Connections — linking AutoAgency to the accounts you already own
This is the fifth chapter, and it's the most technical in the manual. Not because you need to become technical — but because several steps happen outside AutoAgency, inside the Google or Facebook website, or your bank's. When that happens, the text tells you in so many words.
If you don't yet know your way around the system, read the chapter Getting started first.
What a "connection" is, in one sentence
Connecting means giving AutoAgency permission to use an account that is already yours.
You already have a Google account. You already have a Facebook account. Maybe you already have a work WhatsApp, an online store, a payments account. AutoAgency doesn't create any of that for you — it asks for your authorization to look at and work in those accounts, the same way you'd hand the keys to the shop to a trusted employee.
What's safe
- You don't type your password here. For the main connections (Google, Facebook, social networks, and the Kommo import), the system opens the login window of Google/Facebook/Kommo itself, you sign in there and authorize. Your password never passes through AutoAgency. The Kommo import screen says it in these words: "We only read the data — nothing changes there, and your password doesn't pass through here."
- Disconnecting doesn't delete anything on your side. Facebook's confirmation is explicit: "Nothing is deleted on your Facebook — your campaigns and your data are still there." The same goes for Google, for your store, and for your hosting account.
- Every connection can be turned off at any time, by you, without asking anyone. Each section of this chapter ends with How to disconnect.
What needs attention
- Some connections ask for a copied-and-pasted code instead of the authorize button: the online store, Mercado Pago, Hostinger, and Verified WhatsApp. That code is a password. Treat it like a password: don't send it over WhatsApp, don't leave it written on paper on your desk.
- Only the owner or an administrator of the account connects and disconnects. If the buttons look locked to you, that's why. The screens tell you — for example "Only the account owner can connect/disconnect."
- WhatsApp via QR Code has its own privacy rule. It's written in its section, and it's worth reading before you connect.
What's in here
- 1. All connections — the map
- 2. Who sees what
- 3. Google connections
- 4. Meta Ads (Facebook and Instagram)
- 5. Google Ads
- 6. WhatsApp
- 7. Social networks
- 8. Import from Kommo
- 9. Email marketing
- 10. Arcturus Concierge — how the system talks to you
- 11. Voice agent (Íris)
- 12. Online store (E-commerce / Shopify)
- 13. Stripe — getting paid by your customers
- 14. Mercado Pago
- 15. Hostinger — domain, DNS, and professional email
- 16. Conversions API — telling us when the sale closes
- 17. Click protection — simple setup
- 18. Click protection — advanced setup
- 19. Custom protection rules
- 20. Advanced protection panel
- 21. Click reimbursement
- 22. Phone numbers (the former "PhoneTrack")
- 23. Automation (n8n) — you're not the one who connects it
- 24. When the connection drops
1. All connections — the map
Where to find it: full menu → All connections
Address: /app/integracoes
What it's for
It's the screen that answers "what's already connected and what still needs connecting?". Everything in this chapter starts here.
The title says Connect AutoAgency to your business, with the explanation: "The more tools you connect, the more autonomous the agents become."
What you see
At the top, the Overall status: a progress bar and the sentence "X of Y core integrations active", with the percentage in big type on the right.
Heads up: that count only considers the core integrations — the ones that make sense for what you subscribed to. It's not 100% of everything that exists in the system.
Right below, the Arcturus Concierge card, with the New label. It's the setting for how the system talks to you (item 10 in this chapter).
Then, the cards. Each connection is a card with:
| Part of the card | What it means |
|---|---|
| The name and the logo | Which account it is |
| A short sentence under the name | What that connection does for you |
| A colored label | Connected (green), Pending (yellow), or Not connected (gray) |
| A "Next: …" line | What's left to do, or what's already done |
| A link in the corner | Connect (if it isn't yet) or Manage (if it already is) |
At the end, the Explore more integrations drawer. It says, for example, "8 integrations available for other products". These are the connections that aren't part of what you subscribed to. Click to open and see them. This is where the screen ends.
There's no "Coming soon" section on this screen. The system has the design ready for a strip of upcoming integrations, but its list is empty and nothing feeds it: I checked on September 22, 2026, and the strip would only appear if there were items — since there aren't, it's never drawn. If you saw it written somewhere, it was from another time. A new integration shows up directly among the cards, when it arrives.
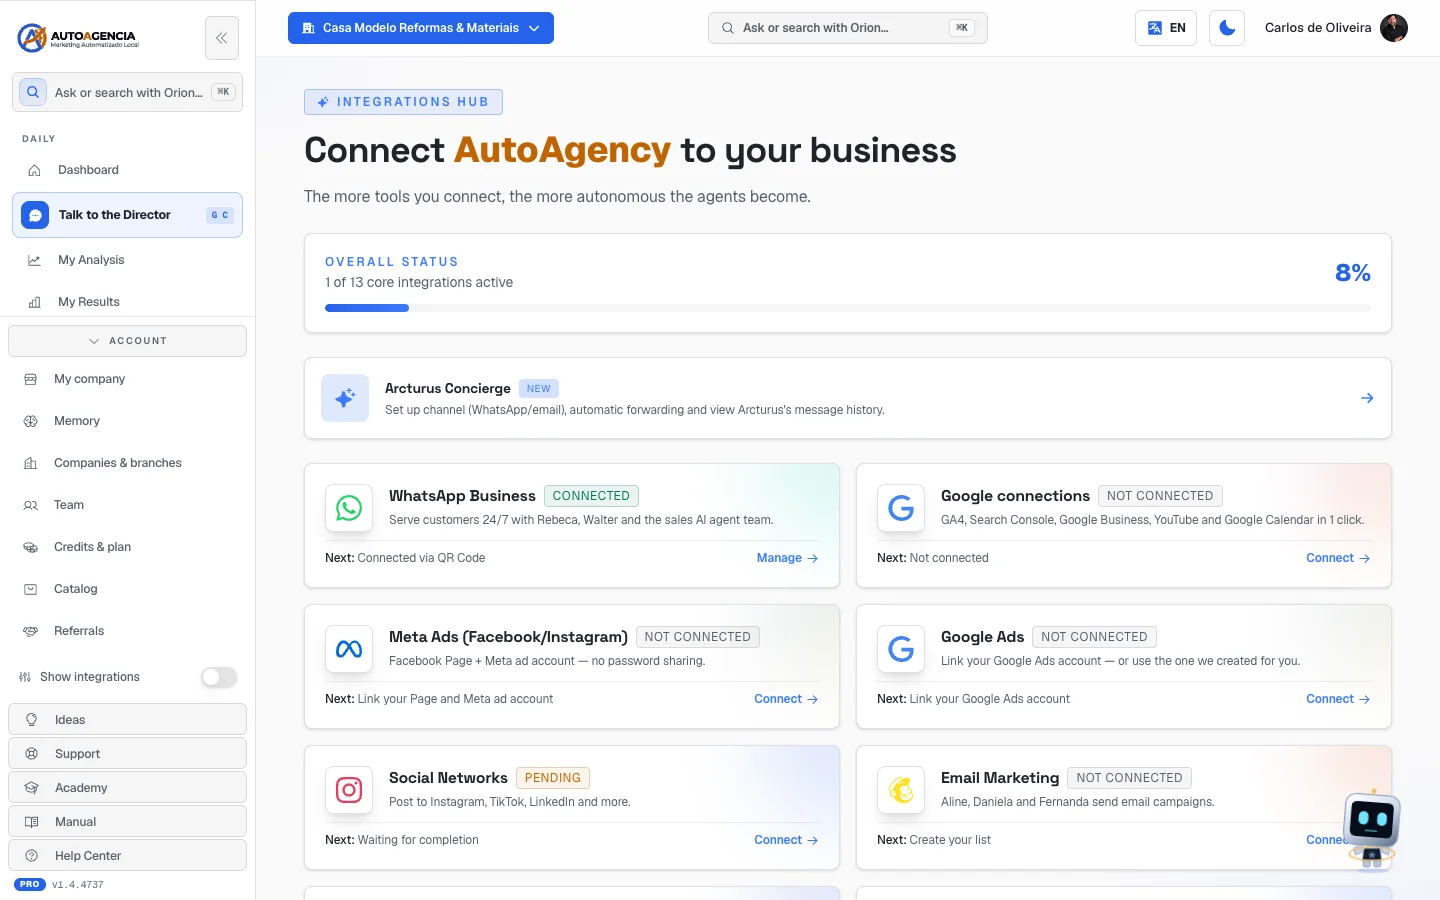 The /app/integracoes screen with the overall status bar at the top and the grid of colored cards below
Step by step — using this screen
- In the full menu, click All connections.
- Look at the labels. Anything that says Not connected or Pending is work to do.
- Click the card. It takes you straight to the screen where that connection is made — sometimes it's a screen of its own, sometimes it's a tab inside a module.
- Come back here afterward to check whether the label turned Connected.
Why does a card sometimes take you inside a module? Because several connections live next to the controls they serve. The Google Ads connection, for example, is inside Traffic Management, next to the spending brake. It's the same place, just with context.
2. Who sees what
Not everyone sees the same list of connections. It's worth understanding why, so you don't go looking for a screen your type of account doesn't show.
The card rule
The All connections screen exists for every account owner — it's in everyone's menu, under the name All connections.
What changes is how many cards stay on top and how many go in the drawer:
| Your case | What happens |
|---|---|
| You're a regular customer, with modules subscribed | On top stay the cards for the connections your modules need, plus any connection you've already turned on. The rest goes to the Explore more integrations drawer |
| You're an agency or administrator account | All the cards stay on top. The drawer doesn't appear |
| The system couldn't read what you subscribed to | It shows everything, for safety. It never hides a connection because of a read failure |
Nothing disappears for good: the Explore more integrations drawer is always still reachable.
The "Show integrations" toggle
At the bottom of the full menu there's a toggle called Show integrations. When it's on, it turns colored (the name stays the same). With the menu collapsed, it becomes an icon, and the tooltip says Show integrations when it's off and Integrations: visible when it's on.
- It only appears for agency accounts and administrators. If you're a regular customer, you won't find it — and nothing is missing from your screen.
- It doesn't turn any connection on or off. What it does is show in the menu the direct shortcuts to connection screens (for example the WhatsApp item), along with other advanced panel items.
- The choice is saved in your browser, not in your account. If you switch computers, or clear the browser, it goes back to off.
In short: a regular customer reaches every connection they care about through the All connections screen or through the corresponding module. The toggle is a shortcut for people who operate many accounts.
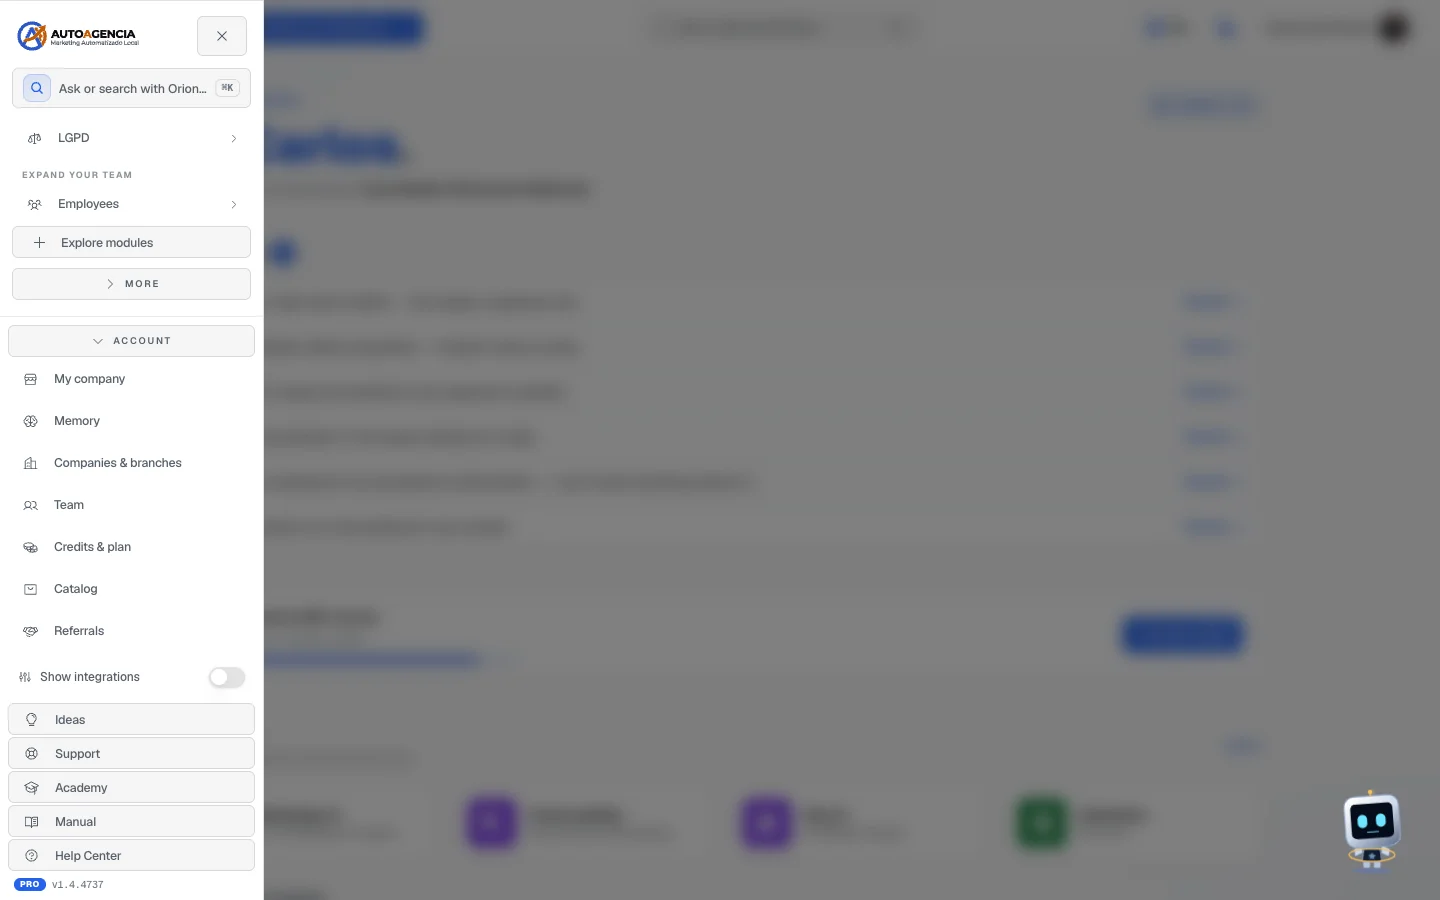 The full menu scrolled to the bottom, with the "Show integrations" toggle turned off
3. Google connections
Where to find it: full menu → All connections → Google connections card
Address: /app/integracoes/google
What it's for
A single authorization that unlocks, all at once, the free Google tools that measure your business:
- Google Analytics (GA4) — how many people visit your site and what they do there.
- Search Console — what people type into Google and end up on your site, for free.
- Google Business Profile — your little listing that shows up on Google Maps and in search.
- YouTube — your channel's numbers, if you have one.
- Tag Manager (GTM) — the "little box" that installs the measurements on your site without having to touch the code.
The screen explains: "Connect a Google account to your company to unlock GA4, Search Console, Google Business Profile and YouTube Analytics for the agents." Each service turns on a different specialist on the team.
What you need to have first
- A Google account (a Gmail, or the company email if it's Google Workspace) — the account that already manages your company's things on Google. If you have a personal account and another for the company, use the company one.
- Be the owner or an administrator of the account here in AutoAgency.
- Your website address filled in under My company (several steps depend on it).
Step by step to connect
- In the full menu, click All connections and then the Google connections card.
- In the 1. Google account section, click Connect with Google.
- Here you leave AutoAgency. Google's own login screen opens. Choose the right account.
- Still on Google, it asks whether you authorize AutoAgency to access each thing. Read it and click allow. If any checkbox comes unchecked, check it — whatever you don't authorize, the system can't read later.
- You come back to the AutoAgency screen on your own, and the notice Google account connected! appears.
- Now the second part: saying which properties to use. In the 2. IDs per product section, click Detect automatically. The button shows "Detecting…" and the system fills in on its own what it found in your account.
- Check the filled-in fields and click Save configuration. The screen confirms "Configuration saved."
Step 6 didn't find anything? The screen says "No accounts found in this Google account" and offers Create what's missing — it creates the Analytics property, the Tag Manager container, and the site in Search Console for you. The warning is honest: "This creates real resources in your Google account."
Step by step — your Google Business Profile listing
If you don't have a listing on Google yet, the screen offers to create one:
- In the Google Business Profile section, read the Your Google profile block.
- Click Create my Google profile.
- The system asks you to confirm the name, with an important warning: "It becomes public on Google Maps and in Search, and Google doesn't let you delete it afterward."
- Once it's created: "Google will confirm the business exists — by phone or postcard. We'll follow up and let you know."
If the system finds that your company already has a listing and it belongs to someone else, it says: "We found '…' on Google, and that profile already has an owner. If the business is yours, ask Google for access — they'll check and transfer it to you." Then the Request access to my profile button appears.
How to tell it worked
- At the top of the screen, the checklist shows green checkmarks on: Google account connected securely (no password sharing), GA4 Property ID, Search Console site address, YouTube Channel ID, and Google Business Profile.
- In section 1, Connected as appears followed by your email, and the line Connected resources: with the list (Google Ads · Google Analytics · Search Console · …).
- On the card on the All connections screen, the label turns green and the line says N services active.
Did it say "Pending" instead of "Connected"? It means the Google account is linked, but no service has been chosen yet. Go back to the 2. IDs per product section and do step 6.
How to disconnect
- On the Google connections screen, 1. Google account section, click Disconnect.
- The system asks: "Disconnect Google account from this company?". Confirm.
- The screen says Google account disconnected.
The IDs you had already saved stay saved — if you reconnect the same account later, you don't have to fill everything in again.
When something goes wrong
| What appears | What it means |
|---|---|
| "The automatic connection to Google Business hasn't been approved by Google yet (we're awaiting approval). Meanwhile, paste the ID manually." | It's not your mistake. Everything else works |
| "This Google connection is turned off in our account. We're already enabling it — try again in a moment." | A failure on our side, already being fixed |
| "This address is not in the connected Google account — search reports will not arrive." | You typed a site that this Google account doesn't manage. Pick one from the list |
| "Google connection is unstable right now" | See item 24 of this chapter |
4. Meta Ads (Facebook and Instagram)
Where to find it: All connections → Meta Ads (Facebook/Instagram) card
Address: /app/integracoes/ads — this address is a shortcut: it takes you straight to
Your apps → LeadAdsPilot → Meta Ads → Settings tab.
If you subscribe to ClickVigil but not to Traffic Management, the same card takes you somewhere else: Your apps → ClickVigil → Ad account tab. It's the same connection, only where it lives changes.
What it's for
Linking your Facebook Page and your Meta ad account to AutoAgency, so the team can create and manage ads on Facebook and Instagram — and, for those who only have the protection, so it can see what the account spends and protect that money.
The screen makes the deal clear:
- With traffic management: "Connect your Facebook account once so I can set up and run your Facebook and Instagram ads."
- With protection only: "Connect your Facebook account once so I can see your ads and protect what you spend on them. I don't touch your campaigns."
What you need to have first
- A personal Facebook account that is an admin of the company's Page.
- An ad account in Meta Business Manager. If you've ever advertised on Facebook or Instagram, you have one.
- Be the owner or an administrator of the account here in AutoAgency.
Step by step to connect (the recommended path)
- Open All connections and click the Meta Ads (Facebook/Instagram) card.
- Find the Connect your Facebook block and click Connect Facebook. The button shows "Opening Facebook…".
- Here you leave AutoAgency. The Facebook screen opens. Sign in with your personal account — the same one that manages the Page.
- Still on Facebook, it lists what you're authorizing and which businesses, Pages, and ad accounts are included. Check the right business and Page and finish.
- You come back to AutoAgency. If you have more than one business, Page, or ad account, the system asks: "I found more than one. Which should I use?" — click the right one in each list (Company, Page, Ad account).
- If anything is left pending, the What's left now block appears with the explanation and the Resolve now button.
Does an account appear crossed out in the list? These are accounts that Meta itself blocked (closed, disabled, unpaid invoice). They stay on the list on purpose, so you don't keep looking for them — but you can't pick them. Resolve the issue in Facebook's Business Manager first.
Step by step — the invite path (when the one above doesn't work)
There's a second path, on the same screen, where you paste the account number and AutoAgency sends an official invite that you accept in the Meta panel. The screen explains: "You paste the ID, AutoAgency sends the official invite and you accept it in the Meta or Google panel."
- Under Facebook Page, paste the numeric ID or the address of your page
(e.g.:
123456789012345orhttps://facebook.com/suaempresa) and click Connect. - Under Meta ad account, paste the account ID (with or without the
act_in front — it's in Ads Manager) and click Connect. The screen confirms "Invite sent." - Click Open invite ↗. Here you leave AutoAgency: Meta's Business Manager opens.
- Inside Facebook, accept the invite.
- Go back to AutoAgency and click I've accepted. The system checks with Meta right away and answers "Done — <name> is connected. We just checked it with Meta."
How to tell it worked
- The block at the top says Facebook connected and shows a summary of what was linked.
- In the checklist, these appear in green: Facebook Page linked and Meta Ads account linked.
- On the card in All connections, the label turns green with N accounts linked.
How to disconnect
- On the same screen, click Disconnect Facebook.
- Read the confirmation — it's specific: "We'll remove our access to your business, your Page and your ad account, and stop receiving your Pages' updates. While disconnected, we can't create or manage your ads. Nothing is deleted on your Facebook — your campaigns and data stay there."
- Confirm.
To turn off just one of the two things, use the Disconnect button on the corresponding row (the Page or the ad account). When you disconnect the ad account, the screen reminds you: "The partnership in your Business Manager stays — to remove it for good, take AutoAgency out under Business settings → Partners." That last step is inside Facebook.
When something goes wrong
| What appears | What it means |
|---|---|
| "Meta hasn't granted us access to this account yet. Open the invite, accept it in Business Manager, then click 'I've accepted' again." | The invite hasn't been accepted yet. Nothing was changed here |
| "Our app is still under Meta review for access to this account." | Waiting on Meta's side. Use the Connect Facebook button right above, which gives direct access, with no invite |
| "We connected …, but Meta reports this ad account is CLOSED." | The account exists, but it doesn't run campaigns. Use another one, or reopen it in Business Manager |
| "We couldn't confirm with Meta right now. Nothing was changed." | Instability. Try again in a few minutes |
| "Only the company's owner or an admin can disconnect an account." | You don't have permission for that |
5. Google Ads
Where to find it: All connections → Google Ads card
Address: /app/integracoes/google-ads — shortcut to Your apps → LeadAdsPilot →
Google Ads → Settings tab → Connection.
What it's for
Putting your Google Ads account under AutoAgency's management, so the team can run and adjust the search campaigns. The card says: "Link your Google Ads account — or use the one we created for you."
What you need to have first
- A Google Ads account. If you've never advertised on Google, you don't need to create one first — the system also creates one for you.
- The account's Customer ID, if it already exists: it's the number in the format
123-456-7890that appears in the top-right corner of the Google Ads screen. - The Google connections already done (item 3), because that's how the system lists your accounts.
Step by step to connect
- Open All connections and click the Google Ads card.
- You land on the Settings tab, on the Connection pill.
- If your Google connections are already set up, the system lists the Google Ads accounts you manage. Choose your company's.
- Didn't show up on the list? Use the manual field: paste the Customer ID in the format
123-456-7890and click Connect. The screen explains: "We'll link it to AutoAgency's MCC." - The screen confirms Invite sent to Google Ads.
- Now you leave AutoAgency. Sign in to Google Ads (
ads.google.com) with the right account. In the notification bell, or under Tools → Access and security, the manager's invite appears. Accept it. - Go back to AutoAgency and click I've accepted.
If the account is already under our management, the system answers directly: "All set — your account is already under our management." There's no step 6.
How to tell it worked
- In the screen's checklist: Google Ads account linked turns green, with the note "Carlos (Google Ads) takes over."
- On the card in All connections, the label turns green: 1 account linked.
- In the Google Ads Dashboard tab inside the module, the numbers start to appear (impressions, clicks, cost, conversions).
How to disconnect
In the same Settings → Connection tab, use the Disconnect button on the account's row. That takes the account out of management here; the campaigns and history stay in your Google Ads.
When something goes wrong
- "Pending" with "1 invite(s) pending" — the invite was sent and nobody has accepted it yet. Step 6 is pending, and it happens inside Google Ads.
- A red message you don't understand — the screen translates Google's errors into plain language. If a technical text shows up anyway, copy it and send it through Talk to the Director.
6. WhatsApp
Where to find it: All connections → WhatsApp Business card. (For agency accounts with
the Show integrations toggle on, there's also a WhatsApp shortcut in the menu.)
Address: /app/integracoes/whatsapp
What it's for
There are two WhatsApp channels here, and they serve different purposes. The screen sums it up: "Use both channels together: Phone WhatsApp, so Ava chats with your customers 24 hours a day, and Verified WhatsApp (Meta's official one), to send campaigns to many contacts at once with message templates approved by Meta."
| Channel | What it's for | What it costs |
|---|---|---|
| Phone WhatsApp (connected via QR Code) | Answering conversation by conversation, 24 hours a day, with the virtual assistant Ava | No cost per message |
| Verified WhatsApp (Meta official) | Sending messages to many contacts at once, with message templates approved by Meta | Whatever Meta charges per message |
You can — and the screen recommends it — keep both turned on at the same time.
6a. Phone WhatsApp — the support
What you need to have first
- A phone with a number dedicated to support. Read the screen's own warning before you decide:
Important — privacy: "connect a DEDICATED support number, never your personal one. Everything this number receives in one-on-one conversations is read, stored in the system, and answered automatically by Ava (AI). The messages you send and those from groups are not read. We don't use your number to send messages to many contacts at once."
- Be the account owner. The screen warns: "Only the account owner or an admin can connect."
Step by step to connect
- Open All connections → WhatsApp Business card.
- Click the Phone WhatsApp — Ava's Support tab.
- The screen asks "How do you want to connect your WhatsApp?". Click Scan QR Code (if you have another device or a computer to read the code). The screen shows "Generating QR…" and the little square appears. If you only have your own phone, choose Connect by code, type the number with area code, and follow the path the screen shows.
- Now go to your phone. Open WhatsApp and go to Settings → Linked devices → Link a device.
- Point the phone's camera at the QR Code on the computer screen. "Pairing is instant."
- Done. The screen shows WhatsApp connected and the linked number.
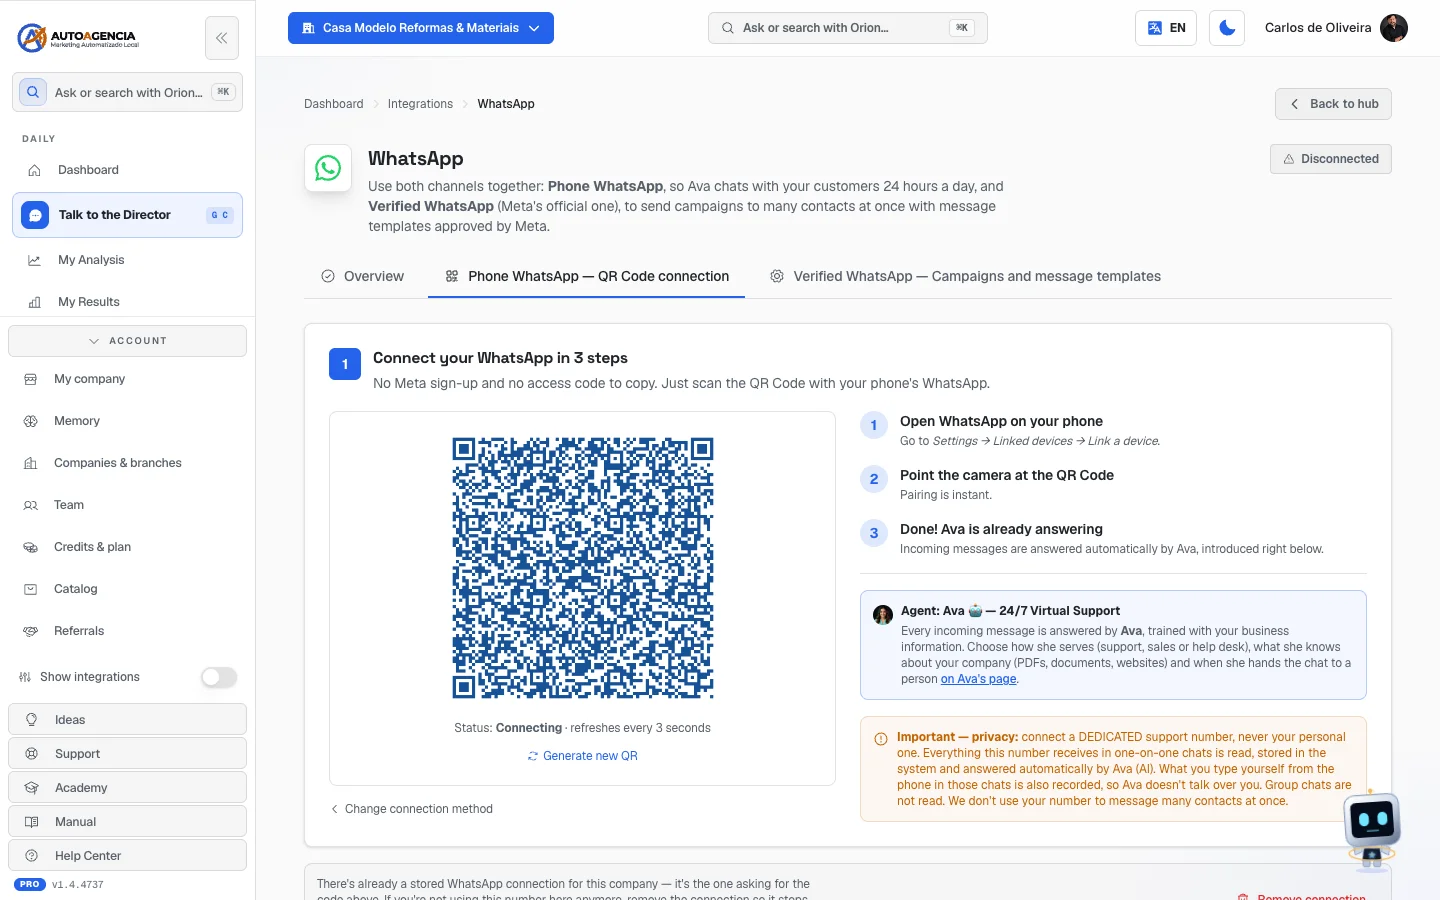 Tab "Phone WhatsApp — Ava's Support" with the QR Code on the screen, the "Connecting" status below it, and the three numbered steps beside it
The QR Code expires quickly. Until you scan it, the screen shows the connection's status (for example "Status: Waiting for QR scan · refreshes every 3 seconds"). If it takes too long, click Generate new QR and scan again.
How to tell it worked
- The tab shows WhatsApp connected, with the number beside it.
- In the Overview, the Phone WhatsApp card gets the Connected label and the line "Connected · <your number>". Before connecting, the same line says "Status: Not connected".
- On the card in All connections, the line says Connected via QR Code.
- A real test: send a message from another phone to the connected number and see whether Ava replies.
How to disconnect
On the same tab, click Disconnect. The screen confirms Disconnected. Your WhatsApp on your phone keeps working normally — all that goes away is AutoAgency's "linked device".
You can also do it from your own phone, under Settings → Linked devices, by disconnecting the session there.
6b. Verified WhatsApp — the campaigns
What you need to have first
You need:
- An official number (not your phone's) to use on Verified WhatsApp.
- A Facebook account with access to your business at Meta.
You don't need to create an app at Meta for Developers or copy any codes: AutoAgency does that for you.
Step by step to connect
- Open the Verified WhatsApp — Campaigns and message templates tab.
- Click Connect with Meta.
- Here you leave AutoAgency. A Meta window opens: sign in with your Facebook, choose the business and the number you'll use, and follow the screens to the end.
- Done: AutoAgency saves the account, the number and the new-messages notice on its own. There is nothing to copy, paste or save.
- Who answers shows right below, based on the product you subscribed to (Ava, if subscribed) — there is nothing to choose or type.
How to tell it worked
- On the tab, the Your official number section shows the Number and the Verified name.
- In the Overview, the Verified WhatsApp (Meta official) card becomes Connected, with the number on the line below.
- On the card in All connections, the line says Verified WhatsApp configured.
How to change the number
On the same tab, click Change the number through Meta and go through the Meta window again with the new number.
How to disconnect
On the same tab, click Disconnect and confirm. The official number stops sending and receiving through AutoAgency; to come back, just connect again through Meta.
Who answers the messages
The screen explains, and it's worth copying here in full:
"Ava answers on both channels — on Phone WhatsApp and also on Verified WhatsApp — whenever her support module is subscribed. Without the module subscribed, incoming messages are recorded, but nobody answers for you."
7. Social networks
Where to find it: All connections → Social Networks card
Address: /app/integracoes/social — shortcut to
Your apps → Social → Connection.
What it's for
Letting the team post for you on Instagram, Facebook, TikTok, LinkedIn, and other networks. The screen says: "Connect Instagram, Facebook, TikTok, LinkedIn and 5 other networks. The specialists Sofia, Vera, and Rafa create and publish content in your name."
What you need to have first
- The login for each network you want to connect — and be an administrator of the company profile there.
- For Instagram: the profile has to be business or creator, and be linked to a Facebook Page. That's Meta's own rule.
Step by step to connect
- Open All connections → Social Networks card.
- In the Connect accounts section, the instruction is direct: "Click a network below — its official login window will open. You can connect several."
- Click the network (for example Connect Instagram).
- Here you leave AutoAgency. The login window of the network itself opens. Sign in and authorize.
- Come back and repeat for the other networks you want.
- Don't skip this step: in the Connected (N) list, check only the accounts that belong to this company. The screen explains why: "Unchecked ones don't receive posts (e.g.: clients' pages that show up because you manage them)."
- Click the button to save the active accounts. The screen confirms "Accounts updated."
How to tell it worked
- The Connected (N) list shows each network with the profile's
@, in green. - On the card in All connections, the line says Connected: instagram, facebook, ….
- The checklist shows At least one network connected with a checkmark. The screen's recommendation is 3+ networks for maximum reach — "Recommended: Instagram, Facebook, LinkedIn."
How to disconnect
In the Connected list, click the account to uncheck it. It appears crossed out and stops receiving posts. To cut the authorization off for good, do it inside the network itself, in the profile's connected-apps area.
When something goes wrong
This is the connection that expires most. See item 24 of this chapter — it was written with it mainly in mind.
8. Import from Kommo
Where to find it: Your apps → SalesFlow (the CRM) → the
Import from Kommo tab
Address: /app/modulos/crm/conexao (the old shortcut /app/integracoes/crm leads there).
What it's for
The CRM is the platform's own — SalesFlow — and it doesn't need any connection: the pipeline works on its own. AutoAgency doesn't create a Kommo account or connect Kommo as a CRM.
This screen exists only for people who used Kommo and want to bring over what they had there: contacts and deals enter your pipeline, just once, each deal at the stage equivalent to the one it had in Kommo. After that you work in SalesFlow; nothing is synced and nothing changes in your Kommo account. The full step by step is in the CRM module manual, in the Import from Kommo section.
Card in All connections: it only appears for a company that already had Kommo connected before. It's called Kommo — import into SalesFlow and leads to this tab.
Step by step — summary
- On the Import from Kommo tab, click Authorize reading Kommo.
- Here you leave AutoAgency. A little window (popup) with the Kommo login opens. Sign in and authorize.
- Close the little window and go back to the tab: "Reading authorized on the … account" appears.
- Click Import now and wait for the done message.
If the browser blocks the little window, allow popups for the AutoAgency site and click again.
How to remove the authorization
Click Remove authorization and confirm. Nothing that already came into SalesFlow is deleted, and your data stays in Kommo — all that goes away is our permission to read your account.
9. Email marketing
Where to find it: All connections → Email Marketing card
Address: /app/integracoes/email — shortcut to
Your apps → Email → Campaigns.
What it's for
Here there's no "third-party account to connect". Email sending runs through our account. What's missing for the card to become Connected is you having a contact list. That's why the card's line simply says Create your list.
What you need to have first
A list of customer emails — in a spreadsheet (CSV), or already registered in My contacts.
Step by step
- Create the list in My contacts (full menu → More drawer → My contacts, or the Lists tab of the Sites app). The full step by step is in item 10 of the chapter Day to day.
- Go back to All connections. The card now shows the list's name and how many contacts it has: "<list name> — N contacts".
How to tell it worked
The Email Marketing card turns green with your list's name and the count.
How to disconnect
Doesn't apply — there's no authorization to remove. To stop using it, delete or empty the list in My contacts.
The module's full manual is at Email Marketing.
10. Arcturus Concierge — how the system talks to you
Where to find it: All connections → the featured card at the top, with the New label
Address: /app/integracoes/concierge — shortcut to
Your apps → Elisa → Concierge.
What it's for
Deciding how the system notifies you when something needs your attention: WhatsApp, email, or both. The screen sums it up: "How Arcturus talks to you: channel, contacts and automatic forwarding."
What you need to have first
Just your phone and your email. No third-party account.
Step by step
-
Open the Arcturus Concierge card.
-
Under Preferred channel, choose one of the four options:
Option What it does WhatsApp first "Sends via WhatsApp. Forwards to email on failure (if forwarding is on)." Parallel "Sends to both channels simultaneously." WhatsApp only "Never sends email." Email only "Ignores WhatsApp." -
Turn Automatically forward to email if WhatsApp fails on or off.
-
Under Contacts, fill in the Phone (WhatsApp) and the Email. The phone goes in international format (e.g.:
5511999999999); the country code comes from the selector beside it. -
Click Save configuration. The screen confirms "Configuration saved."
How to tell it worked
- Go to the Test send section.
- Choose a Message template and click Send test.
- The screen answers by saying what went out on each channel — for example "Test sent — WhatsApp: ok · Email: ok". If forwarding kicked in, the message ends with "(forwarded)".
- Check on your phone and in your inbox.
Further down is the Message history, with everything that has already been sent. When it's empty, it says "No messages sent yet."
How to disconnect
Choose Email only to silence WhatsApp, or WhatsApp only to silence email, and save.
11. Voice agent (Íris)
Where to find it: All connections → Voice Agent (Íris) card
Address: /app/integracoes/voz — shortcut to
Your apps → Phone AI → Settings.
What it's for
An agent that speaks, 24 hours a day, on your site and on the phone. The card says: "24/7 voice support on your site and by phone, with your brand's voice."
This screen is part of a paid module. Without it subscribed, the system shows the invitation to subscribe instead of the setup.
What you need to have first
- The module subscribed.
- Your website address (Íris learns about your business by reading your site).
- Your brand registered, because the voice and the way of speaking come from it.
Step by step to connect
The screen is a list of three steps, and each one has its own button:
- Create Íris — click Create. The system creates the agent with a voice in Portuguese and your brand's personality.
- Train on website content — paste your website address into the field and click Sync. "Íris starts answering about the business."
- Enable in-call actions — click Register. This "lets Íris capture a lead, schedule a callback, and transfer to a human during the call."
After all three, the Embed Íris on your site section and the Voice and language settings appear.
How to tell it worked
- The three steps get a checkmark.
- On the card in All connections, the label turns green.
- The This month's usage block appears with the minutes used, and the line Connected numbers: when a phone is connected.
While the label says Pending, it means the module is subscribed but the steps haven't been completed — or the system is still finishing creating the agent.
How to disconnect
There's no "disconnect" button on this screen: what exists is canceling the module, under My Subscriptions (chapter 4). While it's active, the three steps can be redone (step 1 becomes Refresh).
When something goes wrong
If a step fails, This step didn't complete appears in red with the reason right below it. Repeat the step; if it keeps happening, describe the problem in Talk to the Director.
12. Online store (E-commerce / Shopify)
Where to find it: All connections → your store's card (the name changes depending on the platform)
Address: /app/integracoes/shopify — shortcut to
Your apps → E-commerce → Store.
What it's for
Letting the team take care of the products, orders, and coupons of your online store. The card says: "Connect the store you already have (or have us build one) and the team takes over products, orders and coupons."
The card changes name and color depending on your store's platform. If your store was created here, it appears as AutoAgency store, with the storefront icon and AutoAgency's colors. If you connected a Shopify, Shopify store appears, in green. It's not an error. The technical name WooCommerce, which runs underneath the AutoAgency store, only appears inside Bling — see the manual for the E-commerce module.
Two paths
On the Store tab there are two blocks:
- Create my store — the system builds the store ready to sell, with catalog, payment, shipping, and the mandatory pages. You just add the products. It's a one-time charge, and the price appears right away.
- I already have a store — "Already selling on another platform? Connect your store and the team will take it from there."
The step by step below is for the second path.
What you need to have first
- A Shopify store that's live.
- Be an administrator of it.
- Two pieces of information that you get inside the Shopify panel: the store's internal address and an access code.
Step by step to connect
- Open Your apps → E-commerce → Store and click Connect my Shopify store.
- The screen shows the How to get the access code (takes 2 minutes) block. The next four
steps happen inside the Shopify panel:
- Open Settings → Apps and sales channels.
- Click Develop apps and then Create an app. You can name it AutoAgency.
- Under Configure Admin API scopes, check: read products, read orders, and create
discounts (
read_products,read_orders,write_discounts). - Click Install app and then Reveal token once — copy the code
that starts with
shpat_.
- Back in AutoAgency, fill in:
- Your store's internal address — "It's the address ending in .myshopify.com (not your website domain)."
- Store access code — the
shpat_…you just copied.
- Click Connect my store.
The name "Reveal token once" is literal: Shopify shows that code only once. If you close the screen without copying it, you'll have to generate another.
How to tell it worked
- The screen confirms Store connected: <store name>.
- The Store details block appears with name, address, platform, currency, and the status Connected.
- On the card in All connections, the line says Store: <address>.
Pending label with "Store being set up — connection not finished"? The store was created but the last step didn't close. Go back to the Store tab and finish it.
How to disconnect
- On the Store tab, click Disconnect.
- Read the confirmation: "Disconnect the store from the panel? Your store stays online — the team simply stops running it."
- Confirm.
13. Stripe — getting paid by your customers
Where to find it: All connections → Stripe Connect — Payments card
Address: /app/integracoes/stripe
What it's for
Generating payment links to send to your customers by WhatsApp, email, or social media. The money goes straight into your Stripe account. The screen explains: "Receive payments from your customers straight into your Stripe account. AutoAgency automatically charges a platform fee on each charge. Available to any company — agencies, local commerce, service providers."
Don't confuse it with your AutoAgency subscription. This is for you to charge your customers, not for paying us.
What you need to have first
- Be the owner or an administrator of the account. The screen warns: "Ask the workspace owner/admin to connect Stripe."
- Your company's documents or your personal details, and a bank account — the signup is done on Stripe's site and it asks for these.
Step by step to connect
- Open All connections → Stripe Connect — Payments card.
- Click Connect now.
- Here you leave AutoAgency. The browser opens Stripe's own signup. Fill in the company's details, your details, and the bank account where the money will land.
- When you finish, Stripe sends you back to AutoAgency on its own.
- If anything is still pending, the button now shows Continue setup — click it and finish.
How to tell it worked
At the top of the screen Account connected and active appears, and right below it a box with four lines:
| Line | What it means |
|---|---|
| Account | Your account's code on Stripe |
| Country | Where the account was opened |
| Charge | Enabled = you can already generate links |
| Payout | Enabled = the money can already go out to your bank |
If either says Pending, Stripe is still checking something. Click Refresh to reread the status.
Step by step — generating a payment link
- With the account active, go to Generate payment link.
- Fill in Amount (R$) and Description (required). Customer name and Customer email are optional.
- Click Create payment link.
- The link is created and already copied for you to paste wherever you like. The screen confirms by saying which fee was applied.
- The links are listed under Recent links, with date, description, amount, customer, and status (Active, Paid, Canceled, Expired). Each row has Copy link, Open, and Deactivate.
The fee
There's an AutoAgency fee (%) field, with the explanation: "Automatically deducted from each charge you generate." You can adjust it between 0 and 20% and click Save. Outside that range, the screen rejects it with "Invalid value (0–20%)."
How to disconnect
There's no Disconnect button on this screen — and there isn't one on any other. I checked on September 22, 2026: the system has 8 actions for your Stripe account (connect, refresh the status, open the dashboard, create and deactivate a payment link, adjust the fee), and none of them undoes the connection — not from here, not through support, not through AutoAgency's internal area.
Removal really is only on Stripe's side. Click Stripe dashboard, which opens your account on their site — it's in there, in the connected-apps area, that you remove AutoAgency's authorization. Here, what you can do is Deactivate each payment link, one by one, to stop receiving through them.
14. Mercado Pago
Where to find it: All connections → Mercado Pago card
Address: /app/integracoes/mercadopago
What it's for
Receiving bookings and charges straight into your Mercado Pago account. The screen says: "Receive bookings and charges straight into your Mercado Pago account — the preferred option in Brazil and Chile." When someone pays, the booking is confirmed on its own.
What you need to have first
- A Mercado Pago account.
- Be the owner or an administrator of the account here. The screen warns: "Ask a workspace admin to connect the account."
- Two credentials that are in Mercado Pago's developer panel: the Access Token (required) and the Public Key (optional).
Step by step to connect
-
Open All connections → Mercado Pago card.
-
Click Open Mercado Pago panel. Here you leave AutoAgency — the site
mercadopago.com/developers/panel/appopens. -
Inside Mercado Pago, follow the screen's guidance: "open 'Your integrations', create (or open) an application and copy the production credentials."
The word production is the one that matters. Mercado Pago also offers test credentials — with those, no real payment happens.
-
Go back to AutoAgency and paste the Access Token into the field (it starts with
APP_USR-). -
If you like, paste the Public Key too.
-
Click Connect. The button shows "Validating…" while Mercado Pago checks the code.
How to tell it worked
- The screen shows Account connected, with the country beside it (Brazil, Chile, Argentina…).
- This sentence appears: "Payment links for your bookings will be created in this account, and an approved payment confirms the booking automatically."
- On the card in All connections, the line says Account connected.
If the code is wrong, the screen warns: "Mercado Pago rejected the token."
How to disconnect
- Click Disconnect.
- Read the confirmation — it's important: "Disconnect Mercado Pago? Existing payment links keep working, but new links and automatic confirmations will stop."
- Confirm. The screen says Account disconnected.
15. Hostinger — domain, DNS, and professional email
Where to find it: All connections → Hostinger — Digital Presence card
Address: /app/integracoes/hostinger — shortcut to
Your apps → Presence → Connection.
What it's for
It's your site's engine room: buying a domain, setting up DNS, creating professional emails
(voce@suaempresa.com.br), and hosting the site. The one who does this is Téo, the
infrastructure specialist.
You don't need to connect anything for this to work. By default, Téo works on AutoAgency's account, and the screen tells you what that means: "Téo operates on the platform's managed account on your behalf — domain, email and hosting costs will be passed through on your next invoice."
Connecting your own Hostinger account is for: using your own credentials and receiving the charges directly on your Hostinger, instead of them coming on the AutoAgency invoice.
What you need to have first
- A Hostinger account of your own.
- An API token generated in its panel.
Step by step to connect
- Open Your apps → Presence → Connection.
- Find the Connect my Hostinger account section.
- Here you leave AutoAgency. Follow the path the screen indicates: hpanel.hostinger.com → Account → API and generate a token.
- Come back and paste the token into the field.
- Submit the form. The screen confirms Hostinger account connected: <account name>.
If the token is too short, the screen rejects it right away: "Token too short — check it in the Hostinger panel."
How to tell it worked
- The screen now shows Your account in place of AutoAgency.
- This sentence appears: "Téo operates on this account. All purchases and changes are billed directly to your Hostinger."
- On the card in All connections, the label turns green.
How to swap the token
If you needed to generate a new token, the section changes its name to Swap token / reconnect. Click Show token swap form, paste the new one, and submit.
How to disconnect
- Click Disconnect.
- Read the confirmation: "Téo will go back to operating in the shared AutoAgency environment. Domains and sites already registered on your account stay intact — only the integration with the platform is removed."
- Confirm.
16. Conversions API — telling us when the sale closes
Where to find it: All connections → Conversions API card
Address: /app/integracoes/conversoes — shortcut to
Your apps → LeadAdsPilot → Google Ads → Settings tab.
The shortcut opens straight on the right pill. You land on the Settings tab, already on the Conversions API pill. Until September 22, 2026 it left you on the Connection pill and you had to click the one next to it — the address even loaded the request, but the screen dropped it along the way. Fixed: the same fix put two other links in the product back on course, the "Tag Manager code on the site" and the "Connect Google (Tag Manager)", which also landed on the wrong pill.
What it's for
Telling AutoAgency back when a contact became a real sale. The screen explains: "Tells AutoAgency when a sale closes in your CRM. This trains click protection and improves campaign performance."
In practice: Google learns to look for more people like those who bought, and click protection learns to tell a good contact from one that's thrown away.
What you need to have first
- A CRM or system of yours that knows how to notify another system when a sale closes. That's the job of whoever looks after your system, not yours.
If you don't have someone technical, you don't need to open this screen. Mark sales by hand in My Results → Your contacts — the effect on learning is the same. See item 6 of the chapter Day to day.
Step by step
- Open the Conversions API card and, on the module's screen, click the Conversions API pill.
- Under Your API key, click generate. The screen confirms "Key generated."
- Copy the key with the copy button beside it. Treat it like a password — the screen itself says so: "Use this key in your CRM to confirm sales. Treat it like a password."
- The screen also shows a ready-made example of how your system should send the notice. Send that entire block to whoever looks after your system. It's not for you to run anything.
How to tell it worked
- The screen shows the key (masked, with dots) and the connected label.
- On the card in All connections, the line says Key active.
- The real proof: as soon as your CRM sends the first sale, it shows up in the reports.
How to disconnect
There's no "disconnect". What exists is generating a new key, which invalidates the old one instantly — and then your CRM can't send notices until you update the key there. Only do this if the key leaked, and tell whoever looks after your system first.
17. Click protection — simple setup
Where to find it: Your apps → ClickVigil → Settings
Address: /app/integracoes/click-protection and /app/click-protection — both are old
shortcuts that lead there.
What it's for
Adjusting how strict the system should be when blocking fake clicks on your ads, and saying where your service area is. This is the version for you: few options, in plain language.
It's part of a paid module. Without it subscribed, the system shows the invitation to subscribe.
What you need to have first
- The module subscribed.
- Know which cities you actually serve.
Step by step
-
Open Your apps → ClickVigil → Settings.
-
Choose the protection level. There are four:
Level What the screen says Light "Blocks only the obvious (server bots). Almost no risk of blocking a real customer. Good to start with." Balanced "The sweet spot for most: blocks bots, Tor and proxies, and avoids paying for VPN clicks — without blocking real customers." Smart "Adds detection of coordinated bots (many machines together) and of who clicks a lot and never becomes a customer. Recommended with heavier traffic." Extreme "Maximum hardness: blocks even VPN and residential proxy on the spot. May block a rare corporate-network customer — use under heavy attack." -
Enter the service cities and the radius in kilometers.
-
Adjust the notices and the automatic pause, if you like.
-
Save.
How to tell it worked
The setting takes effect from the moment you save. The result appears in the module's Dashboard tab and in My Results → Your peace of mind, on the Fake-click protection line.
The module's full manual is at Click Fraud Blocking (ClickVigil).
18. Click protection — advanced setup
Where to find it: Your apps → ClickVigil → Settings, in the link
Advanced settings and custom rules →, at the end of the settings box.
Address: /app/integracoes/antifraud
There's a second path, for those who also have Traffic Management: Your apps → LeadAdsPilot → Overview, in the Your connections block, on the Click protection card, Configure button. It was the only one until September 22, 2026 — anyone subscribed only to ClickVigil had no path at all to this screen, and it isn't in the menu. That's why the link was born inside the module itself.
What it's for
It's the same protection as item 17, with all the buttons in view — including the ones that touch your site's address and your Google Ads account.
Read this before continuing: this screen changes real things, outside AutoAgency. If you don't know what a DNS is, you don't need this screen. Use the one in item 17, or ask in Talk to the Director — a specialist does it for you. Nothing here is required for the protection to work at a basic level.
What the screen has, from top to bottom
- Protection setup (step by step) — a checklist of what's already ready and what's missing. The orange items are the ones waiting on you.
- Protection level — the same four as in item 17, but worded differently: here the first is called Low (in item 17 it's Light) and the texts are shorter — "Blocks only the obvious (datacenter/Tor). Zero risk of blocking a customer.", "Recommended. Stops future clicks from suspicious proxy/VPN without blocking anyone now.", "Best protection for the cost. Correlates the same bot across many IPs (evolving)." and "Maximum protection. Blocks high-risk proxy/VPN clicks.", the latter with the warning "May block a rare lead on a VPN.". It's the same setting — choosing here or there comes to the same thing.
- Service cities and Radius (km) — where you serve. The warning is clear: "No cities defined. Without cities, the geographic filter stays inactive."
- Clicks per visitor cap — "Blocks the same visitor clicking your ad too many times within the time window. 0 = off."
- Paid clicks per visitor (stops the ad) — the screen's explanation is worth copying: "How many ad clicks the same visitor can make before you stop paying for them. Past the limit, they stop seeing your paid ad — but can still reach the site via Google search or a direct link. Great for expensive keywords: a real customer clicks once and gets in touch. 0 = unlimited." The default is 2 (it cuts off the third click).
- Google IP cache (days) — a technical setting. Don't touch it without guidance.
- The Save button.
- Premium Protection (Fingerprint Pro) — an optional connection to an external bot-detection service.
- Domain-level traffic protection (advanced) — the protected domains.
- DNS configuration — to connect your domain to the protection.
- Enable protection on the Google Ads account — the step that makes all the ads' traffic go through the filter.
Step by step — enabling protection on the Google Ads account
This is the step that delivers results. The screen explains: "Applies the protection redirect directly on your Google Ads account (tracking template), routing all ad traffic through our filtering before reaching the site. Preview before applying — this action changes the real account."
- Click Preview. The system shows what it's going to do, without doing anything yet.
- If everything looks right, click Apply. The system asks for confirmation.
- The answer is one of these two:
- "Protection enabled on the Google Ads account (verified)." — done.
- "Protection applied. Awaiting Google verification." — it was applied, Google is still checking.
- To undo, click Revert. The screen confirms "Tracking template reverted on the Google Ads account."
If the Apply button is dimmed, it's because the preview didn't pass. The reason appears in red right below.
Step by step — managed DNS (the recommended path)
- In the DNS configuration section, click Use managed DNS.
- The system shows a list of server addresses and the instruction: "Go to registro.br → your domain → Change DNS servers (DNS) → replace them with the servers below."
- Copy each address with the copy button beside it.
- Here you leave AutoAgency. Go to
registro.br(or to the site where your domain is registered), open your domain, and paste the addresses in place of the ones that were there. - Come back and click Check delegation.
Until step 4 is done, the screen shows the label Awaiting your update on Registro.br. After that, it turns into Delegated — we handle the rest.
There's also the Advanced setup / agencies drawer, with a CNAME record for those who want to keep the site on its current hosting, without changing the servers. The screen explains: "add this CNAME record on the DNS where your domain lives today, without changing the nameservers." That path is for whoever looks after your site.
How to tell it worked
- The checklist at the top turns all green.
- In the DNS section, the label says Delegated — we handle the rest.
- In the protected domains, each row shows active (green) instead of awaiting DNS (orange).
How to disconnect
- On the Google Ads account: Revert button.
- On a protected domain: Remove button on its row.
- On premium protection: uncheck Enable premium protection and click Save premium.
19. Custom protection rules
Where to find it: on the screen from item 18, in the Custom rules → link, at the top. There's no menu
item for it, and that's on purpose: it's the continuation of the advanced setup, and you get there
by the same path — Your apps → ClickVigil → Settings → Advanced settings and
custom rules → → Custom rules →.
Address: /app/integracoes/antifraud-rules
What it's for
Creating rules of your own, on top of the automatic protection. The screen explains: "Create your own rules: IF the conditions match, THEN the action is applied. Rules run alongside the automatic protection."
Practical example: block anyone who clicks more than 5 times in 10 minutes coming from outside the country.
What you need to have first
Nothing besides the module. But you need to have a concrete reason — a badly written rule blocks real customers.
Step by step
-
Click New rule.
-
Give it a Rule name and choose the Priority (lower number runs first).
-
In the IF (all conditions) block, build the condition by choosing:
- the what: Risk score (0-100), Clicks in window, Is VPN/proxy, Is blocklisted, Outside target city, No conversion, Source country, Keyword, Referrer host, Page views, Time on page (ms);
- the comparison: equals, not equals, is true, is false, contains, not contains, in list, not in list;
- the value.
-
Need more than one condition? Click Add condition. They add up — all of them have to match.
-
In the THEN block, choose the action:
Action What it does Block Blocks the click Challenge (CAPTCHA) Asks the person to prove they're not a robot Allow (whitelist) Always lets through — use it so you don't block people you know Flag only Blocks nothing, only records. Start here to test a new rule -
Leave the Active switch on and click Save rule. The screen confirms "Rule saved."
How to tell it worked
The rule appears on the list with the active label, the condition count, and the priority. If you used Flag only, watch the dashboard for a few days before switching to Block.
How to turn off a rule
Open the rule under Edit and turn off the Active switch. It stays on the list marked off, without being deleted.
When there are no rules, the screen says No rules yet, with the explanation: "Rules define when a click gets blocked before it costs budget."
20. Advanced protection dashboard
Where to find it: Your apps → ClickVigil → Dashboard, on the
Open advanced dashboard → button
Address: /app/antifraud
What it's for
It's not a screen for connecting anything — it's the screen for seeing the result, in the full version. The invitation in the module sums it up: "Want the full dashboard? Per-attacker dossier (PDF/spreadsheet evidence for refunds and lawyers), manual unblock and site protection."
What you see
From top to bottom:
- At the top, the title Click Fraud Blocking (ClickVigil) and, below it, the current Protection level — with the same name you chose in the module's Settings tab (Light, Balanced, Smart, or Extreme) — and the configured cities (or "no city configured"). While the protection is in observation mode, one more sentence appears explaining that it's still detecting and learning.
- Four numbers for the last 7 days: Blocked (7d), Challenged (7d), Allowed (7d), and Total evaluated (7d).
- Blocked at the front door — how many robots were blocked in the last 7 days before your page even opened. This applies even in observation mode. When there are blocked ones, the box separates how many were server robots and how many were on the repeat-offenders list.
- Who is attacking you — the people blocked for clicking your ads and disappearing, more than once. Each row shows the full number (or "Withheld number"), whether it came by call or WhatsApp and, when available, the device, the searched word, the city, and the time of the click. Each one has the buttons Message on WhatsApp (when the number is known), It was a mistake, Download dossier, and Spreadsheet. With the list filled in, the general buttons appear above it, with the label Evidence for a lawyer: — Download full report and Spreadsheet. With nobody on the list, the screen says No repeat offenders yet and notes that anyone who clicks and disappears more than once appears there, with the number and the click's details.
- Your protected sites — where you turn on the protection on each of your sites and, in a separate step, turn on the real blocking of clicks.
- Block slots in Google Ads — how many internet addresses (IPs) of fraudsters are blocked on your Google ads right now, out of a maximum limit, and how many are waiting for a slot. When the list fills up, the blocks older than the period shown in the sentence (in days) go out first to make room for the new ones.
- Why we blocked (7 days) — the most common reasons for the blocks. It only appears when there was blocking during the week.
What you can do
- Unblock a number that was blocked by mistake. Click It was a mistake on the person's row. The system asks "Unblock this number?" first.
- Message on WhatsApp the person who called, straight from the list.
- Download the evidence to ask Google for a refund or take to a lawyer.
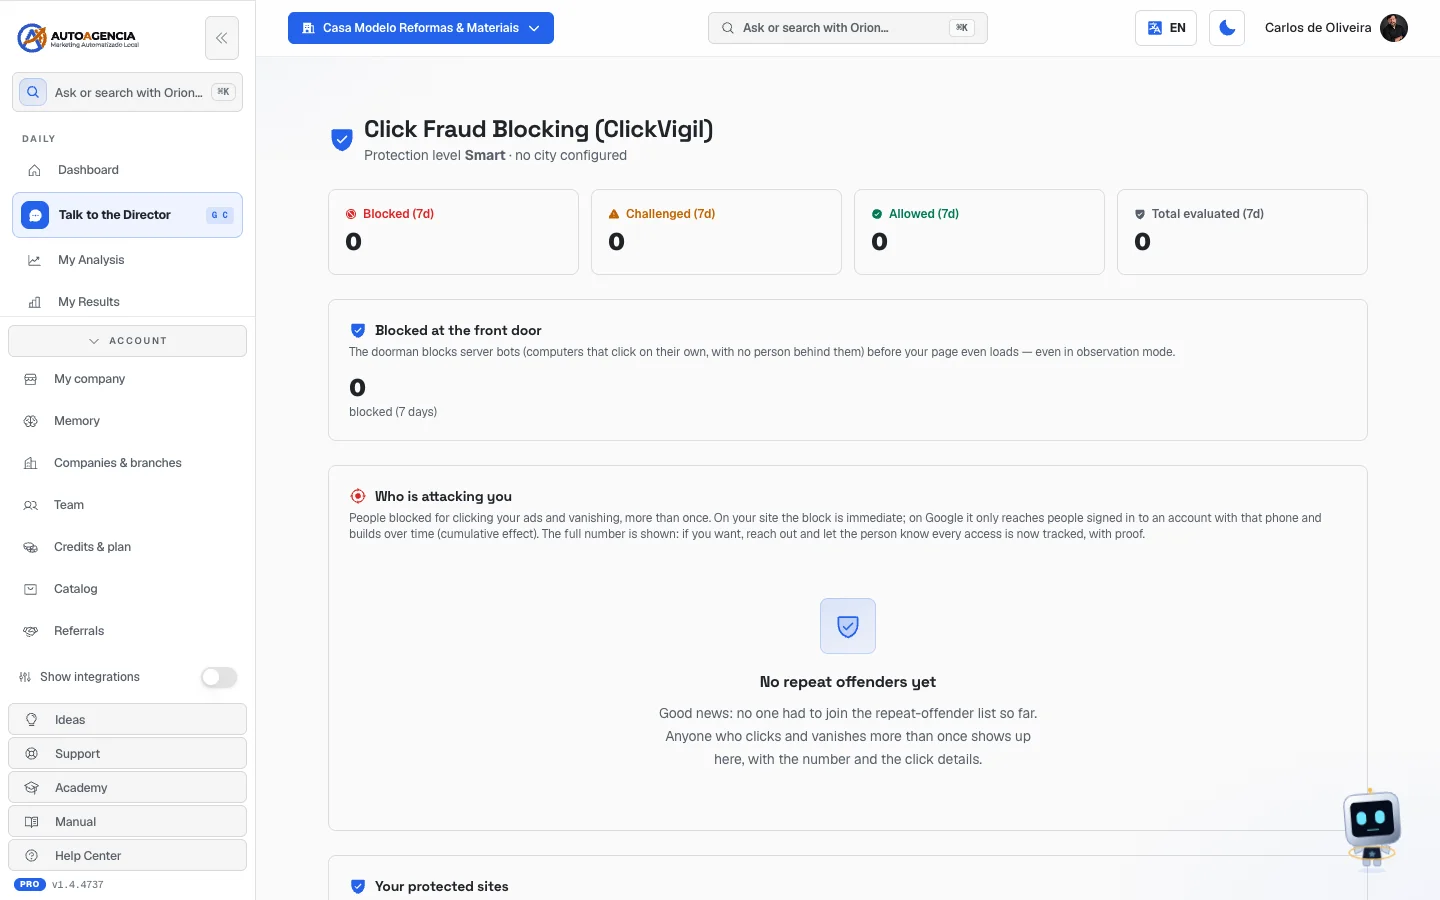 The /app/antifraud screen with the title "Click Fraud Blocking (ClickVigil)", the four numbers at the top, the "Blocked at the front door" box, and the "Who is attacking you" list, still empty in this example company
21. Click reimbursement
Where to find it: All connections → Click Reimbursement card
Address: /app/integracoes/ressarcimento — shortcut to
Your apps → ClickVigil → Reports.
What it's for
Getting back the money you paid for fake clicks. The card explains: "Monthly forensic report + assisted dispute with Google."
It's not a new connection: it's the use of the data the protection has already gathered.
What you need to have first
- ClickVigil subscribed and running for at least a few days.
- The Google Ads account connected — without it, the system still shows the suspicious clicks, but warns "value unavailable (connect your Google Ads account)", because it doesn't know how much each click cost.
Step by step
- Open the Click Reimbursement card.
- Choose the dates in the From and Up to fields. The screen notes that it can be done right away: "Pick the dates and generate the report right now — no need to wait for the 1st. Useful to dispute immediately."
- Click Generate report.
- The system shows how many suspicious clicks it found in the period and the Estimated waste.
- Download the report.
- Here you leave AutoAgency. At Google, the request is made through a public form — the system already hands you the text ready in English for you to paste. At Meta, the path is different, and the screen indicates which.
How to follow up
Each request gets a status:
| Status | What it means |
|---|---|
| Ready to dispute | The report is ready, the request hasn't been made yet |
| Dispute in progress | The request was sent and is being reviewed |
| Approved (refunded) | It worked — the money came back |
| Denied by Google | The request was rejected |
On the card in All connections, the label follows along: Pending when there's a request in progress, Connected when one has already been approved.
If you request the same period again, the screen warns: "This period's clicks were already submitted to Google in another request — there is nothing to download here."
22. Phone numbers (the former "PhoneTrack")
Address: /app/integracoes/phonetrack — shortcut to
Your apps → OmniLeadTrace → Settings → Numbers tab.
There's no PhoneTrack account to connect. That was an old external provider. Today call tracking is done with AutoAgency's own numbers, and we're the ones who take care of activating them. The address keeps working only so as not to break old links.
What you find there is the list of your tracking numbers, each with:
- the channel it belongs to (Primary, Google Ads, Meta Ads, Google Business Profile, Landing Pages, Website);
- the status — Active and working (green) or Activating — we handle everything for you (yellow);
- the Check now and Run test now buttons.
The test makes the system call you: "Test call started — answer on your phone."
The full manual is at Contact Tracking.
23. Automation (n8n) — you're not the one who connects it
Address: /app/integracoes/n8n — shortcut to
Your apps → Automation → Flows.
There's nothing to connect here. The automation engine runs on AutoAgency's account; you don't need an account, login, or code. The address exists only so as not to break old links.
What you see on the Flows tab is the list of your automations, each marked as On or Off. When there are none, the screen says You don't have any active automations yet and explains: "An automation is work that runs on its own — billing, alerts, follow-ups — with nobody having to remember."
To create one, there are two paths, which the screen itself suggests:
- "Turn on a ready-made recipe in the Gallery tab";
- "Or describe a repetitive task to Leo — he builds it and turns it on for you" (through Talk to the Director).
Automations trigger actions on your WhatsApp and your CRM. That's why anyone who subscribes to Automation sees those two cards as primary in All connections — that's where the real connection is made.
24. When the connection drops
This section is the most important in the chapter. Read it even if you skip the others.
Why a connection expires
When you authorize AutoAgency on an account of yours, that authorization has an expiration date. That's the platforms' rule, not ours — and it exists precisely for your security: a permission that lasts forever is a door that stays open forever.
Meta (Facebook, Instagram) is the strictest. Its authorizations expire on their own, from time to time, and also drop when:
- you change your Facebook password;
- you log out of all devices ("Log out of all sessions");
- someone removes AutoAgency from the app list, inside Facebook;
- Meta disables or locks the ad account or the Page;
- you stop being an administrator of the Page.
Google usually lasts longer, but drops for the same reasons: password changed, authorization revoked, account removed.
The practical consequence is always the same: while the connection is down, that piece stops working. Posts don't go out, numbers don't arrive, ads aren't adjusted. Nothing is deleted — it just stays paused. That's why the notice can't be ignored.
What notice appears
On social networks
In Your apps → Social → Connection, in the Connected list, a network in yellow, with one of these marks beside the name:
- · expiring soon — the connection expires in the next few days. It still works.
- · connection expired — it already dropped. It no longer works.
And, above the list, the notice in yellow:
"The networks marked in amber lost their authorization. Click “Reconnect” on the network — anything sent to it until then may not go out."
Beside each network like that appears the Reconnect button.
The system is careful with that alarm: networks that renew themselves don't become a notice, and a network that posted successfully after the declared deadline doesn't either. If the yellow appeared, it's because there's something to do.
📷 This screen has no photo — when a social network's authorization expires, it appears in yellow in the "Connected" list, marked "connection expired", with the Reconnect button beside it.
On Facebook / Meta Ads
The block at the top stops saying Facebook connected, and the main button becomes Reconnect Facebook. On the card in All connections, the label drops from Connected to Pending or Not connected.
On Google
A yellow banner appears with the title Google connection is unstable right now and the text:
"Your account is still connected, but I couldn't reach Google at this moment — it may be a passing glitch. If this keeps showing for more than a few minutes, click Reconnect. Nothing was disconnected."
Read the last sentence calmly: this notice does not mean you've lost the connection. It means Google didn't respond just now. Give it a few minutes before touching anything.
Does the system notify me on its own, or do I need to look?
That's the question that decides whether you find out about the problem from the panel or from the customer who wasn't served. The answer, checked on September 22, 2026, is different for each platform:
| Platform | Does someone come to you? |
|---|---|
| Google Ads | Yes. Once a day the system examines your account and, if it isn't in a condition to serve ads — no account linked, inactive account, billing missing or pending, account ready but with no owner —, it opens a request for you in Support, explaining what happened and what to do. You can reply right there. The same state doesn't become a new request before 7 days, so it doesn't turn into a daily nag |
| Social networks | Yes, on the screen itself: the yellow and the "expiring soon" / "connection expired" marks described above |
| Meta (Facebook / Instagram) | No. There's no automatic notice when Meta's authorization drops. The only sign is on the screen: the button becomes Reconnect Facebook and the label leaves green |
That's why the ten-second habit: open All connections once a month and look at the labels. It's what covers Meta's gap — which, as written above, is precisely the platform whose authorization drops most often.
Google's yellow banner is not a dropped-connection notice. "Google connection is unstable right now" means it didn't respond at that moment. When the connection really drops, what arrives is the request.
Step by step to reconnect
The path is always the same, on any platform:
- Open All connections and find the card that left green.
- Click it — the system takes you to the right screen.
- Click Reconnect (or Reconnect Facebook, or Connect with Google).
- Here you leave AutoAgency. Log in to the platform and authorize again — the same steps as the first time.
- Come back and check whether the label went back to green.
On social networks, reconnect network by network. The Reconnect button is on the row of each yellow network; there's no button that reconnects them all at once.
Common questions
Did I lose anything while it was down? You didn't lose anything that already existed. But what was scheduled to go out in that period may not have gone out. The screen itself is honest about that: "anything sent to it until then may not go out." After reconnecting, look at the Approvals and the module's history to see what was left behind.
I reconnected and it's still yellow. Give it a minute and refresh the page. If it continues, the problem may be on the platform's side — for example an ad account locked because of an unpaid invoice. In that case, the message usually says what the problem is. Resolve it inside Facebook/Google and reconnect again.
Does reconnecting erase any of my settings? No. The IDs, the chosen accounts, and the rules stay saved. Reconnecting only renews the authorization.
Do I have to reconnect everything again? No. Each connection expires on its own. Only touch the one that's marked.
Is there a way for it to never expire? No. It's the platform's rule. What you can do is open the All connections screen once a month and look at the labels — it takes ten seconds and avoids finding out about the problem from the customer who wasn't served.
"This link isn't valid for your account" or something similar appeared. You're on another company's screen, or the link expired. Go back through the menu, not through the link.