

Getting started — signing in and finding your way around
This is the first chapter of the manual. It shows you the ropes: the first time you sign in, the home screen, how the menu is organized, how to switch companies, where your data lives and where to ask for help when you get stuck.
You don't need to know anything about marketing or computers to read this chapter.
What's in here
- 1. The first time you sign in
- 2. The guided setup (the registration "step by step")
- 3. Getting started (the list of what's still missing)
- 4. Confirming an action by link
- 5. The Dashboard — your home screen
- 6. The "Your results" screen (for the people you invite)
- 7. The full menu — how the system is organized
- 7b. Inside an app — the tabs at the top of the screen
- 8. Search — "Ask or search with Orion…"
- 9. The top bar and your name menu
- 10. Having more than one company and switching between them
- 11. My company — the data your team uses
- 12. Where to ask for help
1. The first time you sign in
Where it is: /bem-vindo — the system takes you there on its own when you sign in with a login
that doesn't have a company yet. You don't need to type that address.
What it's for
Letting you know that your login doesn't have a company yet and showing the way to get one. At AutoAgency your company — the space where everything done for your business is kept — is created when the plan is paid. This screen doesn't create any company.
What you see
A simple, centered screen: the brand at the top and, inside the card, the title Your account doesn't have a company yet and the sentence "At AutoAgency your company is created when the plan is paid. Pick your plan — or take the free X-Ray, which builds the right plan for your business."
Below, two buttons:
- See the plans — takes you to the plans page.
- Take the free X-Ray — takes you to the free X-Ray, which builds the right plan for your business.
At the bottom of the card, the question "Already paid with another email?", with two links: Sign in with another account and Talk to us.
📷 This screen has no screenshot — it appears for someone signing in with a login that doesn't have a company yet: the title "Your account doesn't have a company yet", the "See the plans" and "Take the free X-Ray" buttons, and the "Sign in with another account" link.
Step by step
- If you don't have a plan yet, click See the plans, pick yours and pay. The payment is what creates your company.
- If you'd rather start with the X-Ray, click Take the free X-Ray.
- If this login's email has already paid for a company, you don't need to click anything: the screen shows "Opening your dashboard…" for a few moments, recognizes the company you paid for and takes you on its own to the guided setup (item 2).
- If you paid with a different email, click Sign in with another account and sign in with the email you paid with.
Common questions
I already paid and landed on this screen. That's normal in the first moments: the screen checks whether this login's confirmed email has already paid for a company and, if so, takes you on its own to the guided setup. If the screen keeps showing, look at the question at the bottom of the card — Already paid with another email? — and click Sign in with another account, or Talk to us.
I already had a company and landed on this screen. That's normal. The screen shows "Opening your dashboard…" for a few moments and sends you straight to the Dashboard. You don't need to do anything.
2. The guided setup (the registration "step by step")
Where it is: /app/onboarding. You get there on your own after your company is created, with the payment of the plan.
After that, the way back is the Review your company setup card, which appears on
two screens: Getting started (item 3) and My company (item 11).
What it's for
Telling the system who you are, what you want to achieve, what you're going to subscribe to and which accounts to connect. This is how the team of specialists knows what to do for your business. Without it, everything they write comes out generic.
What you see
At the top, a badge that says Guided setup and the title Let's build your marketing operation, with the sentence "In a few steps: who you are, your goal, the right plan and the connections."
Right below there's a little progress bar with the five steps, in this order:
- Identity
- Goal
- Plan
- Integrations
- Services
At the bottom of the screen are two small links: ← Back (only shown from the second step on) and Skip to dashboard.
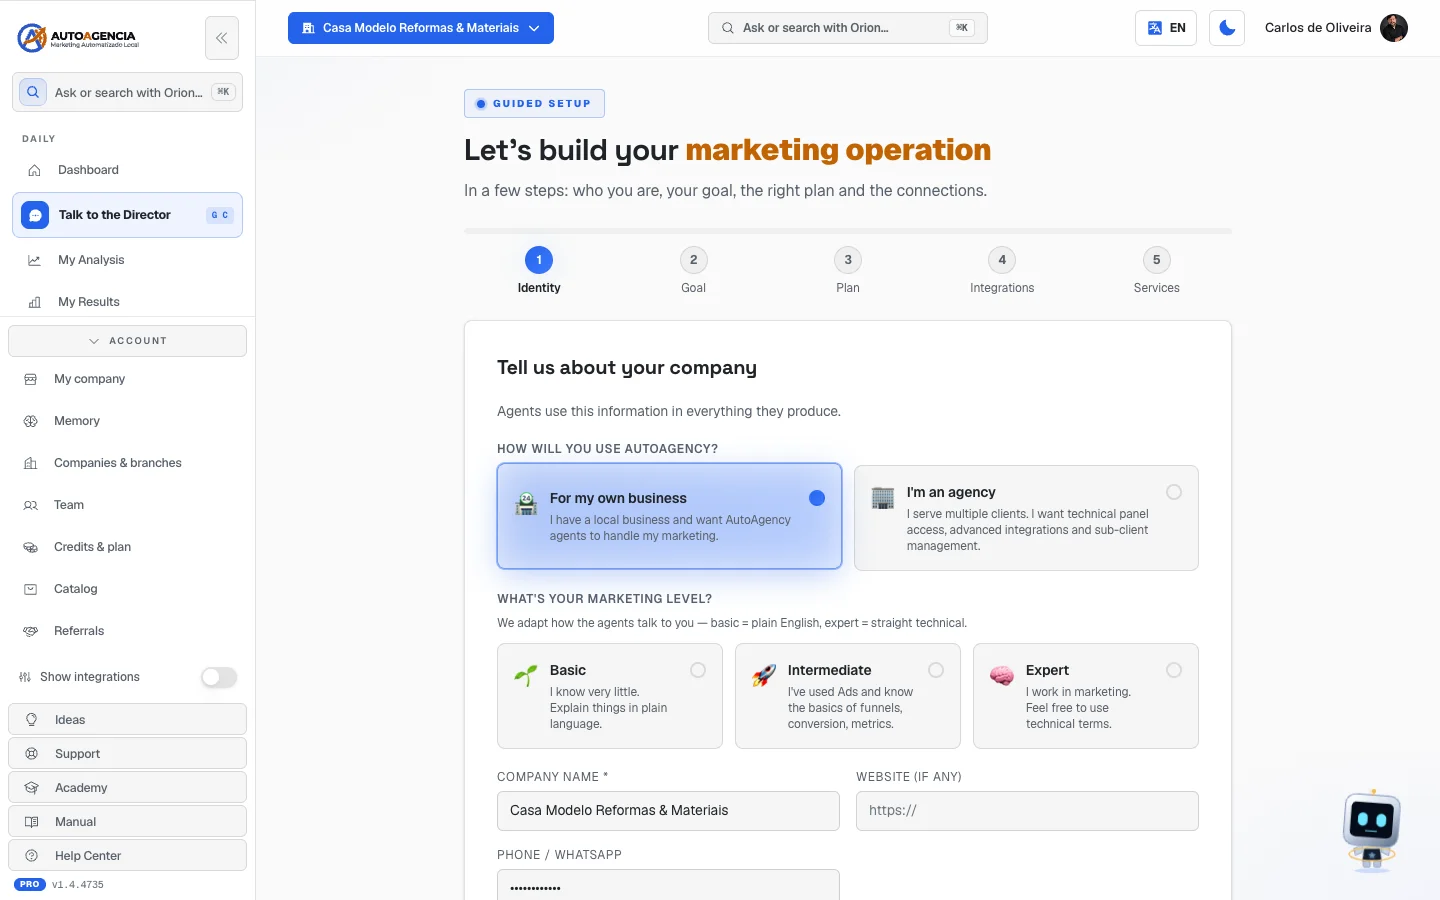 The /app/onboarding screen at the Identity step, showing the bar with the 5 steps and the start of the "Tell us about your company" form
What each step asks for
Step 1 — Identity. Title "Tell us about your company". Here you answer two questions and fill in the basic details:
- How will you use AutoAgency?
- For my own business — "I have a local business and want AutoAgency agents to handle my marketing."
- I'm an agency — "I serve multiple clients. I want technical panel access, advanced integrations and sub-client management."
- What's your marketing level? — Basic, Intermediate or Expert. This only changes how the system talks to you: on Basic, it explains everything in plain language.
- Fields: Company name *, Website (if any) and Phone / WhatsApp.
- What do you work with? — check every service your company provides (it can be more than one) and pick which one is the main one.
- How does your business sell? — you can also check more than one way. The system already leaves checked what it thinks is your case; you just need to review it.
- Your other pages — campaign pages or the website of another business of yours. For each one, you say what it's about; if it belongs to another business, check the this is another business of mine box. You can leave blank whatever you don't have.
- Address (at least city).
- Your social networks (only for those who checked For my own business) — Instagram, Facebook, TikTok, YouTube and LinkedIn. With the website and the networks, the team puts together a free analysis of your marketing.
Step 2 — Goal. What you want to happen in your business.
Step 3 — Plan. Here you put together what you're going to subscribe to and move on to payment.
Step 4 — Integrations. Connect your accounts (Google, social networks, WhatsApp, email…).
Step 5 — Services. Reviewing your business record: the list of what your company does, built from your own website. That same screen exists later, on its own, under What my company does (explained in chapter 2 of this manual).
When it's done, the screen says "All set! Going to the dashboard…" and takes you to the Dashboard.
Step by step
- Answer the step you're on.
- Click the blue button at the end of the step. On the Identity and Goal steps it's called Continue; on the Integrations step, Continue to Services →; and on the last step, That's all correct. If the button is gray, a sentence next to it says what's still missing.
- Made a mistake on the previous step? Click ← Back, at the bottom.
- Don't want to finish now? Click Skip to dashboard. The system remembers where you left off.
Common questions
How do I come back here later? Through the Review your company setup card — it says "Opens where you left off — or at Integrations, if you already finished". It's on the Getting started screen and on the My company screen.
I checked "I'm an agency" by mistake. Click ← Back until you reach the Identity step and change your choice.
I gave up at the payment and came back. The screen says: "You came back without completing the payment — nothing was charged." and adds: "Your plan is still set up exactly as you left it. Just click subscribe again whenever you want."
3. Getting started (the list of what's still missing)
Where it is: full menu → Daily → Getting started.
Address: /app/launchpad
This menu item disappears on its own when you reach 100%. The same happens with the "Your account is N% set up" bar on the Dashboard.
What it's for
It's your arrival to-do list. It shows what's already done, what's still missing and — most important — why each task matters. Every line carries a sentence explaining the benefit, so you don't do anything blindly.
What you see
- The title Getting started and a progress bar with the percentage next to it.
- The Review your company setup card (the shortcut to item 2 of this chapter).
- Three blocks that open and close (the first block that's still incomplete starts out open):
- Foundation
- Connections
- Lift-off
- Next to each block's name: how many tasks are done, out of the total, and the percentage.
Each task is a line with a status icon, the task name, the "why" sentence and a Go link:
| What shows on the line | What it means |
|---|---|
| Empty circle | Not done yet |
| Hourglass + "in progress" | Started, but not finished |
| Triangle + "couldn't verify right now" | The system couldn't check it; doesn't count toward the total |
| Green check | Done |
Examples of tasks: Complete your company profile, Check out the Help Center, Connect Google Ads, Chat with the module's agent …, Read the "How to use" manual ….
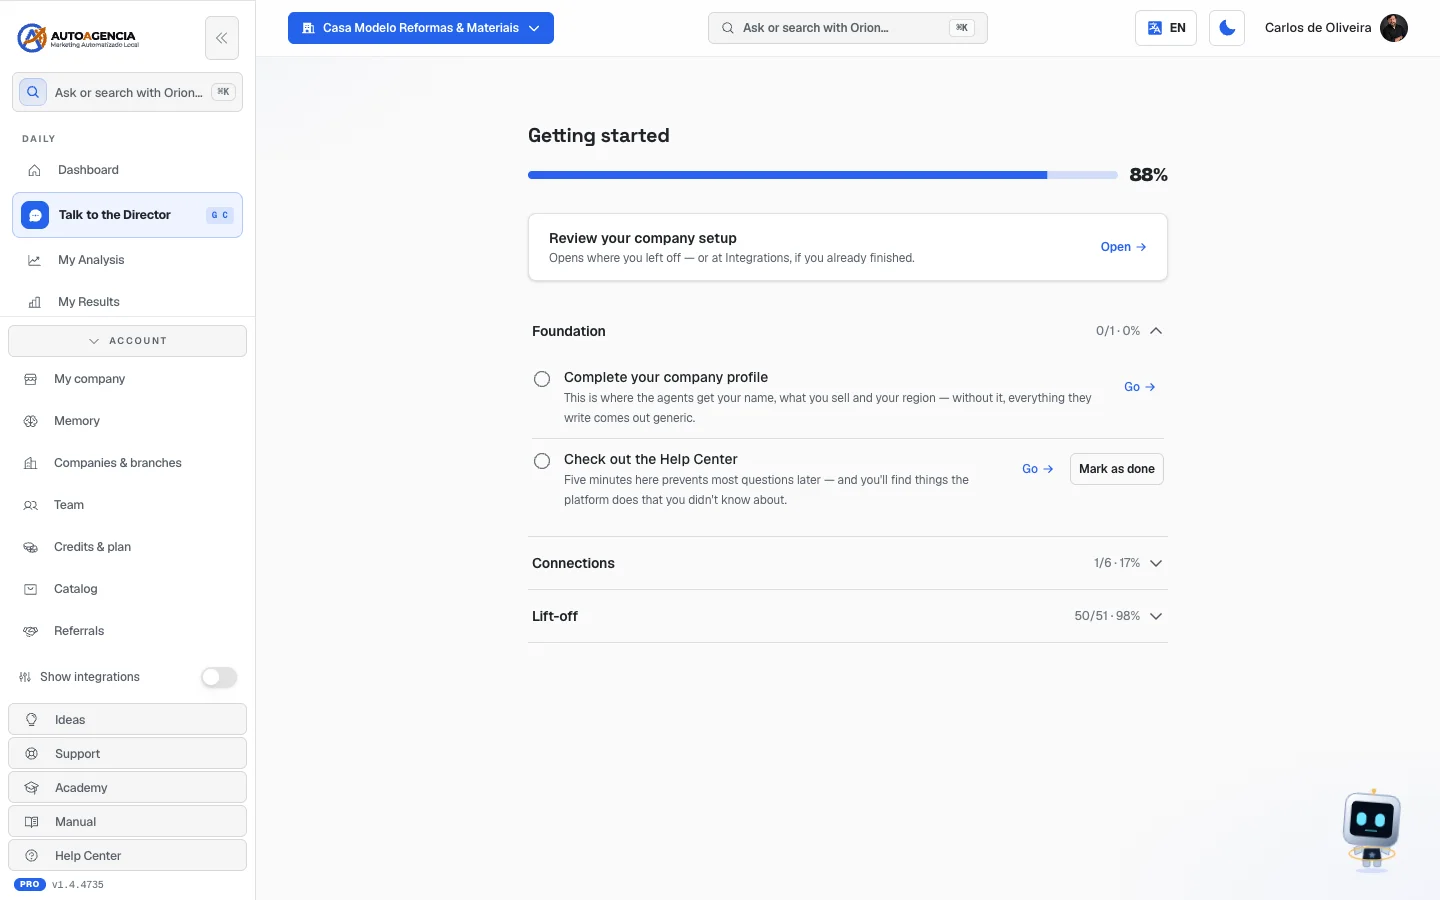 The /app/launchpad screen with the percentage bar and the "Foundation" block open
Step by step
- In the full menu, click Getting started.
- Look at the first open task and read the sentence under it — it tells you what you gain.
- Click Go. The system takes you straight to the screen where the task gets solved.
- Go back to Getting started. The tasks the system can check on its own already show up checked.
- On the reading tasks (the manuals and the Help Center) there's also a Mark as done button — click it when you finish reading.
Common questions
I read the manuals and the percentage didn't go up. That's on purpose. Reading stays on the list because it helps you, but it doesn't count toward progress — only tasks that actually change something on the platform count.
"We couldn't load your getting-started checklist right now." showed up. Click Try again, right below the message.
I finished everything, now what? The screen shows the Lift-off 🚀 block with the sentence "You've completed AutoAgency's first steps." After that, the item disappears from the menu.
4. Confirming an action by link
Where it is: /app/confirmar/<código> — you only get here through a link that Elisa, your
account manager, sends you. There's no menu for this screen.
What it's for
When you ask for something and it needs your formal "ok" before it happens, the system sends you a link. Opening the link and clicking the button is what carries out the request.
What you see
The title Confirm action and the sentence "Elisa, your account manager, prepared this action at your request. Confirm to run it."
Below: the name of the action, the explanation of what it does and the Confirm and run button.
Step by step
- Open the link you received.
- Read what it says — it's the exact description of what's going to happen.
- Click Confirm and run. The button changes to "Running…".
- When it's done, the screen shows: Done! ✓ The action was executed.
Common questions
"This link has expired." For security, links are valid for a limited time. The screen itself tells you: ask Elisa to generate a new one.
"This action had already been confirmed." Someone already clicked (maybe you, on another device). You don't need to do anything.
"Invalid or not-found link." or "This link doesn't belong to your account." The link is broken or belongs to another company. Ask for a new one.
5. The Dashboard — your home screen
Where it is: it's the screen that opens when you sign in. From any other screen, get back to it
with the ⌂ Home button (inside an app) or the Dashboard item in the full menu.
Address: /app
What it's for
Giving you the picture of the day in 10 seconds: what needs you, your apps and what the team has already done. It's also from here that you enter any subscribed app.
What you see
At the top, the top bar (item 9) — on the left, the Full menu button, which opens the system menu (item 7). On Home the menu is tucked away behind that button to keep the screen clean. Then, from top to bottom:
-
The greeting. A small label saying "Good morning", "Good afternoon", "Good evening" (or "Good night") and, below it, Hi, followed by your name (or the company name), the sentence "Your AI agency is working for …" with the company name, and the Agency ON badge.
-
Needs you — what's waiting for you in any app, all in one place, with the count next to the title. Each line says what happened in plain language (for example "1 article is ready and waiting for your approval to publish.") and has a Resolve → button, which opens the right screen to deal with it. When there's nothing, it says "Nothing needs you today." — that's good news.
-
The "Your account is N% set up" bar, with the name of the next task and the Continue setup button — it takes you to Getting started and disappears when it reaches 100%.
-
Your apps — a colored block for each app you subscribed to, with the count ("N modules subscribed") and the + add → link, which leads to the catalog. The four you open most in this browser are highlighted at the top; the others are grouped by topic (Attract more customers, Strengthen your brand, Serve customers better, Sell more…), each group with its own color. Click a block to open the app (item 7b).
-
The Director's note. A short sentence in plain language about the day — for example "Your campaigns are paused: nothing ran today." — and, next to it, the big number for Ad leads today. If any account has a problem, the Accounts that need attention list shows up.
-
What the agency did for you — the work done in each app (for example, how many frauds were blocked or how many calls came in during the month) and the This week's deliveries, with the See everything we did link.
-
Your 3 decisions — the only things only you decide: Money (how much to invest in ads), Days and hours and Places (where you serve). Each one shows what's in effect today (or "Not set yet") and has an Adjust button.
-
The record invitation, when you still need to review what the system knows about your business. Its text changes depending on the case: "Check what we know about your company", "Tell us what your company does" or "Which services do you want to advertise?".
-
The status badge. A strip with one of three sentences:
- "Agency ON · working"
- "Agency ON · all set up"
- "Almost there · connect your ad account" — accompanied by the Connect now button.
Right below it, the summary numbers: how many active modules, how many connections and what your plan is.
-
This month — when your plan includes credits, a bar shows how many you've already used out of the month's total (for example "0 of 150 credits included"), with the View credits link.
-
Quick actions — two cards: Created assets ("See images, videos and copy created by specialists for your business.") and Capture pages ("Publish an offer").
-
The results notice — "Your results live here", with the See my results button. You can remove it from the screen by clicking the "x" (Dismiss notice).
-
Three numbers: Active connections, Assets this month and Plan.
-
Account status — one card per connected platform and the Manage connections link. It only shows up when at least one account is connected.
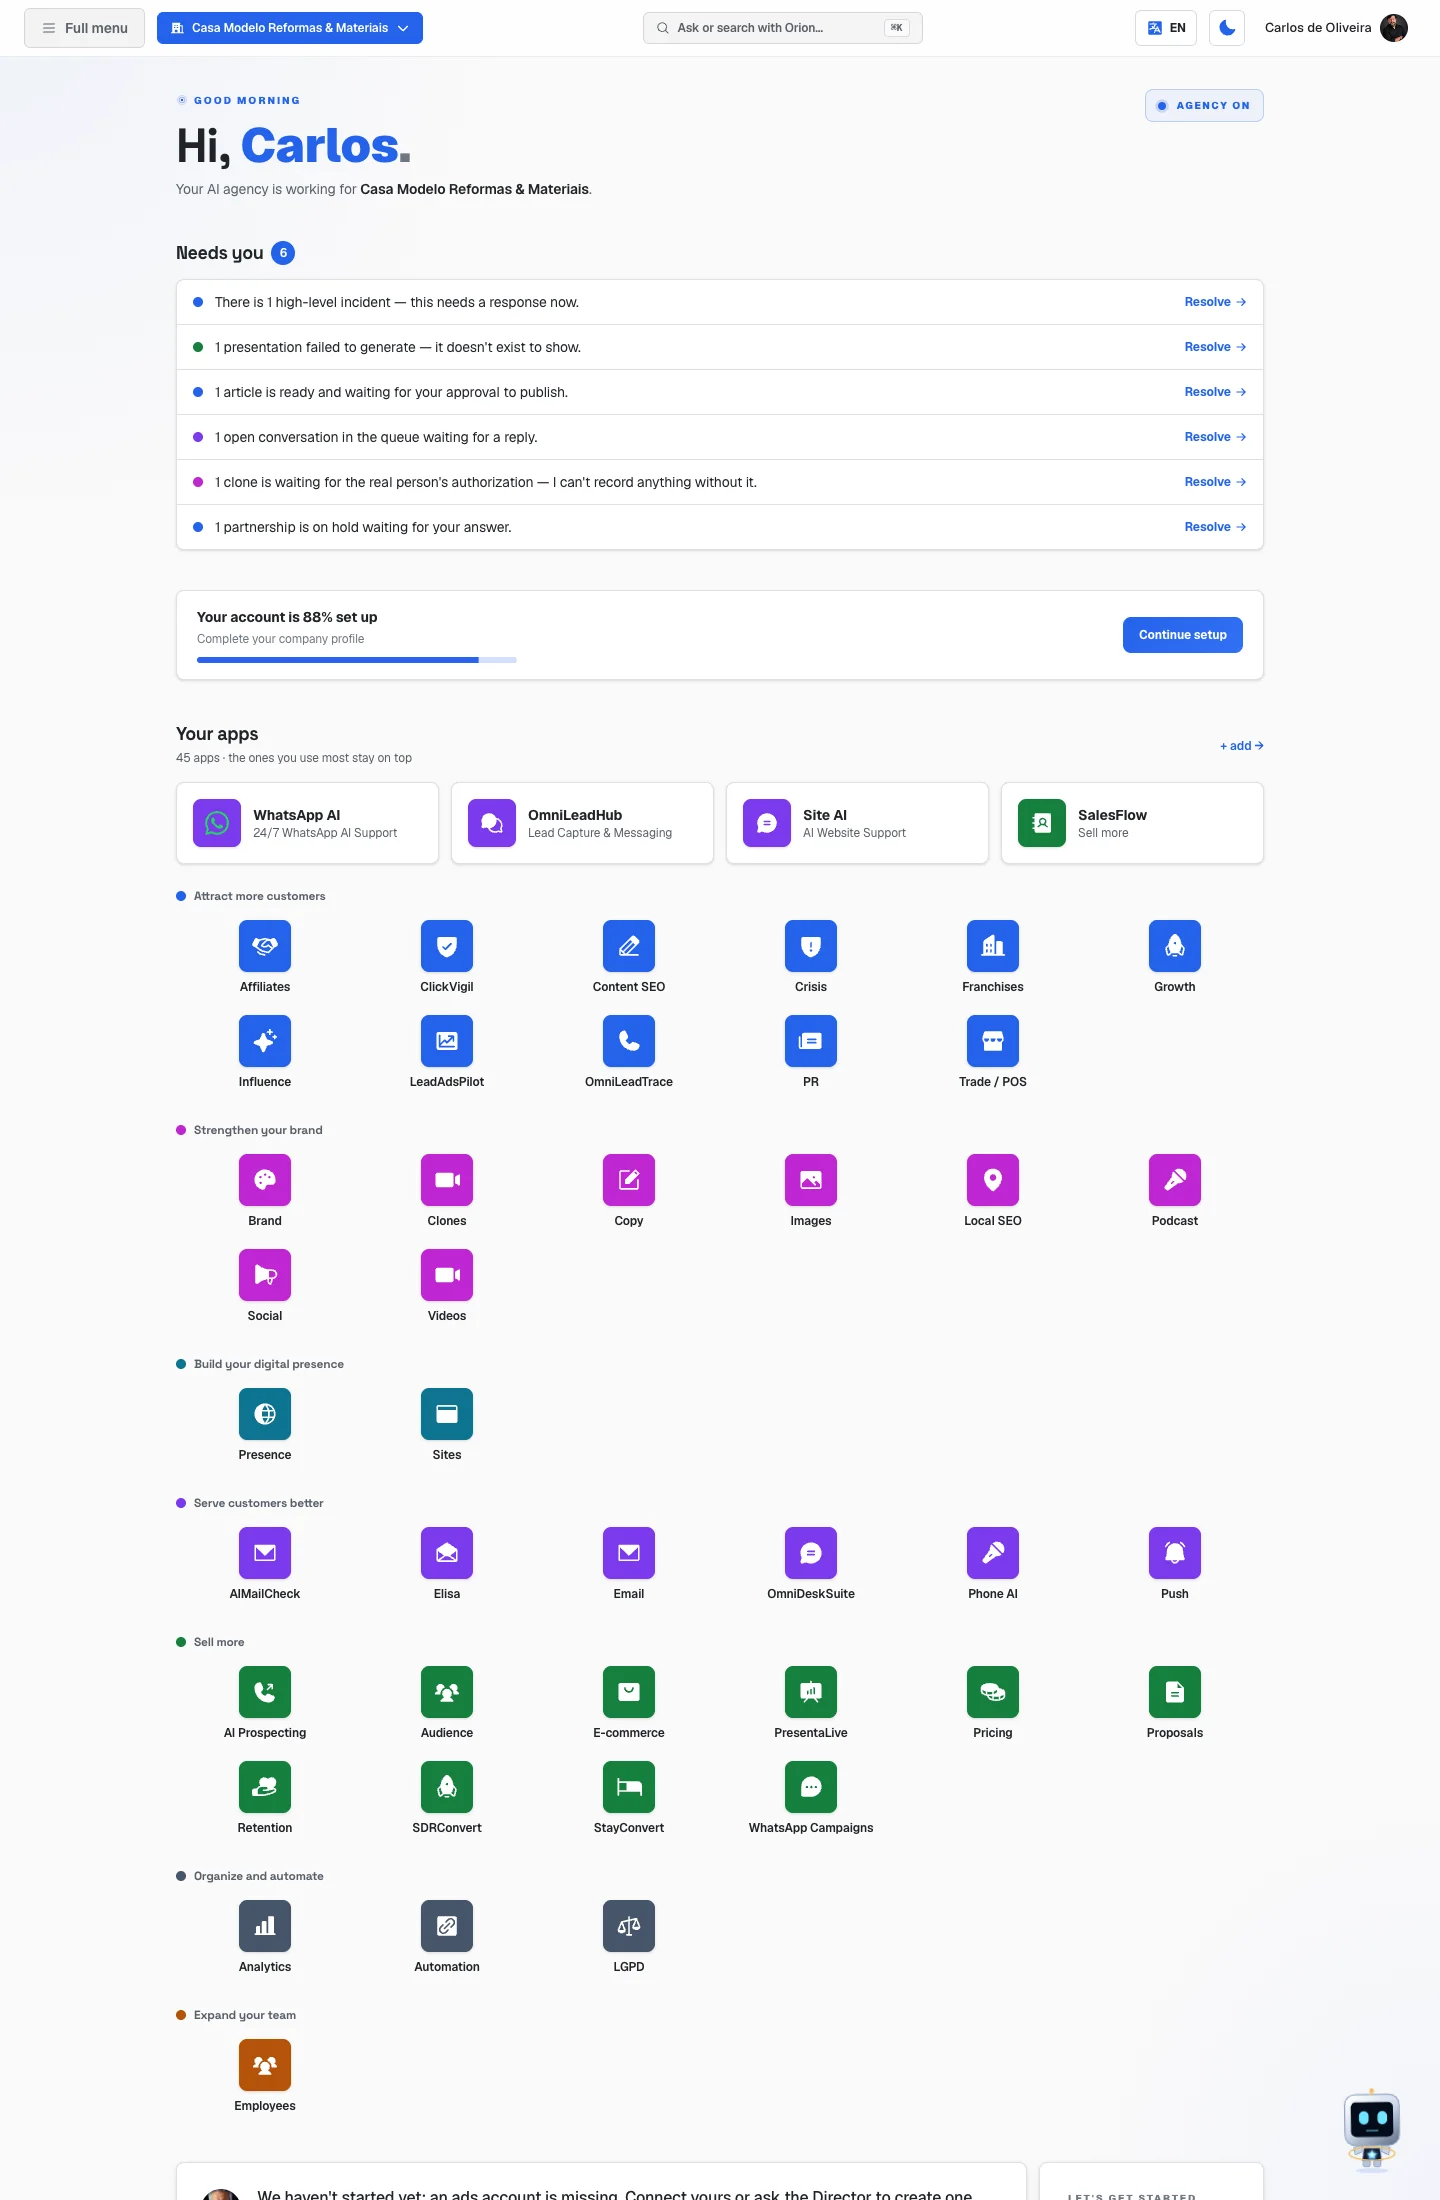 Home: the greeting, "Needs you", the setup bar and the "Your apps" grid grouped by topic
How to read the numbers
| What shows | What it means |
|---|---|
| Ad leads today | How many people contacted you today because of an ad |
| Active connections | How many of your accounts (Google, WhatsApp, social networks…) are linked to the system |
| Assets this month | How many images, videos and texts the team produced this month |
| Plan | The name of what you're subscribed to today |
| Active (green label) | Account connected and working |
| Awaiting acceptance | Someone on the other side still has to accept the invitation |
| In setup | We're still fixing up that connection |
| Rejected / Expired | The invitation was denied or ran past its deadline — it needs to be redone |
Common questions
"—" shows up instead of a number. The system is still fetching the data. Wait a few seconds or reload the page. "—" never means zero.
The percentage bar disappeared. You reached 100%. The badge right below now says "Agency ON · all set up".
The "Connect now" button won't go away. It shows up as long as there's no ad account linked. Click it, connect, and it goes away.
6. The "Your results" screen (for the people you invite)
Where it is: /painel
For you, the account owner, this screen is not the way in. If you open that address, the system
sends you back to the Dashboard (/app).
What it's for
It's the read-only version of the results, made for anyone you want to show the numbers to without giving access to the whole system — a partner, a manager, an accountant. The person signs in, looks and doesn't touch anything.
What you see (from the invited person's side)
A simple header with the title Your results, the theme button and the user menu. Below, the period filters (7 days, 30 days, 90 days) and the number blocks.
Your version of that same information, with the system menu around it, is the My Results screen — explained in chapter 2.
7. The full menu — how the system is organized
Where it is: on Home and inside the apps it's tucked away, to keep the screen clean — on Home, open it with the Full menu button, at the top left; inside an app, with the ⊞ Switch → See full menu button (item 7b). On the other screens (My Results, Approvals, My company…) it's in plain view, on the left. On mobile, it opens with the three-line button in the top left corner (Open menu).
What it's for
It's the index of the whole system. For day-to-day use you hardly need it: your apps are on Home, and the search at the top (item 8) finds any screen by name. The menu is the full map, for when you want to see everything.
What you see, from top to bottom
-
The AutoAgency logo (clicking it takes you back to the Dashboard) and, next to it, a button: when the menu opened over the screen, it's the X that closes it; on the screens where it stays in view, it's Collapse menu — which becomes Expand menu once clicked. Collapsed, the menu shows only the icons.
-
The search: Ask or search with Orion…, with the
⌘Kkey drawn on the right side. It's the same search as the one at the top of the screen, explained in item 8. -
The "Daily" section — what you use every week:
Menu item What it is Dashboard The home screen (item 5) Talk to the Director The conversation with the AI team — it's the highlighted item, in the brand color My Analysis The X-ray of your marketing My Results How many contacts came in and from where Latest Contacts The list of people who looked for your company Approvals What's waiting for your "ok" What my company does Your business record Getting started The arrival list (item 3) — disappears when it reaches 100% Next to Dashboard and Talk to the Director you'll see the marks
G HandG C. They're keyboard shortcuts, and they work like this: pressG, let go, and press the second letter —Htakes you to the Dashboard,Ctakes you to Talk to the Director. You have a second and a half between one key and the other; past that, just start over.While you're typing, the shortcut stays quiet. If the cursor is inside a text field, a message box or a list of options, the letters go to what you're typing — the system doesn't steal the key. The same goes if you hold
Ctrl,CmdorAltat the same time: then the shortcut belongs to the browser, not to us.The third shortcut is the search one:
⌘K(on a Mac) orCtrl K(on Windows), explained in item 8. -
The "My modules" section — the products you subscribed to, grouped by topic (for example, Attract more customers and Strengthen your brand). A module with a little
>arrow on the right has several screens: clicking its name opens the module and its screens show up right below, one step further in — that's how you switch screens inside the module. At the end of the section is the Explore modules link, which opens the showcase. -
The "More" drawer — starts out closed. It holds the screens that exist but aren't part of your daily routine: Calls, My contacts, My Subscriptions, Proposals, Support Desk, Employees, Website chat, All connections. It doesn't repeat what one of your apps already brings: if you subscribed to the app that has the screen (for example, Site AI brings the Website chat), the item leaves the drawer — the screen stays inside the app, in search and in your pinned items.
-
The "Account" drawer, at the bottom — My company, Memory, Companies & branches, Team, Credits & plan, Catalog and Referrals.
-
The "Show integrations" switch — explained below.
-
Five fixed links: Ideas, Support, Academy, Manual and Help Center (item 12).
-
The PRO badge and the system's version number.
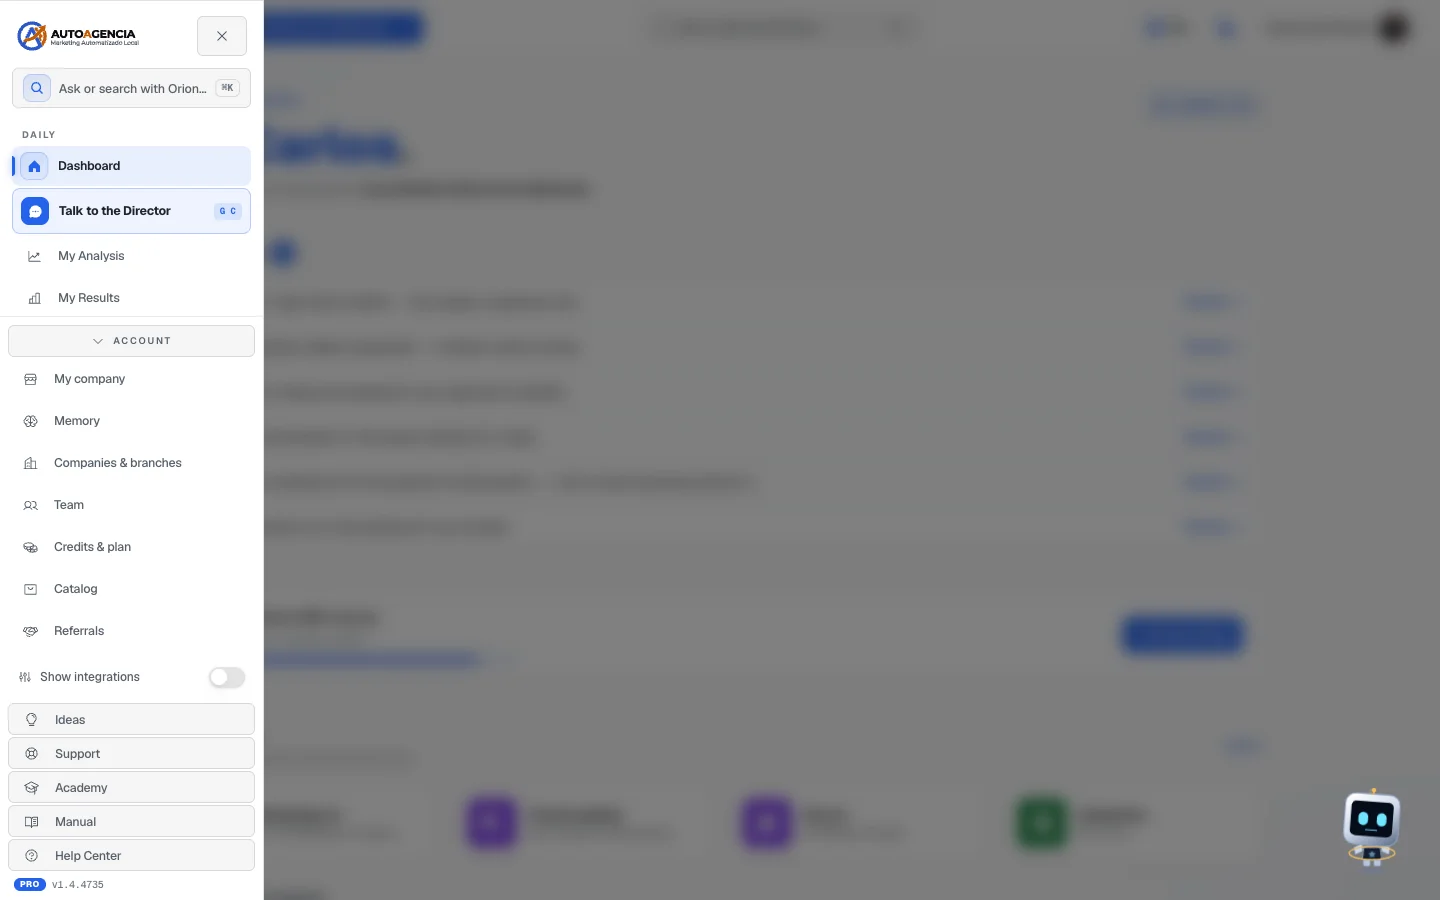 The full menu opened with the Home button: the search, the Daily section, the start of My modules, the Account drawer, the switch and the fixed links
Pinning an item to "Daily"
You can pull any screen you use a lot up to the top of the menu.
- Hover over the item in the full menu.
- A small pin appears at the right edge of the line.
- Click it. The little tooltip says Pin.
- To remove it, repeat the gesture — now the tooltip says Unpin.
Items you pin are valid only in this browser. They're kept in the memory of the device where you pinned them, separated by company — they don't go up to your account. If you switch computers, phones or browsers, the menu goes back to the factory arrangement: Dashboard, Talk to the Director, My Analysis, My Results and Latest Contacts. Pin them again on the new device, and it takes two clicks. Clearing the browser data also erases the arrangement — and nothing else: none of your business data lives there.
The drawers remember how you left them — also only in this browser. The Account drawer starts out open; the More drawer starts out closed. If you open or close one of them, it stays that way the next time you sign in from this same device.
The "Show integrations" switch (advanced mode)
At the bottom of the full menu, above the help links, there's a switch labeled Show integrations. When on, it makes the technical shortcuts appear in the menu — the screens for connecting directly to each platform, the agent teams, the playbooks and the client area.
It only exists for agency accounts. If you use the system for your own business, that switch doesn't show on your screen — and you're not missing anything: everything that matters for your business is in the regular sections.
With the menu collapsed, the switch becomes an icon and the tooltip says Show integrations when it's off, and Integrations: visible when it's on.
Common questions
An item I saw yesterday disappeared. Two likely causes: either it was Getting started (which disappears at 100%), or it's inside the More drawer — click it to open.
I can't find a module I subscribed to. It's on Home, under Your apps, inside its topic group — and also in the full menu, under My modules. If you can't find it, use search (item 8) and type the name.
The menu disappeared from Home. That's on purpose: on Home it sits behind the Full menu button, at the top left. Nothing was removed — it's the same menu as always.
7b. Inside an app — the tabs at the top of the screen
Where it is: in any open app (addresses that start with /app/modulos/).
What it's for
When you open an app, the screen becomes only that app's: the menu steps aside and everything the app has shows up in a bar at the top. A link that arrives through WhatsApp, email or a notice also opens this way, straight to the tab for the topic.
What you see
The app bar, with a thin strip in its group's color, and in it:
- ⌂ Home — goes back to the home screen (on mobile, just the little house icon).
- The app's icon and name.
- ⊞ Switch — opens the Your apps window over the screen, with all your apps and a Search app or tab field (type "contracts" and it shows the app and the right tab). At the bottom of the window, the See full menu link opens the menu from item 7.
- The app's tabs, laid out horizontally — click one to switch screens. The open tab is highlighted. Every app ends with the How to use tab, the summary of this manual for that app. On a computer, if the tabs don't fit on one line, they drop to a second one; on mobile, swipe the row sideways.
Step by step — going from one app to another
- Click ⊞ Switch.
- Click the app you want — or type its name (or a tab's name) in the search field.
- Done: the new app opens, on the usual tab or on the tab you searched for.
To go back to the start of everything, click ⌂ Home.
8. Search — "Ask or search with Orion…"
Where it is: the Ask or search with Orion… button in the middle of the top bar (on mobile, the
magnifying glass icon), or the same field at the top of the full menu.
Shortcut: hold Ctrl (on Windows) or ⌘ (on a Mac) and press K.
What it's for
One door for both finding and asking. Type the name of any screen — including a tab inside an app, like "contracts" or "funnel" — and go straight to it. If what you want is an answer, the same box offers to ask Orion.
What you see
A box that opens in the middle of the screen, with the Ask or search with Orion… (e.g. contracts,
budget, fraud) field and the ESC key drawn on the right. Results come separated by group:
- Actions — things that happen right away: Open chat with Orion, View my briefing, Toggle light/dark theme and Switch language to … — only the two languages you aren't using show up (in English, for example, "Switch language to Spanish" and "Switch language to Portuguese").
- Daily, Management, Specialists & AI agent teams, Integrations — the system's screens.
- Modules — the products you subscribed to and, when you type, the tabs inside them, written as "App › Tab" (for example SalesFlow › Contracts). Search understands the name of the tab in all three languages and the product's brand name.
- Ask — whenever you've typed something: Ask Orion: "…" takes the text to the conversation with Orion without sending it (you check it and send it). Inside an app that has a specialist, Ask so-and-so also shows up (for example "Ask Klara (chat on this screen)"), which puts the text in the chat of that app's specialist. When nothing else matches what you typed, the question to Orion is what's left — "No results" doesn't show up.
- Account help: Arcturus — opens Arcturus's bubble, the companion in the corner of the screen, already with what you typed.
At the bottom of the box you'll see the result count and the key legend: ↑↓ navigate and ↵ open.
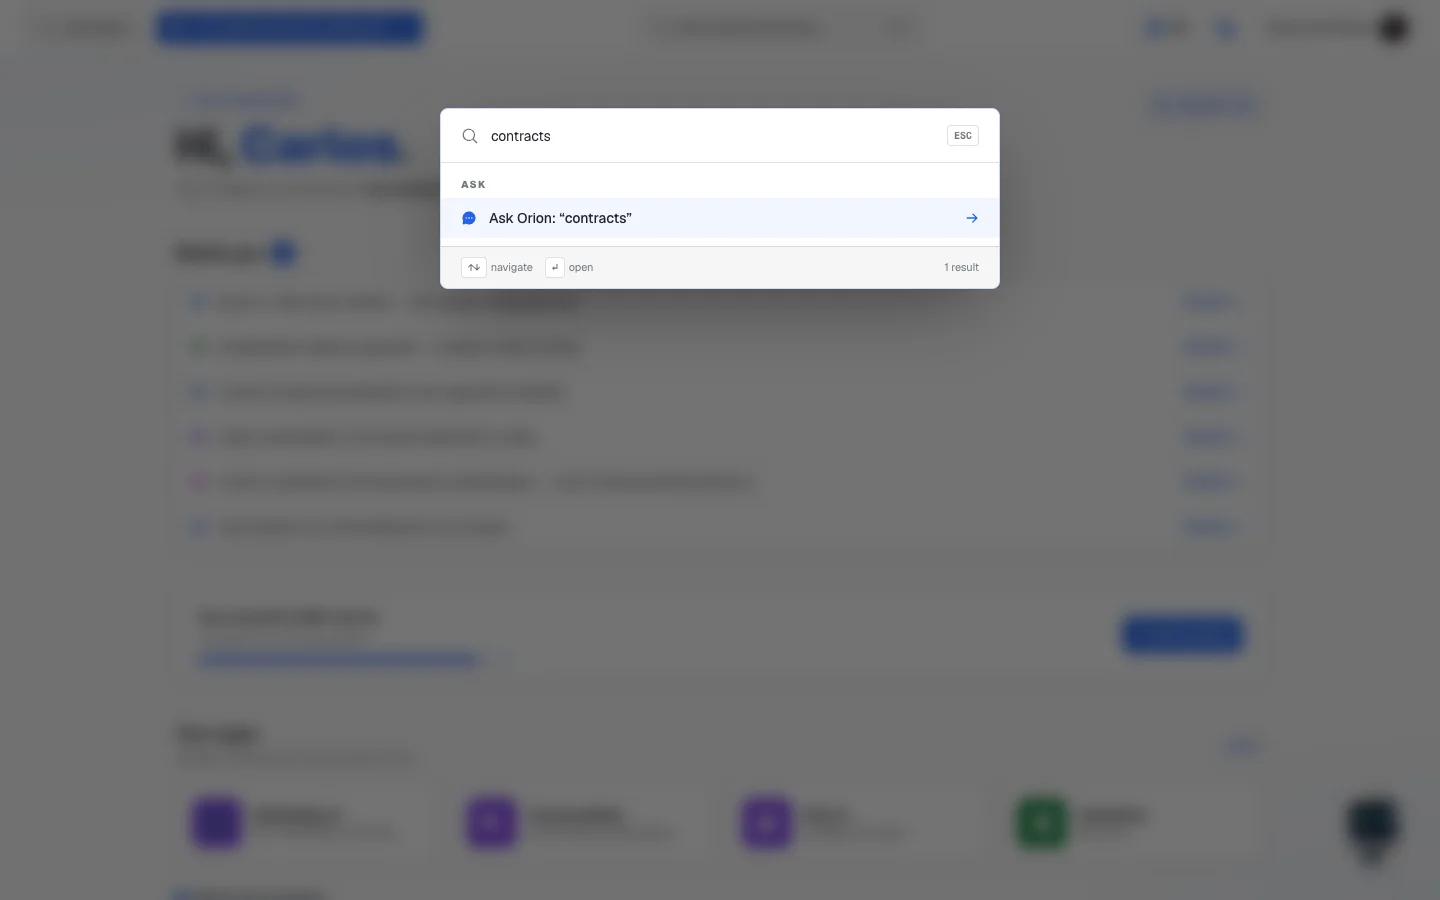 Search open with "contracts" typed: the SalesFlow › Contracts result and, below it, Ask Orion
Step by step
- Press
Ctrl+K(or⌘K), or click Ask or search with Orion…. - Start typing what you're looking for. You can type by name ("approvals"), by topic ("contacts"), by the name of a tab ("contracts") or by the product's brand.
- Use the ↑ and ↓ arrows to choose, or click with the mouse.
- Press
Enterto open. - To close without choosing anything, press
ESCor click outside the box.
Common questions
Only "Ask Orion" showed up. The term you typed doesn't match any screen or tab. Try a shorter word, or the name of the thing as it appears on the screen — or ask Orion the question.
I typed "open contracts" and it found it just the same. Yes: words like "open", "go to", "see" and "my" are ignored.
9. The top bar and your name menu
Where it is: the thin strip at the top of every screen.
What you see
From left to right:
- The menu button — on Home, the Full menu button (item 7); on the other screens, the three lines, on mobile only; inside an app it doesn't appear (the ⊞ Switch plays that role, item 7b).
- The company selector — shows which company you're viewing right now (item 10).
- The Ask or search with Orion… button with
⌘K(item 8) — on mobile, a magnifying glass. - The button to install the app, the language selector, the light/dark theme button.
- Your name and your photo — it's the user menu.
Your name menu
Clicking your name opens a menu with your name at the top and these shortcuts:
- Manage account — your login account's data (password, connected accounts)
- My company — the business data (item 11)
- Credits & plan
- My Subscriptions
- Team
- Português / Español / English — switches the language of everything
- Sign out
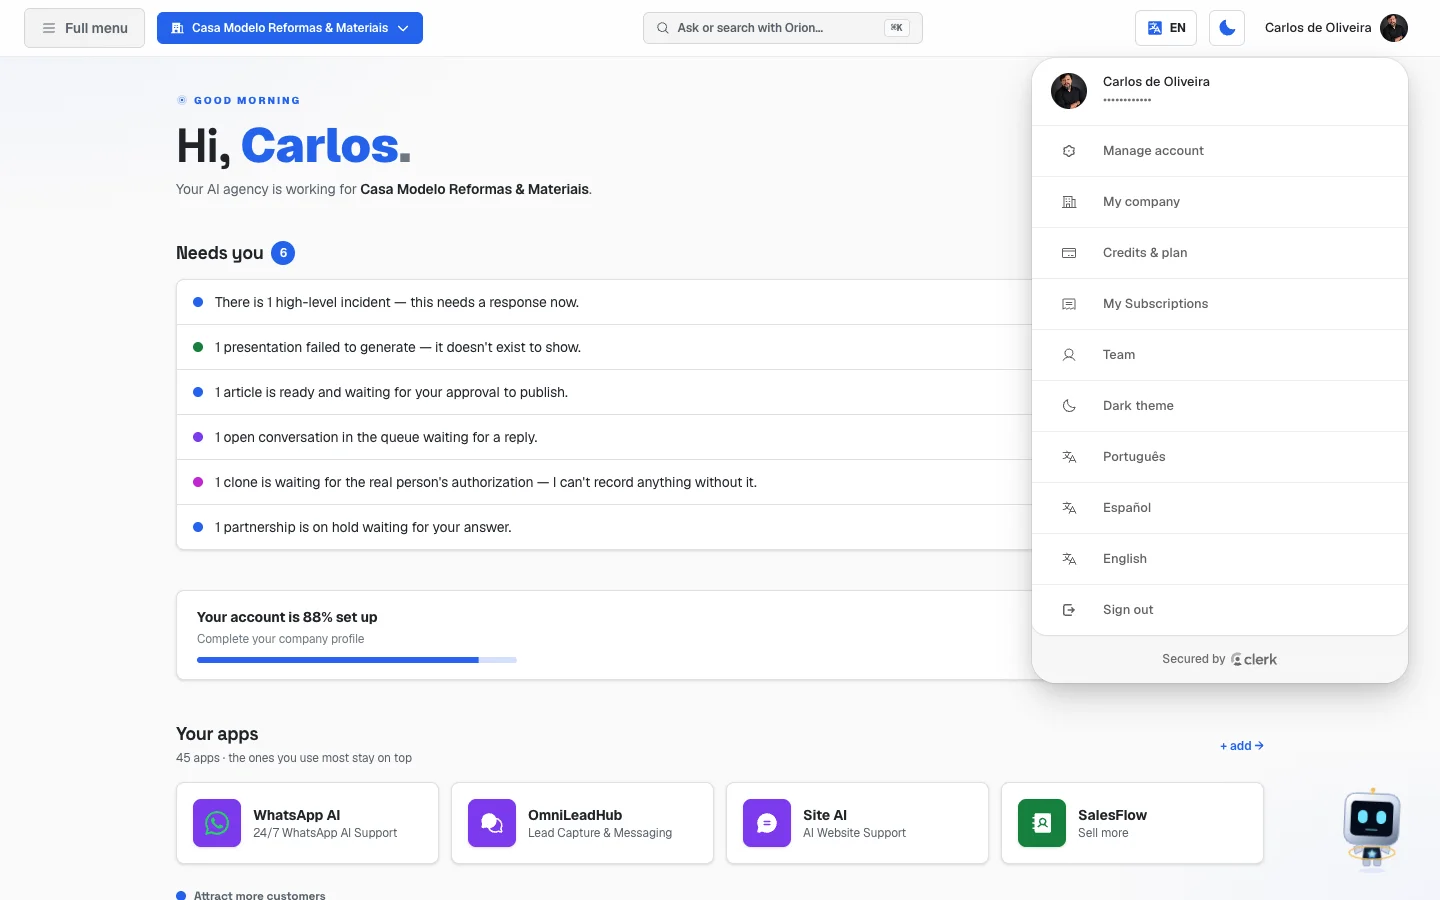 Top bar with the user menu open
Common questions
I switched the language and it went back on its own. It shouldn't: the change made through this menu is saved to your registration and holds for future sign-ins. If it goes back, open a support request (item 12).
I'm seeing a company name that isn't mine instead of my name. This happens when someone from support is looking at your account to help you. A colored strip at the top of the screen tells you when that's happening.
10. Having more than one company and switching between them
10.1. The selector at the top
Where it is: top bar, left corner.
If you have just one company, a label with its name shows up there and, beside it, the + Multi-company button. Its tooltip explains: "Enable to register multiple companies and branches".
If you already have several, the selector is a button with the company name (and the branch, when it applies). Clicking it opens a two-column panel:
- Left column, Companies: starts with Overview (the view of everything together), lists your companies and ends with New company.
- Right column, Branches — <company name>: starts with Entire company, lists the branches and ends with New branch.
An Archived label appears when the active company is archived.
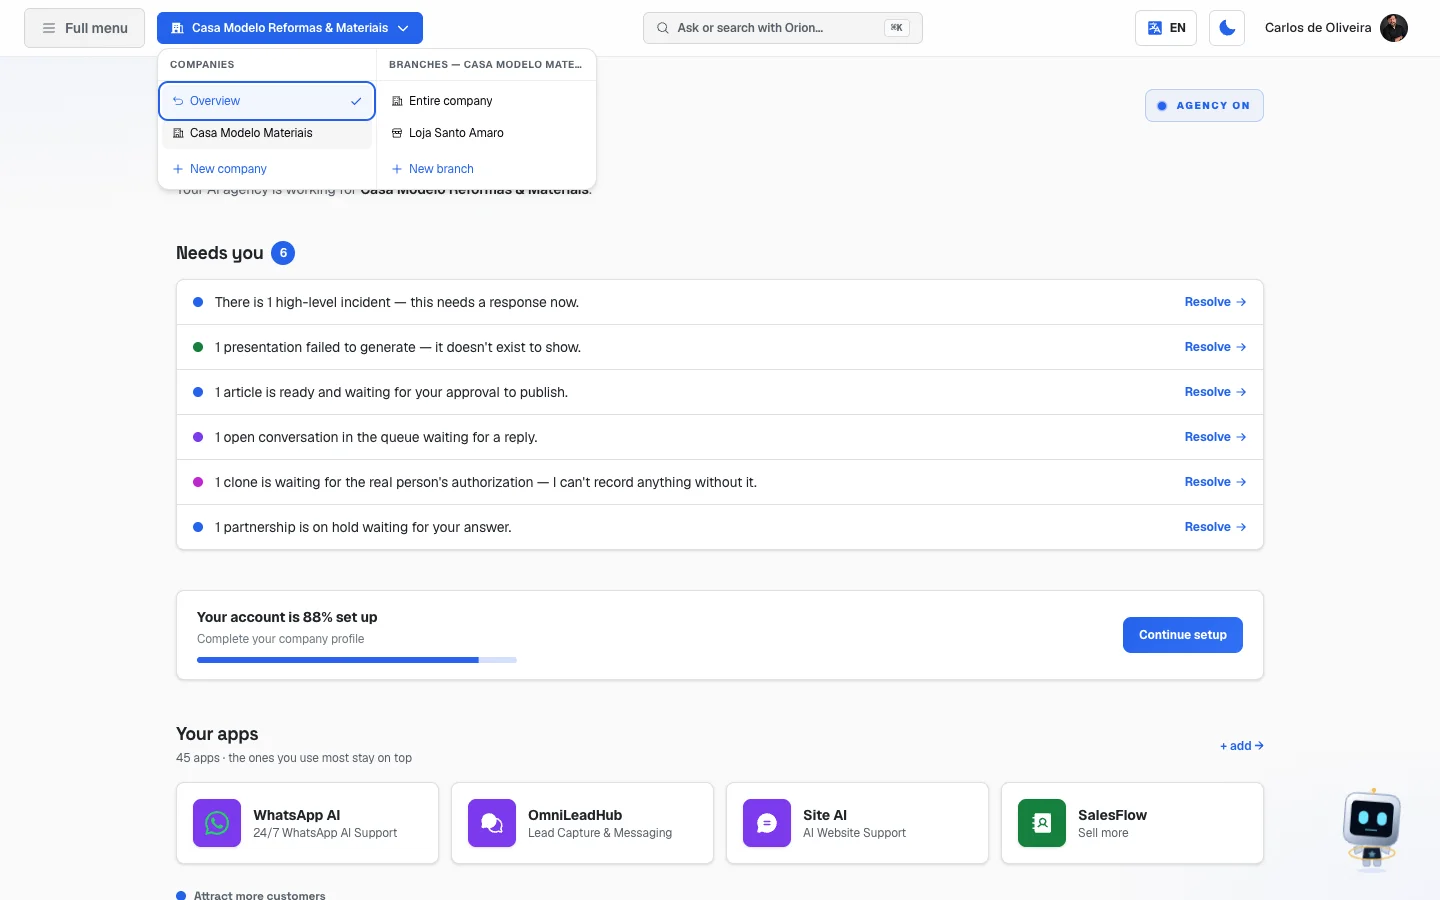 The company selector open, with the two columns "Companies" and "Branches"
Step by step — switching company
- Click the company name in the top bar.
- In the Companies column, click the company you want to see.
- If it has branches, pick one in the right column — or click Entire company to see the whole group.
- The screen you were on stays open, now with the chosen company's data.
The switch applies only to this browser tab. If you open the system in another tab, it starts on your usual company. That's on purpose: you can look at two companies at the same time, in two tabs.
Common questions
I switched company and a notice appeared saying it went back. It means that company is no longer accessible to you (it was archived or your access changed). The system goes back to the valid company and tells you, instead of switching silently.
I switched company and ended up on a different screen. If the new company doesn't have the module for that screen, the system takes you to the module showcase, with that module highlighted.
10.2. The Companies & branches screen
Where it is: full menu → bottom → Account → Companies & branches
Address: /app/empresas
What it's for
Registering, renaming, archiving and deleting your group's companies and each one's branches.
What you see
Title Companies & branches, with the sentence "Manage your group's companies and their respective branches." and the New company button.
Below, three tabs: Active, Archived and Trash. And a table with the columns Name, Type, Status, Relationship and Actions.
In the Type column you read Company or Branch. Under Relationship, you read "root company" or "branch of <name>". The company you're viewing right now is marked • current.
If you haven't enabled multi-company mode yet, a card shows up in place of the table: Activate multi-company mode, with the Enable multi-company button.
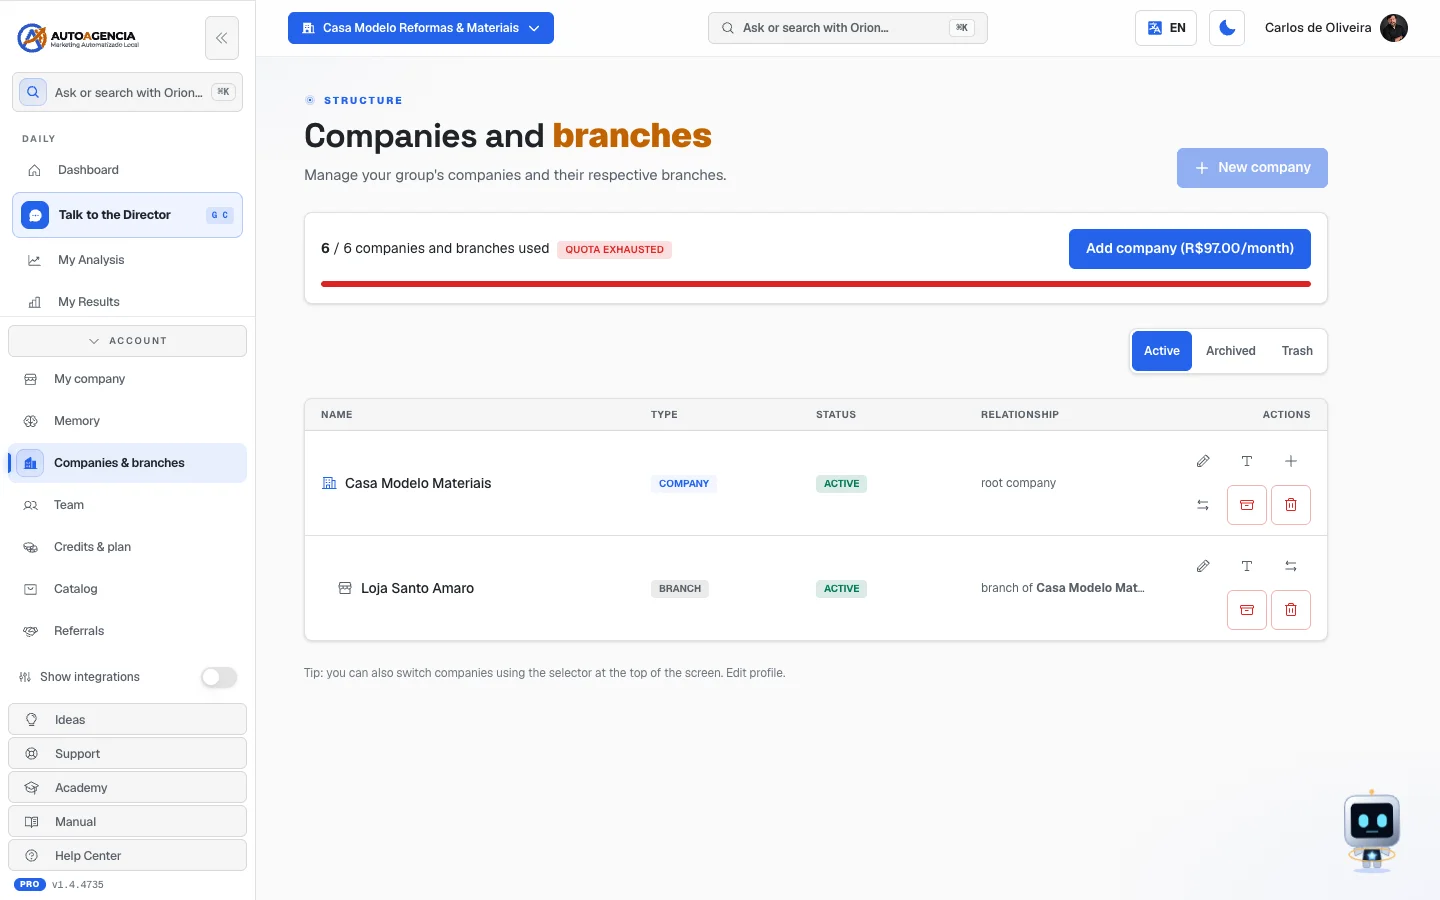 The /app/empresas screen on the "Active" tab, with the table of companies and branches
The actions on each line
| Button | What it does |
|---|---|
| Rename | Changes the name. It goes away and a text field appears with Save and Cancel |
| Edit | Opens that company's full details |
| New branch | Registers a branch inside that company |
| Switch to this company | You start seeing the system with its data |
| Archive | Takes it off the everyday list, without deleting anything |
| Delete | Sends it to the Trash. You can recover it for 30 days |
| Restore | Brings it back from the Archived tab or the Trash |
| Delete permanently | Erases it for good. There's no way back — the system asks you to type the company name to confirm |
Common questions
"Switch to another company before archiving this one." You can't archive the company you're viewing at the moment. Switch using the selector at the top and come back.
The company has branches and I want to archive everything. The system asks: the Archive <name> box offers the Archive company and all branches button.
Quota exhausted. The number of active companies and branches is what your plan includes plus your Additional Companies. When it runs out, the new company button shows the notice "Quota exhausted — add an Additional Company", and the quota strip offers the Add company button, which opens the Catalog with that item highlighted. Each Additional Company counts for one more company, branch or client (details in the Account, plan and billing manual, item 9).
10.3. What's left to set up (for a specific company)
Where it is: you get there from inside the Companies & branches screen, when you open a company.
Address: /app/empresas/<código da empresa>/configuracao
What it's for
Seeing, in a single list, what each module subscribed to by that company still needs someone to fill in.
What you see
Title What's left to set up, with the sentence "The modules this client subscribes to and what still needs to be filled in for each."
Right below, the tally — for example "2 of 5 complete" — and the list. Each line has the module's name and, on the right:
- the Resolve button, when something is missing;
- the green All set badge, when it's ready;
- the Couldn't check right now notice, with the Try again button.
If there's nothing pending, the screen says: "No setup pending here."
Step by step
- Open the list.
- Click Resolve on the first pending line. The system takes you to the right screen.
- Fill in what's asked and come back.
- Repeat until every line shows All set.
11. My company — the data your team uses
Where it is: full menu → bottom → Account → My company. It's also in your
name menu, in the top bar.
Address: /app/profile
What it's for
It's your business's record: name, what you sell, phone, address, social networks, logo, colors and tone of voice. Everything the team of specialists produces comes from here. Without this data, what they write comes out generic — without your company's name, without your city, without your personality.
What you see
Title Company profile, with the sentence "Agents use this information to personalize deliverables."
Then, in order:
-
Review your company setup — the shortcut back to the guided setup (item 2). It stays here forever, even after everything is done.
-
The multi-company card (same topic as item 10).
-
Communication language — what language the team speaks to you in. The Automatic option follows the system's language.
-
Communication channels — where you want to be notified (for example, Email). It has the Save and Send test buttons, to check that it really arrives.
-
The company data:
Field What to write Company name The way customers know you. E.g.: "Hot Bread Bakery" Segment Your line of business. Pick from the list Time zone The time your company lives by Website Your website's address, starting with https://Phone E.g.: (11) 99999-9999 What does your company do? A short description of the business, the products and what sets you apart Address Street, number, city — state Social networks Instagram, WhatsApp, Facebook, TikTok, YouTube and LinkedIn -
Brand Kit — "Logo, colors and tone of voice that agents will use in creatives, posts and landing pages." This is where the Main logo (horizontal), the Square logo / icon, the Primary color, the Secondary color, the Accent color, the Heading font, the Body font, the Tone of voice and the Brand keywords go. At the end there's the Photo library, with the Upload photos button.
-
Business knowledge — the long answers that make the difference: Products and services, Target audience, Differentiators, Competitors, Marketing goals, Price range, Main channels and Notes. Above them is the Profile complete bar, with the percentage filled in.
Right below those fields, at the end of the same card, is the Save profile button — it saves everything from items 5, 6 and 7 at once. On mobile, the button sits on a bar stuck to the bottom of the screen.
-
Documents — the Upload file button takes "PDF, TXT, Markdown or DOCX (up to 15MB). The text becomes memory the agents read before working." Upload proposals, catalogs and manuals there.
-
Email communication — "Choose what Elisa, your account manager, sends you by email." There are four switches: Weekly results summary, Important alerts (urgent), Billing and payments and Requests and approvals.
-
Close account, at the end of the page.
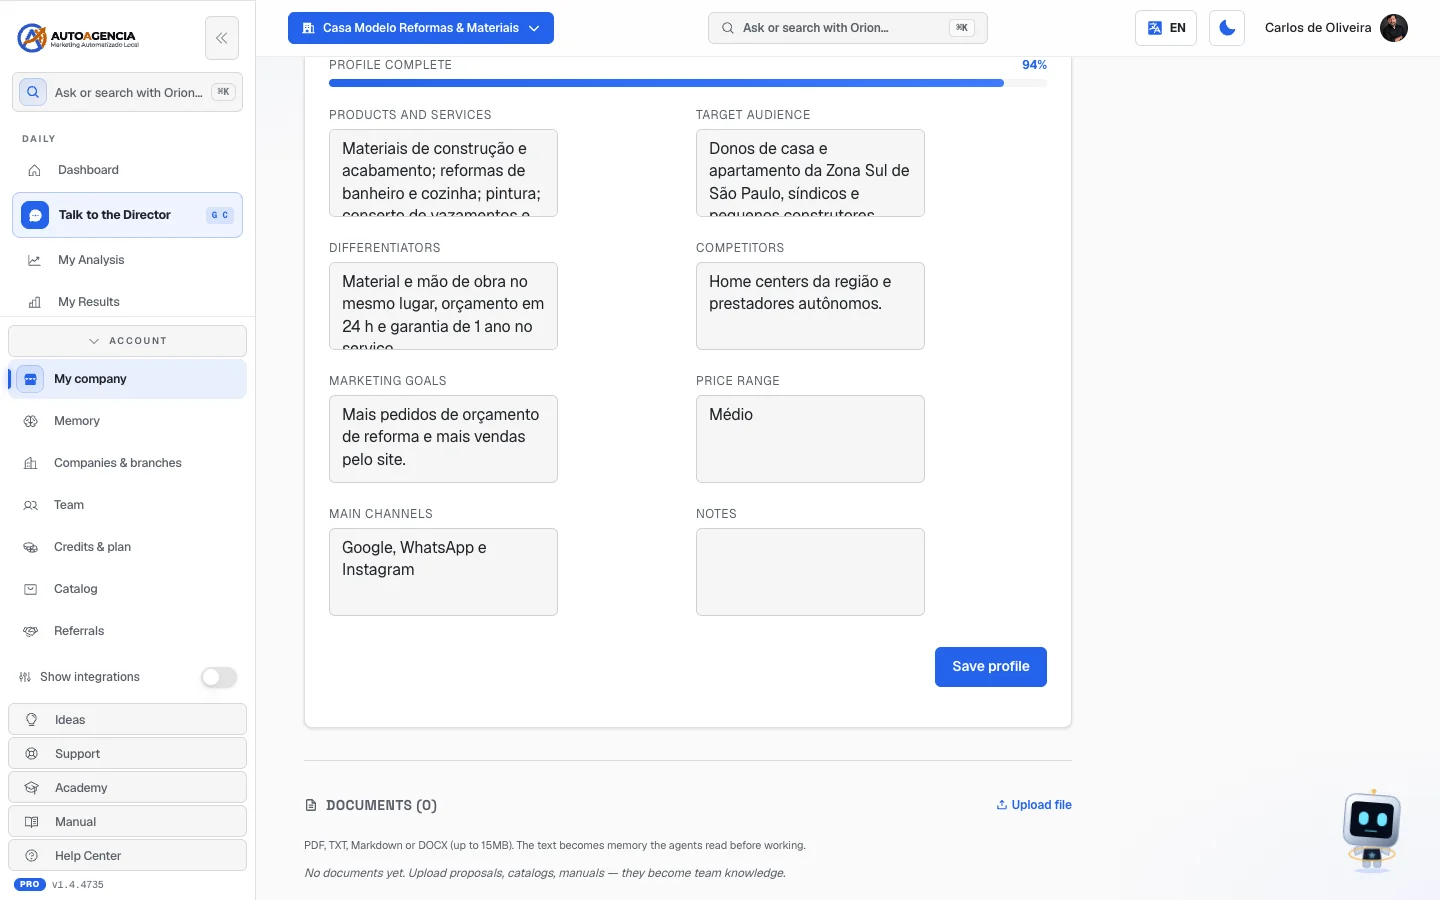 Bottom part of My company: the Profile complete bar (94% on this sample company), the Business knowledge fields, the Save profile button and, below, the Documents block with the Upload file button
Step by step — filling in the profile
- In the full menu, open Account → My company.
- Fill in the fields from top to bottom. You don't have to fill in everything at once.
- Click Save profile. While it saves, the button says "Saving…"; when it finishes, ✓ Saved appears.
- Keep an eye on the Profile complete bar — the higher it is, the better the deliverables.
Step by step — letting the AI fill it in from your website
- Fill in the Website field with your website's address.
- Click Fill from site, next to the field.
- The system asks whether it can replace your brand data, the segment and the Business knowledge with the ones from the website. Confirm.
- Wait — the button shows "Analyzing…".
- When it's done, the notice says how many fields were filled in. Review and click Save profile.
Common questions
I did "Fill from site" twice with different websites. The second one erases the first. The screen itself warns you: "Clicking again with a different site replaces everything with the new one."
"Enter the site first." The Fill from site button only works with the Website field filled in.
I didn't click save and left. What you typed is lost. On mobile, the bar at the bottom reminds you: "Don't forget to save".
What's the difference between this screen and "What my company does"? This one is the record (name, contact, brand). The other is the list of services your company provides, and it's explained in chapter 2.
12. Where to ask for help
There are four doors, and each one is for something different.
| If you want to… | Go to… |
|---|---|
| Get an answer to a "how do I" question | Help Center |
| Report that something is broken | Support |
| Ask for a new feature | Ideas |
| Learn from scratch, at your own pace | Academy |
12.1. Help Center
Where it is: at the bottom of the full menu (Help Center); the link also shows up in the
Getting started tasks.
Address: /app/ajuda
What you see
The title How can we help? and a search field with the example "Search a question — e.g.: credits, pricing, WhatsApp…".
Below, the frequently asked questions: each one opens and closes when clicked. After them comes the list of your modules' manuals, the Ask Our Agent Ava block and the notice about where the full manuals are: inside each module, on the How to use tab.
Step by step
- Type a word from your problem in the search field.
- Click the question that looks most like yours to open the answer.
- Didn't find it? The screen shows: "Nothing found for that term. Ask Our Agent Ava in the chat bubble or talk to us."
- Ava is the AI attendant — the chat bubble in the corner of the screen. She answers at any hour, in simple language.
12.2. Support requests
Where it is: full menu → bottom → Support
Address: /app/tickets
What it's for
Keeping track of what you asked support for and replying to our team. "A request is what we open when something breaks on our side."
Important: you don't open the request on this screen. You tell any specialist about the problem in the conversation (Talk to the Director) and they open the request for you. This screen is where the request shows up afterward.
What you see
Title Support requests, with the sentence "Everything you asked support, with our team's answer. You can reply right here."
When there are none yet, the screen shows No requests yet and explains what will appear there once there are.
When there are requests, the screen turns into two columns: the list on the left, the open request on the right. Each request has a status:
| Status | What it means |
|---|---|
| Open | We received it, haven't started yet |
| Being handled | Someone on the team is taking care of it |
| Answered — waiting for you | The ball is in your court: we need your reply |
| Resolved / Closed | It's over |
And a priority: Low, Normal, High or Urgent.
In the open request you see the What you asked block, the messages exchanged (yours marked with You, ours with AutoAgency support) and, at the end, a field to write in.
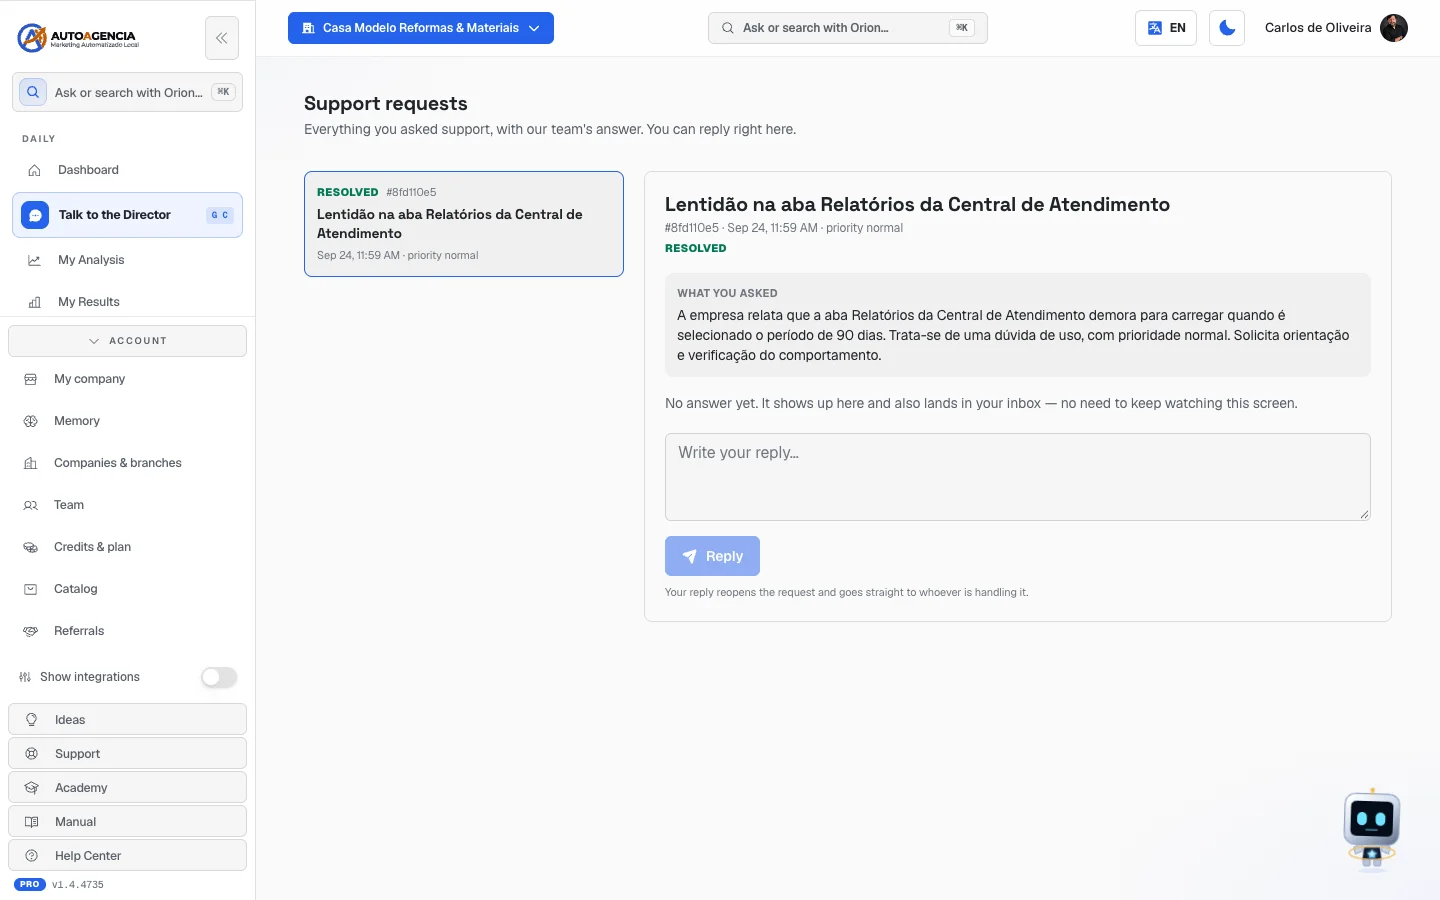 The /app/tickets screen with the list of requests on the left and an open request on the right
Step by step — replying to a request
- In the full menu, click Support.
- Click the request in the list on the left.
- Read the team's answer.
- Write in the Write your reply… field.
- Click Reply.
The notice under the button explains the effect: "Your reply reopens the request and goes straight to whoever is handling it."
Common questions
My request has no answer. The screen says: "No answer yet. It shows up here and also lands in your inbox — no need to keep watching this screen."
I can't open a request from here. That's how it works. Talk to a specialist in the chat and they open it for you.
12.3. Ideas
Where it is: full menu → bottom → Ideas
Address: /app/ideias
What it's for
Asking for what's missing and voting on what other customers asked for. "What goes up here enters our build queue."
This board is for all customers. You see other people's ideas and they see yours.
What you see
Title Ideas, the Suggest an idea block and, below, the list of ideas. Each idea comes with a vote button with the count, the title, the description and a status label:
| Label | What it means |
|---|---|
| New | Just arrived |
| Under review | We're studying it |
| Planned | It's going to be built |
| Shipped | Already live |
| Won't do | We decided not to go ahead |
The ideas you wrote yourself show up marked "your idea".
Step by step — sending an idea
- In the full menu, click Ideas.
- In the first field, write in one sentence what you want to be able to do.
- In the field below, describe the problem this would solve in your day to day.
- Click Send idea.
The button only turns on when the title has at least 4 letters and the description at least 10.
Step by step — voting
- Find the idea in the list.
- Click the button with the little up arrow, to the left of the text. The number goes up.
- Clicked by accident? Click again to take your vote back.
12.4. Academy
Where it is: full menu → bottom → Academy
Address: /academy
What it's for
Learning to use the platform at your own pace. They're reading tracks — no video — put together from the modules' manuals, in the order that makes sense to learn them.
What you see
Three tracks. At each step you read what that module delivers, how to read the result it produces and what usually goes wrong.
Step by step
- In the full menu, click Academy.
- Pick the track and start with the first step.
- Since you're signed in, the system keeps track of what you've already completed.
- At the end of the track, you get the certificate.