

Day to day — the screens you use every week
This is the second chapter. It covers the screens that sit outside the modules you subscribe to: the ones every customer has, whatever else you use. They answer the questions of the day: who reached out to me?, what is waiting for me to decide?, how are my numbers? and does the team know what my business does?.
If you don't yet know your way around the system, read the Getting started chapter first.
What's in here
- 1. Talk to the Director — the conversation with the team
- 2. Latest Contacts — who reached out to your company
- 3. Approvals — what is waiting for your "OK"
- 4. Approving a budget proposal
- 5. Approving keywords
- 6. My Results — your marketing numbers
- 7. My Analysis — the x-ray of your marketing
- 8. What my company does — the business profile
- 9. Memory — what the team keeps about you
- 10. My contacts — the sending lists
- 11. Support Desk
- 12. Website chat
- 13. Three old addresses that now only redirect
1. Talk to the Director — the conversation with the team
Where to find it: full menu → Daily → Talk to the Director (it's the highlighted item,
in the brand color).
Address: /app/chat
What it's for
It's your agency's phone line. You write what you need, in plain language, and Orion — the Marketing Director — brings in the right specialists to work on it. It's also the place to ask for support: just describe the problem and the specialist opens a ticket for you.
Use it to ask for things ("I need a post for Friday's promotion"), to ask questions ("how many contacts did I get in the last 7 days?") and to complain when something is wrong.
What you see
At the top, the Orion · director bar and, on the right, three buttons: Team / Show team, History (with the number of conversations next to it) and New.
The middle of the screen is the conversation. At the bottom is the message box, with the paperclip for attaching files on the left and the Send button on the right.
The first time you open it, Orion introduces himself:
"Hi! I'm Orion, your AutoAgency's Marketing Director. I lead a team of N specialists who will work for your brand in real time here in chat."
And he offers two paths, on a highlighted card: Yes, start the analysis and I'd rather write a request.
On later visits, he's briefer ("Where do we start?") and shows Suggestions to get started buttons — ready-made questions that change depending on what you've subscribed to. For example: "What is waiting for my approval?", "What should I do first today?", "Which materials were created this month?".
On the right (on a computer) is the Your team panel: who was called in for your request and where each one stands — thinking…, writing…, done or needs you. On a phone, that panel opens with the Team button.
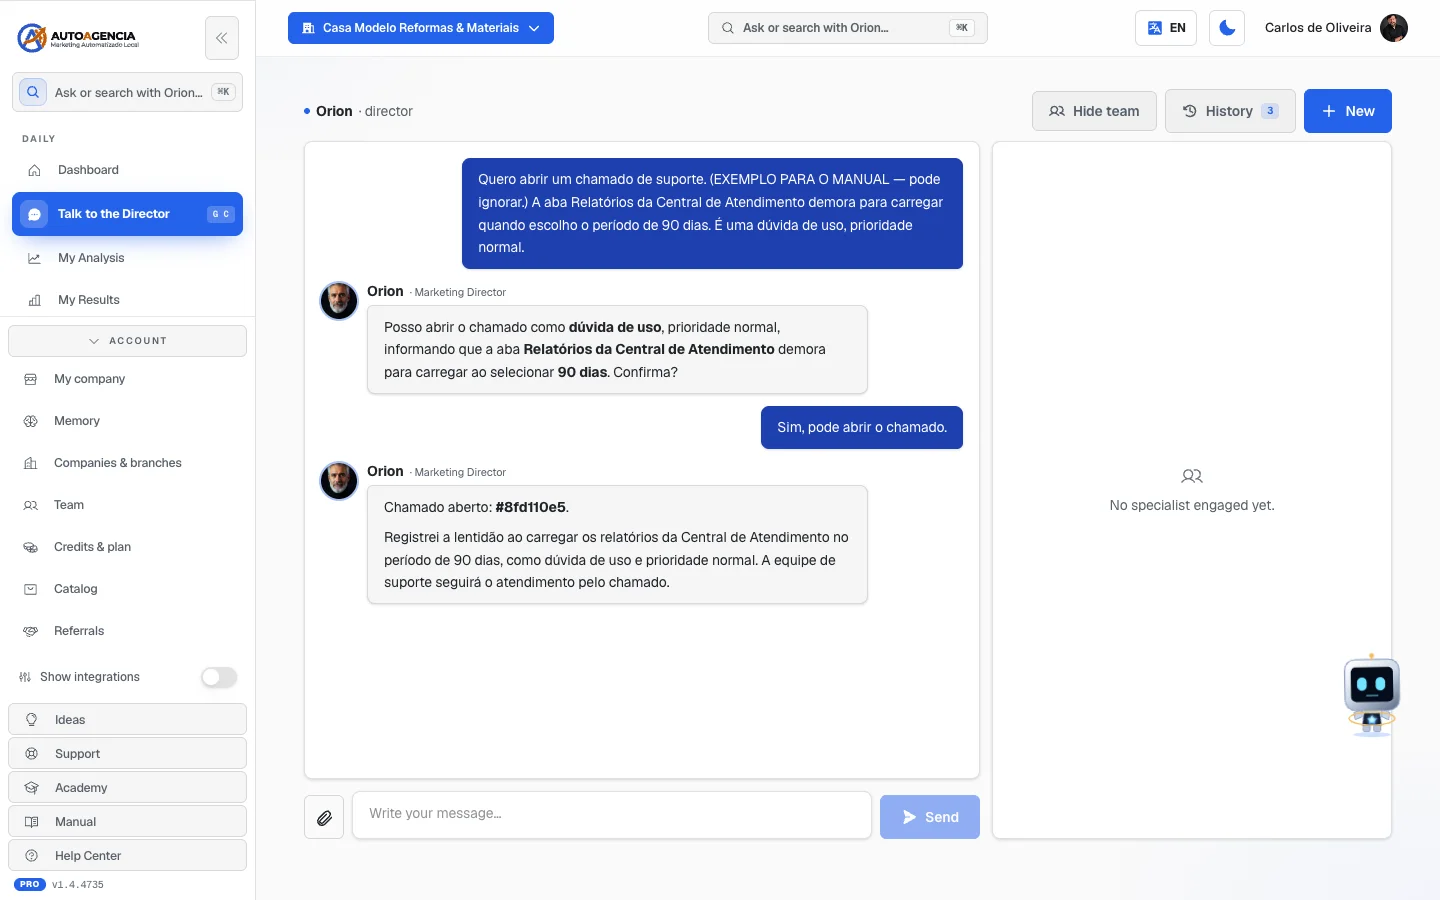 The /app/chat screen with a conversation in progress and the "Your team" panel on the right
Step by step — making a request
- In the full menu, click Talk to the Director.
- Write what you want in the box at the bottom. Talk the way you would to an employee: "I want to advertise drain unclogging in Goiânia this weekend", "my phone number changed, update it everywhere".
- Need to send a photo or a file? Click the paperclip on the left of the box and choose it.
- Press
Enteror click Send. (To start a new line without sending, useShift+Enter.) - Follow who is working in the Your team panel. Meanwhile, the box shows "Waiting for response…".
- Want to talk to a specific specialist? In the Your team panel, click their name and then Chat directly.
Step by step — the initial analysis
- In the first conversation, click Yes, start the analysis.
- The whole team analyzes what's already registered: company profile, brand, industry, website, social media, contact lists and connections.
- Each specialist replies right there in the chat, and at the end comes the plan for the next 30 days.
- This takes a few minutes. You can go to another screen and come back.
Step by step — going back to an old conversation
- Click History, at the top right.
- Choose the Active or Archived tab.
- Click the conversation you want to reopen. The conversation you're in is marked ACTIVE.
- To start from scratch, click Start new conversation (or the New button, at the top).
Archiving and deleting conversations
Inside History, the trash icon next to each conversation archives it — it leaves the list of active ones and goes to Archived, without losing anything. The tooltip explains: "Archive (keeps in history)".
In the Archived tab, on the other hand, there are two buttons: Restore, which brings the conversation back, and a second trash icon, Delete permanently — that one really does delete it for good, and the system asks for confirmation first.
Common questions
How long does it take? It depends on the request. While the team works, the screen shows Team working…. You can leave the screen and come back later.
The reply came with a "Sources consulted" notice. It means the specialist went to look for information outside the system (websites, public data). Click to see where it came from.
A message marked "Automatic request" appeared. It's a request the system put together for you when you clicked a button — for example, the initial analysis.
"Connection failed." Your internet dropped midway. Send it again.
2. Latest Contacts — who reached out to your company
Where to find it: full menu → Daily → Latest Contacts
Address: /app/ultimos-contatos
What it's for
It's the list of everyone who reached out to you, all in one place — no matter how the person got in touch. They called on the phone, sent a WhatsApp, wrote an email or filled out a form on your website: it all shows up here, in a single list.
Each row is a person, not an event. If the same customer called and then sent a WhatsApp, they appear only once, with the history inside.
What you see
The title Latest Contacts, with the line "Everyone who reached out to your company, all in one place."
The filters, right below:
- Seven period buttons: 24 hours, 7 days, 15 days, 30 days, 60 days, 90 days and Date range. The screen always opens on 30 days. If you choose Date range, two date fields appear: From and to.
- A search box: "Search by name, phone or email".
- A channel selector: All channels and, below it, only the channels your company really has, with the number from each one. (If you only have one channel, the selector doesn't even appear.)
- The Excel button, which downloads the list as a spreadsheet.
The yellow block at the top appears when someone called in the last 48 hours and nobody answered. It says, for example: "3 people called in the last 48 hours and nobody answered", followed by "Calling back now usually recovers the sale." Each person on the list comes with two buttons: Call and WhatsApp.
The list, below, shows the count ("12 people") and one row per person with:
- the name (or the phone, or the email — whichever there is; "Unidentified" when there's nothing);
- the awaiting callback tag, when it applies;
- a "3×" counter when the person got in touch more than once;
- the icons of the channels they used;
- when it was ("today, 14:32", "yesterday" or the date).
📷 This screen has no photo — the list fills up with the calls and WhatsApp conversations that come in through the company's tracking number. At the top is the yellow block of people awaiting a callback; below it, the list of contacts.
The channels
| Channel | Where it comes from |
|---|---|
| Call | Tracked phone calls |
| WhatsApp conversations | |
| Emails that arrived in the company's inbox | |
| Website form | People who filled out a form on your website |
| Facebook ad | People who filled out the form inside the ad |
Step by step — calling back someone who got no answer
- In the full menu, click Latest Contacts.
- Look at the yellow block at the top of the screen. It's your to-do list for the day.
- Click Call to open your phone's dialer, or WhatsApp to open the conversation already set up with the right number.
- After you talk to the person, they leave the block on their own at the next refresh.
Step by step — seeing a person's history
- Click the person's row. It opens.
- Inside you'll see History: each time they got in touch, through which channel, when, whether the call was unanswered and — when the system knows — which campaign they came from.
Step by step — downloading the list as a spreadsheet
- Choose the period and filters you want.
- Click Excel. The button shows "Building…".
- The spreadsheet downloads on its own.
Common questions
It says "No contacts in the last 30 days". That's not an error. The screen even lists what will show up there once there is something: whoever calls, whoever sends a WhatsApp, whoever writes by email and whoever fills out a form on your website.
It says "No contacts match this filter". Then it's the filter. Clear the search or go back to All channels.
"We could not read right now: …" appeared. One of the channels failed on our side, and the screen warns that "This list may be incomplete" instead of hiding the problem. Try again later.
"There are more contacts than fit in this list." appeared. Choose a shorter period to see them all.
3. Approvals — what is waiting for your "OK"
Where to find it: full menu → Daily → Approvals
Address: /app/aprovacoes
What it's for
It's the desk where finished pieces arrive — posts, videos, Google posts — waiting for you to say whether they can go live. It's also where you decide whether or not you want to be consulted on each type of piece.
The line at the top sums it up: "Pieces ready and waiting for your OK. Once approved, I publish within 10 minutes."
What you see
From top to bottom:
-
When do you want to approve before publishing? — the rule you set, separated by type of piece: Social networks, Videos and Google Business Profile. Each one has three options:
Option What happens Always — every piece goes through me "Every piece waits for your OK before going live." Only the first one per channel "Only the first piece on each channel waits for your OK. After that I publish on my own." Never — publish right away "I publish straight away, without checking with you." Below Google Business Profile there's one extra line, about the replies that Renata writes to the reviews on your Google profile. With Always, those also wait for your OK here; with the other two options, the line says they go out directly.
-
The notice about the other queue (it only appears when there is something to review) — "N content item(s) waiting for your OK", with the Review content button. These are articles and page optimizations, which live on the Content & SEO screen (see the Common questions below).
-
Building your video — the video pieces that are still being produced. The notice says: "As soon as it's ready I'll message you on WhatsApp so you can give the OK."
-
Redoing it now with your request — the pieces you asked to have adjusted.
-
The pieces waiting for you. Each one shows the image or video, the text (which you can edit right there) and two buttons: Approve and publish and Reject. This is where you do your work — scroll down to this part. When the piece is a Reply to a Google review, the card first shows the review your customer wrote (who left it, the stars and the comment), the deadline you have to decide and, below, the reply Renata wrote — this is what becomes public on your Google profile.
-
Approved, waiting to be published — what you've already released that hasn't gone out yet.
-
Latest pieces that went out — the history of the five most recent.
When there's nothing, the screen says: Nothing waiting on you right now. ✨
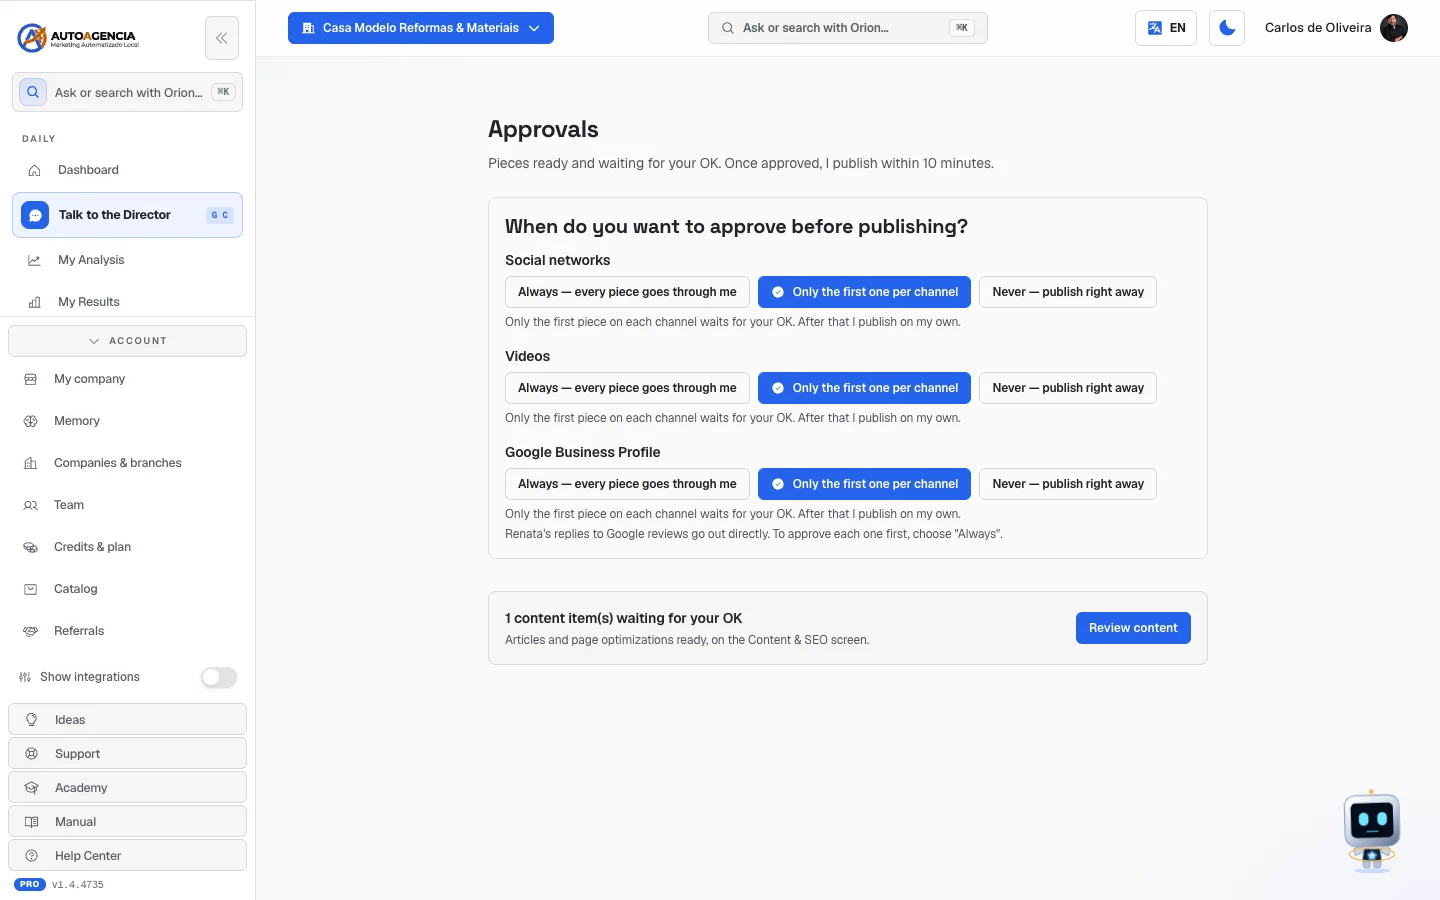 The /app/aprovacoes screen with the modes block at the top; in this sample company there is no piece waiting for approval
Step by step — approving a piece
- In the full menu, click Approvals.
- Look at the piece: the image or video shows up on top, the text right below it.
- If you want to change the text, click inside it and edit. What you write is what goes live.
- Click Approve and publish.
- For social media pieces, the line above the text already says where and when it will go out — for example "Goes out on Instagram, LinkedIn · scheduled for 12/03/2026 09:00".
Heads up: approving a social media post is not publishing it now. It goes out at the scheduled time. When no time is set, the screen says "as soon as you approve".
Step by step — rejecting a piece
- Click Reject, next to Approve and publish.
- The piece leaves the pending list.
Step by step — choosing when to be consulted
- In the When do you want to approve before publishing? section, find the type of piece.
- Click the option you want. The chosen one gets the brand color and a checkmark.
- The line below changes to explain the effect of your choice.
- No need to save — it applies right away.
How to read the piece notices
| What appears | What it means |
|---|---|
| "30s · with voice-over · 12 credits" | What the piece is and how much it cost in credits |
| "Shortened to fit the spending cap you set." | The video was cut down to respect your limit |
| "You approved with voice-over, but only music came out: …" | The piece came out different from what was approved, and the screen says why |
| "Published on <date>" | It went live |
| "I couldn't publish it: <reason>" | It failed, and the reason is written there |
| "Not out yet: <reason> I'll retry on my own." | It's stuck, but the system keeps trying |
What happens if you don't approve
Nothing goes live. The piece stays on the screen, waiting. There is no automatic approval after a certain time: if your rule is Always — every piece goes through me, everything waits indefinitely.
The only exception is replies to Google reviews. If you don't decide within 24 hours, Renata publishes the reply anyway and lets you know — the exact deadline is written on the card.
That's why this screen matters: a stalled piece is stalled money. If you don't want to be consulted every time, switch the rule to Only the first one per channel or Never — publish right away.
Common questions
I approved it and the post didn't show up on the network. Look at the Approved, waiting to be published block. If there's a reason written there, that's what's holding it up.
A piece failed. Can I try again? In the history, the pieces that failed get the Publish again button. It doesn't appear when the scheduled time has already passed — republishing then would put old content live.
"N content item(s) waiting for your OK" appears with a "Review content" button. It's a second queue, of articles and page optimizations, that lives inside the Content & SEO module. Click the button to go there.
Where do I see the published post? In the history, published pieces have the See the post button.
4. Approving a budget proposal
Where to find it: /app/aprovar-verba/<código> — you get there through a link you receive (by email
or WhatsApp). There is no menu item for this screen.
What it's for
When the traffic manager wants to change how much you invest in ads, they don't change it on their own: they put together a proposal and send you this link. The screen explains: "Your traffic manager has a proposal that changes your ads budget. Budget is your call — nothing happens without your OK."
What you see
The title Approve budget proposal, the line above, and a highlighted block with the explanation of the proposal in plain language — what they want to change and why. Below, the Approve now button.
📷 This screen has no photo — it opens from the link in the notice you get when there is a budget change proposal. The screen explains the proposal and has the "Approve now" button.
Step by step
- Open the link you received.
- Read the block with the explanation.
- Click Approve now. The button changes to "Applying…".
- When it's done: Done! I applied the budget change. The team handles the rest.
What happens if you don't approve
The budget doesn't change. That's all. The proposal stays on hold; the ad keeps running with the previous amount. There is no deadline after which it approves itself.
Common questions
"This proposal has already been decided." Someone already answered — you, on another device, or someone else on your team.
"This link isn't valid for your account." The link belongs to another company, or it's broken.
"I couldn't apply it right now. Please try again shortly." A passing glitch. Click again.
A message saying the product is no longer active. It means Traffic Management was canceled, so nothing was changed. The screen itself tells you to contact us to reactivate it.
5. Approving keywords
Where to find it: /app/aprovar-palavras/<código> — also only through a link. No menu item.
What it's for
A "keyword" is what a person types into Google when looking for a service like yours. The system finds out, by looking at your ads, that there are searches worth targeting — and others that only burn money and should be blocked. This screen is where you decide.
What you see
The title Approve keywords and up to two blocks:
- Activate these searches — the searches worth targeting. People who search for them will see your ad.
- Block these searches — the searches that have nothing to do with you. People who search for them will not see your ad.
Each row is a checkbox with the text of the search. All of them come already checked, so you only uncheck what you don't want. At the end, the Apply button.
📷 This screen has no photo — it opens from the link in the email you get when there are new searches to decide on. The screen has two blocks: "Activate these searches" and "Block these searches".
Step by step
- Open the link you received.
- Read the Activate these searches list. Uncheck any that doesn't describe what you do.
- Read the Block these searches list. Uncheck any that you actually do serve — blocking by mistake costs you customers.
- Click Apply. The button changes to "Applying…".
- When it's done, the screen tells you how many were activated and how many were blocked, for example: "Done! Activated 7 and blocked 3. The team takes it from here."
What happens if you don't approve
Nothing changes in your ads. The suggested searches aren't activated and the useless ones aren't blocked — in other words, the money keeps being spent the same way as today, including on the searches that don't bring customers. There is no automatic application.
Common questions
I unchecked everything and the button won't turn on. You have to leave at least one checked.
"You already decided on these suggestions." That batch has already been answered.
"This link isn't valid for your account." The link belongs to another company, or it expired.
6. My Results — your marketing numbers
Where to find it: full menu → Daily → My Results
Address: /app/resultados
What it's for
It answers, on one screen: how many contacts came in, which way they came and what was blocked before it turned into a loss.
What you see
The title My results, with the Your marketing tag above it.
Right below, three period buttons: 7 days, 30 days and 90 days.
Then come the sections — and here is the important point: the screen only shows the sections for the services you subscribed to.
| Section | Appears for those who have… | What it brings |
|---|---|---|
| Your peace of mind | Fake-click protection | Today's investment, fake clicks blocked, contacts and the investment calculator |
| Traffic management | Traffic management | Where your contacts came from, the spend brake and the words that bring the most contacts |
| Your contacts | Call and WhatsApp tracking | Each call and conversation, so you can mark it as sale, good, discard or fraud |
What you did not subscribe to doesn't turn into a zeroed number: it turns into an invitation. The There's more you could measure block explains: "These numbers show up here once you subscribe to the module that produces them. None of it is switched off by mistake — it's a service you don't have yet."
And if you have none of those three, the screen says so, before anything else: "This screen measures results from ads and phone calls — services you haven't subscribed to yet. Nothing here is broken.", with the buttons See what's waiting for you and See created materials.
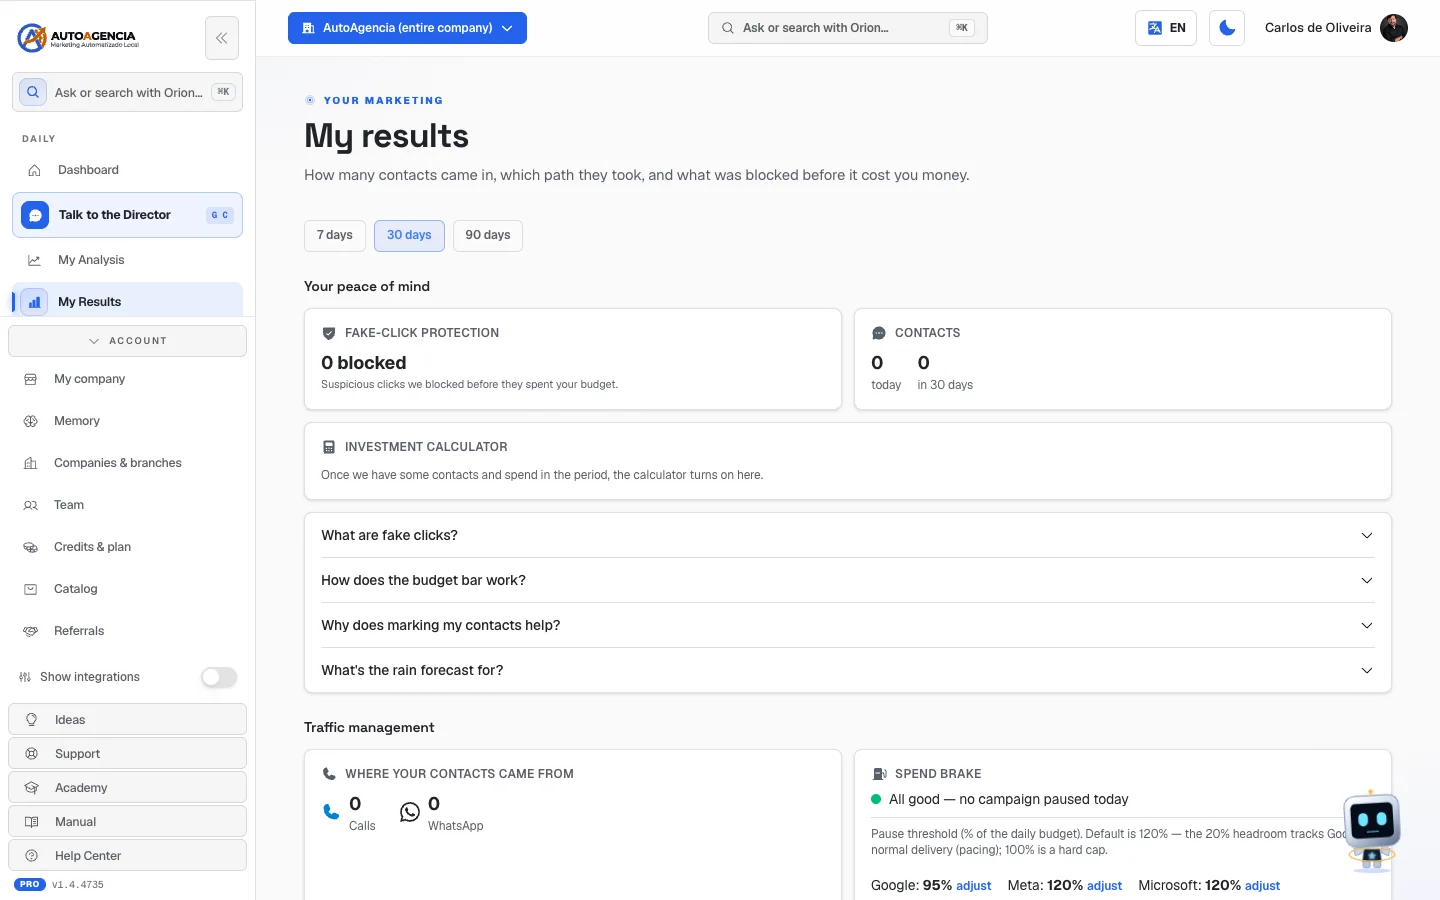 The /app/resultados screen with the period buttons and the "Your peace of mind" section
How to read the numbers
In "Your peace of mind":
| What appears | What it means |
|---|---|
| Today's investment | How much has gone out today, and what the day's limit was. Green = fine, yellow = "Nearing today's limit", red = "Daily budget reached" |
| Fake-click protection | How many suspicious clicks were blocked and how much that saved. "Suspicious clicks we blocked before they spent your budget." |
| Contacts | How many people reached out to you, today and over the period |
| 48h forecast | Whether rain is coming. Rainy days tend to increase searches for urgent services |
| Investment calculator | You say how much you want to invest per month and it estimates how many contacts that brings — or the other way around |
In "Traffic management":
| What appears | What it means |
|---|---|
| Where your contacts came from | How many by call and how many by WhatsApp |
| Spend brake | "All good — no campaign paused today", or the notice that a campaign was paused for overspending, or that the ads may be offline |
| Words that bring the most contacts | What people typed into Google before reaching out to you |
In "Your contacts": each call and conversation shows up for you to classify as Sale, Good, Discard or Fraud. The screen's explanation: "When you mark sale/good, Google learns to bring more similar people. When you mark discard/fraud, it stops looking for that type."
Common questions
"No data for this period yet." There was no activity in the period you chose. Extend the period to 90 days and see if anything shows up.
A number shows zero and I have the service. Zero really is zero — that day or period had no activity. What the system doesn't know, it shows as "—", never as zero.
I want to show these numbers to someone else without giving them access to the system. You can: there is a read-only version of this screen, for whoever you invite. See item 6 in the Getting started chapter.
7. My Analysis — the x-ray of your marketing
Where to find it: full menu → Daily → My Analysis
Address: /app/analise-principal
What it's for
It's a complete diagnosis of your company's presence on the internet — website, social media, positioning, competition — with a score and a written report. The first analysis is free.
What you see
The title Your Marketing Analysis, with the line "A complete x-ray of your company's marketing presence, made by our team of specialists."
Then it depends on the state:
You've never done one. The Generate your free analysis card appears, with the notice: "We use your company's website and socials (from your profile) to build the diagnosis. Make sure your website is filled in your profile." And the Generate free analysis button.
It's running now. Analyzing your company… appears with a progress bar, the name of the current step and the percentage. The notice: "Our specialists are working. This takes a few minutes — feel free to navigate and come back."
It's ready. The Marketing score appears: a number inside a colored circle and a word next to it — and, in the right corner, the date of the analysis ("Analysis from …").
| Word | Color |
|---|---|
| Weak | Red |
| Fair | Yellow |
| Good | Light green |
| Great | Green |
Below, two buttons — Download PDF and Generate new analysis —, the notice that a new analysis uses up credits, and the full written report. When you already have more than one analysis done, the Evolution over time block also appears, with each analysis, its date, its score and the difference from the previous one.
It failed. The last analysis didn't finish appears, with the reason and the Try again button.
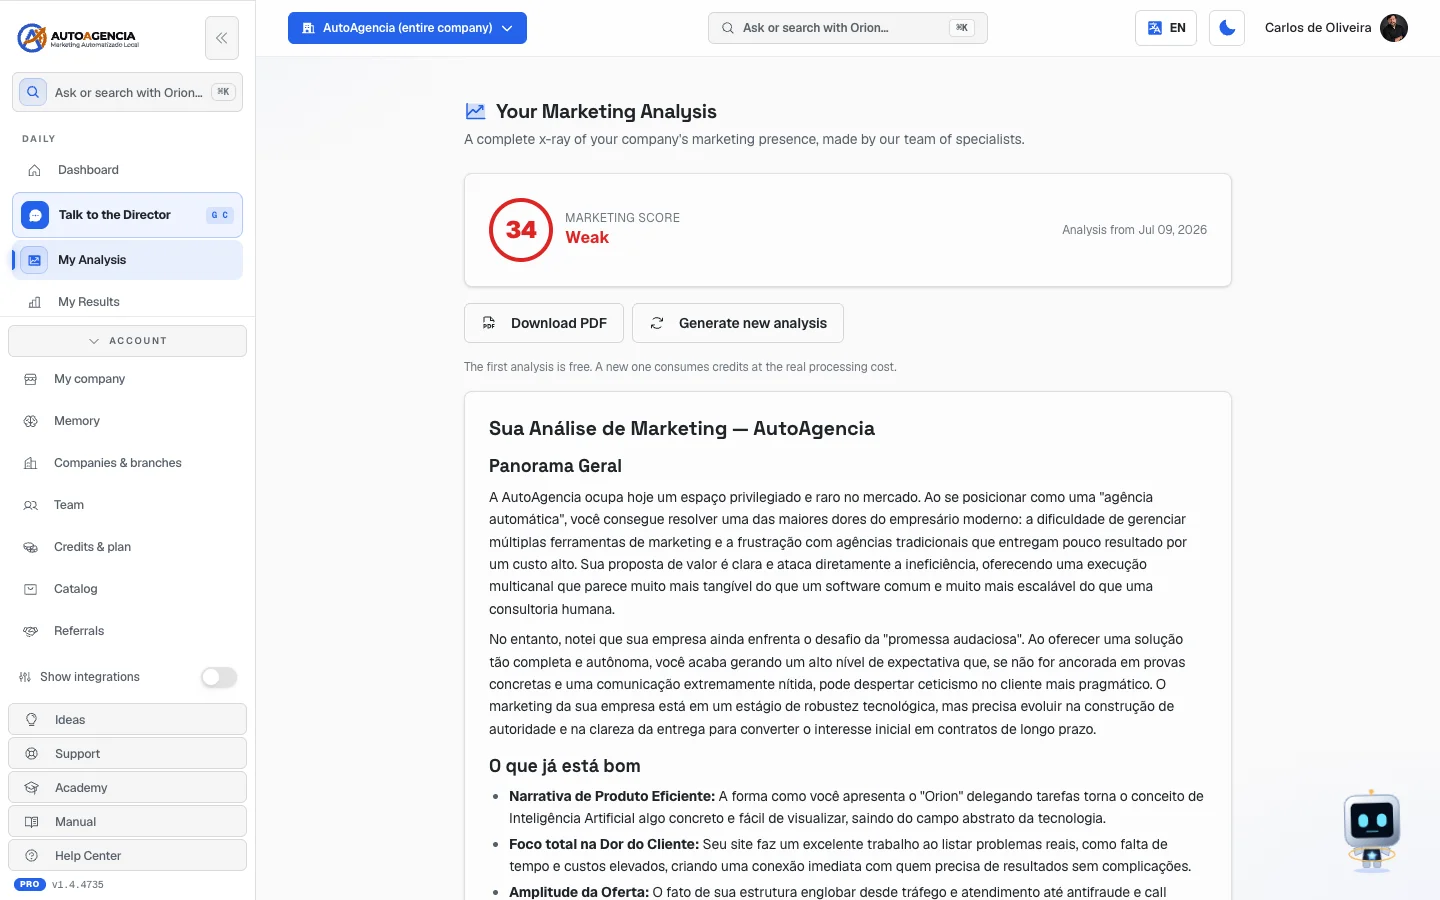 The /app/analise-principal screen with the score, the buttons and the start of the report
Step by step — generating the first analysis
- First of all, go to My company and check that the Website field is filled in. That's where the analysis starts from.
- In the full menu, click My Analysis.
- Click Generate free analysis.
- The screen says "Your analysis started (free)." and starts showing the progress.
- You can leave the screen. When you come back, the report will be there.
Step by step — downloading the report as a PDF
- With the analysis ready, click Download PDF.
- The button shows "Generating…" and then opens the file in a new tab.
Common questions
Can I redo it? Yes, with the Generate new analysis button. But, as the screen's notice says: "The first analysis is free. A new one consumes credits at the real processing cost."
The score dropped. What do I do? Open the Evolution over time block to see since when, and read the report of the most recent analysis — it points out what changed.
8. What my company does — the business record
Where to find it: full menu → Daily → What my company does
Address: /app/ficha
This is the most important screen in this chapter. It's worth reading carefully.
What it's for
This is your business record: the list of what you do, what you do not do, where you serve, at what hours and how much you want to invest. This is where the whole team gets what it needs to know about you.
The screen explains it like this: "This is where your team gets what you do, where you serve and how much you want to invest. Did something change in your business? Fix it here — it applies from now on."
Why this matters so much, in practice: if the record says you do "water heater installation" and you don't, the ads will bring people asking for water heater installation — you pay for the contact and lose the call. If the record does not say you do "leak detection" and you do, nobody searching for that will find you. The record is what separates a good contact from a wasted one.
You don't write this list from scratch. The system reads your own pages and puts together the proposal. You just check it, uncheck what isn't yours and add what's missing.
What you see
The title Your company record and the line above. Then the screen changes depending on the case:
While it reads your website: "We're reading your pages to build your list of services…" / "It takes a few seconds."
When everything went well, the review appears:
- Check what your company does — "We found these services on your own pages. Uncheck what you don't do and add anything missing." The wording changes depending on your type of business: in a store it reads Check what your store sells ("We found these products…"); for those who sell courses, Check what you teach; for those who provide a service and sell products, Check what your company does and sells. The rest of this list uses the wording for service providers — on your screen, swap "service" for "product", "course" or "item" as the case may be.
- The services come grouped by the page where they were found. Each group starts with the word "Found", followed by the page they came from and the count — for example "… — 12 services". Large groups start closed, with the see all 12 link to open and hide to close. When closed, the group says: "They're already in your profile. Open it if you want to remove any." There is also a group called What you already state you do (what your record already had) and another with the services Common for your line of work.
- Each service is a checkbox. When it was found on your website, below the name, in quotation marks, comes the excerpt it came from. Those in the Common for your line of work group don't come from your website, so they appear without an excerpt.
- Any service missing? — a box to type in and the Add button. (In a store, the box is called Any product missing?; for courses, Any course missing?; for those who both provide and sell, Anything missing?.)
- Services we understood you do NOT provide — a block that starts closed. It exists because those services are making your ad show up. The text explains: "These are making your ad show up. If you do provide any of them, tell us — so we stop treating it as a mistake." Each item has two buttons: I do provide this and I don't. When the system knows, it also shows what people searched for and how many have already gotten in touch that way.
- Which of these services do you want to advertise? — the business choice. Three options: All of them, Only some — I'll pick and None new for now. The notice: "We'll only create new ads for what you pick here. The rest stays on your record, with no ads." This question disappears after you answer it.
- Where and when to advertise — a block that starts closed. When closed, it shows a summary next to the title, for example "No days set · no cities" (and the amount per day, once there is one). Click it to open. Inside are three things: the grid of days and hours when your ad runs; Cities you serve, with the field for adding a city; and How much to invest per day, with the Split by service option.
- At the end, the That's right button.
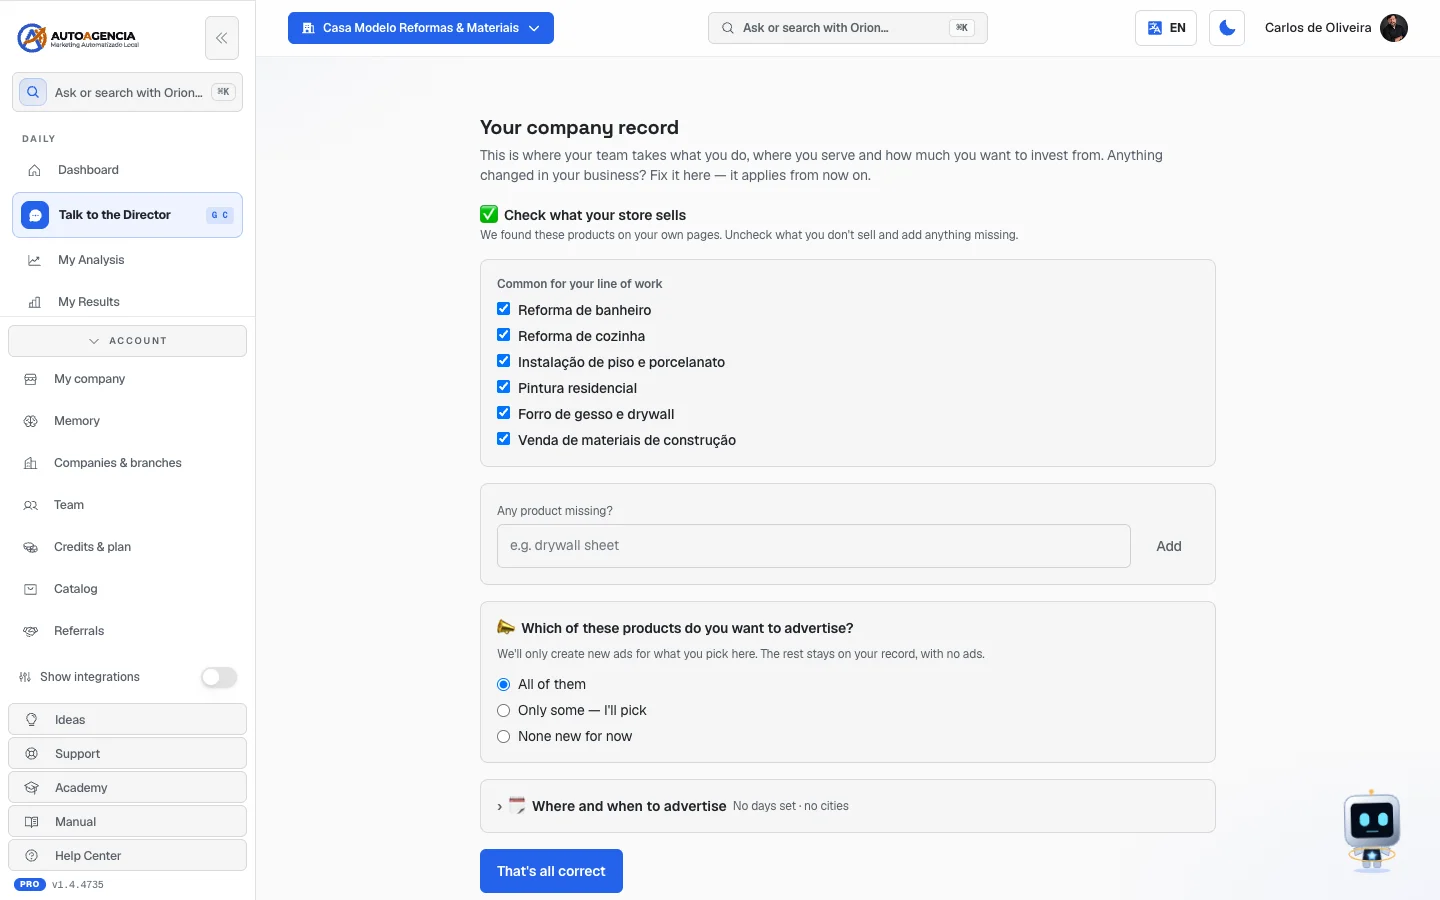 A store's record: "Check what your store sells", six items checked in the Common for your line of work group, the "Any product missing?" field with the Add button, the "Where and when to advertise" block closed with the summary "No days set · no cities" and the That's right button
Step by step — checking the record
- In the full menu, click What my company does.
- Wait for the system to put the list together.
- Go through the services. Uncheck everything your company doesn't do.
- Open the closed groups (see all N link) and check what's inside them too.
- Missing a service? Type it in the Any service missing? box and click Add.
- Open the Services we understood you do NOT provide block and answer item by item: I do provide this or I don't. What you don't answer remains just a guess on our part — it doesn't become an answer from you.
- If the Which of these services do you want to advertise? question appears, answer it.
- Open the Where and when to advertise block and check the hours, the cities and the amount per day.
- Click That's right.
- The screen shows: ✅ Saved. Your team is already working with this information. You stay on the same screen — it's a maintenance screen, you can come back and adjust whenever you want.
Step by step — when you don't have a website
If your company has no website (or the website doesn't have enough content), the screen says: "We couldn't read enough from your website." and offers the alternative path: "No problem: let's answer a few quick questions about what your company does."
- Click Answer the questions.
- Answer by checking the services your company provides, from a list for your line of work.
- Confirm at the end.
On this path, what you check adds to what's already in the record — nothing is erased. The questionnaire asks using the vocabulary of your line of work, and doesn't show what's already saved.
Common questions
"We couldn't build your list right now." The screen makes clear whose fault it is: "That was on us, not on your website. Try again in a moment." Click Try again.
"Part of the reading failed — and that was on us." One of the sources didn't respond. Try again, or answer the questions and the system fills in the rest later.
"⏳ We're still reading the rest of your website (N pages to go)." appeared. It's just information, not a question. Whatever is found goes into the record on its own. There's no need to wait.
A notice with page addresses appeared. These are pages of yours that the system couldn't open. If they have different services, add those services by hand in the Any service missing? box.
"Pick at least one service your company provides…" You tried to save with nothing checked. Without that, the system doesn't know what to advertise.
What's the difference between this screen and "My company"? My company is the registration (name, contact, logo, colors). What my company does is the list of services and the rules for where, when and how much to advertise.
9. Memory — what the team keeps about you
Where to find it: full menu → footer → Account → Memory
Address: /app/memoria
What it's for
It's the team's notebook about your business. Everything the specialists have learned is written here — and they read it before each job.
The line on the screen: "Everything the agent team knows about your business. Edit it anytime — the agents read it before working."
Why you should open this at least once: if a specialist understood something wrong about your business, this is where you fix it. You're the one who knows.
What you see
The title Your company's memory. Right below, a bar with the Refresh everything button and the explanation: "Changed something on your website or profile? Refresh everything so the agents work with the new information." Further down, the timing notice: "Usually takes a few seconds: we re-read your website and your profile. You can leave this screen open."
Then the screen splits into two columns:
On the left, Knowledge (N) — the notes, one per subject, with the New section link at the top. The subjects are usually: Company, Brand, Website, Social media, SEO, Google Business Profile, Google Analytics, Paid media, Competitors, Copy / Tone of voice, Target audience, Offer, Industry, Latest diagnosis, History and Team research (what each specialist looked up before working).
Each note shows the date of the last change and who wrote it (the specialist's name, or manual when you wrote it on this screen), and has the Edit button and a trash icon to remove it.
On the right, Recent executions (N) — the record of what the team did: analyses, campaigns,
posts, emails. Each row has the category on a tag (for example, Analysis delivered), the
date, the title, the details when there are any, sometimes a link to the screen where that thing lives (it
appears written as an address, for example /app/modulos/marca) and, below, "by" and the name of the
specialist who did it.
At the bottom of the page is the Documents block, where you can Upload file — price lists, catalogs, manuals. Each document shows how many pieces it was split into, and it can be reprocessed or removed.
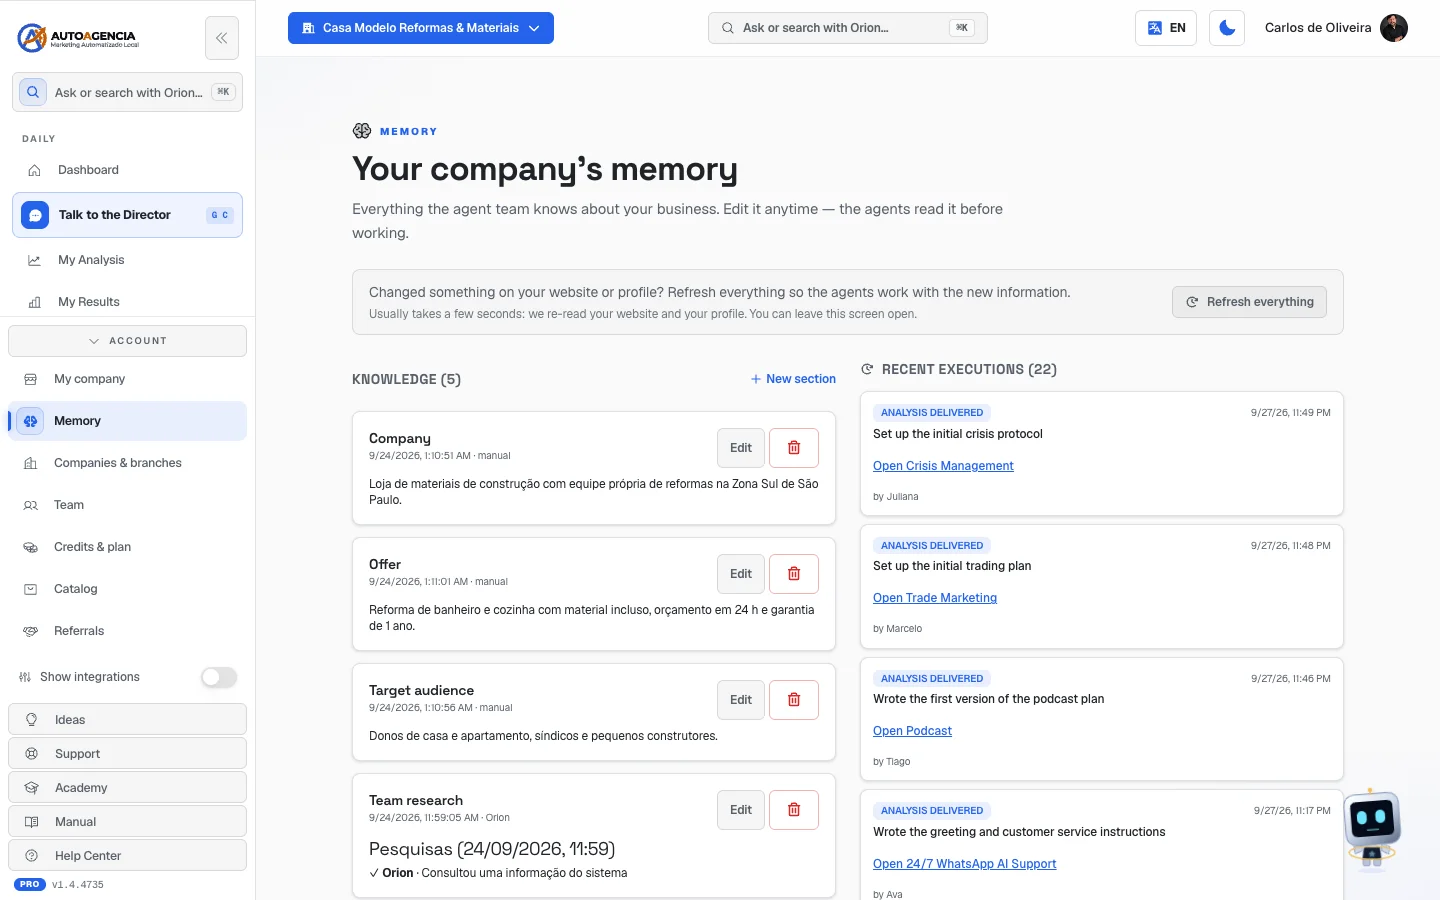 The Your company's memory screen with the Refresh everything button bar at the top and the two columns: Knowledge (3), with the Company, Offer and Target audience notes written by hand, on the left; Recent executions (10), with analyses delivered by Sofia, Viviane, Mariana, Bruno and Diana, on the right
Step by step — fixing something the AI got wrong
- In the full menu, open Account → Memory.
- Find the note with the error, in the Knowledge column.
- Click Edit.
- Fix the text in the box that opens.
- Click Save. The screen confirms: "Section saved".
Step by step — adding a piece of information of your own
- Click New section, at the top of the left column.
- In the first field, write the key — a word that identifies the subject (for example: "business hours").
- In the large field, write the content.
- Click Save.
Examples the screen itself suggests: "Brand tone of voice", "Business hours", "What to never offer". As it says: "Anything you save here, the agents start taking into account."
Step by step — updating everything after changing your website
- Click Refresh everything.
- The button shows "Refreshing…". Wait a few seconds.
- When it's done, the system tells you what new it brought in — for example "Memory refreshed: 4 from the profile, 12 from the website".
Common questions
"Found nothing new to read." appeared. The full notice says: "Check that the website is up and the company profile is filled in." It's almost always that.
The memory is empty. That's normal at the start: "Agents will fill it in as they work — or add entries here yourself."
The right column says "Plus N behind-the-scenes actions". These are automatic things the system does (watching spend, scanning accounts). The notice itself says: "It doesn't need your attention."
Can I delete a note? Yes, with the trash icon next to it. The system asks for confirmation.
10. My contacts — the sending lists
Where to find it: full menu → More drawer → My contacts — or, if you have WhatsApp
or Voice Campaigns, the Lists tab of those apps (then the item leaves the More drawer)
Address: /app/contatos
If you subscribed to WhatsApp Campaigns, Voice Campaigns or Sites, this same screen shows up as the Lists tab inside the module. The item in the More menu exists so that those who have none of those modules can still reach the lists.
What it's for
Keeping customer lists for the team to use in prospecting, WhatsApp and email marketing. An example from the system itself: a "2023 customers" list to reactivate people who already bought from you.
Don't confuse it with Latest Contacts (item 2). That one is who reached out to you. Here are the lists that you upload for the team to get in touch with.
What you see
The title Your contacts, with the line "Customer lists used by specialists for prospecting, WhatsApp and email marketing.", the count of lists and the New list button.
When there are none: No lists yet / "Create your first list and upload contacts via CSV." / Create first list button.
Each list is a card with the name, the number of contacts and the Open list button.
Inside a list: the Back to lists link, the Contacts in this list title, the Import CSV and Add to email list buttons, and the table with Name, Email, Phone, Company and City. (The Sync Kommo button only appears for a company that already had Kommo connected — Kommo is no longer offered as a CRM; the CRM is the platform's own.)
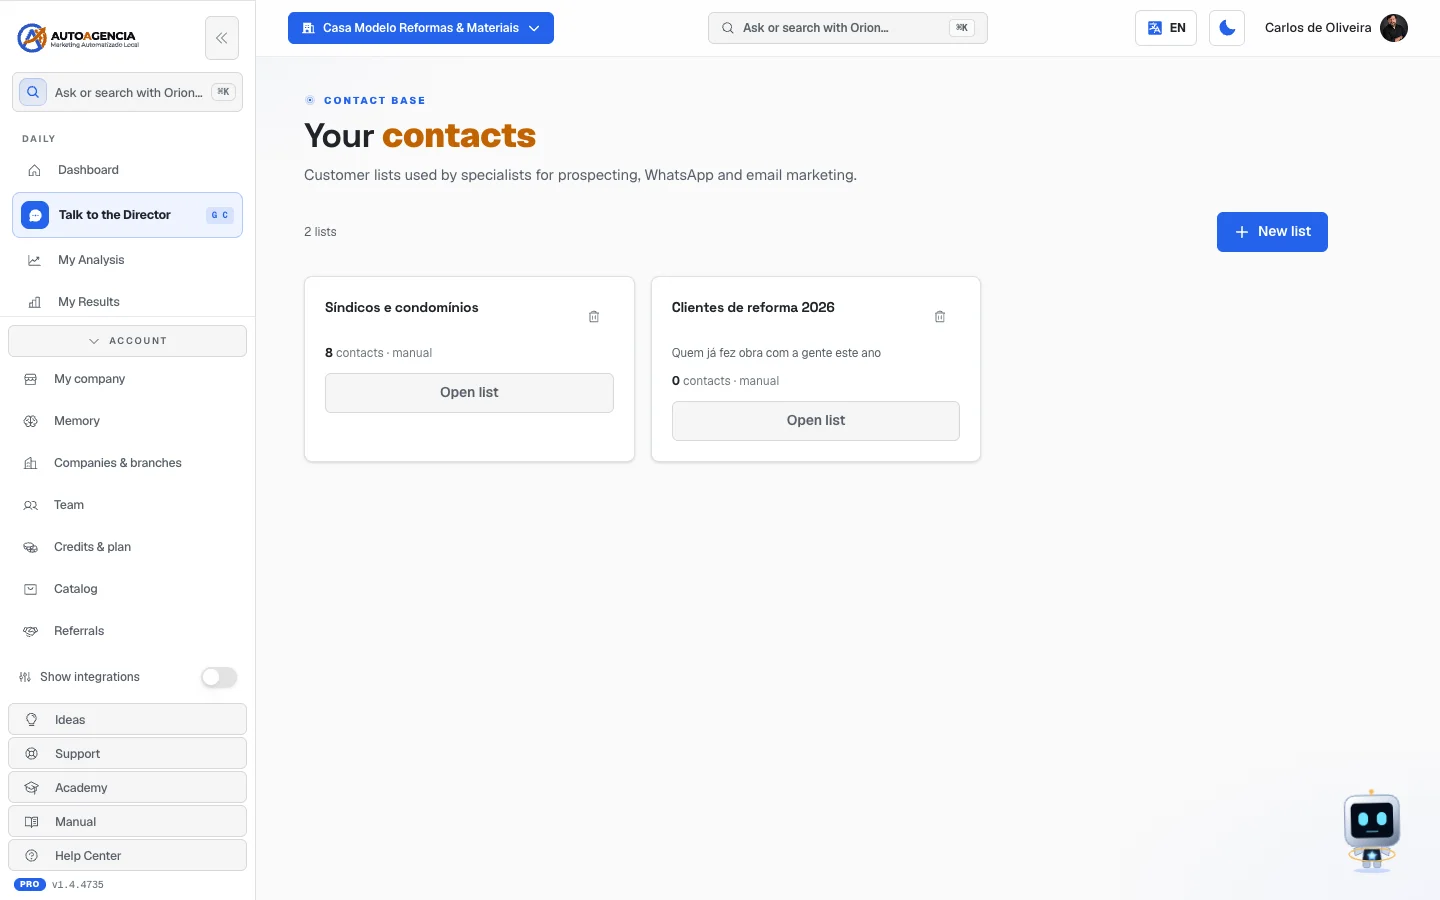 The My contacts screen with the list of lists and the "New list" button
Step by step — creating a list
- In the full menu, open More → My contacts.
- Click New list.
- Give it a name — the example on the screen is "Ex: Hot leads — October".
- Write a description, if you want (it's optional).
- Click Create list.
Step by step — importing contacts from a spreadsheet
- Open the list and click Import CSV.
- Choose the file on your computer. A CSV is a spreadsheet saved in text format — Excel and Google Sheets export in that format.
- The Column mapping screen opens: "Confirm which field each CSV column maps to. Columns set to "—" will be ignored."
- For each column in your spreadsheet, choose the right field: Name, Email, Phone, Company, Position, City, State or Notes.
- Check the preview of the first three rows.
- Click Import N contacts.
- At the end, the notice says how many came in and how many were ignored.
Common questions
"Empty or invalid CSV". The file isn't a real CSV, or it has no rows. Export it again from your spreadsheet, choosing the CSV format.
I deleted a list by accident. It can't be undone — the confirmation warns that it deletes the list "and all of its contacts".
11. Support Desk
Where to find it: Home → Your apps → OmniDeskSuite, if you subscribed to the app; without it,
full menu → More drawer → Support Desk
Address: /app/desk
This screen is part of a paid module (OmniDeskSuite). If you haven't subscribed, the system takes you to the module showcase with it highlighted, or shows the invitation to activate it in the catalog.
What it's for
A single inbox for WhatsApp, email and site chat — with automatic AI triage, ready-made replies and conversation assignment to your team. The text of the invitation itself sums it up: "One inbox for WhatsApp, email and site chat — with automatic AI triage, macros and conversation assignment for your team."
What you see
The title Support Desk, with the line "WhatsApp, email and site chat — all in one queue." Right below, inside the page itself, is a row of eight tabs:
| Tab | What's in it |
|---|---|
| Queue | The conversations waiting for attention — it's the screen that opens by default |
| Tickets | The open cases, organized |
| Reports | The support numbers |
| Help center | The help center you publish for your customers |
| Migration | Bringing in the history from another tool |
| Get started | The step-by-step for the module's initial setup |
| Manual | The complete manual |
| Settings | The module's settings |
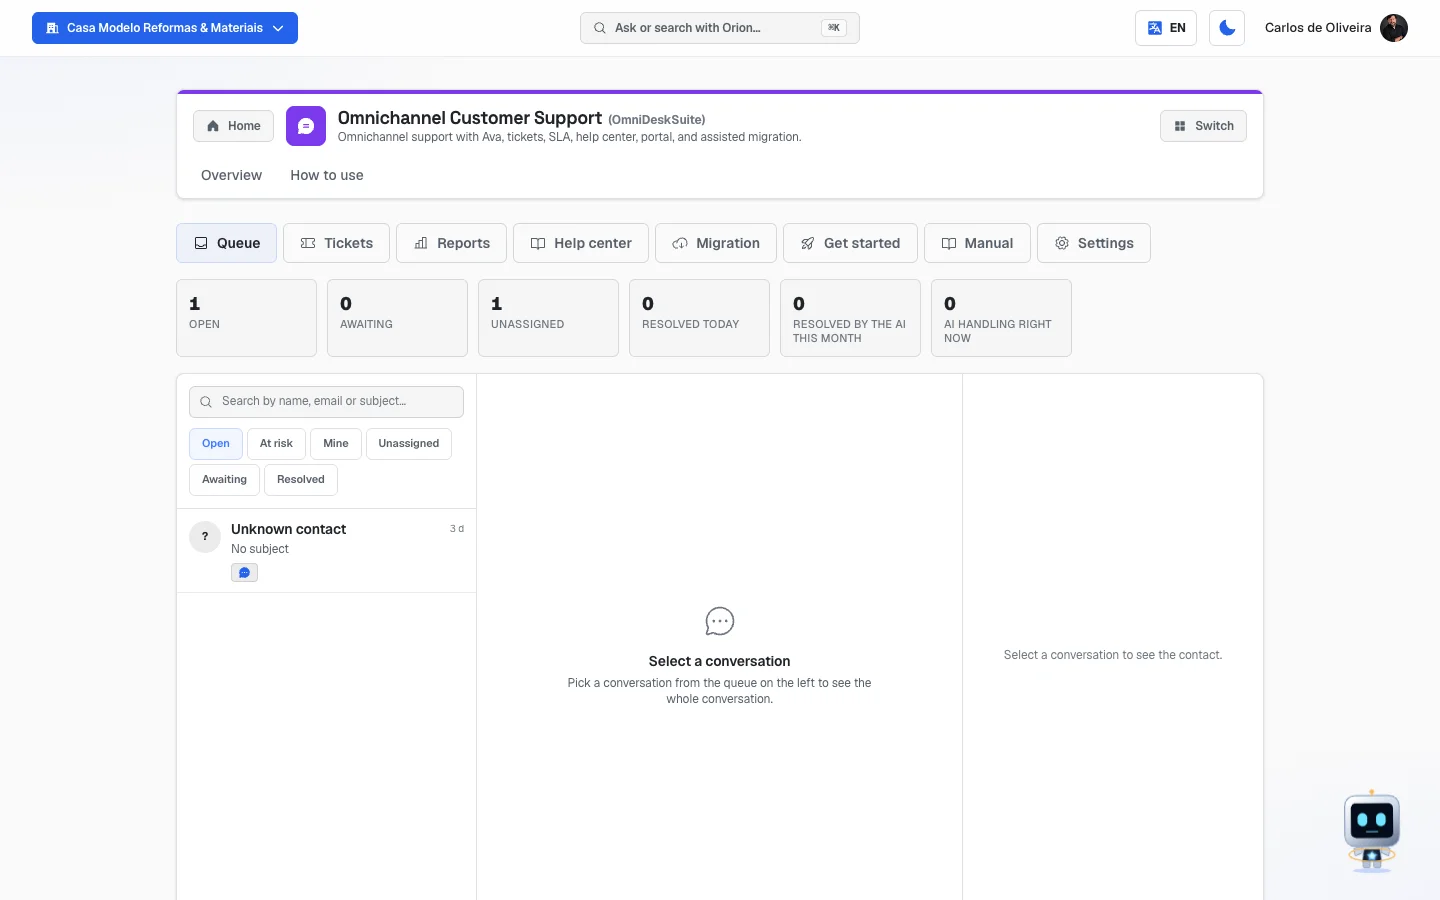 The /app/desk screen on the "Queue" tab, with the row of eight tabs at the top, the six queue numbers and the list still empty in this sample company
The complete step-by-step for this module is in its own manual — the Manual tab, inside the screen itself, and also in the OmniDeskSuite app, under Your apps.
12. Website chat
Where to find it: Home → Your apps → Site AI → Website chat tab
Address: /app/modulos/atendimento-site/chat-do-site (the old address, /app/widget,
still leads there)
This screen is also part of a paid module (AI Website Support). Without it subscribed, the system shows the invitation instead of the screen.
What it's for
Putting a chat bubble on your website, so that visitors can talk to your company without having to call. The line on the screen: "Put an agent on your site, WordPress or any landing page."
What you see
The screen opens inside the Site AI app, with the app bar at the top and the Website chat tab selected. Below, two columns.
On the left, Configuration, with the name and photo of whoever answers in the bubble ("Assistant: …"). The fields are:
| Field | What it does |
|---|---|
| Mode | WhatsApp button (direct link), Embedded chat (agent) or Both — agent replies + option to go to WhatsApp |
| Primary color | The color of the bubble, to match your website |
| Position | Bottom right or Bottom left |
| Welcome message | The first line the person reads when opening the bubble |
| WhatsApp number for the direct link | In international format, e.g.: 5511999999999 |
| Show automatically on my AutoAgency Landing Pages | Turns the bubble on in the pages built here |
| Widget active | Turns the bubble on and off |
And the Save widget button.
On the right, Preview (a sample of how the bubble will look) and Code for your site — "Copy the code below and paste it into your site, at the bottom of the page (on WordPress, use a plugin that adds code to the footer). If someone else runs your site, just send them this code." — with the Copy code and Generate new security code buttons. Right below, a tip in green: connect your business WhatsApp in the WhatsApp tab, so the agent can also respond directly there.
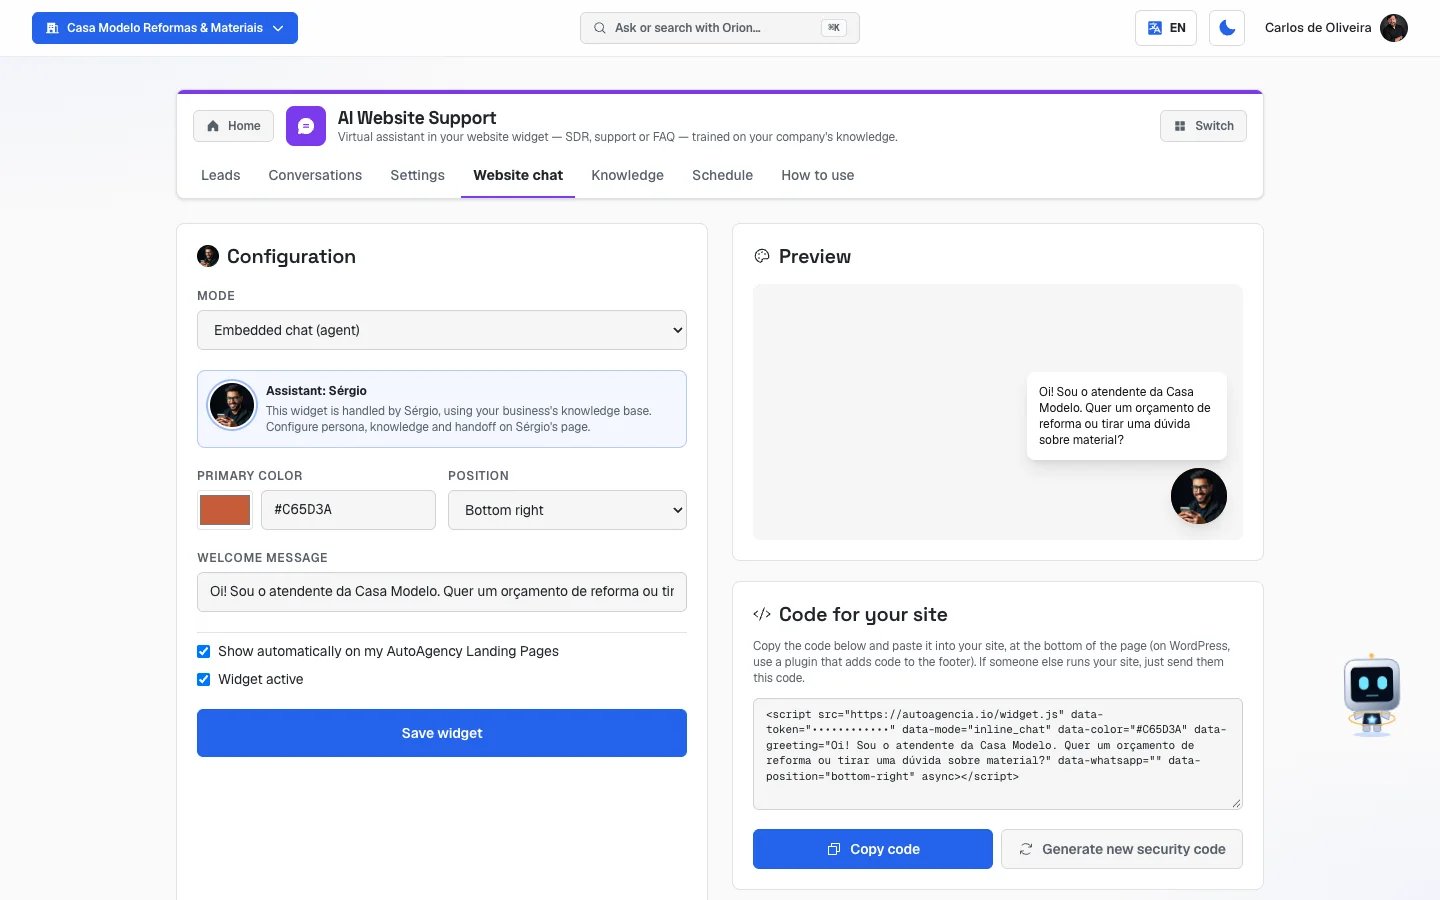 The Website chat tab of the Site AI app, with the configuration on the left and the sample + the code on the right
Step by step — putting the chat on your website
- On Home, under Your apps, click Site AI and then the Website chat tab.
- Choose the Mode, the Primary color, the Position and write the Welcome message.
- If you chose a mode with WhatsApp, fill in the number in international format.
- Click Save widget. The screen confirms: "Widget saved."
- In the Code for your site block, click Copy code.
- Paste that code into your website (if you use WordPress, ask whoever runs your site, or use a plugin that adds code to the footer).
Common questions
"Save the widget first to generate the security code." The code is only created after the first Save widget. Save and the code appears.
I want to change the code for security. Click Generate new security code. Heads up: the old code stops working immediately, so you need to update the code on your website right afterward.
The fields are locked. Only the account owner or an administrator can change the widget.
13. Three old addresses that now only redirect
Three addresses keep working so that old links don't break, but they aren't screens of their own: they take you straight to the right place.
| Old address | Where it leads today |
|---|---|
/app/midia (Created assets) | The Studio, inside the Image Creation module |
/app/calls (Calls) | The Contacts tab, inside the Contact Tracking module |
/app/reports (Results by channel) | The Overview tab of the Traffic Management module, already open on the Reports pill |
If you click one of those links and land on a module screen, it's not an error — it's the redirect working. The content is documented in the manual for the corresponding module.
The Calls item appears in the More drawer of the full menu for those who don't have the OmniLeadTrace app (those who do find the same screen inside the app); it leads to the Contact Tracking module. To see all contacts from all channels together — including those who don't have that module —, use Latest Contacts (item 2).