Click Fraud Blocking
Where it is: Home → Your apps → ClickVigil (at the top of the screen the module shows as Click Fraud Blocking)
Address: /app/modulos/protecao-cliques
Why two names? Under Your apps the module shows up with the brand's short name, ClickVigil. When you open it, the screen's title is Click Fraud Blocking (ClickVigil) — what it does, with the brand in parentheses. That's the full name, and it's the same on every screen of the module. It's all the same product. Its assistant is called Heitor.
What it's for
When you advertise on Google or Facebook, you pay per click. Someone clicks your ad, and Google takes a piece of your budget. It doesn't matter whether that person was going to buy or not. They clicked, you paid.
The problem is that not everyone who clicks is a customer. There are bots — a computer program that sweeps the internet clicking on everything it sees. There are competitors who click your ad on purpose, several times a day, just to burn your budget and push you out of the way. There are people who click by mistake and leave right away. None of them will hire you, and all of them cost the same as a real customer. That's the fraudulent click: a click that spends your money with no chance of turning into a job.
Click Fraud Blocking is the doorman who stands at the door all day checking who arrives. When he recognizes a bot or a repeat clicker, he stops the person before they open your site and sends their address (the IP) to a block list over at Google — so your ad simply stops showing for that guy. That way, his next click never happens, and you never pay for it.
And for what was already charged, the module builds the report: a file with the proof of each fake click, in the format Google requires, so you can ask for your money back. You download it, attach it to Google's form and follow right here whether it was approved.
An everyday example: you're a locksmith. On a Tuesday morning, 40 clicks come in on your ad in two hours — and not one call. Looking at the dashboard, you see that 31 of those clicks came from the same place, the same device, always searching for the same word. Heitor had already blocked all of them. At the end of the week, you download the report and ask Google to refund what was charged.
Before you start
- The module needs to be active on your account. Until it is, the Settings tab shows the subscription offer with the Activate in catalog button, and the Panel tab shows "Protection not activated yet" with the Activate now button.
- The protection needs to be installed on your site. Without it Heitor can't block a single click — he has no way to see who arrived. Installation is done on the Settings tab.
- Optional, but highly recommended: have your Google Ads account connected. Without it the panel can't say how much Google charged you or calculate how much you saved, and the report comes out without the amount in money.
- Optional: connect your Meta Ads account (Facebook/Instagram), on the Ad account tab, if you also advertise there.
- Optional: connect your WhatsApp, on the WhatsApp tab, if you have ads that lead straight to a WhatsApp conversation.
First steps
- On Home, under Your apps, click ClickVigil. You land on the Panel tab.
- If "Protection not activated yet" shows up, click Activate now — it takes you straight to the Settings tab. If the module is already active but the protection hasn't been put on your site yet, Heitor's note at the top of the screen says: "Protection isn't installed on your site yet — without it, Heitor can't block a single click." The Open settings button, next to the note, takes you to the same place.
- On the Settings tab, scroll to the Tracking in your Google Tag Manager panel and click Install tracking in my GTM. This is what puts the protection online. If your site doesn't use a tag manager, use the Have your own website? We protect it too panel and send the two codes to whoever looks after your site.
- Still on Settings, choose the Protection level. If you're just starting, choose Balanced — it's the sweet spot for most people.
- Under Cities you serve, write the cities where you work and click Add. If you serve the whole country (or don't want to use this), leave it empty.
- If you want to be told when Heitor acts, check I want to receive alerts and choose By email and/or By WhatsApp.
- Click Save configuration. Saved! appears.
- Go back to the Panel tab. In a few days the numbers start showing up.
- At the end of the month, go to the Reports tab and download the report.
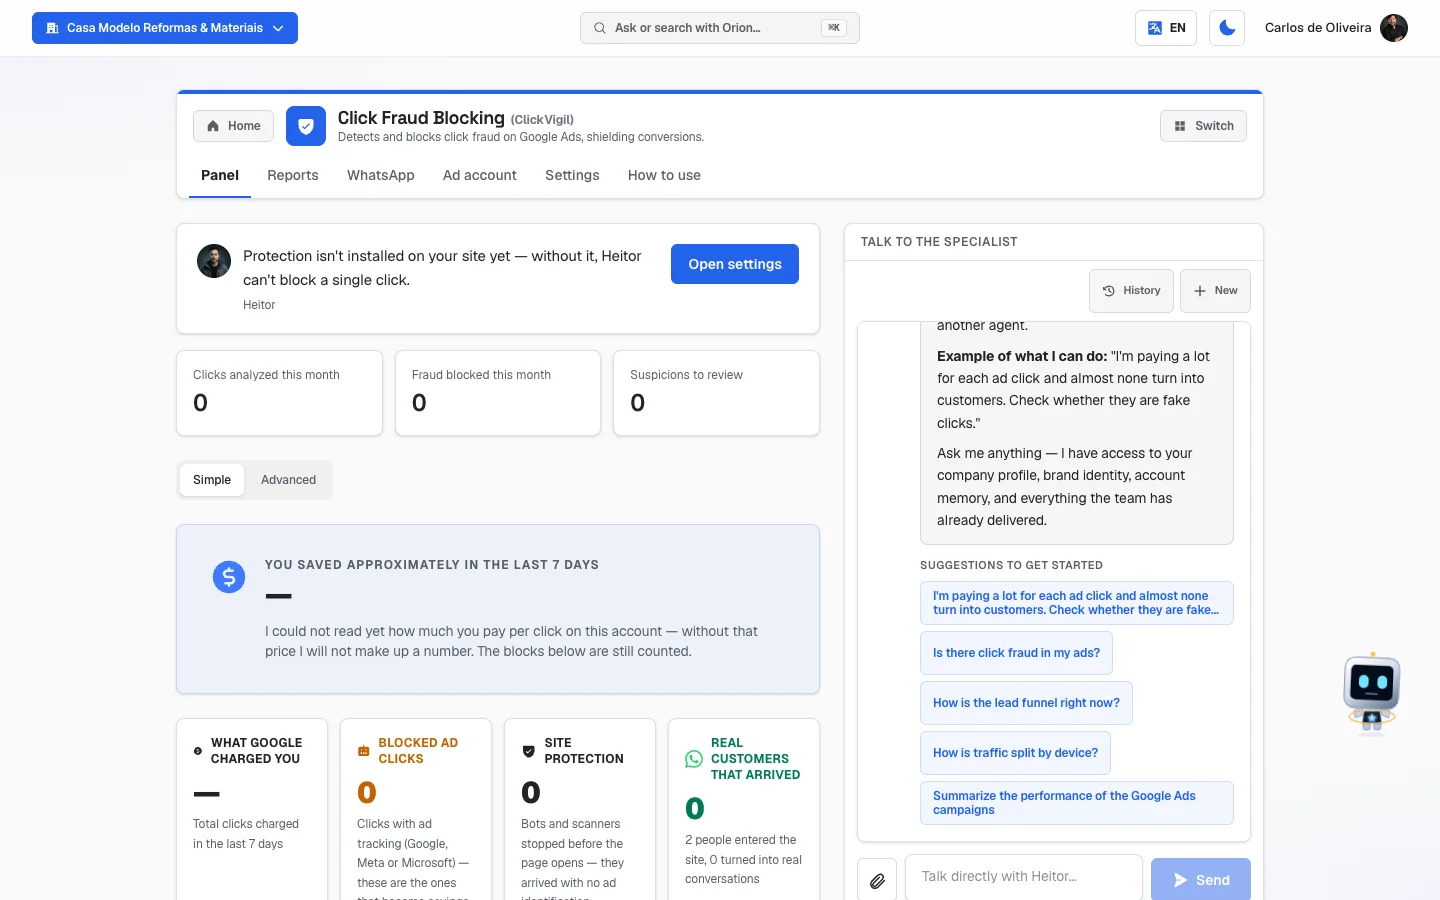 Panel tab in the Simple view: Heitor's note warning that the protection isn't installed on the site yet, the three numbers for the month, the savings panel with a dash (no price per click yet) and the row of little boxes below it
Understanding the blocking (read this first)
What is a fraudulent click, in plain words?
It's a click you paid for and that would never have become a customer. It has three common origins:
- Bot: a program that sweeps the internet clicking on everything. It isn't a person, has no intention to buy, and still generates a charge.
- Competitor: someone in your line of business who clicks your ad on purpose, many times, just to wipe out your daily budget.
- Repeat clicker: the same person clicking several times, never talking to you.
How does the system block?
In three layers, and it's worth understanding the difference because the panel splits the numbers this way:
- What Google already stops on its own. Before anything else, Google itself filters part of the bots. Those clicks are not charged to you. The panel shows that number just so you can see the size of the traffic.
- The doorman at your site's entrance. When the click gets past Google's filter and comes to your site, Heitor decides on the spot: if it's a known bot or an address already on the blacklist, it's stopped before the page opens.
- The exclusion on Google. The attacker's address (IP) goes to an exclusion list inside your Google Ads account. From then on your ad stops showing for them — and this is where the real savings happen, because the next click never gets charged.
What does the system do when it isn't sure?
It doesn't block blindly. A doubtful click can be left under suspicion — noted, but let through — or have its address sent to Google's exclusion without stopping the current click. That's how it avoids shutting the door on a real customer. How strict it is, you choose, under Protection level.
And the money that was already charged?
That you ask back. Google has an official invalid clicks form, and the Reports tab builds for you the package it requires: a PDF with the proof, a click-by-click spreadsheet and even the text ready to paste into the form. Mind the deadline: Google's window is 60 days counted from the click, and it accepts one request every 60 days per account. That's why the screen shows deadline tags on each report.
Observe mode: there's a state in which Heitor is on but only takes notes, without actually blocking anyone — it's the period when the team calibrates the protection with your traffic. When that's the case, the top of the Settings tab warns: "Running in observe mode (measuring without blocking). The team turns blocking on after calibrating with your traffic." Even so, the doorman at the entrance already stops server bots.
And if I want to turn blocking on myself? You can, and the button exists — it just isn't on the Settings tab, which is why it goes unnoticed. It lives in the advanced dashboard (the Open advanced dashboard → link, at the end of the Panel's Advanced view), in the Your protected sites panel: there the row says "Observing only (captures evidence)" and, beside it, there's the Turn on blocking button, which asks for a confirmation under Confirm blocking. From then on clicks are actually blocked, and the same place offers Turn off blocking to go back.
Three things so you don't get fooled here: (1) whoever turns it on is the account owner or administrator — another user even sees the button, but the system refuses their click; (2) it only shows up after at least one of your sites is protected in the panel right below — with no protected site there's nothing to block; and (3) there's no fixed calibration period written into the system. There's no "seven days" or "thirty days": either the team turns it on when it judges it has measured enough, or you turn it on whenever you want. When in doubt, the safe path is to talk to the team first — turning it on too early, on traffic that's still barely measured, is what raises the chance of blocking a real customer.
The tabs, one by one
This module's tabs are in the app bar, at the top of the screen, next to the name ClickVigil.
Panel
/app/modulos/protecao-cliques/painel
- What you see here: at the top, Heitor's panel — a sentence saying how the protection is doing and three numbers: Clicks analyzed this month, Fraud blocked this month and Suspicions to review. Below, a little button to switch between two views: Simple and Advanced. The system remembers the one you chose last time.
- What you can do: just look and decide. It's a read-only screen, with a shortcut to the reports.
- If the protection isn't activated, the screen shows "Protection not activated yet" and the Activate now button, which takes you to the Settings tab.
In the Simple view you see, from top to bottom:
- Google's shield (only shows up when there's that measurement) — how much Google itself blocked on your ads in 30 days, with the sentence "These clicks were not charged: Google filters them before they reach your site." It also says, in the same panel, how many ClickVigil blocked after that.
- The big savings panel — "You saved approximately in the last 7 days", in money. If the system couldn't read how much you pay per click, it shows a dash (—) and says it doesn't make up the amount — the blocks are still counted. The math is always the same, and the screen's footer repeats it: the blocked ad clicks × your account's real cost per click in the last 7 days. It isn't a market average or an average for your industry: it's the price your own account paid that week.
- A row of little boxes — What Google charged you, Blocked ad clicks, Site protection and Real customers that arrived. When there's measurement, a fifth one comes in, How many of those we saw, right after the first. All explained in the "How to read the numbers" section.
- Recent attacks we blocked — the list of fraud signals, in plain language, each with a risk number from 0 to 100.
- Who is attacking you — who the blocked ones were: city, device, browser, the word the person was searching for and how many times they clicked.
- Download fraud evidence — a shortcut to the Reports tab.
- The fine print at the bottom, closing the view: "The estimated savings multiplies the blocked ad clicks by this account's real cost per click over the last 7 days. Actual values may vary." It's the same math as the big panel in item 2, written out in full.
What each "recent attack" means:
| What the screen writes | What happened |
|---|---|
| "We detected many clicks that didn't turn into real conversations." | Lots of people clicking and no one talking to you. Classic fake-click pattern. |
| "Clicks arriving at bot speed (way too fast)." | The clicks came too fast to be people typing. |
| "Unusual click spike out of the ordinary." | Suddenly, many more clicks than normal on your ad. |
| "A bot clicked the ad several times without ever opening the site." | You paid for the click and the site never opened. No one was on the other end. |
| "Click bombing on a keyword (far more clicks than impressions)." | One of your words got far more clicks than appearances — a sign of a targeted attack. |
| "Suspicious behavior signal." | Another strange pattern the system recognized. |
Each row ends with the word Blocked. — which means the system has already acted.
If the list is empty, "All quiet here" appears: no bot attack in the last week — with the tip "When a bot attacks, the block shows up here, with the reason explained". Under Who is attacking you, the empty state is "No one on the radar right now".
In the Advanced view you see, instead:
- Four 7-day numbers: Clicks analyzed, Blocked, Challenged and Passed (real).
- Stopped at the door (before the page opens) — how many never even got to open your site, split into server bots and blacklist. Those don't generate a charge on Google.
- IPs excluded on Google — how many addresses are already on your exclusion list, how many fit, and how many are in the queue.
- Meta Ads protection and Microsoft Ads protection — a ✓ when they're online. The screen warns that each one activates automatically when the account is connected.
- IPs to exclude on Microsoft Ads (Bing), when there are any — with the Copy list button. Microsoft doesn't allow doing this automatically, so you paste the list into Campaign settings → IP exclusions (up to 100 per campaign).
- Top blocking reasons and four breakdown lists: By ad channel, By city, By device and By campaign.
- At the end, the invitation to Open advanced dashboard →, which leads to the full screen, with each attacker's dossier (proof in PDF and spreadsheet for a refund and a lawyer), manual unblocking and site protection.
Reports
/app/modulos/protecao-cliques/relatorios
It's the tab for asking for your money back.
- What you see here: the Generate a report for a period panel, the list of Monthly reports already ready and, at the end, the step-by-step How to ask for your money back (step by step). If you're an agency, before that the Your clients' refunds block shows up — explained at the end of this section.
- What you can do: generate a report on the spot, download the files, copy the form's text and follow where each request stands.
- If you also advertise on Facebook/Instagram, at the top the Platform: selector shows up with the Google Ads and Meta Ads buttons — because the refund path is different on each. The selector only shows up if you have the Meta account connected.
Step by step — generating a report now:
- On the Reports tab, in the Generate a report for a period panel, choose the date under From and the date under Up to. The period can be at most 92 days (about 3 months).
- Click Generate report.
- The result appears right below, with how many fake charged clicks were found, how many are high confidence and the estimated waste in money.
- Download the files with the buttons: Download PDF, Excel, Spreadsheet (strong) and Spreadsheet (full). Also use Copy form text.
Step by step — asking Google for the refund (what the screen itself teaches):
- Download the month's Spreadsheet (strong) — it's the format Google asks for.
- Open Google's invalid clicks form (the screen has the link).
- Attach the spreadsheet and the forensic PDF, and paste the period's summary.
- Submit and come back here to mark it as disputed (the Mark as disputed button).
- When Google replies, mark Approved or Denied.
The screen warns: Google only refunds ad spend on invalid clicks. It's worth also sending the full spreadsheet, because it's reviewed click by click. And, if you prefer, the team submits the dispute for you.
📷 This screen has no photo — in a month with fake clicks detected, the Reports tab brings the monthly report, with the status tag, the deadline tag and the download buttons.
What each status of a report means:
| Status | Means |
|---|---|
| Ready to dispute | It's ready and nobody has asked for anything yet. It's up to you. |
| Dispute in progress | You already sent it to Google and you're waiting for the answer. |
| Approved (refunded) | Google accepted it and will refund it. |
| Denied by Google | Google didn't accept the request. |
The deadline tags that show up beside it:
| Tag | What it means |
|---|---|
| dispute by <date> | Until that date the request still covers the whole period. |
| already losing clicks — last chance <date> | The oldest clicks have already expired. Hurry: after that date nothing is left. |
| Google window expired (60 days) | The 60 days have passed. That period can no longer be disputed. |
| already disputed in the <date> request — <date> | That month already went into another, larger request. There's nothing you need to do. |
Important notices that can appear:
- "No invalid clicks found in this period. 🎉" — it's good news: there was nothing to find.
- Yellow "you already asked for these" notice — that period's clicks already went into an earlier request and so were left out. The screen explains the reason: "Submitting the same click twice destroys the credibility of the whole request." If Google denies the earlier request, those clicks become available again on their own.
- Automated access notice — besides the charged clicks, the system blocked bot visits that never even opened the site. They go into the report as proof of the attack, but the refund request is made only for the charged clicks.
- Careful: X periods in this list are the SAME request — when a request covers several months, they show up repeated in the list. Adding up the values would count the same money more than once.
The "Money in this case" panel shows up on reports that were already sent to Google. It's for you to note down what really happened:
| Field | What to write |
|---|---|
| Amount requested from Google | How much you asked back, as it appears in Google's email. |
| Google case number | The case code Google gives you. |
| Approved amount | How much Google approved (only shows up after it's marked as approved). |
| Day the credit landed in the account | The date the money really came back. |
Click Save amounts. While it's blank, the system doesn't talk about money in your report — it never estimates. And the screen reminds you: Google takes 4 to 6 weeks to apply the credit.
If you're an agency and have clients under you: before all this, one more block shows up, called Your clients' refunds. It only exists for those who have companies registered under their account, and only after a report has already been generated for one of them — anyone who uses the system for their own business never sees it, and nothing changes in the rest of the screen.
- What it shows: a panel with Awaiting dispute (the sum in money of what can still be asked back, and how many periods it is), the Open Google's invalid clicks form button and, below, a card per client and period. Each card brings the company name, the period, how many invalid clicks were found (and how many are high confidence), the wasted amount, the deadline tag and the status — the same four statuses and the same deadline tags explained above.
- What you can do: download the PDF, Strong spreadsheet and Full spreadsheet of each client, Mark as disputed, then mark Approved or Denied, and fill in the Money in this case panel. It's exactly the same flow as your own account, done on their behalf.
- Two notices the screen gives that save rework: "Only the account admin submits Google's form" — you prepare and organize, but the one who submits is whoever administers that client's Google account; and, when a client already has a request in progress, the card says on what date the next window opens and recommends bundling the pending periods into a single submission, because Google accepts one request every 60 days per account.
- You only see the companies that are under your agency. Any other account is refused by the system — there's no way for a client to show up in another agency's list.
If you advertise on Meta: click Meta Ads in the selector at the top. It works similarly — you choose From and Up to, click Generate, and get the summary with how many fake clicks Meta charged and the estimated amount to ask back. The buttons are Copy the case text, PDF and Spreadsheet. Meta has no public form: the step by step of the request shows on the screen itself.
On that Meta screen a notice may appear that some of your ads aren't tagged yet — in that case the report points to the time range of the waste, but can't say which ad it came from. The screen shows a little text for you to paste into the URL parameters field when creating the ad. If you forget, the system tags them on its own within an hour.
/app/modulos/protecao-cliques/whatsapp
- What it's for: protecting ads that lead straight to a WhatsApp conversation. In that format the person doesn't go through your site — so there's no visit to analyze, and the protection goes blind. By connecting WhatsApp here, the system starts seeing which ad each conversation came from and flagging whoever starts a conversation and vanishes, never becoming a customer.
- What you see here: the explanation, the What the connection does — and what it doesn't panel and the WhatsApp connection screen.
What the connection does:
- ✅ Identifies which ad each conversation came from and detects the pattern of whoever just makes you spend.
- ✅ Excludes those numbers from your next ads, so you stop paying for the same person.
What the connection does NOT do:
- 🚫 It doesn't reply anything to your customers. The system only observes to protect. Automatic support is another module, and only works if you subscribe to it.
- 🚫 It doesn't change anything on your device: you keep chatting normally from your phone.
Step by step — connecting:
- On the WhatsApp tab, choose under How do you want to connect your WhatsApp?:
- Scan QR Code — if you have another device or a computer to scan with (it's the fastest).
- Connect by code — if you only have this phone. Type the number with the area code, tap Get code and, in WhatsApp: Settings → Linked devices → Link a device → Link with phone number.
- Done. The conversations start being analyzed.
Disconnect × Remove connection: when you disconnect, the device leaves but the connection stays saved and asks for the QR again on its own. When you remove the connection, it ceases to exist — and to use it again you connect from scratch.
Ad account
/app/modulos/protecao-cliques/conta-meta
- What it's for: connecting your Meta ad account (Facebook and Instagram) so the protection works there too. Without this connection the protection sees nothing on the Meta side: it doesn't know which ads exist, can't say which ad each click came from, and the refund request can't point to the ad — only to the time range.
- What you see here: the explanation, the What the connection does — and what it doesn't panel, the button to connect Meta and, hidden behind a click, the manual path Didn't find your account in the list above?.
What the connection does:
- ✅ Reads your ads and what Meta charged, to calculate how much of your money went to fake clicks.
- ✅ Tags your ads with an identification label, to know which of them each click came from.
- ✅ Excludes from your next ads whoever has already been identified as a fake click.
What the connection does NOT do:
- 🚫 It doesn't create campaigns, change your budget or change the targeting you chose. Managing your ads is another module, and only works if you subscribe to it.
- ⚠️ It only pauses something in one case: during a fake-click attack, and for a few minutes — and only if you turned that option on in the Settings tab.
Step by step — connecting the account:
- On the Ad account tab, click the button to connect Meta and authorize in the window that opens.
- Choose your business's ad account from the list.
- If your account doesn't show up in the list, open Didn't find your account in the list above? and enter its number. Use this only if it didn't show up above.
Settings
/app/modulos/protecao-cliques/config
It's where you tune the protection and install the code on the site.
- What you see here: at the top, the ✓ Protection active notice (or the subscription offer, if the module isn't active). Below, the panels Protection level, Cities you serve, Per-visitor click brake, Want to be notified when Heitor protects you?, Block the attack before it starts, the Save configuration button, the What you get panel, the Tracking in your Google Tag Manager and the Have your own website? We protect it too.
- What you can do: choose how strict the protection is, say where you serve, turn on alerts and install the protection on the site.
Step by step — configuring:
- On the Settings tab, choose one of the four Protection levels (the table below explains each one). The chosen level gets a ✓.
- Under Cities you serve, write the City and the State and click Add. Repeat for each city. To remove one, click the ✕ next to it.
- If you added cities, adjust the Tolerance radius on the little bar (in kilometers).
- Under Per-visitor click brake, write from how many paid clicks by the same person the system stops paying. 0 = no limit.
- If you like, check I want to receive alerts and choose By email and/or By WhatsApp.
- If you like, check Preemptively pause at predicted attack times.
- Click Save configuration. Saved! appears in green.
Each control explained:
| Control | What it is |
|---|---|
| Protection level | How strict the doorman is. The stronger it is, the more bots you block — and the higher the (small) chance of blocking a real customer. |
| Cities you serve | A click coming from very far from your area is usually fraud. Leave it empty to protect from anywhere. |
| Tolerance radius | How many kilometers around your cities are still considered normal. |
| Per-visitor click brake | From how many paid clicks by the same person the system stops paying. 0 = no limit. |
| Max clicks/window and Window (minutes) | They sit inside Advanced settings. It's the same brake, measured by time: how many clicks in how many minutes. When you change the level, those two adjust on their own. |
| I want to receive alerts | Turns on the alert every time Heitor pauses a campaign because of a spike in fake clicks or for hitting the spending limit. You don't need to do anything — it's just so you know. |
| Preemptively pause at predicted attack times | Some bots always attack at the same time. When the pattern is very clear, Heitor pauses the campaign for a few minutes before the wave and turns it back on right after. He only acts when he's very sure, so he never pauses a healthy campaign for nothing. |
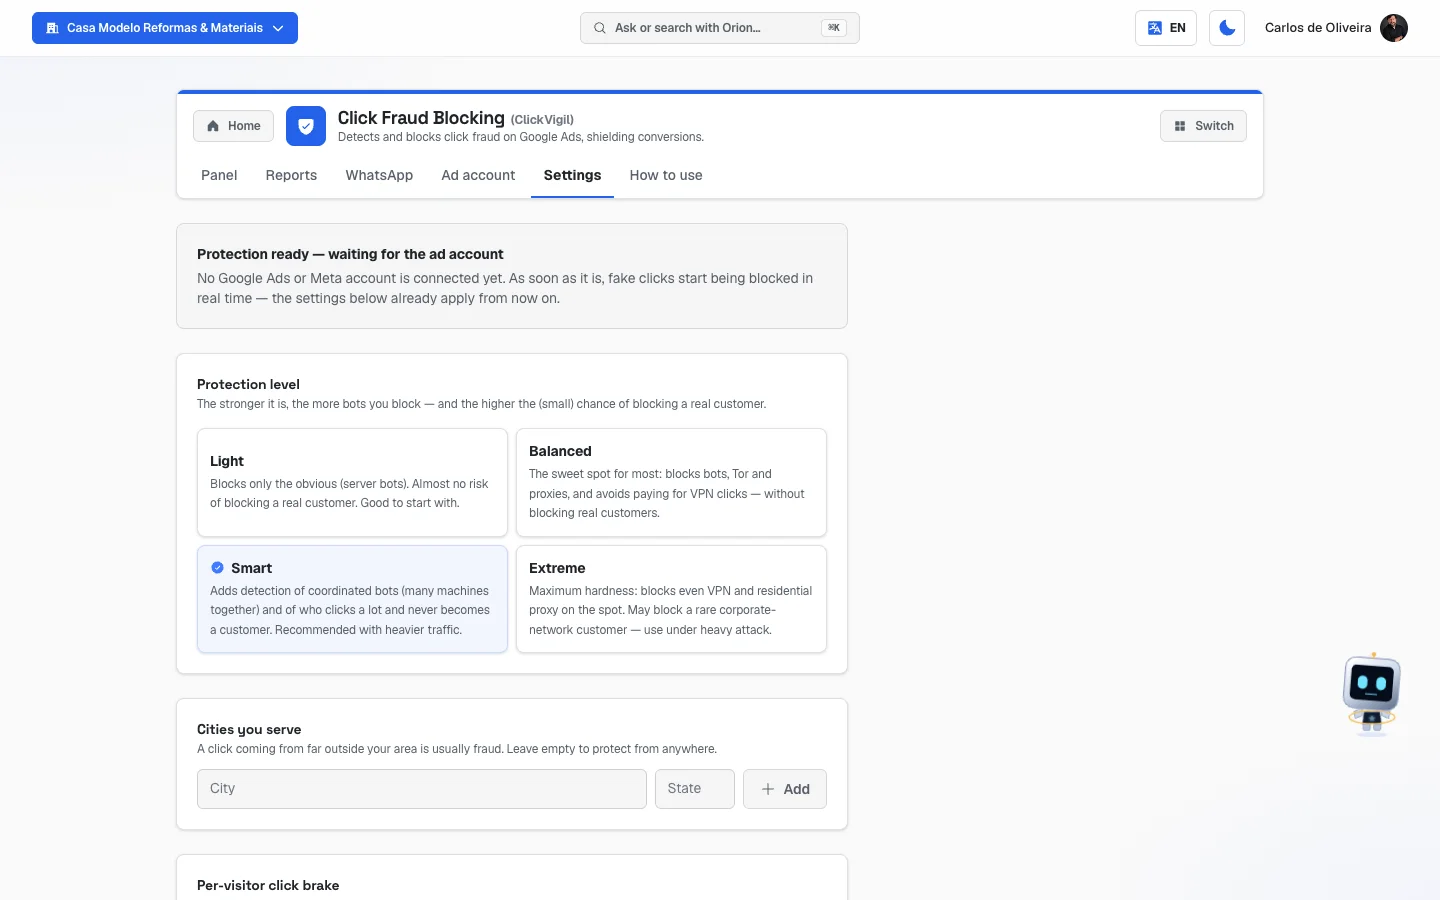 Settings tab showing the four Protection level cards, with the chosen one marked
The four protection levels, as the screen itself describes them:
| Level | What it's for |
|---|---|
| Light | Only blocks the obvious (server bots). Almost no risk of blocking a real customer. Good for those just starting. |
| Balanced | The sweet spot for most: blocks bots, Tor and proxy, and avoids paying for VPN clicks — without blocking real customers. |
| Smart | Adds detection of coordinated bots (several machines together) and of those who click a lot and never become a customer. Recommended with lots of traffic. |
| Extreme | Maximum toughness: blocks even VPN and residential proxy on the spot. It may block a rare customer on a corporate network — use it under a strong attack. |
Step by step — installing the protection on the site (the automatic way):
- On the Settings tab, find the Tracking in your Google Tag Manager panel.
- Click Install tracking in my GTM. If your account requires approval, the button is See what I'll install (you approve first) — the system shows the list and you click Approve & apply.
- Nothing changes in the look of your site, and you can undo it at any time with the Remove tracking button.
Step by step — installing the protection on the site (the manual way):
- On the Settings tab, scroll to Have your own website? We protect it too.
- Copy the two codes that show up there: the WhatsApp button tracking and protection one and the fake-click protection (anti-fraud) one.
- Send both to whoever looks after your site and ask them to paste them into the
<head>— or ask the team to do it for you.
The codes already come with your company's identifier: just copy and paste, nothing to swap. Even so, the automatic way (Tag Manager) is the recommended one — it installs on its own, with nobody touching the site.
How to use
/app/modulos/protecao-cliques/como-usar
Every module has this tab at the end. It's the module's manual inside the system itself.
How to read the numbers
In Heitor's panel (top of the Panel tab):
| Number | What it is |
|---|---|
| Clicks analyzed this month | How many clicks went through the doorman in the last 30 days. |
| Fraud blocked this month | How many were blocked in the last 30 days. This is not an alert — it's the product working. |
| Suspicions to review | Registered signals that haven't turned into a block yet. This one does turn into an alert when there are any. |
In the Simple view:
| Panel | What it is |
|---|---|
| You saved approximately in the last 7 days | The ad clicks that were blocked, multiplied by the price you actually pay per click on this account. If the system can't read that price, it shows a dash (—) and says it doesn't make up the amount. |
| What Google charged you | Total clicks charged in the last 7 days. |
| How many of those we saw | Of the charged clicks, how many the system managed to check one by one. This number is smaller than What Google charged you, the little box beside it, and the sentence below it explains why: either the check hasn't covered all the days of the period yet, or part of the clicks were calls, WhatsApp or map — those never open your site, so there's nothing to check on them. When there's no measurement, the panel simply doesn't show up. |
| Blocked ad clicks | Blocked clicks that came from an ad (Google, Meta or Microsoft). These are the ones that become savings, because they're the only ones that would cost money. |
| Site protection | Bots and scanners blocked before the page opened, that arrived with no ad identification. Since they didn't come from an ad, they wouldn't generate a charge on Google — that's why they don't count in the savings math. |
| Real customers that arrived | How many people became a real conversation. Below, the complete math: how many came into the site and how many became a conversation. |
| risk N/100 | On each recent attack: how serious the system considered it. The higher, the more certain it is to be fraud. |
Why do the savings number and the blocks number talk about 7 days, while Heitor's panel talks about 30? They're different windows on purpose — the panel at the top summarizes the month, the panels below show the week. The labels always say which is which.
In the Advanced view:
| Number | What it is |
|---|---|
| Clicks analyzed (7 days) | Everything that went through the doorman. |
| Blocked | Actually blocked. |
| Challenged | The system got suspicious, noted it, but didn't block. |
| Passed (real) | They got through — they're the real people. |
| Stopped at the door (before the page opens) | They didn't even get to open your site. They don't generate a charge on Google. |
| IPs excluded on Google | How many addresses are already on your Google Ads exclusion list, how many fit in total and how many are in the queue to enter. |
| Meta Ads / Microsoft Ads protection | ✓ means it's online. A dash means not yet — it turns on by itself when the account is connected. |
| By channel / By city / By device / By campaign | On each row, the total number and, in red with the shield, how many were blocked. That's how you find out where the attack comes from. |
On the report (Reports tab):
- invalid clicks detected — how many fake clicks that month had.
- spent on invalid clicks — the amount in money that went down the drain in that period.
- high confidence — the part of the proof that is strongest. It's the spreadsheet Google asks for.
- automated access — blocked bots that didn't generate a charge. They go in as proof of the attack, not as a money request.
Frequently asked questions
Can you block a real customer by mistake? It's rare, and more likely at the stronger levels. Start on Balanced, which blocks bots, Tor and proxy without locking out real customers, and only go up if you're under attack. If you suspect someone was blocked unfairly, the advanced dashboard (link at the end of the Advanced view) has manual unblocking.
I installed it and the panel is at zero. Is it broken? Not always. Zero clicks analyzed usually means the protection isn't live on your site yet. Heitor's sentence at the top of the panel says exactly which case it is: if it's "Protection isn't installed on your site yet", go back to the Settings tab and install it.
If Heitor blocks, does my ad stop running? No. Blocking a clicker doesn't pause your campaign. The only situation in which something is paused — and for a few minutes — is the preemptive pause, and it only works if you check that option on the Settings tab.
How do I ask Google for my money back? Go to the Reports tab, download the Spreadsheet (strong) and the PDF, open Google's invalid clicks form through the link on the screen, attach everything and submit. Then come back here and click Mark as disputed.
How long do I have to ask? Google's deadline is 60 days from the click, and it accepts one request every 60 days per account. The tags on each report warn you when the deadline is getting tight.
Why does a period show up as "already disputed" if I didn't ask for it? Because it went into a larger request you already sent. The screen shows the period of the request that covers that month. There's nothing you need to do.
Does this protect only the ad or the site too? Both. The Site protection little box counts the blocked bots that arrived without coming from an ad. And, if you have an ad that leads to WhatsApp, the WhatsApp tab covers that channel too.
Will you reply to my customers on WhatsApp? No. The WhatsApp connection is only to observe and protect. Automatic replies are another module.
When something goes wrong
| Symptom | What to check | What to do |
|---|---|---|
| The Panel tab says "Protection not activated yet" | Is the module subscribed and active? | Click Activate now — it takes you straight to the Settings tab. |
| Heitor's sentence says "Protection isn't installed on your site yet" | Without the code on the site, Heitor blocks nothing. | Go to the Settings tab and click Install tracking in my GTM, or use the two codes from the site panel. |
| Heitor's sentence says "Heitor is only watching" | The protection is in observe mode: it logs the fraud, but nobody is actually blocked. | It's the calibration period, and has no fixed deadline. The team turns blocking on after tuning it with your traffic — and, if you want to turn it on now, the Turn on blocking button is in the advanced dashboard, in the Your protected sites panel. |
| Heitor's sentence says "No click arrived in the last 30 days" | Is the code really live on the site? Are the ads running? | Check the installation on the Settings tab and confirm the campaigns are active. |
| "I could not load your numbers right now" | It's a failure of the screen, not of the protection — the blocking stays on and working. | Click Try again in a few seconds. |
| The savings amount shows as — | The system couldn't read how much you pay per click on that account. | Connect your Google Ads account. The blocks are still counted anyway. |
| "What Google charged you" shows — | The Google Ads account isn't connected or didn't respond. | Connect the Google Ads account. |
| The "How many of those we saw" panel disappeared | There wasn't enough measurement in the period. The system prefers not to show it rather than fake a number. | Nothing to do. It comes back when there's measurement. |
| The two numbers — charged and seen — don't match | It's expected. | Read the sentence below the panel: either the check didn't cover all the days, or part of the clicks were calls, WhatsApp or map, which never open the site. |
| It's blocking too much / I suspect I lost a customer | Which level is chosen? Is the list of cities too tight? Is the click brake too low? | On the Settings tab: lower the level (Balanced or Light), increase the Tolerance radius, add the cities that are missing, and increase the Per-visitor click brake (or put 0 to remove the limit). Save. To release a specific person, use manual unblocking in the advanced dashboard. |
| It's blocking too little / I still see strange clicks | Is the protection installed? Is it in observe mode? Is the level at the minimum? | Check the installation on Settings; if Heitor's sentence says he's only watching, turn on blocking in the advanced dashboard (the Turn on blocking button, in the Your protected sites panel) or talk to the team; raise the level to Smart or Extreme; reduce the Per-visitor click brake; and check that your cities are registered. |
| "Invalid dates. The start date must be on or before the end date." | You swapped From and Up to. | Fix the dates. |
| "The end date cannot be in the future." | The Up to field has a date that hasn't arrived yet. | Choose today or a past date. |
| "The period is too long. Choose at most 92 days (about 3 months)." | The range went over 92 days. | Shorten the period and generate one report at a time. |
| "No monthly report yet" | No month has closed yet. | Use the Generate a report for a period generator to get one now. |
| "This period has no data to build the report." | There's no fake click registered there. | Try another period. |
| "This period's clicks were already submitted to Google in another request" | That period already went into an earlier request. | Nothing to do. If Google denies the earlier request, they become available again on their own. |
| "Download failed." | Momentary failure while building the file. | Try again in a few seconds. |
| The tag says "Google window expired (60 days)" | The dispute window has passed. | That period can no longer be requested. Watch the deadlines for the following months — turn on the alerts so you don't miss them. |
| The Meta report doesn't say which ad the spend came from | Some of your ads aren't tagged yet. | Copy the text the screen shows and paste it into the URL parameters field when creating the ad. If you forget, the system tags them on its own within an hour. |
| "This client has no Meta account connected" | The Meta account isn't connected. | Go to the Ad account tab and connect it. |
| My Meta account doesn't show up in the list | The automatic discovery didn't find it. | Open Didn't find your account in the list above? and enter the account number. |
| The Microsoft Ads IPs don't go away on their own | Microsoft doesn't allow excluding IPs automatically. | In the Advanced view, click Copy list and paste it into Campaign settings → IP exclusions (up to 100 per campaign). |
| The button to install tracking doesn't show up for me | Only the account owner or administrator can install. | Ask the account owner to do it. |