

Email marketing
Where it is: Home → Your apps → Email (at the top of the screen the module shows as Email marketing)
Address: /app/modulos/email-marketing
What it's for
This module is your email sending to customers, from start to finish. You keep your contacts (your "list"), write the email, choose who gets it and send it — right away or scheduled for a day and time. Afterward, the system shows how many people received it, how many opened it and how many clicked.
You don't need to subscribe to any outside email service. Sending comes included with the module: there's an amount of emails included each month (the allowance), and it shows up on the Configuration tab. If you go over the allowance, sending doesn't stop: first your package balance is used (if you have one) and, after that, each email costs the price shown in the Configuration tab (in your country's currency), added to your next invoice. You get a warning email at 80% and at 100% of the allowance, so it's never a surprise.
An everyday example: you have a pizzeria and 800 people have already left their email at the counter. On Tuesday morning you build a "Tuesday promo" email, put the person's name at the start of the message (the system fills it in on its own, a different name for each one), send a test to yourself, check it on your phone and schedule it to go out at 10 a.m. By 11 a.m. you can already see how many opened it.
You can also leave emails going out on their own: whoever joins a list gets a sequence that you built beforehand — the first one right away, the second after 3 days, and so on. That's the Automations tab.
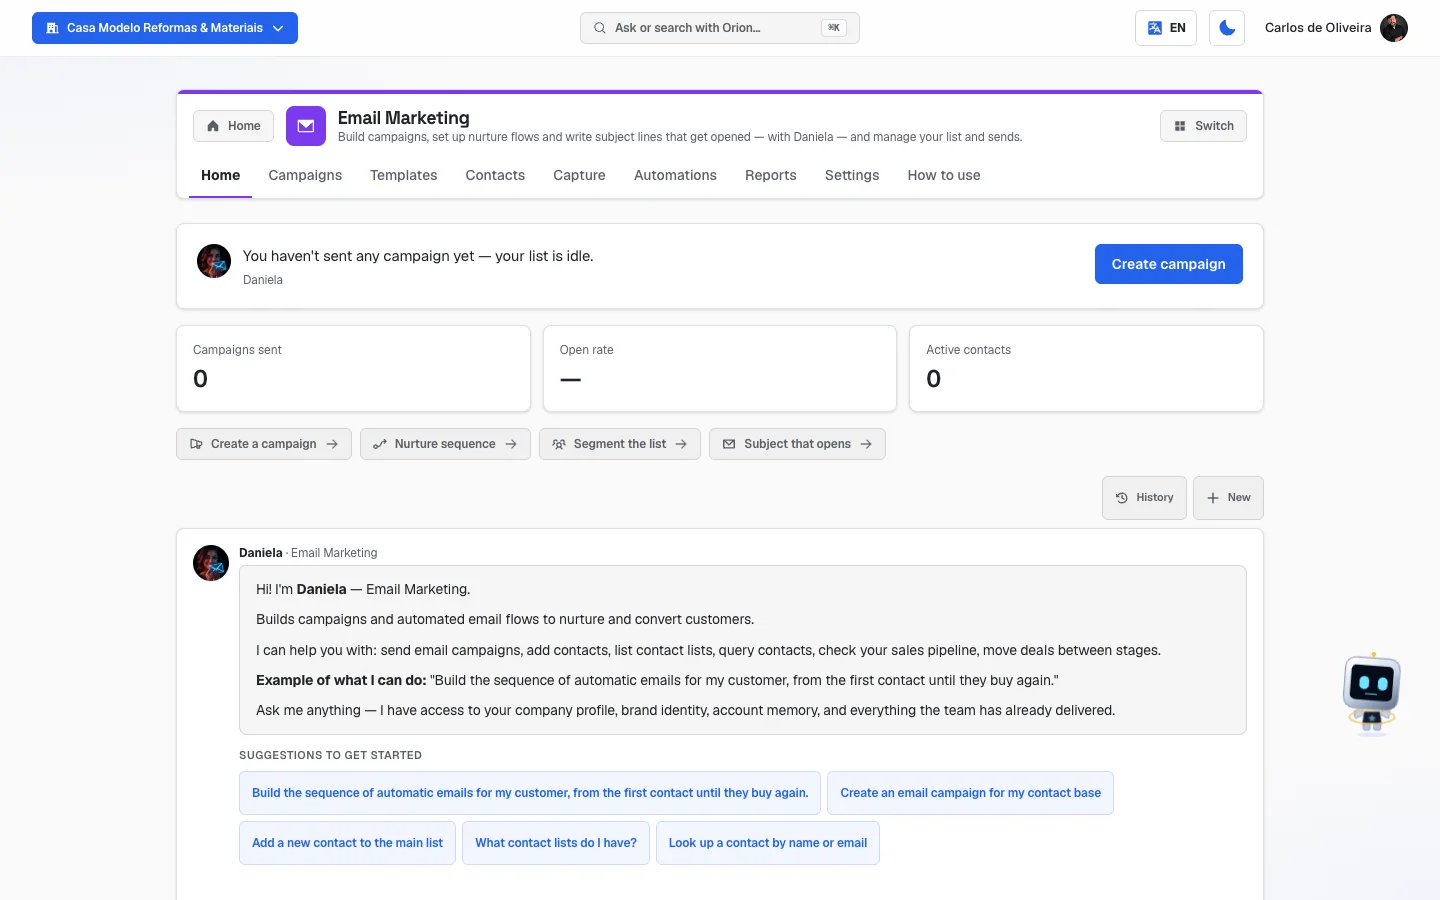 Home screen of the Email marketing module, with the app bar at the top showing the tabs (Home, Campaigns, Templates, Contacts, Capture, Automations, Reports, Configuration and How to use)
Before you start
- The Email marketing module has to be active on your account. If it isn't, the screen says: "Email marketing is not active on this account. Reactivate the module to send campaigns again."
- A contact list with people in it (you create and fill the list in the Contacts tab).
- The sender filled in on the Configuration tab: the name that appears in the inbox of whoever receives it and the address where replies go.
- At least one test email registered (you can register up to 5). Without that, the "Send test" button answers: "Register at least one test email before sending (Contacts tab)."
- You do not need your own email provider or your own domain.
Getting started
From a blank account to your first campaign out the door:
- On Home, under Your apps, click Email.
- Open the Configuration tab. Under "Sender", fill in Name shown in the email (your business name) and Reply to (the address where you want to receive replies). Click Save.
- Still on the Configuration tab, scroll down to "Test emails". Type your own email and click Add. Repeat for anyone else who will check the pieces (maximum 5).
- Open the Contacts tab. In the New list name field, write a name (for example: "Counter customers") and click Create list.
- With the list selected, go to "Import contacts", click the choose-file button
(its name changes depending on the browser) and upload your spreadsheet as a CSV, with the columns
nomeandemail. Click Import and wait for the little bar to finish. - Go back to the top and check: the list now shows the number of contacts next to its name.
- Open the Campaigns tab and click New campaign. Follow the four steps of the wizard (they're explained in detail further down, under "Campaigns").
- In step 4, click Send test and open the email that arrived in your inbox. Check the subject, the images and the links.
- If everything looks right, click Send now — or fill in "Schedule send (optional)" and click Schedule campaign.
- After sending, follow the result on the Reports tab.
The tabs, one by one
The module has eight tabs: Home, Campaigns, Templates, Contacts, Capture, Automations, Reports and Configuration. They sit on the app bar, at the top of the screen. Besides those, every module has a How to use tab at the end, with a short summary inside the system itself.
Home
/app/modulos/email-marketing/inicio
- What you see here: at the top, a box with the photo of Daniela (the system's email specialist), a sentence about how your campaigns are doing and a shortcut button. Below, three big numbers: Campaigns sent, Open rate and Active contacts. Right under the numbers, a row of four shortcut buttons; further down, the chat with Daniela, which also brings a few ready-made suggestions to get started.
- What you can do: chat with Daniela so she helps you write the email, think through the message sequence or suggest subject lines. The four shortcuts are: Create a campaign, Nurture flow, Segment the list and Subject that gets opened.
- Step by step:
- Click one of the four shortcuts. It already writes the start of the request in the chat box.
- Finish the sentence with your case (for example: "…Tuesday promo at the pizzeria, 20% off all large pizzas").
- Send it and chat normally, like a WhatsApp conversation.
- Daniela's sentence changes depending on your situation. If you've never sent anything, it says: "You haven't sent any campaign yet — your list is idle.", with the Create campaign button. If your last campaign was opened little (below 15%), she warns you and offers the View report button.
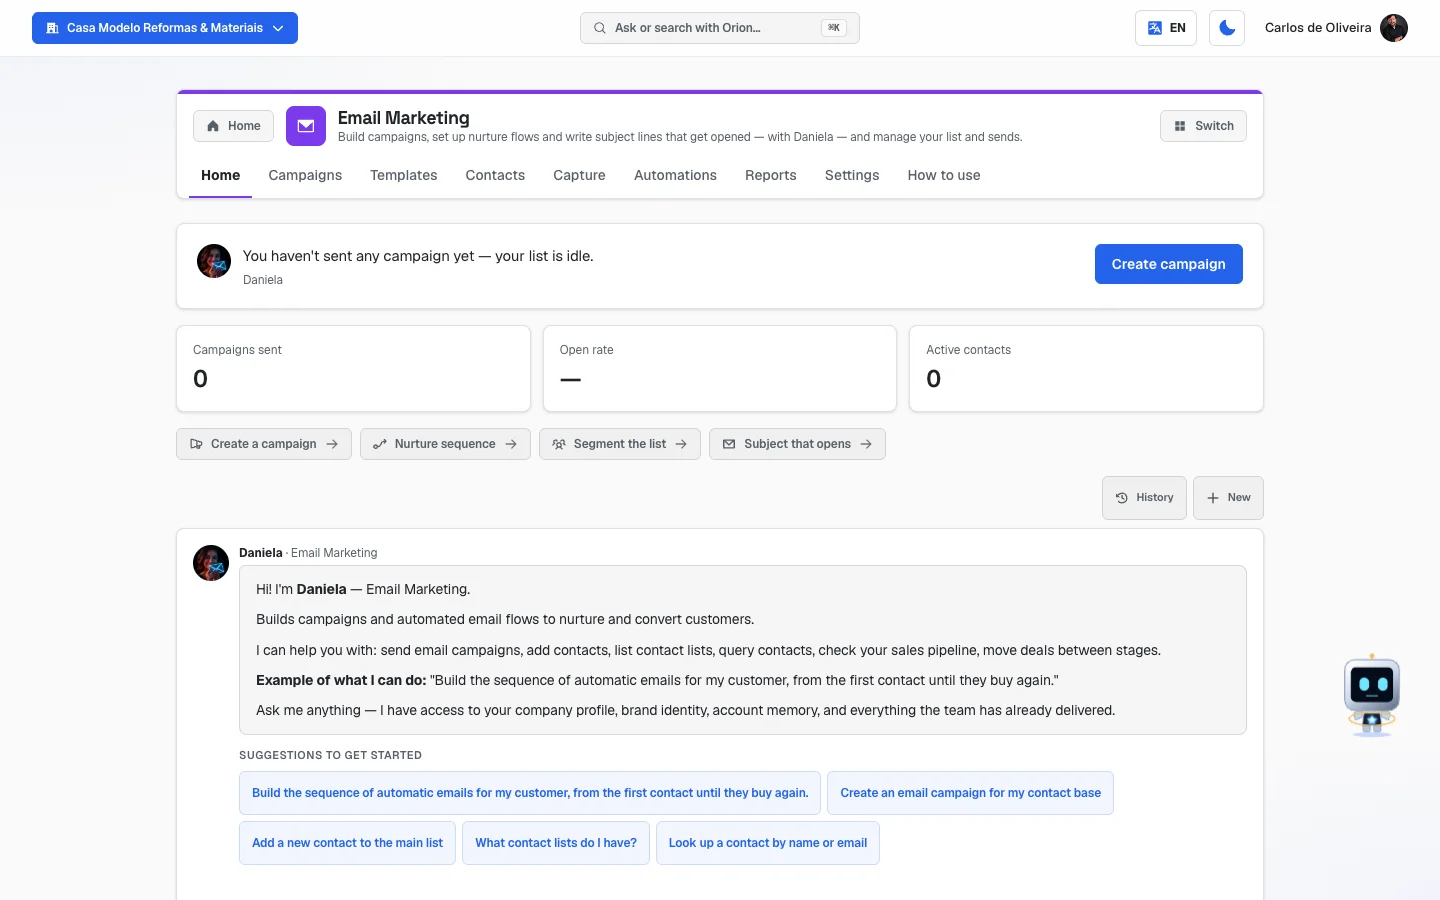 Home tab with Daniela's box, the three numbers, the row of four shortcut buttons and, below, the chat with Daniela
Campaigns
/app/modulos/email-marketing/campanhas
-
What you see here: the list of all campaigns, one below the other. Each row shows the subject, the status (Scheduled, Sending, Paused, Cancelled, Completed or Failed) and the results. When there are none yet, it shows: "No campaigns yet. Click "New campaign" to get started."
-
What you can do: create a new campaign, and Pause, Resume or Cancel a campaign that is scheduled, sending or paused.
-
Step by step — how to send your first campaign:
-
Click New campaign. The wizard opens, with four steps.
-
Step 1 — "Where does the content come from?" Pick one of the five options:
- Start from scratch — you build the email with blocks (heading, text, image, button…). It's the easiest way for anyone who has never done this. It comes already selected.
- Template — uses a ready-made template (yours or one from AutoAgency). A box appears to choose which one.
- Paste HTML — for those who have the email's code ready and want to paste it.
- Link — the system fetches the email that's already published at an internet address.
- Upload — you send an
.htmlfile from your computer.
In Internal name (just for your own organization), give it a name that will help you find it later. Nobody who receives the email sees this name. Click Continue.
If you had already started something and didn't send it, a box "Continue a draft" shows up here with the names of what's pending. Clicking one of them reopens the editor where you left off, instead of starting from scratch.
-
Step 2 — "Edit the content". Here you write the email — the screen sums it up: "Build the email with blocks and watch beside it, live, how it will look." (If you started by pasting HTML, the sentence says "Edit the email you pasted…".) A detailed explanation of the editor comes right below, under "The email editor". Also write the Email subject (the field is at the top of this step). When you're done, click Continue. If you want to save this piece to reuse later, click Save as template first.
-
Step 3 — "Who will receive it?" Check one or more lists. Next to each list it shows how many contacts it has. As soon as you check one, a box shows "Total selected: X recipients" and, when there's a monthly limit, how much of your allowance that will use up. Click Continue. If you don't have any lists yet, the screen says: "You don't have any contact lists yet. Create one in the Contacts tab."
-
Step 4 — "Review and send". Check the Email subject and the line that says "Will be sent as: …". Click Send test and open the email that arrived in your inbox. If everything looks right:
- to send right away: click Send now;
- to pick a day and time: fill in Schedule send (optional) and click Schedule campaign.
-
Done. The campaign appears at the top of the list, and the system says "Campaign sent!" or "Campaign scheduled!".
-
-
About scheduling: the time is always Brasília time — it's written on the screen itself ("The time is always Brasília time"). If you leave the field blank, the email goes out right away. While the campaign is scheduled, its row shows "Scheduled for day/month hour:min".
-
Pausing, resuming and cancelling: a Scheduled or Sending campaign can be paused or cancelled. A Paused campaign can be resumed or cancelled. Cancelling asks for confirmation and warns: "Cancel this campaign? This can't be undone."
The email editor (step 2)
The editor has two halves: on the left you build the email, on the right you see how it looks.
- Blocks / HTML — the little toggle in the top left corner. In Blocks you build the email by putting together ready-made pieces; it's the recommended mode. In HTML you work on the code. Careful: switching from Blocks to HTML is a one-way trip for that email (the screen confirms first: "We'll turn your blocks into HTML code. After that you can't go back to blocks in this email. Continue?").
- Add block — the types are Heading, Text, Image, Button, Divider, Spacer and Footer. Each block has its own settings: alignment (left, center, right), color, text size, image width, button color, and so on. Each block also has buttons for Move up, Move down, Duplicate and Remove. The maximum is 60 blocks per email.
- Desktop / Mobile — switches the preview on the right between a desktop's width and a phone's. Worth checking both: more than half of people read email on their phone.
- Personalize — the button that puts the contact's data inside the text. Explained in the next section.
- Generate text for image-blocked readers — automatically creates two things: the Inbox preview text (that little snippet of text that shows next to the subject, before the person opens the email) and a Text version of the email, for people who use a program that doesn't show images.
- Send test — sends the email to the addresses registered under "Test emails". It only works once the subject is filled in.
- Warnings that may appear:
- "X image(s) in this email are not yet hosted by us — it may not show up for everyone. Prefer images that are already hosted." — the image is on a third-party site and may disappear.
- "Heads up: X of Y contacts don't have '…' filled in…" — you used a piece of data that's missing for part of the list.
Personalize (the fields that fill themselves in)
"Personalize" is the on-screen name for putting each person's data inside the email. You write once "Hi, [name]" and each contact receives the email with their own name: "Hi, Maria", "Hi, John".
How to do it:
- Click with the mouse inside the text, exactly where the data should go.
- Click Personalize (it's at the top of the editor and also next to the subject field).
- Pick the data from the list. Contact name and Contact email are always available; the others are the fields you created yourself in the Contacts tab.
- The system drops the right code at the cursor and says: "… inserted".
Important things:
- Never type the code by hand. It's case-sensitive, and a wrong code isn't replaced: the person receives the email with the code showing, raw, in the middle of the text. Always use the button.
- Under each option in the list the system says how many contacts have that data filled in ("X of Y contacts have this data filled in"). If a lot of people don't have it, pick another one.
- In the preview on the right, the system shows sample values and warns: "Preview with sample data — each contact receives their own."
- If you write something in brackets that isn't real data, this warning appears: "This is not a contact detail and will show up as-is in the email…"
- If you haven't created any custom fields yet, the list says: "You haven't created contact fields yet. Create them in the Contacts tab to personalize the email."
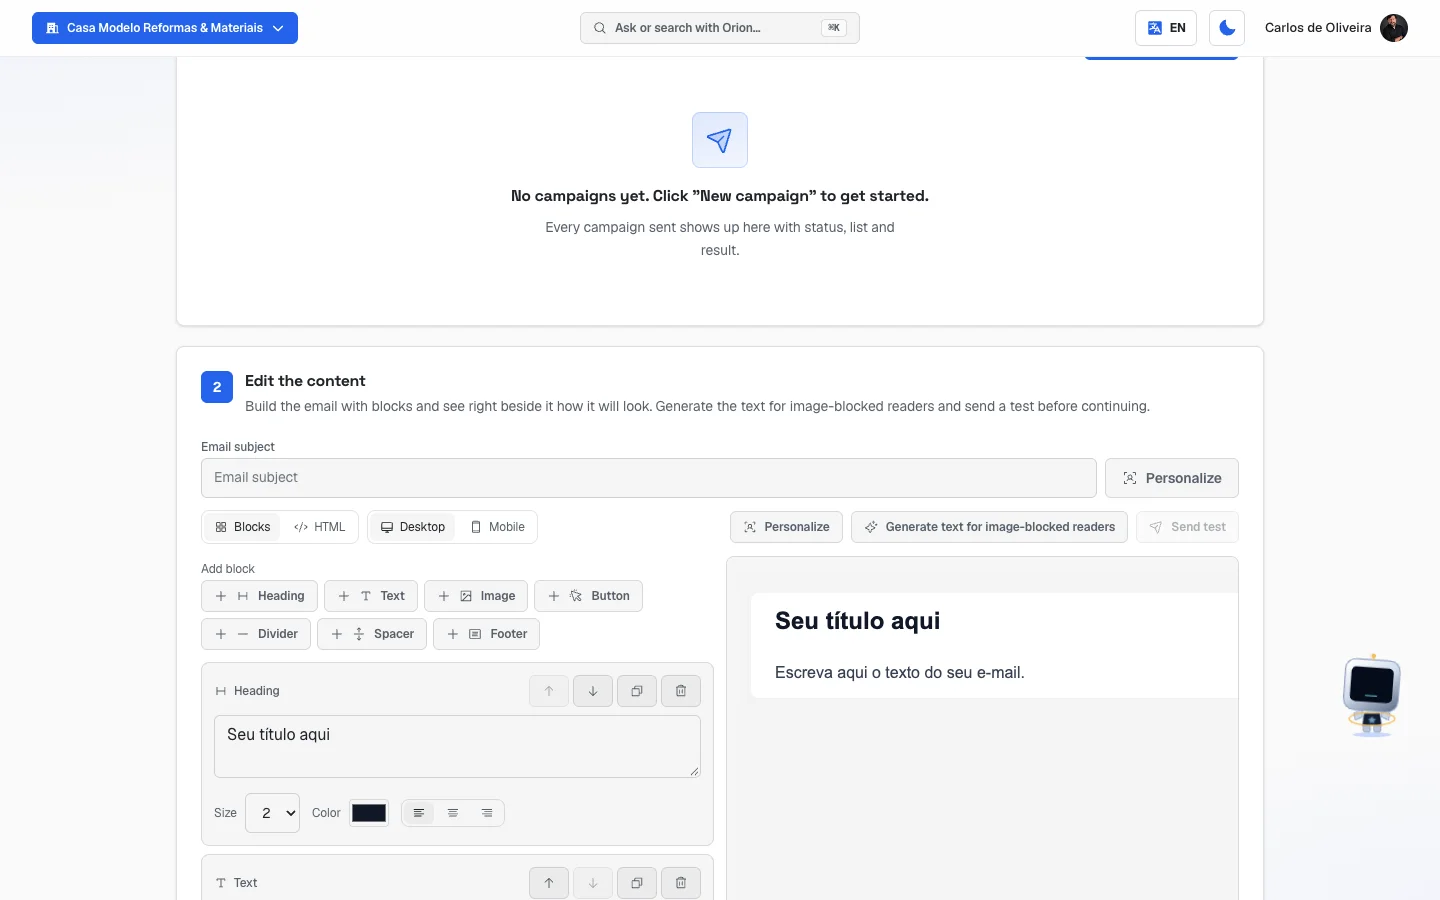 Step 2 of the wizard, "Edit the content", with the subject field at the top, the block editor on the left and the preview on the right
Templates
/app/modulos/email-marketing/modelos
- What you see here: little squares with the thumbnail of each email template. The ones with a star and the AutoAgency tag come ready-made with the system; yours appear with the My template tag. Templates built with blocks also get the Blocks tag.
- What you can do: Use (creates a draft from that template and opens the editor with it), Duplicate (makes a copy that's yours) and, only on your templates, Edit (rename) and Delete.
- Step by step (the short way):
- Click Use on the template you want.
- Give the draft a name (it's only so you can find it later; whoever receives the email doesn't see it).
- Done: the screen says "Draft created from the template — opening in the editor" and takes you straight to the Campaigns tab, with the template's content already open in the editor. From there on it's the normal wizard: edit → pick the lists → send or schedule.
- Step by step (the same result, starting from the campaign):
- Go to the Campaigns tab and click New campaign.
- In step 1, choose Template and select the template in the box.
- Click Continue — the template's content already opens in the editor, ready for you to change the text.
Where does the draft go if I close the page halfway? It isn't lost and there's no "Drafts" tab in this module. Every draft you started and haven't sent yet shows up in the Campaigns tab → New campaign, in step 1, in a box called "Continue a draft": click its name and the editor reopens where you left off. It's the same place where the drafts Daniela creates for you through the chat show up.
- Tip the screen itself gives: replace
{{nome_empresa}}with your business name when editing. - Deleting a template asks for confirmation and can't be undone.
Contacts
/app/modulos/email-marketing/contatos
-
What you see here: at the top, the field to create a list and the little buttons for each existing list (with the number of contacts next to it). Then, "Custom fields", "Import contacts", "List contacts" (the table) and "Test emails".
-
What you can do: create, rename and archive lists; import contacts from a spreadsheet; export; check the quality of the addresses; create extra fields; edit a contact's data; and register the test emails.
-
Step by step — creating a list:
- Write the name in New list name.
- Click Create list. The list is selected automatically.
-
Step by step — importing your spreadsheet:
- Click the little button for the list that will receive the contacts.
- Under "Import contacts", click the choose-file button and select your
.csv. - If the file has columns besides name and email, "Extra columns in the file — choose which field each one goes to" appears. Choose the destination for each column, or leave it on Don't import.
- Click Import.
- Follow the little bar: "Importing… X of Y".
- At the end it shows "X entered · Y left out — download the details". Click Download details to see, address by address, the reason for each rejection.
-
The file has to look like this: CSV with the columns
nomeandemail, separated by;or,, with a maximum of 5MB. Every contact goes through an automatic check before getting in. -
Step by step — checking the health of the list:
- Select the list.
- Click Verify my list.
- The result appears like this: "X contacts: Y good, Z with caveats, W with issues."
-
Each field explained (creating a custom field):
- Field name (e.g. City) — what you want to call the data.
- Type — Text, Number, Date or Select.
- Options separated by commas — appears only when the type is Select; these are the options you'll be able to pick from.
- Once created, each field has Move up, Move down and the Active checkbox. A field that's turned off disappears from the screens but isn't deleted.
- The fields you create automatically become options in the editor's Personalize button and columns in the contacts table.
-
Filtering contacts: click Filter by field and build the condition (field + comparison
- value). The comparisons are: is equal to, contains, greater than, less than, before, after, is filled, is empty. Combining more than one condition is part of the Pro line — when it's not available, a padlock appears with the notice on the screen.
-
Other buttons: Export CSV downloads the list's contacts; the little pencil on each row opens Edit fields to fill in the phone number and that contact's own fields; Rename and Archive are the icons next to the list's name. Archive warns: "Archive this list? It will stop receiving campaigns."
-
"Bring in an existing list": if there are lists created directly in the email system, they show up in a box with the Bring it in button. In that case the list has people in it, but the names may not show in the table; the screen explains this with the notice "The names are not here, but the list has people".
-
Test emails: type the address and click Add (limit of 5). Those are the addresses that receive when you click "Send test" on a campaign.
📷 This screen has no photo — with a list selected, the Contacts tab shows the table of its contacts and, at the top, the bar for importing more.
Capture
/app/modulos/email-marketing/captacao
- What you see here: the list of forms you've already created. Each one shows the name, the type, the destination list, the Active switch and a piece of code to paste into your site. When empty, it says: "No forms yet".
- What you can do: create forms and popups that send contacts straight into an email list, without you typing anything.
- Step by step:
- Click New form.
- Fill in Internal name (just for your own organization).
- Under Type, choose Form for external site (stays fixed inside the page) or Popup (shows up on its own over the page).
- Under Destination list, choose which list the contacts go to — or click Create list… to make one on the spot.
- Fill in what the person will see: Form title, Button text, Success message and Button color.
- Check Ask for name and/or Ask for phone, if you want. If you've already created custom fields, they appear under Also ask for these fields.
- Popup only: Popup delay (seconds) is how many seconds it waits before appearing, and Don't show again for (days) is how long it stays quiet for anyone who has already seen it.
- Click Save.
- On the form's row, click Copy code and ask whoever looks after your site to paste that snippet into the page's HTML. The screen itself explains: "Paste into the site HTML. The form renders where the marker is; the popup shows by itself."
- The Active switch turns the form on and off without needing to touch the site.
Automations
/app/modulos/email-marketing/automacoes
- What you see here: the sequences already built, with the name, the status (Draft, Active or Paused), which list triggers the sequence, how many emails it has and the counters for how many people are in the middle of it. When empty, it says: "No automations yet" — "Create a sequence: anyone who joins the chosen list receives the emails in the order and timing you define." The New automation button is at the top, on the right.
- What it is: a queue of emails that goes out on its own. Whoever joins the chosen list gets the first email, then the second, then the third — at the intervals you set. It's what the screen calls "Email sequences that go out on their own when someone joins the list".
- What you can do: create, edit, Activate/Resume, Pause and Delete sequences.
- Step by step:
- Click New automation.
- Fill in Automation name (just for you).
- Under List that triggers the automation, choose the list — or click Create list.
- Under "Emails in the sequence", the first email comes already open. Fill in:
- Wait (days) — how long to wait before sending. For the first email, the count starts the moment the person joins the list; for the following ones, the count starts from the previous email. With 0, it goes out in the next cycle (within 1 hour).
- Subject — with the Personalize button beside it, same as in campaigns.
- The body of the email, in the same block editor as campaigns. If you want, use Use a ready-made template to bring in a template that's already made.
- Click Add email for the next one in the queue and repeat. The limit is 20 emails. Use the little arrows to change the order.
- Click Save. The automation is born as a Draft — it doesn't send anything yet.
- On its row, click Activate. From then on, whoever joins the list starts receiving.
- Important: automations run every hour. Each email goes out within 1 hour after the set delay — it's written in the footer of the screen.
- Changing the list: with the automation Active, the list is locked. The screen warns: "To change the list, pause the automation first."
- Delete erases the automation and its enrollments; emails already sent stay in the Reports.
- Automations paused on their own: when the system pauses by itself, it writes the reason in a yellow notice on the automation's row (the sending allowance ran out, the plan only allows one active automation at a time, the current plan doesn't include active automations, or sending failed).
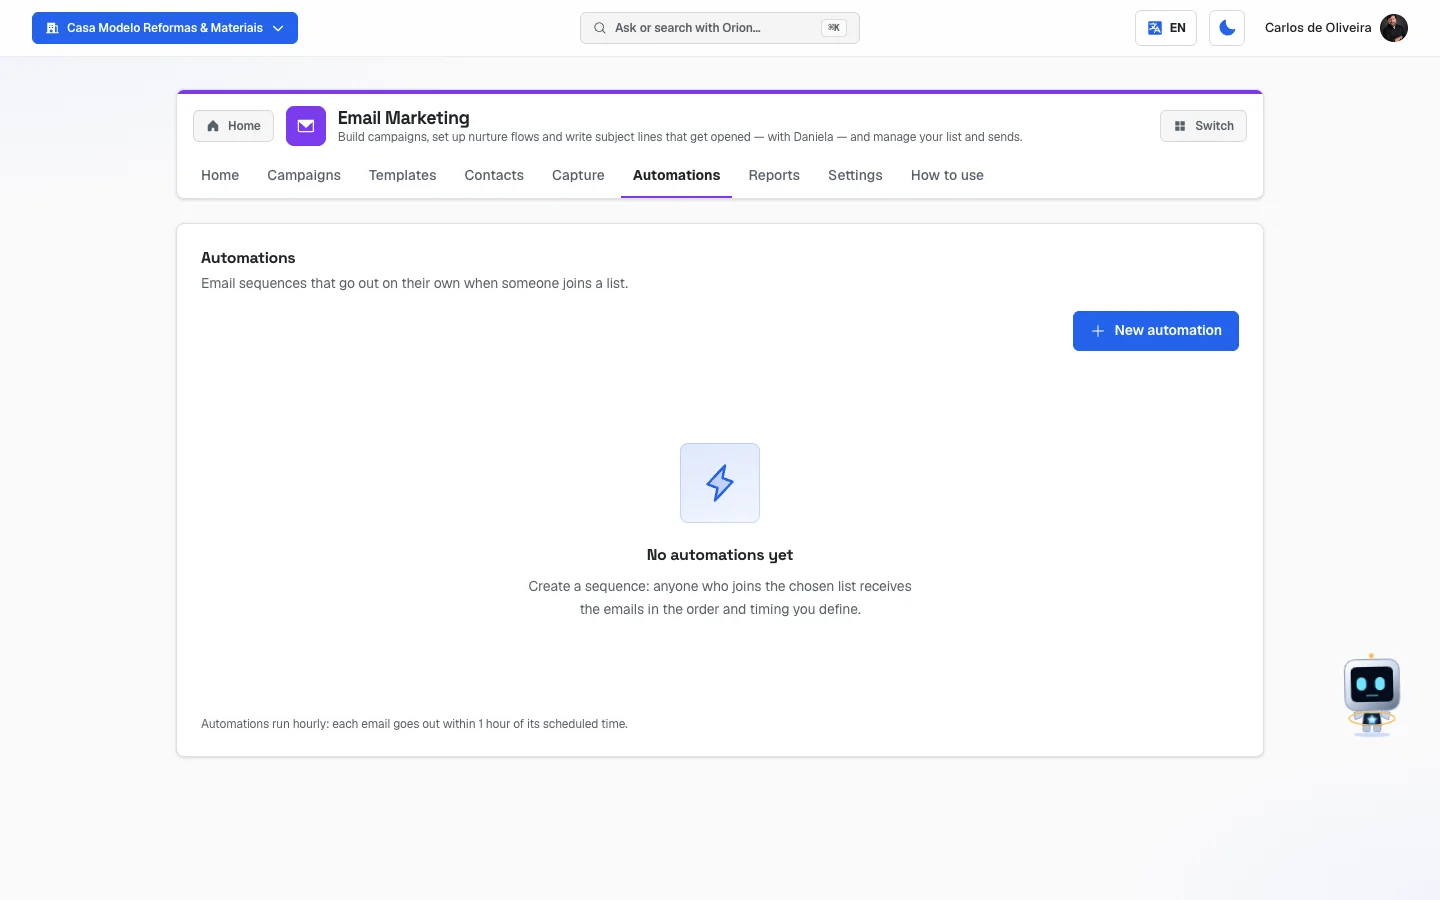 The Automations tab still empty: the "New automation" button, the notice "No automations yet" and, in the footer, the sentence about automations running every hour
Reports
/app/modulos/email-marketing/relatorios
- What you see here: at the top, the View box, where you choose between Overall (last 90 days) and a specific campaign. Below, five cards with the numbers, a chart called Evolution and the Campaigns in the period table.
- What you can do: look at performance — there's nothing to edit here.
- Step by step:
- Leave it on Overall (last 90 days) to see the period's total.
- Or choose a campaign in the View box to look at only that one.
- In overall mode, a line right below says when the last campaign went out ("Last campaign sent: today." / "…X days ago."). When the last one is already outside the 90-day window, that line turns the alert color.
- Campaigns that went out through an automation appear in the table with the Automation tag.
Configuration
/app/modulos/email-marketing/configuracoes
- What you see here: five blocks — "Send balance", "Monthly sending plan", "Sender", "Your own domain" and "Test emails".
- What you can do: see how many emails still fit in the month, buy a send package, subscribe to or change the sending plan, set how you appear to whoever receives and register the test addresses.
- Each field explained:
- This month's allowance — how many emails of your monthly limit you've already used, in the "X of Y used" format. Below this box and the packages one, the screen says how much each email costs above it without a package, added to your next invoice. The overage is calculated on the 1st, on the month that just ended, and the invoice line states the quantity and the month.
- Package balance (never expires) — sends bought separately, which stay saved.
- Buy a send package — buttons with the available package sizes. Clicking opens the payment screen.
- Monthly sending plan — choose between the Basic and Pro lines and then the size of your list in the selection box. The screen explains: Basic sends your list 10× per month; Pro sends 15×.
- Credits at the sending provider — this is another balance, from the service that delivers the emails. The screen warns: "When it runs out, sending stops, even with allowance left." The date next to it is when that number was read.
- Name shown in the email — your business name, as it appears in the inbox.
- Reply to — the address that receives when someone replies to your email.
- Your own domain — not available yet; the screen says it's on its way.
- Test emails — the same ones from the Contacts tab (up to 5). Whatever you change here applies there, and vice versa.
- Step by step (changing the sender):
- Fill in Name shown in the email and Reply to.
- Click Save. The line at the top — "Your emails go out as: …" — shows how it will look.
How to read the numbers
On the Home tab:
- Campaigns sent — how many campaigns have finished going out.
- Open rate — out of every 100 people who received your last campaign, how many opened it. Shows "—" when there's no completed campaign yet.
- Active contacts — the sum of the contacts in your lists that aren't archived.
On each campaign's row (Campaigns tab):
- X sent — how many emails went out.
- X bounced (Y%) — how many didn't arrive: a mailbox that no longer exists, a full mailbox, or a server that refused it. This part only appears when there are bounces. The screen itself explains: "Above 5%, delivery of your next sends starts to suffer." When it goes above 5%, the number turns red. Worth paying attention to: a high bounce rate hurts the delivery of your next campaigns.
- X opens — how many people opened it.
- X clicks — how many clicked a link inside the email.
On the Reports tab:
- Sent — total that went out.
- Unique opens — how many different people opened it (if the same person opens it three times, it counts as one). Below it says "X% of those who received it".
- Unique clicks — how many different people clicked, with the percentage below.
- Bounces — emails that didn't arrive.
- Unsubscribes — people who asked not to receive any more. That's normal and healthy; what you don't want is for it to grow a lot all of a sudden.
- Evolution — the chart with two lines, Opens and Clicks, over time. When there isn't enough data yet, it shows "Not enough data yet for the chart."
- Open rate / Click rate (table columns) — the same calculations as above, campaign by campaign.
On the Contacts tab:
- Quality with a colored dot: Good (green), Medium (yellow), Bad (red) or — when the sending service hasn't rated it yet. A "Bad" address is the number one candidate to become a bounce.
- In the Verify my list result: good are addresses with no problems at all; with caveats are the ones that passed but have some remark; with issues are the ones that shouldn't be used (misspelled address, a domain that doesn't exist, disposable or duplicate email).
On the Automations tab:
- X in progress — people who are in the middle of the sequence right now.
- X completed — people who have already received all the emails in the sequence.
- email N: X sent — how many were sent at each step of the queue.
Frequently asked questions
Do I need an email provider (Gmail, Outlook) to send? No. Sending comes with the module, with an amount included each month. You see how much you've already used on the Configuration tab and, if you need more, you buy a package right there.
How do I put the person's name in the email without typing it one by one? In the editor, click the spot in the text where the name should go, click Personalize and choose Contact name. Each person receives the email with their own name. Never type the code by hand.
Can I see how it looks before sending it to everyone? Yes, in two ways. In the editor, the preview on the right shows the email live (and you switch between Desktop and Mobile). And the Send test button sends the email for real to the addresses registered under "Test emails", so you can open it in your inbox.
I scheduled it for 10 a.m. Which 10 a.m. is that? Brasília time, always — even if you're somewhere else. It's written on the scheduling screen.
Can I cancel a campaign after scheduling it? Yes, as long as it's Scheduled, Sending or Paused: use the Pause or Cancel buttons on the campaign's row, in the Campaigns tab. Cancelling can't be undone.
What's the difference between a campaign and an automation? A campaign is an email you send once, to the lists you choose. An automation is a queue of emails that goes out on its own, at the pace you set, every time someone new joins the list.
When something goes wrong
"Register at least one test email before sending (Contacts tab)." → You don't have a test address yet. Go to Contacts (or Configuration), "Test emails" block, type your email and click Add.
The "Send test" button is grayed out and won't click → The subject is missing. The screen explains when you hover over it: "Write the email subject before sending a test." Fill in Email subject and try again.
"The draft needs a subject and content before sending." → The email has no subject, no body, or neither. Go back to step 2, build the content, and to step 4, write the subject.
"Select at least one recipient list." → In step 3, check the box for at least one list.
"That list is empty — import or capture contacts before sending. No email was sent." → The list exists but has nobody in it. Go to Contacts, select the list and import your spreadsheet.
"All the selected lists are archived." → An archived list doesn't receive campaigns. Choose another list.
"We couldn't confirm how many people will receive it. Try again in a moment — no email was sent and nothing was deducted." → The sending service didn't answer in time. Wait a bit and click again. Nothing was charged.
"You've reached this month's sending limit and there's no package balance." → Only appears when sending above the allowance isn't enabled for the account. With the overage in effect (the per-email price shown in the Configuration tab, on your next invoice), sending carries on normally. To spend less, go to Configuration → "Buy a send package" (it comes out a lot cheaper and never expires), or subscribe to a larger sending plan.
The campaign went out, but a lot of people show up as "bounced" → Look at the percentage next to it. Above 5%, your list has old or wrong addresses. Go to Contacts, click Verify my list and then delete or fix the contacts with issues before the next send.
The automation stopped on its own → Open the Automations tab and read the yellow notice on its row: it says why (the month's allowance ran out, the plan allows only one active automation at a time, the current plan doesn't include active automations, or sending failed). Fix what it points to and click Resume.
"This list is archived. Reactivate it to import/verify contacts." appears → You're trying to import or verify on an archived list. Choose an active list.
A code in brackets shows up inside the email the person received → Someone typed the personalization code by hand, instead of using the Personalize button. Go back to the editor, delete the text in brackets and insert the data with the button.
The screen says "No campaigns sent in the last 90 days" but I've already sent campaigns → Your campaigns are older than 90 days. The line right below shows how many days ago the last one went out.
"No contacts in this list yet" on a list I know has people → If the list came ready-made from the email system, the notice changes to "The names are not here, but the list has people". You can send normally; the names only show up if you import the spreadsheet.
The image didn't show up for some people → It's probably an image from an outside site that went offline. The editor warns about this before sending, with the not-hosted-image warning. Prefer images you uploaded yourself.