

The Support Desk — the single inbox for your customer support
Where it is: Home → Your apps → OmniDeskSuite, if you've subscribed to the app; without it,
full menu → More drawer → Support Desk
Address: /app/desk
This chapter is the heart of the Support Desk (OmniDeskSuite) module. The chapters Day to day and Support Desk (module) point here: this is where everything you do in this part of the system is explained, screen by screen and button by button.
Heads up: this screen is part of a paid module. If the module isn't active on your account, the system takes you to the module showcase with it highlighted, or shows the Support Desk invitation right on the screen, with the button to turn it on in the catalog.
Don't confuse it with the other message screens
The system has three places where conversations show up. It's worth knowing the difference before you start:
| Screen | Who you're talking to |
|---|---|
Talk to the Director (/app/chat) | Your AI team — you asking AutoAgency to do things |
Latest Contacts (/app/ultimos-contatos) | The list of people who reached out to your business, so you can call them back |
Support Desk (/app/desk) | Your customers — the messages they send you |
This is the third one. It's your business's single inbox: WhatsApp, email, site chat and customer portal all land in one queue. It opens like the other apps in the panel: at the top, the bar with the name Support Desk, the Home button and the Switch button; right below, the Desk's own tabs.
An everyday example: you run a pizzeria. One customer complains on WhatsApp that the delivery was late, another emails asking if there's a gluten-free option, and a third uses the site chat to ask for the invoice. Instead of three apps open, all three show up in one list, each with the person's name, the channel, the urgency and the deadline ticking.
What's in here
- Before you start
- The eight tabs at a glance
- 1. Queue — where you handle conversations
- 2. Tickets — the case that needs to be solved
- 3. Reports — the numbers of your support
- 4. Help center — your public knowledge base
- 5. Migration — bring in the history from another tool
- 6. Get started — the setup checklist
- 7. Manual — the module's help text
- 8. Settings — the ten support settings
- Words you'll see all the time
- When something goes wrong
Before you start
You don't need any of this to open the screen, but you do need it for the screen to really work:
- The module active on your account. Without it the screen only shows the invitation to turn it on.
- At least one channel connected: the site chat, a WhatsApp number or an email address. Without a channel, nothing reaches the queue.
- At least one person on the team (Settings tab → Team), if anyone besides you is going to handle conversations.
- Being an administrator to change settings, reports and migration. A regular agent sees the queue, the tickets and the articles, but not the settings forms.
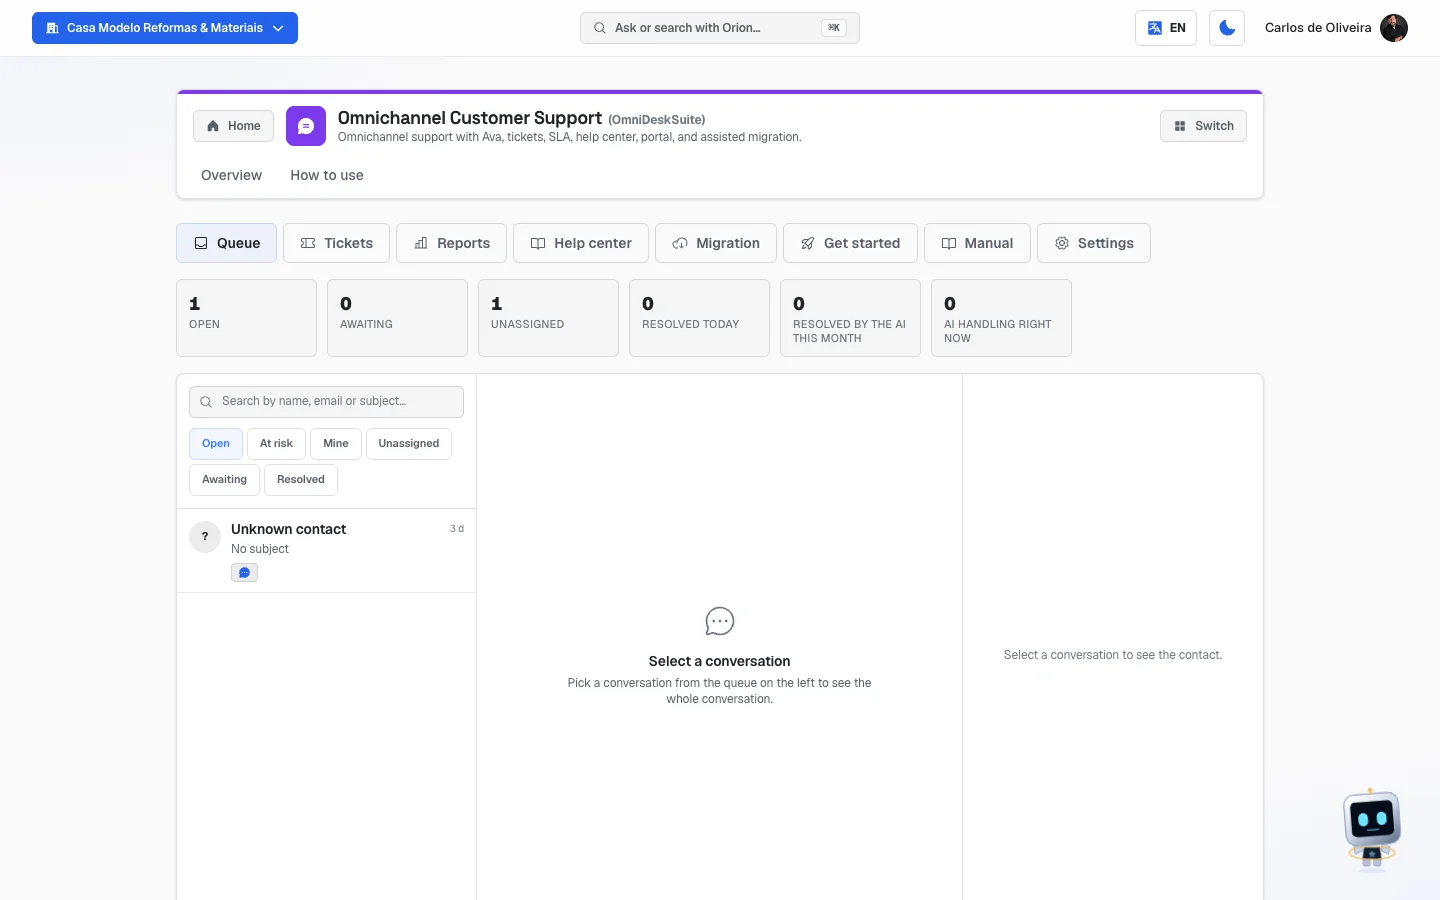 The /app/desk screen open on the "Queue" tab, showing at the top the "Support Desk" app bar with Home and Switch, the row of eight tabs, the six numbers and the three columns — still empty in this sample company
The eight tabs at a glance
At the top of the screen, right below the Support Desk title, is the row of tabs. The screen always opens on the first one.
| Tab | What it's for |
|---|---|
| Queue | Handling conversations: reading the messages that arrived and replying |
| Tickets | Following registered cases until they're solved |
| Reports | Seeing the numbers of your support (administrator only) |
| Help center | Building the public knowledge base for your customers |
| Migration | Bringing in the history from Zendesk or Intercom (administrator only) |
| Get started | The initial setup checklist, which moves forward on its own |
| Manual | The module's own help text, inside the system |
| Settings | Team, macros, targets, the AI, forms (administrator only) |
If you're an administrator, below the queue there's also a reminder with a shortcut: "You manage this Support Desk — the team, incoming email addresses (Aliases), ready-made replies (Macros) and saved queue filters (Views) are in Settings."
1. Queue — where you handle conversations
/app/desk (it's the tab that opens on its own)
What you see
At the top, six numbers that update on their own — the first four every 10 seconds, the two for the AI every minute:
- Open — conversations waiting on someone on your side.
- Awaiting — conversations where the ball is with the customer: you've already replied and you're waiting for them to come back.
- Unassigned — conversations nobody has picked up yet.
- Resolved today — how many were closed today.
- Resolved by the AI this month — how many the artificial intelligence resolved on its own, with nobody from the team stepping in.
- AI handling right now — how many conversations the AI is answering at this moment.
Below, the screen splits into three columns (on a phone, one at a time, with arrows to go back and forth):
- The queue, on the left: the list of conversations.
- The conversation, in the middle: the messages exchanged and the reply box.
- The contact card, on the right: who the person is, what the AI noticed and the ticket.
In the queue column you'll find, from top to bottom:
- The search field, with the text "Search by name, email or subject…".
- A selector that starts at All conversations — it only shows up if someone has already saved a "saved view" (a ready-made slice of the queue; see Settings → Views). Pick the name of a saved view to see only its conversations; go back to All conversations to see the whole queue.
- The six filters, as little buttons.
- The list of conversations. Each row shows the person's initials, the name (or the email, or the phone, or "Unknown contact"), how long ago there was activity, the subject (or "No subject"), the channel icon and the urgency and deadline tags.
If no conversation matches the filter, "Nothing in this queue" appears, with the explanation "No conversation matches this filter — clear it to see the whole queue."
Until you click a conversation, the middle column says "Select a conversation" ("Pick a conversation from the queue on the left to see the whole conversation.") and the right one asks for the same thing, to show the contact.
The six filters explained
Here they are, in the order they appear:
| Filter | What it shows |
|---|---|
| Open | Everything that's open and waiting on your team. This is where you work day to day |
| At risk | Only what's close to missing its deadline — or already has. Start here |
| Mine | The conversations where you are the owner |
| Unassigned | The ones nobody has picked up. If work is piling up here, someone needs to take it |
| Awaiting | The ones waiting for the customer's reply. The deadline is paused on them |
| Resolved | The ones that are already closed out |
One important detail about the At risk filter: a conversation that's Awaiting the customer never shows up in it. That makes sense — if the ball is with the customer, the clock is stopped and you don't owe anyone anything.
The list order isn't by time
The queue isn't a list from newest to oldest. It's organized like this, in this order:
- First the priority someone set (Urgent before High, High before Normal).
- Then the urgency the AI noticed in the message, to break ties.
- Only then the time of the last activity.
In other words: what's urgent rises on its own, even if it arrived earlier.
Step by step — handle a conversation from start to finish
- In the full menu, open the More drawer and click Support Desk.
- Click the At risk filter. If there's anything here, solve it first.
- If nothing is at risk, click Unassigned or Open.
- Click the conversation you're going to handle. It opens in the middle column.
- Read the whole conversation. It scrolls to the last message on its own.
- Look at the right-hand column before replying: that's where the phone, the email and the summary of what the AI understood about the request are.
- Take over the conversation (it's the next step by step) so the team knows it's you.
- Write the reply in the box below and click Send.
- If you need to wait for the customer to reply, change the status to Awaiting — that way the deadline stops running.
- When you're done, change the status to Resolved.
Step by step — take over a conversation
Taking a conversation has two meanings on this screen. Both are in the conversation header:
a) Become the owner of the conversation (telling the team "this one's mine"):
- With the conversation open, look at its header, right below the customer's name.
- Click the selector that shows Unassigned.
- Pick your name from the list. Done — it now shows up in your Mine filter.
To send the conversation back to the common queue, pick Unassigned in the same selector.
b) Take the conversation away from the AI (telling the artificial intelligence "you can stop, I've got this"):
- In the same header, look for the Take over button.
- Click it. The little tooltip explains: "The AI stops replying and the conversation stays with you."
When you want to do the opposite, the button turns into Give it back to the AI — "The AI starts replying to this customer again on their next message, in a fresh round". That button is yellow on purpose: giving the conversation back to the AI starts using up your monthly allowance again.
If the month's allowance has run out, the button shows up greyed out, labeled Monthly AI quota used up, with the notice "This month's AI quota is used up — it wouldn't answer. Talk to the account admin."
Step by step — reply
- Click the writing box, below the conversation. The grey text inside it says where the reply will go out — for example, "Reply via WhatsApp…".
- Check that the Reply button is on (and not Internal note).
- Write.
- Click Send, or press
Ctrl + Enter(on a Mac,Cmd + Enter).
Two shortcuts that save a lot of time:
- Use a macro… — a selector with your ready-made replies. Pick one and its text goes into the box (added to what you've already written, never erasing it). Macros can also change a conversation's status, priority and tags on their own when the reply is sent. You build macros in Settings → Macros.
- AI — the button with the little star, which opens a menu of four helpers (below).
The AI button in the reply box
The menu has, in this order:
- Summarize conversation — the AI reads everything and writes a summary in a panel above the box, called Conversation summary. That panel has an Insert as internal note button, to leave the summary on record for the team.
- Suggest a reply — writes a suggestion and adds it to what you've already typed.
- Adjust tone → Formal or Casual — rewrites what's in the box.
- Translate → PT, EN or ES — translates what's in the box.
At the bottom of the menu is the reminder that sums up the house rule: "The AI only drafts — you're the one who sends." Nothing goes out to the customer until you click Send.
When the text in the box came from the AI, the notice "Drafted by AI — review before sending." appears below it. It goes away when you send or close it.
Internal note — the message the customer never sees
Next to Reply there's the Internal note button. When you turn it on, the box changes color, the text inside becomes "Write a note for the team only (the customer never sees it)…" and the send button turns into Save note.
It's for behind-the-scenes stuff: "customer already called 3 times this week", "Joe went on site and nobody was there". In the conversation, the note appears in a yellow bubble with the stamp "Internal note — the customer doesn't see this".
Fields explained — the conversation header
These are the controls right above the messages:
| Field | What it does |
|---|---|
| Status (first selector) | Open (waiting on you), Awaiting (waiting on the customer), Resolved (finished) and Closed (closed for good) |
| Owner (second selector) | Who's responsible. Starts at Unassigned |
| Priority (third selector) | Low, Normal, High or Urgent. It's what makes the conversation rise in the queue |
| AI tag | Shows up only when there's something to say: AI is handling it, AI handed it to you or You're in control |
| Deadline clock | "due in 45min", "2h late" or "target paused". Disappears when there's no deadline |
| Tags | The conversation's tags. The pencil next to it opens a field to write them, separated by commas |
Resolved vs. Closed is the difference that confuses people most, and it matters:
- Resolved: if the customer replies again, the same conversation reopens and goes back to the queue.
- Closed: if the customer replies, the system opens a new conversation. The old one stays in the history, untouched.
Fields explained — the contact card (right-hand column)
Title About the contact. It brings:
- The initials, the name and the channel the person used.
- The email and the phone, when they exist.
- The View in CRM link, when that person is already registered in your contacts.
- The What the AI noticed block — tags with the urgency (Critical, Urgent, Normal, Low), the mood (Happy customer, Frustrated customer, Neutral), the language, and, in quotes, the sentence with what the AI understood the person wants.
- The Ticket for this conversation block — either the ticket that's already open, or the button to open one.
- The Other conversations from this contact block — their history with you. If there isn't any, it says "No other conversations found."
Common questions
I replied, but a yellow notice appeared. The notice says your reply "was saved to the conversation, but it didn't reach the customer through the channel". In other words: it's on record, but WhatsApp (or email) refused the delivery. The notice itself explains what to do: copy the text and send it by other means, manually. Automatic resending doesn't exist yet.
I wrote half a reply and clicked another conversation. Did I lose the text? No. The draft is kept per conversation. Go back to it and the text is there.
I asked the AI to adjust the tone and it said it didn't change anything. The message is "You edited the text while the AI was working, so nothing was overwritten. Ask again." It's a safeguard: you touched the text midway and it preferred not to erase what you wrote.
The conversation disappeared from the queue. You probably marked it Resolved or Awaiting and the filter you're on doesn't show that kind. Click the matching filter to find it.
Can I send a photo or a file to the customer? Not today. The agent's reply is text only — there's no attach button in the box, and there's no hidden path: I checked on September 22, 2026 and sending accepts only the message text and the internal-note flag, nothing else. In the other direction it works: a file the customer sends arrives and is kept in the conversation.
The workaround is the usual one: upload the file where you already keep it (Drive, your site, your Help center) and paste the link in the reply.
2. Tickets — the case that needs to be solved
/app/desk?tab=tickets
Conversation and ticket: what's the difference?
This is the number one question about the screen, so it's worth explaining in plain English:
- The conversation is the chat. It's the WhatsApp that arrived, the email that came in. Each channel, each back-and-forth, is a conversation.
- The ticket is the case: the problem someone needs to solve, from start to finish. It has a number (#127), a type, an owner, a deadline and a list of what's already happened.
Think of a locksmith. The customer sends a WhatsApp on Tuesday ("the lock jammed"), calls on Wednesday and sends an email on Thursday chasing it up. That's three conversations — but one problem. That problem is the ticket. As long as it isn't solved, the case is open, no matter how many channels the customer used.
In practice:
- Not every conversation needs to become a ticket. "Are you open Saturdays?" is a question: you answer and that's it.
- Make it a ticket when the case won't end today, when it needs a part, a visit, an approval, or when you want to follow it until it's solved.
What SLA is (the deadline you promise)
You'll see the acronym SLA in a few places in the system. In plain English, SLA is just this: the promise of time that you make. Nothing more.
In the Support Desk the promise has three parts, and each one has its own clock:
- First response — how long until someone gives the customer a sign of life.
- Next response — each time the customer comes back, how long until you reply again.
- Resolution — how long until the case is finished.
How the clock behaves:
- It counts within your business hours. If you close at 6 pm, a message that arrives at 10 pm only starts counting the next day, when you open. (You can tell it to count 24 hours a day, if you want — see Settings → Targets.)
- It pauses when the conversation is Awaiting, because the ball is with the customer. The target paused tag appears.
- When there's little time left, the tag turns yellow ("due in 20min"). When it's past, it turns red ("1h late").
And most important: a deadline isn't decoration. Whoever is waiting waits until the time you promised. The At risk filter, in the Queue tab, exists just so you get there first.
What you see
At the top, the filters: a "Search by subject or person…" field, an Any status selector and an Any type selector.
In the middle, the table of tickets, with the columns No., Subject, Type, Status, Priority and Updated. Each row has a little checkbox on the left, used for merging.
On the right, the panel for the chosen ticket. With none chosen, it says "Click a ticket to view and edit its details."
If there are no tickets yet, the screen shows "No tickets yet", with the hint "Open the first one from a conversation, in the Queue tab".
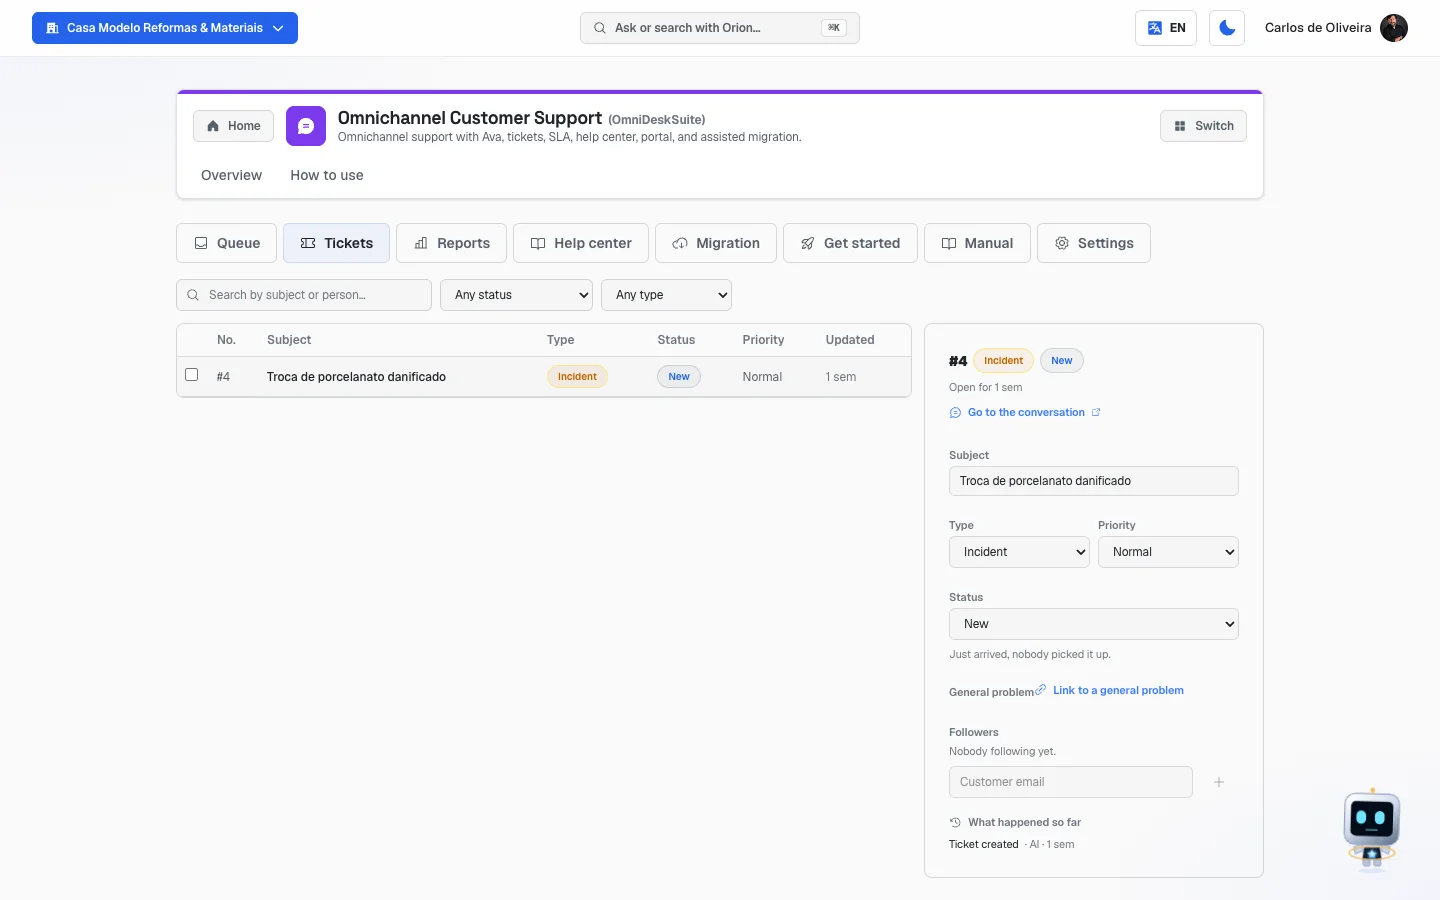 Tickets tab with the table on the left, one ticket selected and the details panel on the right
The four ticket types
| Type | When to use |
|---|---|
| Question | The person just wants to know something |
| Incident | A problem happened with this customer |
| General problem | There's a single cause and it affects several customers (the system went down, the batch came out defective) |
| Task | Someone needs to do something (issue the invoice, schedule the visit) |
The six statuses, and what each one means
Right below the selector, the system shows a sentence explaining the one you chose:
| Status | The sentence the system shows |
|---|---|
| New | "Just arrived, nobody picked it up." |
| In progress | "Someone is working on it." |
| Waiting on customer | "The ball is with the customer — waiting on their reply." |
| On hold | "Paused by something internal (part, third party, approval)." |
| Solved | "Solved — if the customer replies, it opens again." |
| Closed | "Closed for good. A new customer reply becomes a new ticket (follow-up)." |
Step by step — open a ticket from a conversation
Often you don't even need to: on the channels where the AI handles conversations, when the case calls for follow-up — an exchange, a refund, a defect, a deadline to meet — it opens the ticket itself and gives the customer the protocol number in the conversation. In the ticket panel, under What happened so far, you'll see "Ticket created · AI". The step by step below is for the other cases.
- In the Queue tab, open the conversation.
- Look at the right-hand column and find the Ticket for this conversation block.
- If there's no ticket yet, the notice "This conversation has no ticket yet. Opening one helps you track it to resolution (and solve similar cases together)." appears.
- Check the Subject — it comes filled in with the conversation's subject, or with "Support — customer name". Change it if you want.
- Choose the Type.
- Choose the Priority.
- If your company has forms set up, choose one under Form and fill in the fields that appear.
- Click Create ticket from this conversation. The system confirms with the number: "Ticket #12 created."
Step by step — see a ticket through to the end
- Open the Tickets tab.
- Click the ticket's row. The right-hand panel opens.
- Need to see what the customer wrote? Click Go to the conversation — the system takes you straight to it, in the Queue tab.
- Did your understanding of the case change? Change Type or Priority — they save on their own.
- To change the status: pick the new one in the selector, read the explanatory sentence below and click Apply status.
- Done? Choose Solved and apply.
Step by step — join two tickets about the same issue (merge)
It happens a lot: the customer opened a case by email and another by WhatsApp, and they became two tickets for the same problem.
- In the Tickets tab, tick the checkbox of the two tickets. "2 selected to merge" appears.
- Click Merge.
- The window shows which is the Source and which is the Target. Read carefully: "Messages stay in the source conversation; ticket #X will be closed and will point to #Y."
- If it's backwards, click Swap source and target.
- Click Merge. The system confirms: "Tickets merged."
The source ticket then shows the notice "This ticket was merged into another one — follow-up continues in the target ticket."
Step by step — solve several cases at once
Useful when the same cause generated several complaints.
- Create (or open) a ticket of the General problem type describing the cause.
- Open each Incident ticket tied to it.
- In its panel, look for General problem and click Link to a general problem.
- Search by subject and click the right problem in the list.
- When the cause is solved, open the General problem ticket. At the top of the panel you'll see the Linked incidents list and the Solve problem and its N incidents button.
- Click it. The system confirms how many were solved along with it.
Fields explained — the ticket panel
| Field | What it is |
|---|---|
| #number | The case number. It's how the team refers to the case |
| Open for | How long the ticket has existed |
| Subject | The case's title. When you change the text, the Save subject button appears |
| Type / Priority | They save as soon as you choose |
| Status | The big selector, plus the Apply status button |
| No detail | Appears in the second selector when custom statuses exist; it's the option for choosing none |
| Form and fields | The form linked to this ticket and its answers. Saves with Save fields |
| Detach form | Removes the form from the ticket. What was already filled in stays saved |
| General problem | Only on Incident tickets: links this case to the common cause |
| Followers | Who gets notified of progress — people on your team and also the customer's email |
| What happened so far | The list, from newest to oldest, of everything that changed on the ticket and who changed it: Agent, AI or Automatic |
Step by step — put someone on follow-up
- In the ticket panel, go to Followers.
- To add a customer: write the address in the Customer email field and click the +.
- To add someone from the team: pick the person in the Someone from the team… selector and click the +.
- To remove: click the little trash can next to the name.
Common questions
I closed the ticket by accident. Can I reopen it? Not that same ticket — Closed is final. But in place of the selector the Create follow-up button appears, which opens a new case pulling in the old one's form and tags. The field answers don't come along (they applied to the previous case).
I merged two tickets and the messages didn't come together. That's how it works, and the window itself warns you beforehand: messages belong to the conversation, not the ticket. What comes together is the follow-up.
My ticket's form disappeared. If someone deactivated that form in settings, the panel shows: "This ticket's form was deactivated in settings — what was already filled stays saved. Pick an active form to edit the fields again."
Do I really have to open a ticket for everything? No. A quick conversation that ends at the first reply doesn't need one. A ticket is for what you'll need to keep track of.
3. Reports — the numbers of your support
/app/desk?tab=relatorios · administrator only
Anyone who isn't an administrator sees the sentence "Only desk admins (or account owners/admins) can see the reports."
What you see
At the top: three period buttons — 7 days, 30 days and 90 days (it opens on 30) —, an All channels selector and, on the right, the Download CSV button (a spreadsheet with the data for the period).
Then, eight big numbers; then, three panels (By channel, Satisfaction by who resolved and By agent); and, at the end, the help center block.
One rule applies to the whole screen, and it's written at the bottom: a dash (—) means there was no data, not zero. Zero is a result; a dash is the absence of a result.
Next to several numbers there's a little arrow with a percentage: it's the comparison with the previous period of the same length. Green is improvement, red is worsening — and the system knows what counts as improvement in each case (time going down is good; a rate going up is good).
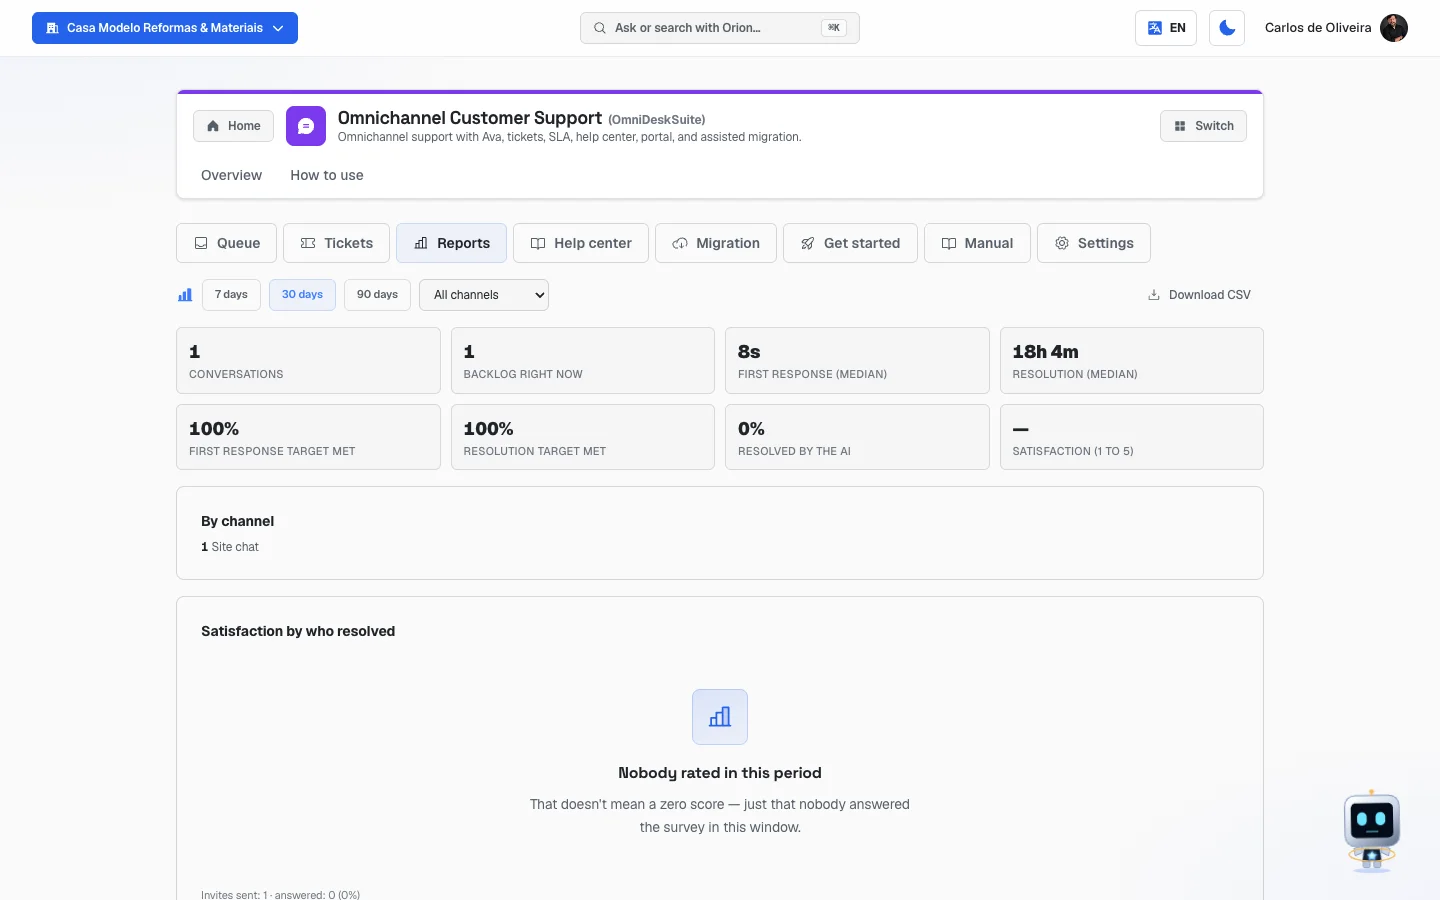 Reports tab with the period buttons, the eight numbers at the top and the "By channel" panel — still no conversations in the period in this sample company, and without the comparison arrows
Each number explained
| Number | What it means |
|---|---|
| Conversations | How many conversations came in during the period. It's the size of the activity |
| Backlog right now | How many are open at this moment. This one looks at no period at all: it's a snapshot of right now |
| First response (median) | How long the typical customer waits until someone replies for the first time. "Median" means the middle case — half waited less, half waited more. It's more honest than the average, which a single awful case can distort |
| Resolution (median) | How long it takes, in the typical case, from the start to the end of the conversation |
| First response target met | Out of every 100 conversations, in how many you replied within the promised time |
| Resolution target met | Out of every 100, in how many you resolved within the promised deadline |
| Resolved by the AI | The share the artificial intelligence resolved on its own, with nobody from the team stepping in. The higher it is, the more of your team's time is left for everything else |
| Satisfaction (1 to 5) | The average rating customers gave. 5 is great, 1 is terrible |
The three panels
- By channel — how many conversations came from each channel. It's for knowing where your customer really is. Empty shows "No conversations in this period".
- Satisfaction by who resolved — rating per person, with the columns Who, Ratings (how many people answered) and Average. The AI shows up in the list as Ava (AI). At the bottom comes "Invites sent: X · answered: Y (Z%)". Empty shows "Nobody rated in this period", with the reminder that this does not mean a zero rating.
- By agent — Agent, Conversations, First response (avg) and Satisfaction. Empty shows "Nobody replied in this period".
The help center block
The block's sentence sums it up: "What people search for, read, and resolve without creating a request."
Four numbers:
- Searches — how many times someone searched your help center.
- Generated answers — how many times the AI wrote an answer from your articles.
- Cached answers — how many times it repeated an answer it had already given to the same question (it doesn't use AI again).
- No results — how many searches found nothing. It's the most useful number on the list: each one is an article that's missing.
And four ranking lists:
- Most viewed articles — the most read in the period.
- Most helpful articles — the ones that got the most "yes" on the "was this helpful?" at the end of the article.
- Most cited by the AI — the articles the AI used most to answer.
- Searches without an answer — what people searched for and didn't find. This panel gets a yellow border when it has content. If it's empty, the message is a good one: "No search went unanswered."
Step by step — download the numbers to a spreadsheet
- Choose the period (7, 30 or 90 days) and, if you want, the channel.
- Click Download CSV, at the top right.
- The file downloads with the period in its name (for example,
atendimento-2026-08-23-a-2026-09-22.csv). Open it in Excel or Google Sheets.
If the period is too large, a notice appears saying how many rows came out and suggesting you pick a shorter period to get everything.
Common questions
Why are there so many dashes on the screen? Because there was nothing to measure. If nobody answered the satisfaction survey, the rating isn't zero — it simply doesn't exist.
Are "median" and "average" the same thing? No. The average adds everything up and divides; one very bad case ruins the result. The median is the middle case, so it represents an ordinary day better.
The report didn't load. The notice "We couldn't build the report right now — the numbers below don't exist, they're not zero." appears. Reload the page before drawing any conclusion.
4. Help center — your public knowledge base
/app/desk?tab=central
What it is, in one sentence
It's a question-and-answer site for your business, for your customers. You write the articles ("How to cancel an order", "What's the delivery time to inland towns"), publish them, and the customer reads on their own — often without needing to talk to anyone.
Don't mix it up: this isn't AutoAgency's help. It's your business's help, with your look, at your address, written by you.
And it has a second use, just as important: it's where the artificial intelligence pulls its answers from when it handles your customers. A well-written help center means an AI that answers correctly.
What you see
The tab has four blocks, one below the other:
- Help center site — the address, the languages and the home page.
- Collections — the sections that organize the articles.
- Articles — the list of what you've already written, and the button to create.
- Custom address — putting the help center on your own domain.
Every team member sees this tab (an agent looks up an article while handling a conversation), but only an administrator sees the create and edit buttons.
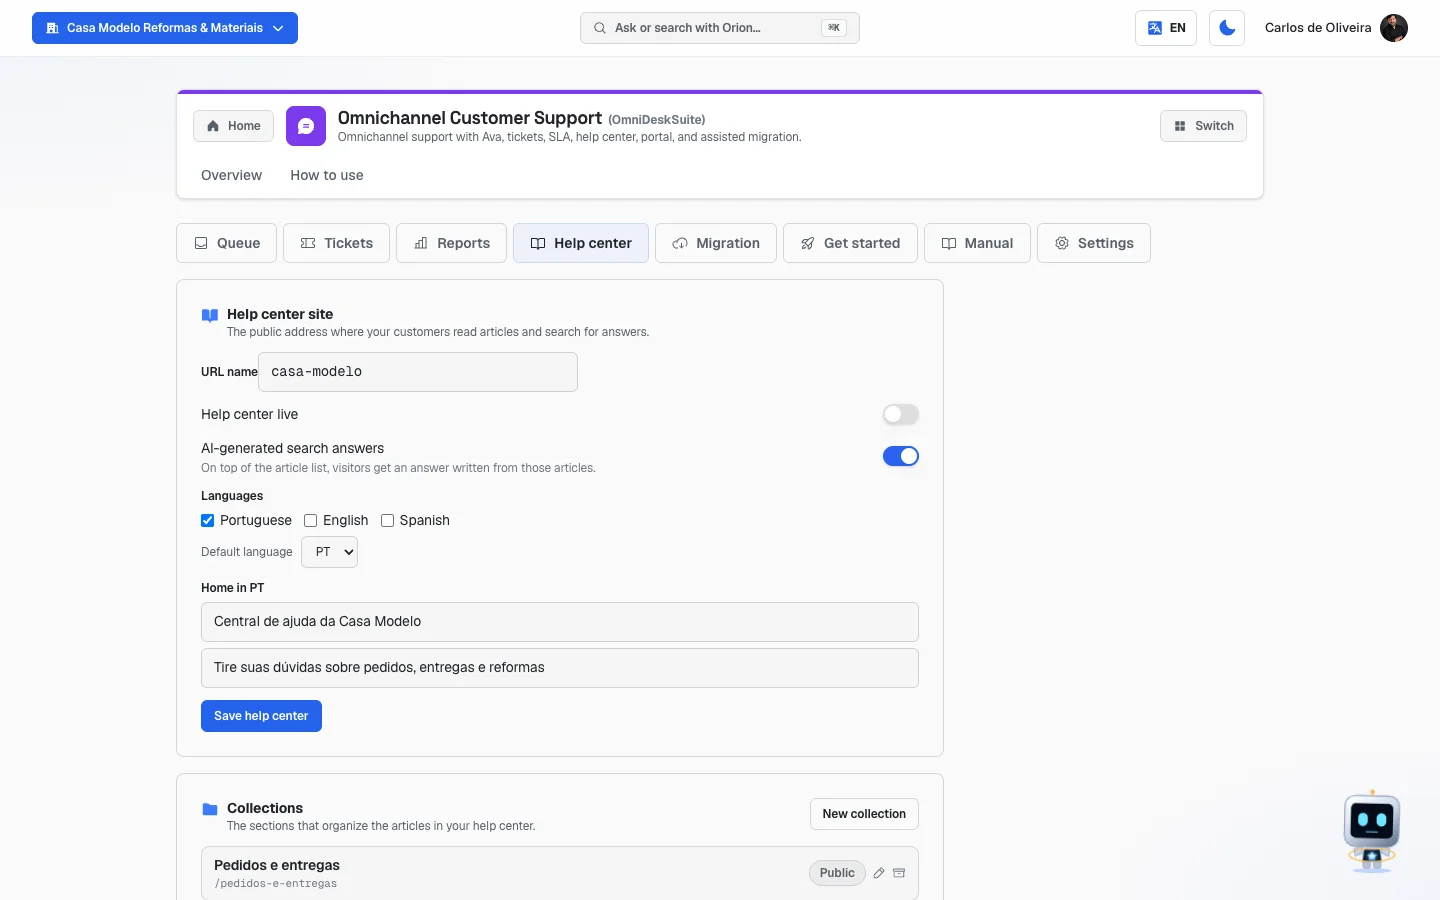 Help center tab, showing the whole "Help center site" block and the start of the "Collections" block
Fields explained — the "Help center site" block
| Field | What it is |
|---|---|
| URL name | The short nickname of your business that goes in the address. Write it with no accents and no spaces: pizzaria-do-ze. It's what makes up the help center's public address |
| Help center live | The switch that turns the site on and off. Off, nobody outside can see it |
| AI-generated search answers | When on, whoever searches gets an answer written from your articles, besides the list of them. The screen explains: "On top of the article list, visitors get an answer written from those articles" |
| Languages | Tick the languages your help center will exist in: Portuguese, English, Spanish. If you only serve Brazil, leave just Portuguese |
| Default language | Which language it opens in when the system can't guess the visitor's |
| Home in PT → Help center title | The big name that appears at the top of the site. E.g.: "Joe's Pizzeria Help Center" |
| Home in PT → Support line (tagline) | The line below the title. E.g.: "Get answers about orders, deliveries and payment" |
Each ticked language gets its own pair of title and support line.
Step by step — put the help center live for the first time
- In the Support Desk, click the Help center tab.
- Fill in the URL name with your business's nickname.
- Under Languages, leave ticked only what you use.
- Fill in the Help center title and the Support line (tagline).
- Turn on the Help center live switch.
- Click Save help center. "Help center saved." appears.
- Create at least one collection and one article before sharing the address — an empty help center helps no one.
While there's an unsaved change, the yellow notice "You have unsaved changes." stays visible.
Step by step — create a collection
A collection is the drawer where articles are kept: "Orders", "Delivery", "Payment". The screen explains: "The sections that organize the articles in your help center."
- In the Collections block, click New collection.
- Write the title. There's one field per language: Title in Portuguese, Title in English, Title in Spanish. Fill in at least the one for the language you use.
- Choose the Visibility:
- Public (help site) — anyone sees it.
- Portal (signed-in customers only) — only people who sign in to the customer portal.
- Click Save collection. "Collection saved." appears.
To change it later, click the pencil on the collection's row. To take it offline without deleting it, click the archive icon — it disappears from the public site and gets the Archived tag, and the little back arrow reactivates it.
Step by step — write and publish an article
- In the Articles block, click New article.
- At the top, three language buttons appear — Portuguese, English, Spanish —, each showing its own status. It's normal for an article to be published in one language and still be a draft in another.
- Write the Article title.
- Write the Short excerpt (shows in search) — one or two lines.
- Choose the Collection (or leave No collection).
- Write the text in the big box. It accepts markdown (a simple way to format:
# Title,- list item,**bold**). - Want to see how it'll look? Click Preview. To go back to writing, Edit.
- Click Save. "Article saved." appears.
- Now click Publish. "Page published." appears.
A few details that avoid surprises:
- The Publish button only works with everything saved. If there's a pending change, it stays greyed out until you click Save.
- To publish on a future date: fill in Publication date and click Schedule. The article gets the Scheduled status.
- To take it offline: Unpublish. "Page taken down." appears. The text isn't deleted.
- Switching language with unsaved text makes the system ask first: "You have unsaved changes on this page. Switching language discards them. Continue?"
An article's statuses
| Status | What it means |
|---|---|
| Draft | Written, but invisible to the public |
| In review | Marked as being checked |
| Scheduled | Goes live on its own on the set date |
| Published | Live, anyone can read it |
| Unpublished | Was live and was taken down |
Step by step — go back to an earlier version of the article
- With the article open, click Versions, in the corner of the panel.
- The Version history opens, with the list of what was saved and by whom: Team member, AI translation or AI draft.
- Click Restore this version on the one you want to recover.
Step by step — translate an article with AI
- The article has to be Published in the source language.
- Look for the yellow panel at the bottom of the editor.
- Choose the target language in the selector.
- Click Translate with AI.
The notice next to it is clear: "Creates a draft in the other language — it never publishes on its own. Uses the help center's monthly AI quota." In other words: you review it and publish it afterward, with the Publish button for the new language.
Step by step — let the AI suggest articles from your tickets
In the Articles block there's a yellow panel explaining: "The AI reads the tickets resolved in the period, groups them by topic and creates up to 5 article drafts. Nothing is published without you."
- Choose the period: Last 7 days, Last 30 days or Last 90 days.
- Click Suggest articles with AI. While it works, the button shows "Reading the tickets…".
- Done, the Drafts created in this round list appears, each with the AI draft tag.
- Open each one, review it, fix what's wrong and publish.
It's the best shortcut for anyone who has never written an article: the system starts from what your customers actually asked.
Fields explained — the "Custom address" block
By default, your help center lives at a system address, which includes the URL name you
chose. With this block, it starts responding on your domain — for example,
ajuda.suaempresa.com.br —, with your brand.
An important warning the screen itself gives: use a subdomain (ajuda.suaempresa.com.br), not
the main domain. "The root domain won't work: DNS doesn't allow this kind of record there."
Step by step:
- In the field, write the address you want (e.g.:
ajuda.suaempresa.com.br). - Click Connect. "Address saved. Now create the records in your DNS." appears.
- The screen shows Step 1 — create these records: a list of records with type, name and value, each with a copy button.
- Go into the panel of whoever manages your domain (the company where you registered the site) and create each record exactly as it appears on the screen. If a record carries the notice "If you use Cloudflare, leave this record with proxy OFF (grey cloud)", follow that instruction.
- Come back and wait. In the meantime, the tag shows Waiting for DNS. The screen warns: "Once the records above are found, step 2 shows up here (one more TXT record). It usually takes a few minutes."
- When Step 2 — also create these (both values, same name) appears, repeat the process with the new records.
- When you're done, the tag turns into Live and the screen confirms: "Your help center is live on that address, with its own certificate."
If something is wrong, the tag becomes Needs attention and the reason appears written in red. The Remove address button undoes everything and returns the help center to the default address.
A DNS record is an "entry in the internet's phone book". You don't need to understand what each one does: you need to copy the name and the value exactly as the screen shows them. If you don't manage your business's domain, send this list to whoever does.
Common questions
What's my help center's address before I connect a custom domain? It lives at AutoAgency's address,
built from the URL name you set, followed by the language. For a URL
name pizzaria-do-ze, in Portuguese, it looks like this:
| What | Address |
|---|---|
| The help center home page | https://autoagencia.io/ajuda/pizzaria-do-ze/pt |
| An article | https://autoagencia.io/ajuda/pizzaria-do-ze/pt/a/como-pagar |
| A collection | https://autoagencia.io/ajuda/pizzaria-do-ze/pt/c/faturas |
| The search | https://autoagencia.io/ajuda/pizzaria-do-ze/pt/busca |
Swap pt for en or es for the other versions.
After you connect a custom domain (and it becomes active), the address gets shorter: the
/ajuda/pizzaria-do-ze part goes away, because the domain is already yours. The same help center becomes
https://ajuda.suaempresa.com.br/pt, and the article, https://ajuda.suaempresa.com.br/pt/a/como-pagar.
The old address keeps working; the one on your domain becomes the official one for Google.
Do I have to write in three languages? No. Tick only the language you use, and the fields for the others don't even appear.
I archived a collection by accident. Nothing was deleted. Click the little back arrow, on the collection's row, to reactivate it.
What's the difference between a Public and a Portal collection? Public is for the open site, which anyone can find on Google. Portal is only for customers who sign in — it's for content that shouldn't be on view for everyone.
5. Migration — bring in the history from another tool
/app/desk?tab=migracao · administrator only
Anyone who isn't an administrator sees: "The migration is managed by a support manager. Ask a manager to validate the source, review the preview, and start the transfer."
Where you can import from
Two tools: Zendesk and Intercom. They're two widely used support systems — if you've never heard of them, this tab isn't for you and you can skip it.
What comes along
The strip of stages at the top shows everything that's brought in, in order:
Contacts → Help content → Conversations → Messages → Attachments → Report.
In other words: the people, the articles, the conversations, each of their messages and the attached files. At the end, a report of what was done.
The text at the top promises the essentials: "Transfer history without shutting down your current operation. Validate, review the preview, and control each step."
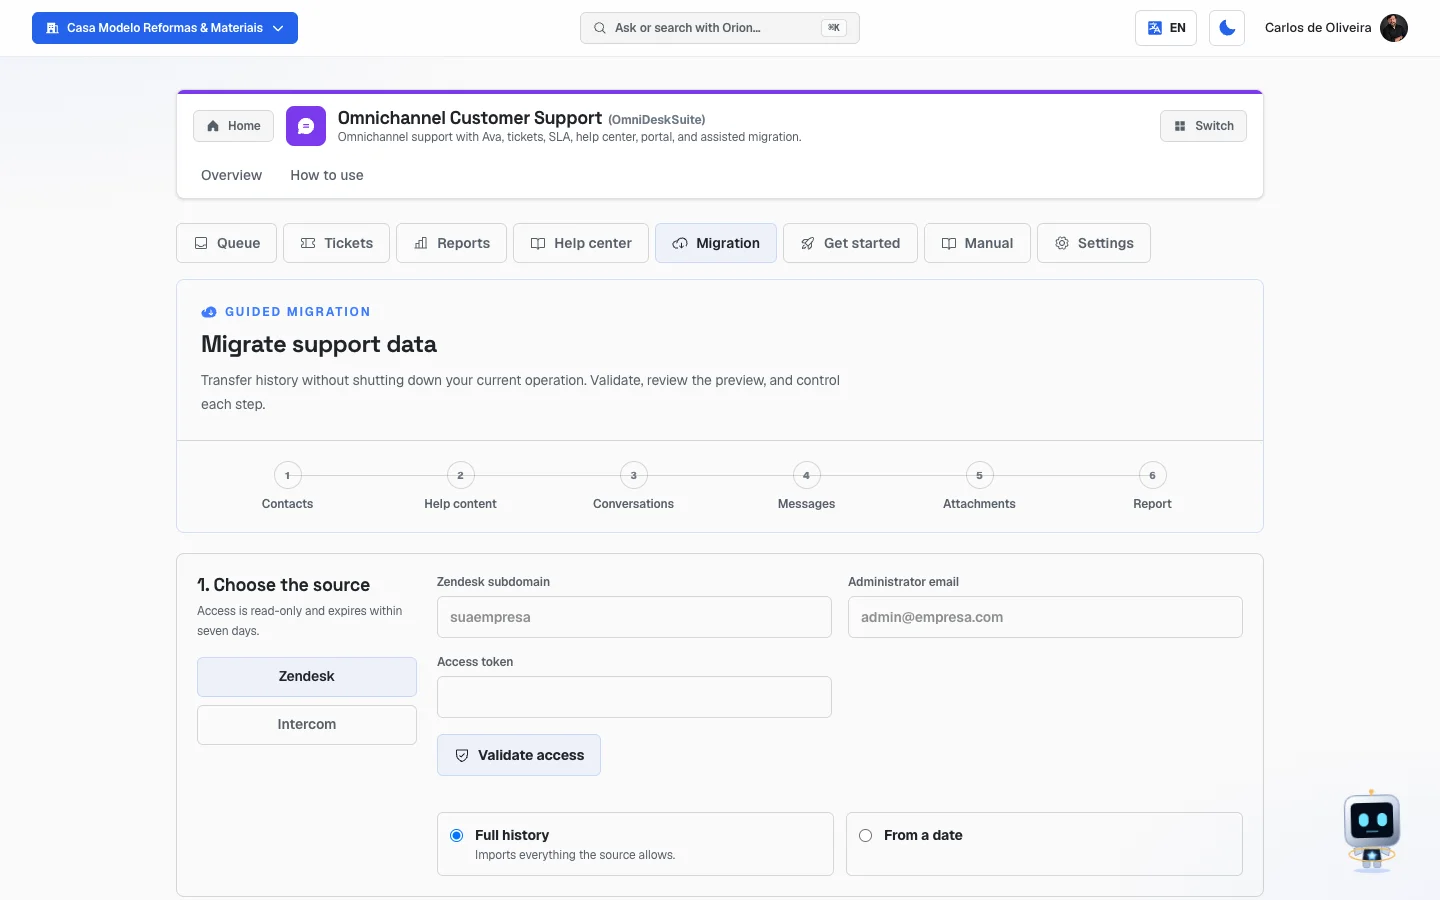 Migration tab with the strip of the six stages and the source form
Fields explained
If the source is Zendesk:
| Field | What to fill in |
|---|---|
| Zendesk subdomain | The nickname of your account there. If the address you use is suaempresa.zendesk.com, write suaempresa |
| Administrator email | The email you use to sign in to Zendesk as an administrator |
| Access token | A special password, read-only, generated inside Zendesk |
If the source is Intercom:
| Field | What to fill in |
|---|---|
| Data region | US, EU or AU — where your Intercom account stores its data |
| Access token | The special password generated inside Intercom |
For both, you still choose how much history you want:
- Full history — "Imports everything the source allows."
- From a date — a date field appears and only what's from that point on comes in.
The system guarantees it, and writes it on the screen: "Access is read-only and expires within seven days." Nothing is changed or deleted in the old tool.
Step by step
- Open the Migration tab.
- Under 1. Choose the source, click Zendesk or Intercom.
- Fill in the fields for the chosen tool.
- Choose Full history or From a date.
- Click Validate access. If it works, Access validated appears.
- Click Generate preview. The system takes a look and shows how much there is of each thing: Contacts, Conversations, Collections and Articles. The status becomes Preview ready.
- Check that the numbers make sense. If the preview says "The preview shows the first sample; totals update during migration", it's because there's more than fit in the sample — that's normal.
- Click Start migration. The status becomes In progress and the numbers go up on their own.
- Need to interrupt? Pause. To pick up where it left off, Resume. To give up, Cancel.
- At the end, the status becomes Completed — or Completed with warnings, and then it's worth reading the Report warnings block, which lists item by item what didn't come over and why.
The migration statuses
| Status | What it means |
|---|---|
| Access validated | The password worked; you can generate the preview |
| Preview ready | The system already knows the size of the job; you just need to tell it to start |
| In progress | It's bringing things in now |
| Paused | You told it to stop; you can resume |
| Completed | Finished without problems |
| Completed with warnings | Finished, but some items were left behind — see the warnings |
| Needs attention | It got stuck. The reason appears written out |
| Cancelled | You gave up |
Common questions
Can I keep handling conversations while it migrates? You can. The migration runs in the background and you can pause it at any time.
Where do I get the "Access token"? Inside the tool you're leaving — we don't create it and we have no way of creating that code for you: it's your access key, issued by them, and it's what authorizes reading your support history.
What the form asks for is different in each one, and that helps you know what to look for in there:
| Where you're coming from | What the screen asks for here | What to look for in the source tool |
|---|---|---|
| Zendesk | Zendesk subdomain, Administrator email and Access token | An API token (in the admin area, API section). It only works together with the administrator's email — that's why we ask for both |
| Intercom | Data region (US, EU or AU) and Access token | An access token from the developer/apps area |
We deliberately don't write here the exact menu path for each tool: those screens move around without warning, and a wrong step by step is worse than none. Search for "API token" in Zendesk's help or "access token" in Intercom's — and, if you get stuck, reach out in Talk to the Director: we'll do the migration with you.
No rush and no risk: the token is stored hidden (the field is a password field) and is used only to read your support history. Once the migration is done, revoke it in the source tool if you like.
The migration stopped halfway with "Needs attention". The reason appears on the screen itself, in a yellow panel. Once the problem is fixed, click Resume — it continues from where it left off, without repeating what already came over.
6. Get started — the setup checklist
/app/desk?tab=onboarding
What you see
A first-steps panel with the name of your plan, the title Getting started and the sentence "Progress updates automatically as your operation becomes ready." On the right, the percentage completed and the count (for example, "3/5 steps"), with a little progress bar.
Then, three numbers:
- Team — how many active people you have, out of your plan's limit.
- AI resolutions this month — how many the AI has already resolved, out of the limit.
- Available credits — the account's credit balance.
And, below, the Operation checklist, with the plan's status next to it (Trial, Active, Payment pending or Internal).
The five checklist steps
Each one is a clickable card, marked Done or Pending. Clicking takes you straight to the place where you do it.
| Step | What it asks for |
|---|---|
| Add your team | "Invite the people who will provide support and set permissions." |
| Connect a channel | "Enable chat, WhatsApp, or email to receive the first conversation." |
| Configure Ava or knowledge | "Set up automation, handoff, or add content for better answers." |
| Create or import the help center | "Start a new knowledge base or bring your Zendesk or Intercom history." |
| Complete a test support conversation | "Receive a message, reply with Ava or your team, and resolve the conversation." |
Step by step
- Open the Get started tab.
- Look for the first card marked Pending.
- Click it — the system takes you to the right screen.
- Do what it asks and come back.
- Repeat until the bar reaches 100%.
You don't need to tick anything: the checklist ticks itself when the system sees that thing is really ready.
Common questions
I did the setup and the step is still Pending. Progress is read from your real data. Reload the page; if it doesn't change, it's because some part of that step is still missing.
Who is "Ava"? She's the name of the module's artificial intelligence assistant — she's the "AI" that shows up in the other tabs.
7. Manual — the module's help text
/app/desk?tab=manual
This tab shows, inside the system itself, the help text for the Support Desk module. There's no form and nothing to fill in: it's read-only, for looking things up without leaving the work screen.
The same content also appears under Your apps → OmniDeskSuite.
8. Settings — the ten support settings
/app/desk?tab=config · administrator only
Anyone who isn't an administrator sees: "Only desk admins (or account owners/admins) can see the desk settings."
Inside the tab there's a second row of tabs, with ten items: Team, Aliases, Macros, Views, Statuses, Fields, Forms, AI, Targets and Satisfaction. The screen opens on Team.
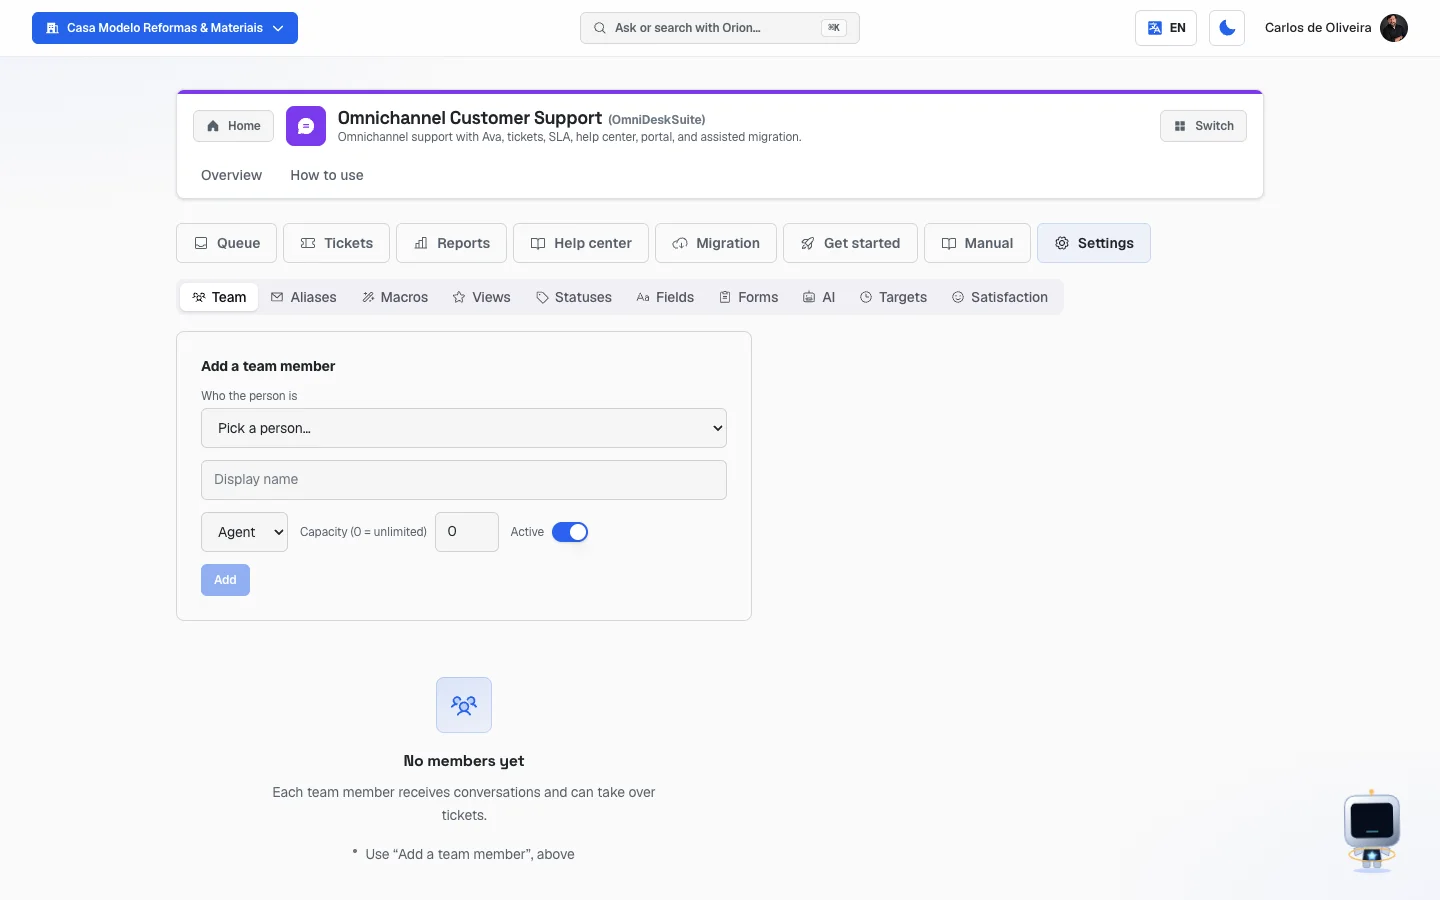 Settings tab showing the second row with the ten sub-tabs
Team — who handles conversations
What you see: a form to add someone and, below it, the list of who's already on the team, with the Admin or Agent tag (and Inactive, when that applies). While nobody has been added, No members yet appears — "Each team member receives conversations and can take over tickets."
Step by step:
- Under Add a team member, open the Who the person is list ("Pick a person…") and choose who's going to handle conversations.
- Write the Display name — it's the name the team sees in the owner selectors.
- Choose the role: Agent (handles conversations) or Admin (handles conversations and changes settings).
- Set the Capacity (0 = unlimited).
- Leave the Active switch on.
- Click Add. "Member saved." appears.
To change someone, click the name in the list — the form fills in with their data.
Fields explained:
| Field | What it is |
|---|---|
| Who the person is | A list of who already has access to your account, by email. Pick and you're done — there's no code to type. When editing someone who's already on the team, the field gives way to the person's name |
| Display name | How the name appears in the Support Desk's lists |
| Agent / Admin | An Agent handles conversations; an Admin handles conversations and configures |
| Capacity (0 = unlimited) | How many open conversations that person can handle at the same time. The system distributes conversations in rotation and skips whoever is already at the limit. With 0, they're never skipped |
| Active | Off, the person stops receiving new conversations |
The person must already have access to your account. The list shows who's in Account → Team and isn't yet part of the support team. Can't find someone? Invite them first in Account → Team (it's by email), wait for the person to accept, and come back here — they'll appear in the list. When everyone is already on the team, the screen says so instead of showing an empty list.
Until September 22, 2026 this field asked for an identification code for the person, typed by hand — and that code didn't appear on any customer screen. There was no way to fill it in without asking for help. Now it's a list of names.
Aliases — the email address that receives support
What you see: the New email alias form and the list of addresses already created.
The alias is the public address your customers write to. Everything that arrives there becomes a conversation in the queue.
Step by step:
- Under New email alias, write the address in the field (the example shown is
suporte-suaempresa@inbound.autoagencia.io). - Fill in the Display name (optional) — the name the customer sees as the sender.
- Click Add. "Alias saved." appears.
A notice the screen gives: "You can't remove an alias here yet — only create and edit the name. If you need to deactivate one, reach out to support."
The two rules for the address
You choose the name; the domain is fixed. The address has to end exactly in
@inbound.autoagencia.io — you can't register suporte@suaempresa.com.br here, and that's
protection, not a limitation: if any account could claim any domain, someone could
reserve the address of a company that isn't theirs. That subdomain is ours, controlled by us, and
reserving a name inside it is just reserving a name.
The part before the @ is free, with two exceptions:
- Reserved names, which nobody can take:
arcturus,elisa,contato,no-reply,noreply,postmaster,abuse,adminandsuporte-interno(contatoandsuporte-internoare the Portuguese words for "contact" and "internal support"; the system reserves them spelled exactly that way). They're product personas and operational mailboxes — letting someone use them would allow them to pass themselves off as us. - Any name that starts with
concierge, for the same reason.
Practical recommendation: include your company's name, as in the screen's example —
suporte-suaempresa@inbound.autoagencia.io. Names are unique across the whole system, so the
more generic it is, the greater the chance someone already took it.
What if I want to receive at my company's email? Set up, at your provider, a forward from
suporte@suaempresa.com.brto the alias created here. Whoever writes uses your address; the message reaches the queue just the same.
Macros (ready-made replies)
A macro is the text you use every week, saved so you can apply it with one click. The screen sums it up: "A macro is a ready-made reply the team applies with one click."
Step by step:
- Click the Macros sub-tab.
- Write the Title (e.g. Ask for more details) — it's the name that appears in the reply box's selector.
- Write the reply text in the big box.
- If you want, say what else the macro does when used:
- First selector: Don't change status or the new status.
- Second selector: Don't change priority or the new priority.
- Text field: the tags to add, separated by commas.
- Leave the Shared with the team (otherwise it's yours only) switch on.
- Click Create macro. "Macro saved." appears.
To edit, click the macro in the list. To delete, click the red trash can next to it.
Practical example (drain-unclogging company): title "Ask for the full address", text "To send the
team, I need the full address with number, neighborhood and a landmark. Can you send it?",
status Awaiting, tag aguardando-endereco. One click and the conversation leaves your queue with
the ball on the right side.
Views — ready-made slices of the queue
The screen explains: "A saved view keeps a slice of the queue — filter and order — for the team to come back to."
Step by step:
- Click the Views sub-tab.
- Write the View name (e.g. Urgent WhatsApp).
- Choose the status in the selector (Any status or a specific one).
- If you want, write a Search filter (optional) — a word that has to appear.
- Leave the Shared with the team (otherwise it's yours only) switch on if everyone should see it.
- Click Create view. "View saved." appears.
From then on, the view appears in the All conversations selector, in the queue column.
Statuses — details inside each ticket status
The six ticket statuses (New, In progress, Waiting on customer, On hold, Solved, Closed) are fixed. What you create here are details inside them. The screen explains it like this:
"A custom status is a DETAIL inside an existing situation (e.g. inside 'Waiting on customer', having 'Waiting on part' and 'Waiting on payment' as separate statuses)."
Step by step:
- Click the Statuses sub-tab.
- Write the Name (e.g. Waiting on part).
- Choose the parent status in the selector. Below it, the sentence explaining what that status means appears.
- Set the Display order (lower shows first).
- Click Create status. "Status saved." appears.
The list below shows the statuses grouped by the status they belong to. The icon next to one deactivates it (it then shows the Inactive tag).
Fields — the ticket's extra questions
A field is one more piece of information you want to record on every case: order number, the device's brand, the car's license plate.
Step by step:
- Click the Fields sub-tab.
- Write the Field name (e.g. Order number). The Internal key fills in on its own.
- Choose the field's type.
- Turn on Required if the agent can't leave it blank.
- If it's a list field, fill in Options, separated, by comma.
- Click Create field. "Field saved." appears.
The six field types:
| Type | What it is |
|---|---|
| Text | Free writing |
| List (1 option) | Choose one of the options you defined |
| List (multiple options) | Choose as many as you like |
| Number | Numbers only |
| Yes/No | A little switch |
| Date | A calendar |
The Internal key is the field's technical nickname. The system generates it from the name and locks it after saving — no need to touch it.
Forms — grouping fields into a set
A form is a group of fields that appears together, in the order you set. If you haven't created any field yet, the screen warns: "Create custom fields first (Fields tab) before building a form."
Step by step:
- Click the Forms sub-tab.
- Write the Form name (e.g. Billing complaint).
- Under Shows up for tickets of type, choose Any type or a specific type.
- Tick the fields that are part of it. The ticked ones move up to the list above, where the arrows change the order in which the agent will see them.
- Want a field to appear only in a certain situation? Click + condition and build the rule: When [field] = [exact value] → show [tick the fields].
- Turn on Default form if it should come selected on its own (only one can be the default at a time — ticking this one unticks the old one).
- Click Create form. "Form saved." appears.
With no conditions, "every field checked above always shows".
Example: in a technical-support form, the "Invoice number" field only appears
when the "Is it under warranty?" field is sim.
AI — how the artificial intelligence handles conversations for you
This is the most important sub-tab for anyone who wants support to run on its own. It has four panels.
Panel 1 — Where the AI answers. One switch per channel (Site chat, WhatsApp, Email, Customer portal). The explanation: "The AI answers on its own and calls a person when needed. Turn it on only for the channels where you want that."
With everything off, the screen warns: "With everything off, no conversation is answered by the AI — everything goes straight to the team queue."
Panel 2 — Instructions for the AI. A text box (up to 2,000 characters) with "Your company rules it must follow (hours, what to never promise, how to introduce itself)". The screen's own example: "we're open Monday to Saturday, 8am to 6pm. Never promise a discount — hand it to a person."
Panel 3 — Message when the AI hands over to a person. "It's the last message the customer gets before someone from the team steps in. Leave it empty to use the default." The default is: "I'm passing your case to someone on our team, along with everything we've discussed here. Someone will get back to you shortly, right here."
Panel 4 — AI allowance and limit. Field by field:
| Field | What it is |
|---|---|
| Optional operational limit | A brake lower than your plan's. Left blank, the full allowance applies. This field only lowers the ceiling, never raises it. When it hits the limit, "the AI hands everything to the team" |
| Use 5 credits per overage resolution | Off by default. When on, the AI keeps working above the allowance while there's a credit balance; the charge happens after it actually resolves the case |
| Help center monthly AI limit | A separate counter, only for the answers generated in the help center's public search and for article translations. It doesn't use up the conversations limit. Left blank, no ceiling |
The plan panel also shows how many resolutions per month it includes, and the system suggests a value for the help center limit ("5× the resolutions limit — visitor searches are far cheaper than a full conversation").
At the bottom of the sub-tab comes The AI this month, with three numbers: Resolved by the AI, Being handled right now and Assists to the team (copilot) — this last one counts how many times the team used the AI button in the reply box.
Click Save to record everything.
Targets — SLA in plain English
Here you set the promise of time. There are two panels.
Panel 1 — Business hours. "This is the clock that counts your targets. Outside it, time doesn't run — nobody misses a deadline overnight."
| Field | What to fill in |
|---|---|
| Time zone | The time zone your business works in. Start typing and the list of suggestions appears — pick one. The format is the international name of the time zone, in the Continent/City pattern: America/Sao_Paulo, America/Santiago, Europe/Lisbon. Don't use an abbreviation (BRT, GMT-3): the system rejects it, with the message "That time zone doesn't exist." Left blank, America/Sao_Paulo applies |
| Monday to Sunday | For each day, the opening ranges. The + range button adds another (useful if you close for lunch: 08:00 → 12:00 and 13:30 → 18:00). A day with no range shows as closed |
| Holidays (closed dates) | The dates you're not open, separated by commas, in the format 2026-12-25, 2027-01-01 |
The suggestions list was born on September 22, 2026. Before, the field was free text and, when you got it wrong, the rejection told you to "pick one from the list" — with no list on the screen. Now it's there, and it's the same list the system uses to check.
Click Save.
Panel 2 — The targets you promise. This is where the policies live. The golden rule is written on the screen: "The first policy in the list that matches the conversation is the one that applies."
Each policy shows the name, the default and off tags (when that applies), whether it counts in business hours or round-the-clock (24×7), and the times for each priority in the order first response · next response · resolution.
Step by step — create a policy:
- Click New.
- Write the Policy name.
- Leave it On.
- Turn on Counts 24×7 if that target should run day and night, even outside business hours.
- Set the Order — the lower number is checked first.
- Under Applies when…, say who it applies to:
- Channel: tick the channels.
- Priority: tick the priorities.
- Tags (comma separated): e.g.:
vip, contrato-ouro. - "Leave everything blank to apply to any conversation."
- In the table, fill in the minutes for each priority under First response, Next response and Resolution. All in minutes — and zero turns that target off.
- Click Save policy. "Policy saved." appears.
There's always a default policy, which has no conditions and can't be turned off or deleted: "it applies to every conversation that doesn't match another one".
Example: a policy called "VIP customers", with the vip tag, counting 24×7, with 15
minutes for the first response; and the default one with 120 minutes, in business hours.
Satisfaction — the rating the customer gives, and the deadline alerts
Two panels.
Panel 1 — Satisfaction survey. The screen's explanation: "When a conversation is closed, the customer gets an invite on the same channel to rate it from 1 to 5. It also covers the ones the AI solved on its own."
| Field | What it is |
|---|---|
| Ask for a rating when closing | Turns the survey on and off |
| Link valid for (days) | For how many days the invite keeps working. From 1 to 90 |
The system doesn't bother the same customer twice in a row: it won't ask the same person for a rating again within 12 hours.
Panel 2 — Where deadline alerts go. "Besides the clock in the panel, we alert when a conversation is about to miss its target — and when it does."
| Field | What it is |
|---|---|
| E-mails that get the alert | The addresses, separated by commas. Worth knowing: "The assignee is always alerted, even if not on this list" |
| Your company's Slack | A Slack alert address. The screen teaches where to get it: "In Slack: Tools → Automations → 'New workflow', or apps.slack.com → Incoming Webhooks. Pick the channel, copy the generated URL and paste it here" |
With Slack set up, two buttons appear: Send test (sends a test message) and Remove.
Click Save to record it.
Common questions about Settings
I changed something and couldn't find the save button. Each panel has its own. While anything is pending, the yellow notice "You have unsaved changes." appears.
A red notice appeared saying it couldn't load the settings. Don't touch anything: reload the page first. The notice exists precisely because "what's on screen may not be what's live" — saving on top of that would record wrong values.
I deactivated a field and now a form won't save. That's expected, and the screen shows in red which fields were left orphaned, with a little button to remove each one from the form.
What's the difference between the conversation's priority and the AI's urgency? The priority is the one you (or a macro) set — it's what rules the queue and the deadlines. The urgency is the AI's guess when reading the message, and it's used to break ties.
Words you'll see all the time
| Word | What it means here |
|---|---|
| Conversation | The chat with a customer, through one channel |
| Ticket | The registered case, with a number, that someone needs to solve |
| SLA / deadline | The promise of time you make: reply and resolve by such and such a time |
| Macro | A ready-made reply: text that goes into the box with one click |
| View | A saved slice of the queue, so you can always come back to it |
| Alias | The public email address that receives support requests |
| Internal note | A message written in the conversation that the customer never sees |
| Collection | The drawer that groups articles in the help center |
| Follow-up | A new case created from one that was closed |
| Incident | A problem that affected this customer |
| General problem | The single cause behind several incidents |
| Copilot | The AI button in the reply box, which helps the agent write |
| CSAT | The satisfaction survey — the 1 to 5 rating |
When something goes wrong
| Symptom | What to check | What to do |
|---|---|---|
| The screen shows the invitation to turn on the module | Whether the module is subscribed | Turn it on in the catalog, or talk to whoever manages the account |
| The screen stays on "Loading…" and doesn't clear | Your internet | Reload the page |
| "Nothing in this queue" with work waiting | The selected filter and the search field | Click Open and clear the search |
| Reply sent with a yellow notice | The text of the notice | The message was saved but didn't reach the customer through the channel. Copy the text and send it manually |
| "Monthly AI quota used up" on the button | The month's allowance | Talk to the account admin. Meanwhile, the team replies |
| "We couldn't load the AI settings right now" | — | Don't change anything. Reload the page before touching anything |
| "We couldn't read the AI numbers right now" | — | The dashes don't mean zero. Reload |
| "We couldn't build the report right now" | — | The numbers don't exist, they're not zero. Reload |
| Reports or Settings refuse access | Whether you're an administrator of the Desk or an owner/administrator of the account | Ask someone with permission, or ask to be promoted in Settings → Team |
| Help center domain stuck on "Waiting for DNS" | Whether the records were created exactly as on the screen | Check name and value, letter by letter. It usually takes a few minutes |
| Domain with "Needs attention" | The message in red on the screen | Fix what it points to and wait for the new check |
| "Custom addresses are unavailable right now" | — | Your help center keeps working on the default address. Let support know |
| Migration "Needs attention" | The reason in the yellow panel | Fix it and click Resume — it continues from where it left off |
| Macro applied but the status didn't change | The notice that appeared when sending | The reply was sent; only the macro's action failed. Change the status by hand |
| A ticket vanishes from the list | The Any status and Any type filters | Set both back to "Any" and search by subject |