

Trade Marketing (POS)
Where to find it: Home → Your apps → Trade / POS (at the top of the screen the module appears as Trade Marketing)
Address: /app/modulos/trade-marketing
What it's for
If your product is sold inside someone else's store — a supermarket, a pharmacy, a hardware store, a bakery — your job doesn't end when you deliver the goods. It starts there. Because after the box goes into the store's stockroom, someone has to check that the product really made it onto the shelf, that it's at eye level, that the sign you sent is hanging, that the price is right and that it hasn't run out.
POS means point of sale: it's every physical store where your product is on sale. If you supply twelve supermarkets, you have twelve POS. And a visit is when someone goes to that store, looks at the shelf with their own eyes and writes down what they found. The person who does this is usually the field rep (also called a merchandiser or sales rep) — the person who goes around the stores. It can be an employee of yours, or it can be you. The module calls that person a field rep and gives them a phone link.
Trade Marketing (POS) is the notebook for that operation. You add the stores, say how often each one needs to be visited, add whoever is going to visit and build a list of questions (the checklist) that the person answers inside the store. When the visit is logged, the system calculates a score for that store on its own and counts how many products were missing. With that, you find out which stores are doing well and which are neglected, without calling anyone.
Everyday example: you make hot sauce and sell to twenty supermarkets. On Monday morning you open the Visits tab and Today's route already shows the six stores that are overdue, from the most forgotten to the least. Your field rep opens the link on their phone, sees those same stores, checks in when they arrive, answers "is the shelf clean?", "is the sign up?", takes a photo of the shelf and finishes. You look at the Execution scoreboard and see that the supermarket on the corner has a 45% score and three stockouts — that is, product missing from the shelf. You call them before you lose more sales.
Before you start
- The Trade Marketing module has to be active on your account. If it isn't, the screens say "The Trade Marketing module is not active in this tenant" (tenant = your company's account).
- The first time you open the module, an invitation appears at the top of the screen to set it up by chatting with Marcelo. It's optional: the tabs below already work, and each reply from the specialist uses AI credits. Click Chat with Marcelo so Marcelo gets to know your company (when you're done, click Complete setup) or Dismiss to remove the invitation without chatting.
- You'll need the list of stores where your product is: name, city and, if you have them, the name and phone of whoever helps you inside.
- You'll need the name and email of whoever visits the stores. The email is optional, but it's how the system chases the field rep when a visit is late.
- Nothing else is required. You don't need to integrate anything or connect any third-party account.
- Heads up: until you create at least one checklist template, the system doesn't generate any visits on its own. It's the step most people forget.
First steps
- On Home, under Your apps, click Trade / POS. You land on the Home tab.
- If the invitation to the setup conversation shows up, chat with Marcelo and click Complete setup, or click Dismiss. The tabs work either way.
- Still on Home, scroll down to Trade plan and write, in your own words, what you want from the shelf: Focus channel, Goals, Promotions, POS material and Commercial calendar. Click Save plan. (If you prefer, ask Marcelo in the chat on the side and then just review what he wrote.)
- Go to the Points of sale tab and click Add point of sale. Add the first store: name, chain, city, contact and how many days apart it needs to be visited. Click Save. Repeat for the other stores.
- Go to the Visits tab. In the Field reps section, click Add field rep, write name, phone and email, and click Save field rep. Copy the link that appeared and send it to them on WhatsApp.
- Still in Visits, in the Checklist templates section, click Create checklist template. Give it a name (for example "Standard shelf checklist") and keep clicking Add item to write what should be checked in each store. Click Save template.
- Go back to the Points of sale tab and, on each store, choose the Field rep in charge. That's what makes the store show up in the link on their phone. Click Save again.
- Done. From the next day on, the system starts generating the visits for overdue stores on its own and sending them to the field rep's phone.
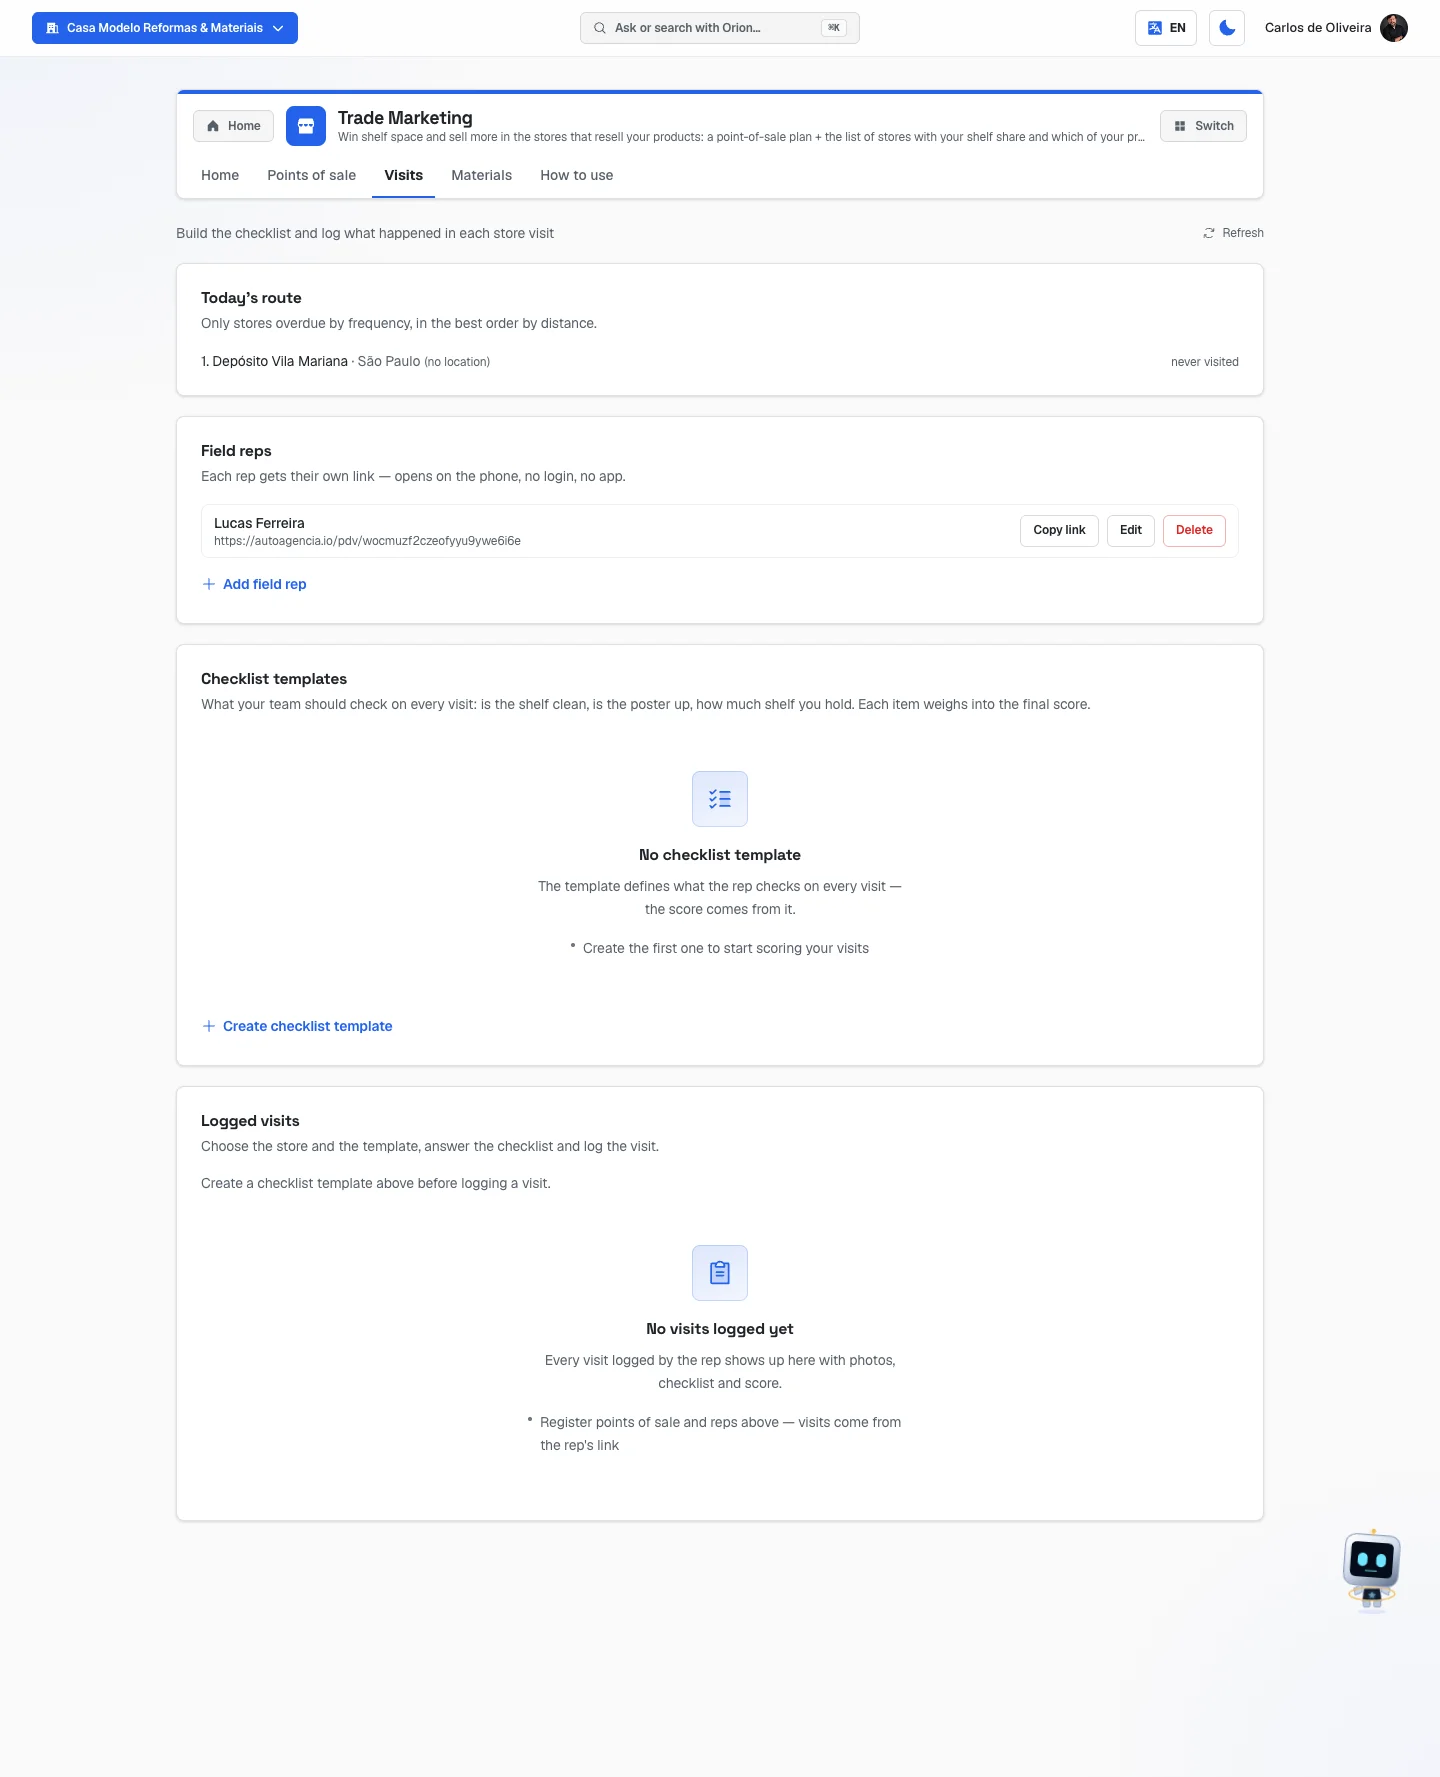 Visits tab with its four sections — Today's route, Field reps, Checklist templates and Logged visits —, still empty in this sample company; at the top, the app bar with the module's tabs
Understanding the machinery (read this first)
It's worth understanding how the five pieces fit together, because the whole module revolves around it:
| Piece | What it is |
|---|---|
| Point of sale (POS) | A physical store where your product is on sale. |
| Visit frequency | How many days apart that store needs to be visited. Each store has its own. The default is 30 days. |
| Field rep | The person who goes to the store. They get a phone link, with no login and no app. |
| Checklist template | The list of questions the field rep answers inside the store. This is where the score comes from. |
| Visit | The record of what was found in that store, on that day. |
How the system decides a store needs a visit: it looks at the date of the last completed visit and compares it with that store's frequency. If 30 days or more have gone by on a store with frequency 30, it's overdue. A store that has never been visited counts as overdue since forever — and goes to the top of the line, because it's the most urgent case.
What the system does on its own, every day:
- It looks for the overdue stores and creates a scheduled visit for each one, already with the field rep in charge of that store and its checklist template.
- It marks as late any scheduled visit whose day has passed without anyone finishing it.
- It sends the field rep an email chasing each late visit (at most one per visit per day), always with their link.
- It sends one summary email to you, the owner, with the list of everything that's late. The subject is "Late POS visits".
Important: if your company has no active checklist template, the system doesn't create any visits — because it would be handing the field rep a visit they can't close. In that case you get, in the same email, a notice with the names of the stores left on hold waiting for a checklist.
What the field rep does on their phone: they open the link, see the Your visits list, tap the store, click Check in when they arrive, answer the checklist, can take photos, write a note and click Finish visit. They don't need an account, a password or an app. If the materials campaign is live, they also see that store's posters there, with Open image and Download PDF.
What the system does with what was logged: as soon as the visit is finished, it calculates on its own, from the answers:
- The execution index — a score from 0 to 100% for that visit.
- The stockouts — how many items you marked as "product missing" went wrong.
- The store's shelf space — if your checklist has an item marked "This item is the % of shelf occupied", the number the field rep entered on it becomes that store's Shelf space (%), in place of what was there before.
The score and the stockouts feed the Execution scoreboard on the Home tab, feed Marcelo's panel and take the store off today's route. You never type the score: it comes out of the calculation.
The tabs, one by one
Home
/app/modulos/trade-marketing/inicio
- What you see here:
- At the top, Marcelo's panel: a note from him about the state of your operation, plus three numbers — Points of sale, Coverage (30d) and Stockouts. If there are stockouts, the number turns to an alert color and Marcelo talks about that first, because a product missing from the shelf is a sale lost right now. Next to the note there's a shortcut button (View visits, View points of sale or Build the plan), depending on the case.
- Right below, a Your trade plan box with the text you wrote, and a What's been done here box with Marcelo's deliveries.
- The Execution scoreboard section, with four big numbers and the tables by store and by chain.
- The Trade plan section, which is a form for you to fill in.
- In the right corner of the top line there's a Refresh to reload the numbers.
- What you can do: read the scoreboard, write the plan and chat with Marcelo in the chat on the side.
The scoreboard, block by block:
| Number | What it means |
|---|---|
| Points of sale | How many stores you have registered and active. |
| Visit coverage (30 days) | Out of every 100 of your stores, how many got at least one visit in the last 30 days. It's the thermometer of your team's discipline. |
| Avg. execution index | The average of the scores of all visits. Shows "—" when there's no score yet. |
| Stockouts | How many times, adding up all visits, an item marked as "product missing" went wrong. |
Below the numbers comes a table with one row per store: Point of sale, Chain, Visits, Index, Stockouts and Last visit. The stores with the best score come first; the ones that don't have any score yet go at the end. If you work with more than one chain, a By chain table also appears, adding everything up by banner.
States that can appear on the scoreboard:
- No store registered or no visit at all: "Add points of sale and log the first visit to see the scoreboard."
- With lots of accumulated visits, a yellow banner warns: "You have a lot of visits logged — this scoreboard is showing only the most recent ones." The scoreboard is still correct, it's just not looking at the whole history.
Step by step — writing the trade plan:
- On the Home tab, scroll down to Trade plan.
- Fill in the five fields (all are free text; you can write the way you talk).
- Click Save plan. The message "Saved" appears.
Each field explained (Trade plan):
| Field | What to write |
|---|---|
| Focus channel | What kind of store you want to fight for space in. E.g.: "big retail, regional, small retail, specialized". |
| Goals | Where you want to get. E.g.: "be in 30 stores by December, take up a whole shelf, sell 200 cases/month". |
| Promotions | The offers that go to the store. E.g.: "buy 2 pay for 1, combo, gift attached to the package, coupon". |
| POS material | Which pieces you send to the store. E.g.: "shelf banner, wobbler (that little sign that sways on the shelf), totem, end cap". |
| Commercial calendar | The dates that drive sales in your line of business. E.g.: "Easter, Mother's Day, Black Friday". |
You don't have to write everything from scratch: ask Marcelo in the chat on the side and then review.
Points of sale
/app/modulos/trade-marketing/pdvs
- What you see here: the list of your stores, one below the other, each in an editable box. At the top, how many points of sale are registered and a Refresh.
- What you can do: add stores, edit them, delete them and — the most important — say how often each store needs to be visited and who visits it.
- Empty state: "No points of sale yet", with the explanation that each POS you add joins the visit route and the execution scoreboard.
- If it fails to load: a red banner appears saying "We couldn't load your points of sale right now. Your data is safe — only the lookup failed.", with a Try again. That doesn't mean the list is empty.
Step by step — adding a store:
- On the Points of sale tab, click Add point of sale. A blank box appears at the end of the list.
- Fill in the Store name. It's the only required field — without it you see "Give the store a name".
- Choose whether it's a Third-party store or an Own store.
- Fill in the Chain, the Address, the City and the State.
- Fill in the Contact name and the Contact phone.
- Under Field rep in charge, choose who visits that store.
- Fill in the Visit frequency (days), the Funnel status, the Shelf space (%) and the Your products on sale in the store.
- Click Save. You see "Store saved".
Each field explained:
| Field | What to write |
|---|---|
| Store name | The store's name the way you say it. "St. George Supermarket", "Central Pharmacy". |
| Third-party store / Own store | Third-party is another person's store that resells your product. Own is yours. |
| Chain (e.g.: Carrefour) | The banner, when the store is part of a chain. It lets the scoreboard add up by chain. Leave it blank if the store is independent. |
| Address / City / State | Where it is. The field rep opens it in Google Maps from their phone. |
| Contact name / Contact phone | Whoever helps you inside the store: the manager, the section lead, the buyer. |
| Field rep in charge | Who visits that store. Under the field the system reminds you: "This is who sees this store in their phone link." If you leave it on "Nobody yet — visits will have no owner", that store's visits don't show up on anyone's phone. |
| Visit frequency (days) | How many days apart that store needs to be visited. It starts at 30. For a store that sells a lot, put 7 or 15; for one that sells little, 60. |
| Funnel status | Where your conquest of that store stands: mapped (you found the store), negotiated (you've already talked), activated (the product is there) or audited (you've already checked it on site). It's only for your own organization. |
| Shelf space (%) | How much of that category's shelf is yours, as a percentage, from 0 to 100. If you take up a third of the sauce shelf, write 33. You fill it in by hand only until the first field measurement: if your checklist has an item marked "This item is the % of shelf occupied", on each completed visit the number the field rep entered becomes the store's shelf space. From then on the field is locked and shows, below, "Measured on the mm/dd visit. It updates itself on every visit." — neither you nor Marcelo, through the chat, write over it any more. |
| Your products on sale in the store | How many different products of yours are on sale in that store. Each variation counts as one: the 150 ml sauce and the 500 ml one are two products. |
The other buttons on each store:
- Remove — takes the store off the list.
- Save — saves the changes for that store. Each store saves on its own; saving one doesn't touch the others.
If Field rep in charge shows "Rep removed — pick another", it's because the field rep who was there was deleted. Choose someone else and save, otherwise that store's visits will have no owner.
Visits
/app/modulos/trade-marketing/visitas
This is the module's central tab. It has four sections, from top to bottom, and it's worth using them in this order the first time: Field reps → Checklist templates → Logged visits. Today's route fills in on its own afterwards.
At the top, the sentence "Build the checklist and log what happened in each store visit" and, to the right of it, a Refresh that reloads all four sections at once.
1. Today's route
The screen sums the section up like this: "Only stores overdue by frequency, in the best order by distance."
- What you see here: the numbered list of stores that are overdue by frequency, in the order in which it makes sense to visit them. Each row shows the stop number, the store name, the city and, on the right, how long it's been since it was visited — "never visited", "1 day ago" or "N days ago".
- What you can do: just look. It's a read-only screen, made so you can send the route to the team or go out yourself.
- How the order is built, in three steps:
- Whoever is late goes into the line, from the most forgotten store to the least (the one that has never been visited comes ahead of all of them).
- It cuts at eight stops — what one person gets done in a day. It's here, and only here, that urgency decides who goes today.
- Within the day, the order they appear in: the stores with a saved location come first, reordered by proximity so you don't cross the city twice; the ones without a location come after, marked "(no location)", and among them the order is still the order of lateness — the most forgotten one first.
- Important — for now no store has a saved location, and there's nothing you need to do. The system has a place to save each store's exact location, but today nothing fills it in: the Points of sale tab has no field for it, and the system doesn't yet work out the location on its own from the address. In practice, then, the whole list for the day comes out in order of lateness — the most forgotten first — and all of them show "(no location)". The "reorder by proximity" part already exists and is waiting for that information; for now you just don't get the savings in travel.
- If there's line left over: "N overdue stores are left for the coming days." appears below. That's on purpose: the route doesn't hide what was left behind, it just doesn't promise the impossible.
- Empty state: "No overdue stores" and "Today's route is clear — every point of sale is up to date.", with the reminder that, when a store goes past its frequency, it joins the route here. That's good news.
2. Field reps
- What you see here: the list of people who visit your stores. Each row shows the name and, below it, that person's personal link. The screen reminds you: "Each rep gets their own link — opens on the phone, no login, no app."
- What you can do: add, edit, copy the link and delete.
- Empty state: "No field reps yet", with the explanation that each registered field rep gets their own link to log visits from the phone.
Step by step — adding a field rep and sending them the link:
- On the Visits tab, in the Field reps section, click Add field rep.
- Fill in the Rep name. It's required.
- Fill in the Phone (optional) and the Email (optional). It's worth filling in the email: it's how the system chases the field rep when the visit is late. Without an email, they simply don't get the reminder.
- Click Save field rep.
- On the row that appeared, click Copy link. You see "Link copied".
- Paste that link into the person's WhatsApp. That's it — they don't install anything and don't create an account.
The buttons on each field rep:
- Copy link — copies their personal link.
- Edit — opens the form to change name, phone or email.
- Delete — opens a confirmation that warns: "Their link stops working immediately. Visits already recorded stay in the history." In other words, you don't lose what they already did.
That link is their access key. Whoever has the link sees that person's visits. Send it only to whoever should have it, through the right channel.
3. Checklist templates
- What you see here: your checklist templates, each in a box with the name and the list of items.
- What you can do: create, edit and delete templates. A template is the list of questions the field rep answers inside the store.
- Empty state: "No checklist template", with the notice that the template defines what the field rep checks on every visit — the score comes from it.
Step by step — building a checklist:
- In the Checklist templates section, click Create checklist template.
- Write the Template name (e.g.: Standard shelf checklist). Without a name, when you save you see "Give the checklist template a name".
- Click Add item.
- In the What to check (e.g.: Is the shelf clean?) field, write the question the way you would ask the person.
- Choose the answer type in the box next to it.
- Adjust How much it's worth and tick the boxes that apply (see the table below).
- Repeat from step 3 for each thing you want to check.
- Click Save template.
The four item types:
| Type | How the field rep answers | Counts toward the score? |
|---|---|---|
| Yes or no | By choosing Yes, No or Not checked. | Yes. "Yes" is the right answer. |
| Number | By typing a number. | Yes. See Minimum target below. |
| Photo | Same as Yes or no, and they can attach the photo. | Yes. |
| Free text | By writing. | No. The system warns on the screen: "Text is just a note — it doesn't count toward the score or stockouts." |
The options for each item:
| Option | What it does |
|---|---|
| How much it's worth | That item's weight, from 1 to 10. An item with weight 3 is worth three times an item with weight 1 in the score calculation. |
| Minimum target (optional) | Only on Number items. It's the value from which the item counts as right. If the target is 12 and the field rep found 8, the item counts as wrong. With no target, any number greater than zero counts as right. |
| Required to answer | The field rep can't finish the visit without answering that item. On their screen, the item shows a red asterisk. |
| If it fails, count as out of stock (stockout) | Tick it on the items about inventory, like "is there product on the shelf?". When that item is answered negatively, the system adds +1 to the Stockouts. |
| This item is the % of shelf occupied | Only appears on Number items. Tick it on the item where the field rep reports how much of the shelf is yours, from 0 to 100. On each completed visit, that number becomes the store's Shelf space (%) on the Points of sale tab, in place of what was there — what you typed when adding the store counts only until the first measurement. A number above 100 counts as 100, and below zero counts as zero. If the field rep leaves the item blank, the store's shelf space stays as it was. With more than one item ticked (one per category, for example), the average of them is used. |
How the score is calculated (you don't have to do the math, but it's good to understand):
- Each answered item that's right adds its weight; each answered item that's wrong adds zero.
- The score is what you earned divided by what you could have earned, as a percentage.
- An item nobody answered is left out of the calculation. It doesn't become a bad score and it doesn't become a stockout. That's on purpose: "Not checked" means nobody looked, not that it was wrong. If the field rep didn't answer anything that scores, that visit's score shows as "—", not as zero.
Deleting a template: click the trash icon on the box. A confirmation appears warning that "It leaves the list and can no longer be picked for new visits. Visits already recorded with it stay in the history, with the score they got." In other words, deleting the template doesn't delete your history.
Careful: if you delete your last template, the system stops generating visits on its own the next day. Always keep at least one template alive.
4. Logged visits
- What you see here: at the top, a form to log a visit by hand. Below, the table of everything that's already been logged, with Point of sale, Date, Index, Stockouts and Photos.
- What you can do: log a visit yourself (with photos from your computer, if you want), see the photos of each visit and delete records.
- Empty state: "No visits logged yet" — "Every visit logged by the rep shows up here with photos, checklist and score." —, with the tip to add points of sale and field reps above, because visits come from the field rep's link.
- Notices that replace the form:
- With no store registered: "Add a store in the 'Points of sale' tab before logging a visit."
- With no template: "Create a checklist template above before logging a visit."
- With a template chosen but empty: "This template has no items yet. Add items to it above."
Step by step — logging a visit by hand:
- In the Logged visits section, choose the store in the Store visited box.
- Choose the template in the Checklist template used box. The questions appear below.
- Answer item by item. On Yes or no items, the options are Yes, No and Not checked — and "Not checked" is different from "No": the first takes the item out of the calculation, the second counts as wrong.
- Write the General visit note, if there's anything to say.
- If you have photos of the shelf on your computer, click Choose photos from your computer and select one or several. While they upload, the button shows "Uploading 2 of 5…"; afterwards each photo appears as a thumbnail, with an x in the corner to remove one that got in by mistake.
- Click Log visit. (If a photo is still uploading, the screen asks you to wait.)
Logging here closes the visit the system had already created for that store, instead of creating a second one. Without that, the system's visit would stay late forever, chasing the field rep for something that's already been done. The photos the field rep had already taken on that visit stay on it — yours go in alongside theirs.
Photos sent from here:
- Up to 20 photos per visit, up to 20 MB each, in JPG, PNG, WEBP or HEIC — the same limit as the field rep's link. The 20 count for the whole visit: if the field rep already took 15 in the store, there's room for 5 more of yours.
- They get marked "uploaded from the dashboard". That way, whoever looks at the visit (you or the manufacturer you show it to) can tell the proof taken in the store by the field rep from the photo that someone picked on a computer.
- On the screen, the Photo item on the checklist is still answered with Yes, No or Not checked; the photos come in through the button, and apply to the whole visit.
Seeing a visit's photos: in the table, the Photos column shows how many the visit has. Click the number to open the thumbnails just below the row; click a thumbnail to see the full photo in a new tab. The ones that came from the computer carry the "uploaded from the dashboard" label. A photo in HEIC (the iPhone format) has no thumbnail in the browser — it shows "Open photo (HEIC)" instead, and clicking opens the file.
Deleting a visit: click the trash icon on its row. The confirmation warns in plain words: "The record is deleted for good, and its score leaves the scoreboard. This can't be undone." Think twice — the scoreboard changes right away.
If the row says "Store removed", it's a visit to a store you already took off the list. The record stays there on purpose, so the history doesn't vanish without explanation.
Materials
/app/modulos/trade-marketing/materiales
This tab is about the artwork that goes to the store: the poster, the flyer, the little shelf sign. It's here that you build the kit the field rep will find on their phone when they get to the store.
- What you see here: three sections — Campaigns, Campaign material and Personalize per store. At the top, a summary like "2 campaign(s) · 5 piece(s) in the kit" and a Refresh.
- What you can do: create campaigns, upload your own artwork or ask the AI to create one, approve the pieces and generate a personalized version with each store's name.
Understanding the order of things: first there's the campaign (the umbrella, with a name and a period). Inside it are the pieces (the artwork). A piece only reaches the field rep if it's approved and if the campaign is live and within the period. Otherwise, the field rep simply sees nothing — and that's on purpose, so an old campaign doesn't come back to show up in the store.
Step by step — creating a campaign:
- On the Materials tab, Campaigns section, click Create campaign.
- Write the Campaign name. It's required.
- Fill in Starts on and Ends on. The end can't be before the start — the system warns: "The end date can't be before the start date."
- Click Save.
- When the artwork is ready and approved, click Put live. The status changes to live and the approved pieces start showing up on the field rep's phone.
- When the campaign is over, click Close.
The three statuses of a campaign:
| Status | What it means |
|---|---|
| draft | You're building it. Nothing reaches the field yet. |
| live | It's in effect. The approved pieces show up on the field rep's phone, respecting the period. |
| closed | It's over. Nothing else reaches the field, and the system won't even let you create new artwork in it: "This campaign is closed — the artwork would never reach the stores. Nothing was created and nothing was charged." |
Step by step — putting artwork in the campaign:
- In the Campaign material section, choose the campaign in the Campaign box.
- Write the Piece name (e.g.: "End-cap poster — Easter").
- Choose the Piece type: Poster, Flyer, Display or Other.
- Now choose one of the two paths:
- I already have the artwork: click Upload my artwork and choose the file. Only PNG and JPG go in, up to 10MB. If the format doesn't work, you see "This file type won't work. Send the artwork as PNG or JPG."
- I want the system to create it: write in the big field what the artwork should show — the offer, the mood of the campaign, what appears. Then click Create with AI. The system opens a "Confirm the spend?" confirmation saying how many credits that uses. Only after you click Yes, go ahead does it create it and charge for it.
- The piece appears in the list, marked as your artwork or made by AI, and as awaiting approval.
- Look at the artwork and click Approve. Only approved artwork reaches the field.
The screen reminds you of this all the time: "Creating with AI uses credits — we show how many before any spend. Uploading your own artwork is free."
The buttons on each piece:
- Approve / Undo approval — turns that artwork's trip to the field on and off.
- Delete — opens a confirmation warning that "The versions already made for each store keep existing, but stop being linked to this artwork."
Step by step — personalizing the artwork with each store's name:
- In the Personalize per store section, choose the piece in the Artwork to personalize box.
- Tick the stores that will get the version with their name. Use Select all or Clear selection to go faster. The counter shows "5 of 12 store(s) selected".
- Click Personalize.
- The "Confirm the spend?" confirmation appears, saying how many stores and how many credits. If any store already has its own artwork, it warns that those versions will be replaced.
- Click Yes, go ahead.
- When it finishes, the system shows how many pieces of artwork were created and, store by store, which ones failed and why. You can tick just those and try again.
- The personalized versions appear in a grid, each with the store's name and status (pending or approved). Click Approve all to release them all at once.
An approved personalized version beats the generic artwork: in that store, the field rep sees the version with its name. In the other stores, they see the generic one — if it's approved.
How to use
/app/modulos/trade-marketing/como-usar
Every module has this tab at the end. It's the module's manual inside the system itself.
How to read the numbers
On Marcelo's panel (top of the Home tab):
- Points of sale — how many active stores you have registered.
- Coverage (30d) — the percentage of your stores that got a visit in the last 30 days. Below 50% the number turns to an alert color and Marcelo talks about it: it means more than half of your portfolio has nobody looking at it.
- Stockouts — how many missing products were logged on the latest visits. Any number above zero lights up the alert.
On the Execution scoreboard (Home tab):
- Avg. execution index — the average of the scores. Think of it as your shelf's report card. 100% is everything as agreed; 50% is half the operation crooked.
- "—" in place of an index means there's no score yet, not zero. It happens when the store has never been visited, or when the visit only had text items.
- In the by-store table, the Visits column counts only completed visits — a scheduled visit nobody made doesn't count.
- In the By chain table, the chain with the worst index is where to start chasing.
On Today's route (Visits tab):
- "never visited" is not "0 days ago". They're different on purpose: "0 days ago" would mean "visited today".
- The stop number (1, 2, 3…) is the suggested order for the day. For stores with a saved location it's the order of the trip (the closest first), not of urgency — urgency was already used before, to choose which eight stores make it into the day. For stores without a location, which today is all of them, the number follows the order of lateness: stop 1 is the most forgotten store.
On the Logged visits table:
- Index is the score of that specific visit, not the store's average.
- Stockouts is how many inventory items went wrong on that visit.
- Photos is how many photos the visit has, adding the field rep's and the ones uploaded from the dashboard. "—" means none.
Frequently asked questions
What exactly is a "point of sale"? It's every physical store where your product is on sale. If the same supermarket has two branches, that's two points of sale — each address is one record.
Who does the visit? Do I have to hire a field rep? Whoever you want. The system calls the person who goes to the store a "field rep", but that can be an employee of yours, an outsourced field rep or you yourself. If it's you, register yourself as a field rep and use your own link on your phone.
Does the field rep need to install an app or create an account? No. They get a link on WhatsApp, open it in the phone's browser and see their visits right away. No login, no password, no app.
Do I have to create the visit every time? No. Every day the system looks at which stores have passed their frequency and creates the visits on its own, already with the right field rep and the right checklist. You only create by hand a visit that happened outside what was agreed — a quick stop-by, a last-minute trip.
What happens if the field rep doesn't make the visit? The next day it's marked as late. The system sends them an email (if you registered their email) and sends you a daily summary with everything that's late.
What's a "stockout"? It's a product missing from the shelf. The customer went to buy, the space was empty and the sale was lost. In the module, a stockout is counted when an item you marked as "If it fails, count as out of stock" is answered negatively on a visit.
What's "shelf space"? It's how much of that category's shelf your product takes up, as a percentage. If the coffee shelf holds 30 packages and 10 are yours, your shelf space is 33%. (In retail this is also called share of shelf.)
Does the store's shelf space update on its own? Yes, if your checklist template has a Number item marked as "This item is the % of shelf occupied". On each completed visit — through the field rep's link or logged by you here in the dashboard — the number entered on that item becomes that store's shelf space. What you typed when adding the store counts only until that first measurement; after that, the field is locked on the Points of sale tab and shows the date of the visit that measured it.
I deleted a visit by accident. Can I get it back? No. Deleting a visit is permanent and its score leaves the scoreboard right away. The screen warns you about that before you confirm.
When something goes wrong
| Symptom | What to check | What to do |
|---|---|---|
| The screen says "The Trade Marketing module is not active in this tenant." | Is the module subscribed on your account? | Turn on Trade Marketing in the Catalog. |
| No visit is created on its own, even with overdue stores | Do you have any checklist template saved? | Create one in Visits → Create checklist template. The next day the visits start being scheduled. You get this same notice in the daily email. |
| The field rep opens the link and sees no store | Does each store have the Field rep in charge filled in? Have the stores already passed their frequency? | On the Points of sale tab, choose the field rep on each store and save. A visit only appears when the store passes its frequency. |
| The field rep says the link "doesn't work" | Was the field rep deleted? Is the link complete? | If you deleted the person, the link dies right away. Add them again and send the new link with Copy link. |
| On the Points of sale tab you see "Rep removed — pick another" | The field rep linked to that store was deleted. | Pick another field rep in the box and click Save. |
| "Give the store a name" when saving | The name field is blank. | Fill in the store's name and save again. |
| "Couldn't save the store. Check the details and try again." | Some field has an odd value (a number in place of text, a field rep that no longer exists). | Check the numeric fields and the chosen field rep, and save again. |
| When logging the visit you see "Required answers are missing:" | The notice lists, in full, the text of the questions left blank — the ones marked as Required to answer. | Go back to the form and answer the questions it named. They show with a red asterisk (*). |
| "Store not found." or "Checklist template not found." | The store or the template was deleted while the screen was open. | Refresh the page (F5) and choose again. |
| Today's route says "No overdue stores", but you think a store is late | Is that store's frequency too high? Was it visited recently? | Open Points of sale and lower that store's Visit frequency (days). |
| All the stores on the route show "(no location)" | The system doesn't have your stores' coordinates — and today it doesn't have any store's. | There's nothing to do from the screen today. The list stays in order of lateness (the most forgotten first); what doesn't happen is the savings in travel. |
| The scoreboard shows "—" on a store's index | That store doesn't have any completed visit yet with an item that scores. | Log a visit with at least one Yes/No, Number or Photo item answered. |
| Yellow banner: "You have a lot of visits logged — this scoreboard is showing only the most recent ones." | Nothing is wrong. It's a notice that the history is too big to fit in the whole calculation. | Nothing to do. The recent numbers are still reliable. |
| "We couldn't load your points of sale right now. Your data is safe — only the lookup failed." | It was a connection failure, not an empty list. | Click Try again. Don't re-add anything. |
| "This request costs N credit(s) and your balance doesn't cover it. Top up and try again." | No credit balance to generate artwork. | Top up credits, or use Upload my artwork, which is free. |
| "This campaign is closed — the artwork would never reach the stores. Nothing was created and nothing was charged." | You tried to create artwork in a closed campaign. | Create a new campaign, or put the campaign back live before generating the artwork. |
| "This file type won't work. Send the artwork as PNG or JPG." | The file isn't PNG or JPG (or has its extension changed). | Save the artwork as PNG or JPG and upload it again. |
| "File is too large — the limit is 10MB." | The artwork went over 10MB. | Reduce the image size and upload it again. |
| The field rep doesn't see the materials in the store | Is the campaign live? Is today within the period? Is the piece approved? | Check all three at once on the Materials tab. A piece that's not approved and a campaign that's not live don't reach the field. |
| When personalizing, some stores "failed" | The system shows the reason store by store. | Tick only the stores that failed and click Personalize again. |
| The email "Late POS visits" arrived | It's the daily summary of visits that went past their deadline. | Open the Visits tab and look at Today's route. Chase the field rep or log the visits that were already done and nobody closed in the system. |
| "… isn't an accepted photo. Send JPG, PNG, WEBP or HEIC." when choosing photos | The file isn't a photo (PDF, video, SVG drawing) or is in a format outside the list. | Save the photo as JPG or PNG and choose again. |
| "… is over 20 MB. Make the photo smaller and send it again." | The photo is bigger than 20 MB. | Reduce the size (or send the WhatsApp version, which already comes smaller) and choose again. |
| "This visit already has N photos and the limit is 20 per visit." when logging | The photos the field rep already took in the store plus yours go over 20. | Click the x on the thumbnails to remove the number of photos the message asks for and log again. |
| "The visit changed while you were logging it…" | The field rep sent a photo (or finished the visit) at the same moment you were logging. | Click Log visit again. Nothing they sent is lost. |
| The store's Shelf space (%) is locked and won't let you type | The store already has a field measurement: the number comes from the last visit that measured the shelf. | Nothing to do — it changes on its own on the next visit. If the last measurement came out wrong, log a visit with the right number, through this screen or through the field rep's link. |
| The store's shelf space didn't change after the visit | The checklist template used has no Number item marked as "This item is the % of shelf occupied", or the field rep left that item blank. | Tick the box on the right item of the template and save. The next completed visit updates the shelf space. |