Social Media
Where it is: Home → Your apps → Social (at the top of the screen the module shows as Social Media)
Address: /app/modulos/social-media
What it's for
Every week it's the same story: you know you need to post, you put it off, and before you know it a month has gone by with nothing on Instagram. A customer lands on your profile, sees the last photo from July and thinks you closed.
This module solves that in three ways, and you pick yours:
- You post yourself, but from one place: you write once, choose the networks and send it to all of them at the same time. No more repeating the same post in five apps.
- You schedule ahead: you sit down once on Sunday, leave the whole week programmed, and the posts go out on their own on the day and at the time you set.
- The team does it for you: you turn on the Editorial Calendar, say how many posts per week and about which topics, and Sofia (the module's specialist) writes the text, generates the image and schedules everything on her own, every week.
Afterwards, on the Analytics tab, you see what worked on Instagram and on your Facebook page: how many people were reached, how many visited your profile or your page and, on Instagram, how many clicked the link to your website.
An everyday example: you own a pizzeria. On Monday you turn on the Editorial Calendar with 3 posts a week on the topics "deal of the day", "behind the scenes in the kitchen" and "happy customer". On Wednesday morning, at the busy hour, you take a good photo of the day's pizza, open the Publish tab on your phone, write two lines and send it to Instagram and Facebook at the same time. You did nothing else all week and the profile is alive.
Before you start
- The Social Media module needs to be active on your account. If it isn't, the screen shows the subscription card with the Activate in catalog button.
- The first time you open the module, an invitation appears at the top of the screen to set it up by chatting with Sofia. It's optional: the tabs below already work, and each reply from the specialist uses AI credits. Click Chat with Sofia so Sofia gets to know your company (when you're done, click Complete setup) or Dismiss to remove the invitation without chatting.
- You must connect at least one social network before you can publish anything. That's done on the Connection tab. While no account is connected, the network buttons on the Publish tab stay grayed out, with the notice "No account for this company on this network".
- For Instagram, the account has to be professional (Business or Creator). A personal account won't do. Switching is free, inside the Instagram app.
- The networks you can connect are: Instagram, Facebook, TikTok, LinkedIn, X (Twitter), YouTube, Threads, Pinterest and Bluesky.
The three ways to send a post (read this first)
This is the module's most common confusion. They're three different things:
Publish now
You write and the post goes out right away, straight to the network.
How to do it: on the Publish tab, leave the Schedule (optional) field empty. The button at the end of the screen will read Publish now. Click it.
What happens: "Post sent." appears and the post shows up on the Posts tab. Careful: "sent" is not the same as "published" — see the How to read the numbers section further down.
Schedule
You write now and say for when. The post is kept and goes out on its own on the day and at the time you set.
How to do it: on the Publish tab, fill in the Schedule (optional) field with the date and time. As soon as you fill it in, the button at the end of the screen renames itself to Schedule post. Click it.
What happens: "Post scheduled for <date and time>. It is not live yet." appears — the sentence is like that on purpose, so no one thinks it's already published. The post shows up on the Posts tab with the Scheduled tag and a Cancel button beside it, which works until its time comes.
The easiest way to know which of the two you're in: look at the button. If it reads Publish now, it goes out right away. If it reads Schedule post, it's kept.
Approve
This only exists for people who are part of a franchise network. If your company is a unit of a network and the head office turned on the approval rule, the posts you create don't go straight to Instagram: they go first to the head office's queue, which checks them before releasing.
How you notice: you click Publish now (or Schedule post) and, instead of "Post sent", the message "Sent for head-office approval — the network checks before publishing. You can follow its progress in the Franchise Marketing module, in the Campaigns tab." appears.
This is not an error. It's the normal path when the network requires a check. The fields are cleared and the post waits for someone at the head office to approve it. Once the head office approves, it's published (or scheduled, if you had set a date).
Where to follow it, in detail: the Campaigns tab mentioned in the message is not in this module — it's in the Franchise Marketing module (Home → Your apps → Franchises → Campaigns tab). There your unit sees the requests it sent, with the pending tag while the head office hasn't decided. If the head office rejects it, it's required to write the reason, and the reason shows up alongside.
If your company isn't a franchise — or if the head office doesn't require approval — you'll never see that message, and you can ignore this part.
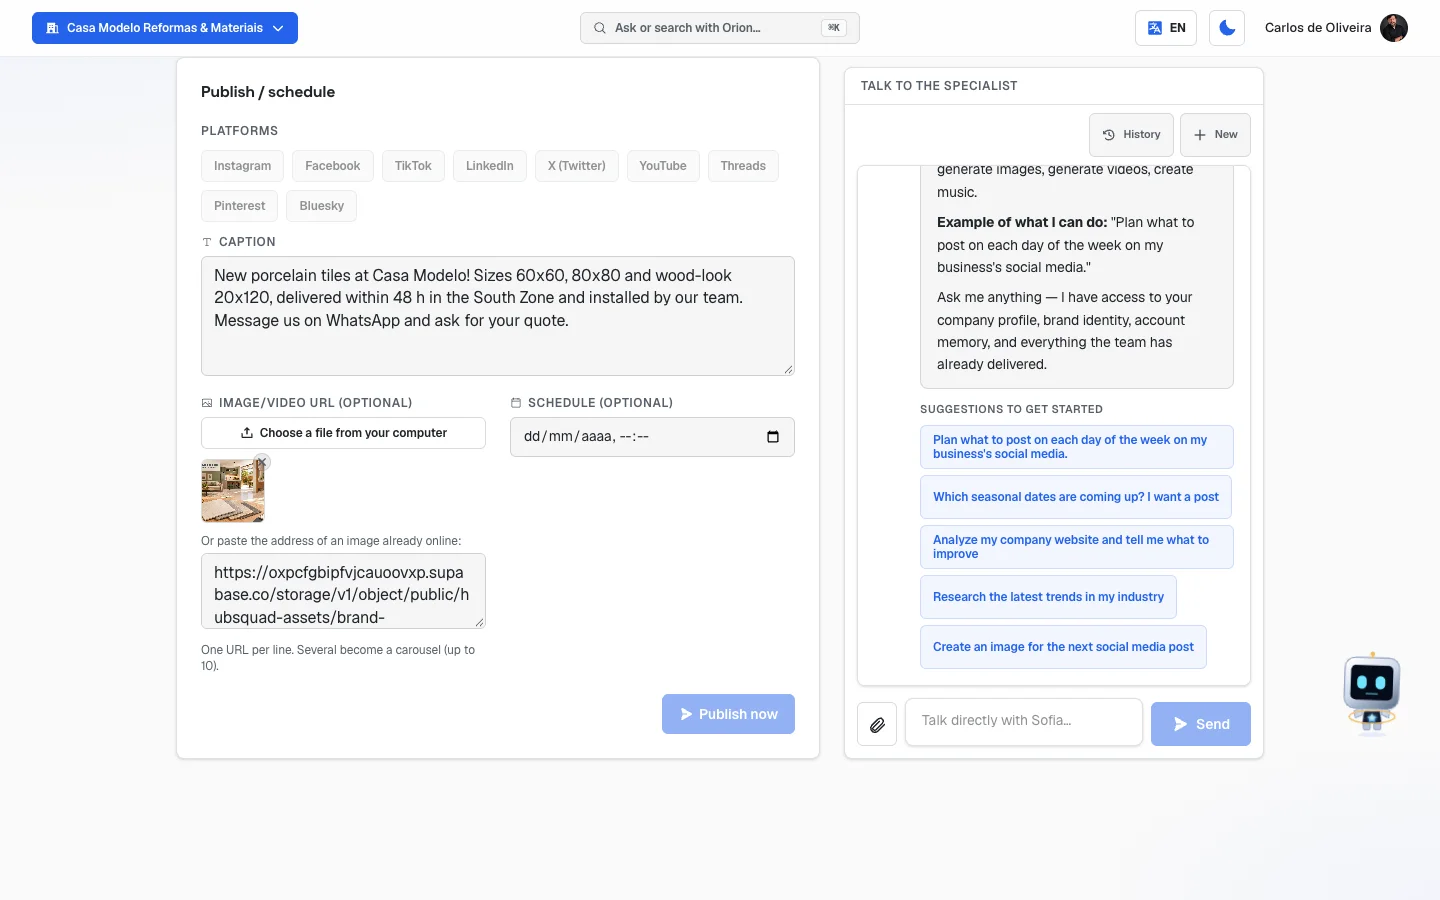 Publish tab with the caption written, the image pasted and the thumbnail; with no network connected, the network buttons stay grayed out until you connect under Connect networks
First steps
- On Home, under Your apps, click Social. You land on the Publish tab.
- If the invitation to the setup conversation shows up, chat with Sofia and click Complete setup, or click Dismiss. The tabs work either way.
- Go to the Connection tab first. Nothing works without a connected network.
- Click the card of the network you want (for example, Instagram). The network's own official login window opens. Sign in and authorize.
- Go back to the Connection tab. The connected account shows up in the Connected list.
- In the list, check only the accounts that belong to your company. Click Save accounts for this company. (If you manage clients' pages, they show up here too — and you don't want to post to them by mistake.)
- Repeat steps 4 to 6 for the other networks you use.
- Go back to the Publish tab. Now the network buttons light up.
- Make a test post: choose a network, write a short caption, leave the schedule field empty and click Publish now.
- Go to the Posts tab and check that the post showed up and what its status is.
- When you're comfortable, turn on the Editorial Calendar so you don't have to remember this every week.
The tabs, one by one
Publish
/app/modulos/social-media/publicar
It's the tab that opens first, and it's where you'll spend the most time.
- What you see here: at the top, the module panel with Sofia's note and what she delivered last. Below, the Publish / schedule form. Beside it, the chat with Sofia.
- What you can do: write a post, attach photos or videos, choose the networks and publish right away or schedule.
Step by step — publishing a post:
- On the Publish tab, under Platforms, click each network you want to send to. The selected network is highlighted. You can choose several at once.
- Under Caption, write the post's text. This field is required — without text the publish button stays off.
- Attach the image or video (see the step by step right below). It's optional.
- If you want it to go out on its own later, fill in Schedule (optional) with date and time. If you want it to go out now, leave it empty.
- Click the button at the end: Publish now or Schedule post.
Step by step — attaching a photo or video:
- Click Choose a file from your computer. You can choose several at once.
- While it uploads, the button reads Uploading….
- Each file becomes a thumbnail. To remove one, click the × in its corner.
- If you already have the image at an internet address, use the field below: "Or paste the address of an image already online". One URL per line.
- Several media files become a carousel (that post the person swipes sideways). The limit is 10 per post.
File rules:
| Rule | Value |
|---|---|
| Accepted formats | png, jpg, jpeg, webp, gif, mp4, mov |
| Maximum size per file | 50 MB |
| Quantity per post | up to 10 |
Each field explained:
| Field | What to do |
|---|---|
| Platforms | The networks the post goes to. Grayed-out network = you don't have an account for it connected and marked as belonging to this company. Fix it on the Connection tab. |
| Caption | The post's text. Required. |
| Image/video URL (optional) | The photo or video. Either you send it from your computer, or you paste an internet address. |
| Schedule (optional) | Leave empty to publish now. Fill in for the post to go out on its own later. |
The publish button stays off when:
- you didn't choose any network;
- the caption is empty;
- a pasted image address isn't valid;
- a file is still uploading;
- you don't have any social network account connected.
Editorial Calendar
/app/modulos/social-media/agenda-editorial
This is the "do it for me" tab. You set it up once and the team starts publishing on its own, every week, without you having to remember.
The screen itself explains: "Turn it on and the team creates and schedules the week's posts on its own: AI-generated caption and image, on the days and time you choose."
- What you see here: a single form.
- What you can do: turn automatic publishing on or off and say how it should work.
Step by step — turning on the editorial calendar:
- On the Editorial Calendar tab, check the Publish automatically every week checkbox.
- Fill in Posts per week — from 1 to 14. Three is a good start.
- Choose the Time (Brasília) the posts should go out.
- Under Preferred days, click the days of the week you want to publish (Sun, Mon, Tue, Wed, Thu, Fri, Sat). You need to choose at least one.
- Under Networks, click the networks that will receive them. You need to choose at least one. Networks with no connected account stay grayed out.
- Under Themes (one per line, up to 12), write the topics the team should talk about — one per line. The screen's own examples are: "Tip of the week", "Behind the scenes", "Promotion".
- Under Tone of voice (optional), say how you want the texts to sound. Example from the screen: "relaxed and welcoming". Up to 200 letters.
- Click Save schedule. "Editorial schedule saved!" appears.
Each field explained:
| Field | What to write |
|---|---|
| Publish automatically every week | The master switch. Unchecked, nothing is generated or published — but your settings stay saved. |
| Posts per week | How many posts the team should create per week (1 to 14). |
| Time (Brasília) | The hour the posts go out. Think about when your customer looks at their phone. |
| Preferred days | Which days of the week to publish. |
| Networks | Which networks what the team creates goes to. |
| Themes (one per line, up to 12) | The list of topics. The more specific to your business, the better the post. "Before and after of a drain unclogging" works better than "tips". |
| Tone of voice (optional) | How the texts should sound. If you leave it blank, the team uses your brand's voice. |
Posts created by the editorial calendar show up on the Posts tab with the Editorial origin. If you don't like one that's scheduled, you can cancel it there before it goes out.
To turn it off: uncheck Publish automatically every week and click Save schedule.
Posts
/app/modulos/social-media/publicacoes
It's the history. Everything that went out or will go out shows up here — what you published by hand, what the agents published and what the editorial calendar scheduled.
- What you see here: the latest 30 posts. Each one shows the status tag, the origin, the networks, the start of the text and the date.
- What you can do: follow each post's status and cancel what's still scheduled.
- Empty state: "No posts recorded", with the explanation "Everything published or scheduled by the team shows up here with date and network." and the tip "Ask for a post in the chat or use the Publish tab".
What each status means — this table is important, read it carefully:
| Status | What it means | What to do |
|---|---|---|
| Scheduled | It's saved, waiting for the date to arrive. It is not live yet. | Nothing. If you changed your mind, click Cancel. |
| Sent | It left here and was delivered to the network. "Sent to the networks — waiting for their confirmation." | Wait. The network usually confirms within minutes. |
| Published | The network confirmed the post is live. It's the only status that guarantees this. | Nothing. It worked. |
| Unconfirmed | It left here, but the network never confirmed it published. | Check your profile on the network. If the connection is expired, reconnect on the Connection tab. |
| Failed | It didn't go. The reason shows below, in red. | Read the error. It's almost always an expired connection or a file the network refused. |
| Canceled | You canceled before it went out. It was never live. | Nothing. |
| Removed from network | The post did go live and was taken down afterward. "The text stays here as history." | Nothing. The text stays saved for you to reuse. |
Each post's origin (shows next to the networks):
| Origin | Who made it |
|---|---|
| Manual | You, through the Publish tab. |
| Agent | One of the specialists, at your request in the chat. |
| Editorial | The automatic editorial calendar. |
| Franchise | Your franchise network's head office, posting on your account. |
Step by step — canceling a scheduled post:
- On the Posts tab, find the post with the Scheduled tag.
- Click Cancel, at the right end of the row.
- "Scheduled post canceled." appears and the tag becomes Canceled.
The Cancel button only shows up on a Scheduled post. Once it has gone out, it can't be undone from here — you'd have to delete it directly on the social network.
Analytics
/app/modulos/social-media/analise
It's the tab for the numbers of Instagram and of the Facebook page. It has five blocks, one below the other: three for Instagram on top and two for Facebook at the bottom.
Instagram and Facebook have numbers here — and the module publishes on nine networks. The other seven (TikTok, LinkedIn, X, YouTube, Threads, Pinterest and Bluesky) have no numbers on this tab: what went out on them you follow on the Posts tab (went out / didn't go out), and the reach and followers of those networks you check in each one's app. The visual post review (block 3, paid) is for Instagram only.
Connecting Instagram and connecting the Facebook page are two separate connections, each with its own button: Connect Instagram (block 1) and Connect Facebook (block 4). You can connect just one or both.
Block 1 — Instagram metrics (the connection).
Here you turn on the reading of the numbers.
⚠️ Read this: connecting Instagram to publish and connecting Instagram to see numbers are two different authorizations. You can have one and not the other, and that's normal. The system itself warns you about this on the Connection tab when it notices the difference: "Instagram @fulano is already connected for METRICS, over on the Analytics tab. This screen is about PUBLISHING — they are separate authorizations." If you want both, you need to connect in both places.
The possible states:
| What the screen says | What it means | What to do |
|---|---|---|
| "@your_account connected" | All good. "Weekly performance report is on." | Nothing. |
| "Your connection expired" | "Meta access lasts 60 days. The weekly report is paused until you reconnect; it's one click and nothing is lost." | Click Reconnect Instagram. |
| "Your account is personal" | Instagram only gives numbers for a professional account (Business or Creator). | It's free: in the Instagram app's settings, tap "Switch to professional account". Then come back and click Connect Instagram. |
| "No account connected for metrics" | You haven't connected yet. | Click Connect Instagram. |
To disconnect, click Disconnect. The window explains what happens: "We'll remove our access to your account and delete the credentials stored here. The weekly report and the post analyses stop until you connect again. Nothing is deleted on your Instagram."
Block 2 — Account metrics (the numbers).
It only shows up with Instagram connected. At the top there are three period buttons: 7 days, 30 days and 90 days (it starts at 7 days).
The six numbers are explained in the How to read the numbers section, further down.
Below them is the Average by content type table, comparing Reels, Carousel, Image and Other — with how many posts of each type you made and the average reach, saves, likes, comments and shares. This table tells you what's worth continuing to do.
Block 3 — Visual post review (paid, per post).
The AI looks at the artwork of your posts (not the text) and says what to improve. The screen warns: "Charged per analyzed post (10 credits/post)."
Where to see your balance and buy more credits. Not here: this module shows the cost, but not the balance. The place is the full menu, under Account → Credits & plan (address
/app/creditos) — that's where you see how much you have, the history of each use and the top-up packs, which you buy instantly, by card. The credit belongs to the whole company, the same one that pays for images, video and narration in the other modules; there's no separate balance just for the visual review. Chapter 4 — Account, plan and billing of this manual explains the whole screen.
Step by step — requesting a visual review:
- In the Visual post review block, choose What to analyze:
- Highlights — your best posts. Then choose whether you want to sort by Most saved or Most reach.
- Feed grid (9) — the last nine, to judge how your profile looks from afar.
- Choose posts — the grid with your real posts shows up and you click the ones you want.
- Click Calculate cost. The screen shows how many posts and how many credits it will cost.
- Check the Include visual review (X credits, Y posts) checkbox to confirm.
- Click Analyze.
- The result brings, for each post, a list of suggestions with the post's link; then the Grid notes (how the profile looks as a whole) and an Overview.
- To start over, click New analysis.
Block 4 — Facebook metrics (the connection).
Here you turn on the reading of the numbers for your company's Facebook page. The screen says: "Connect your business Facebook Page to see reach, followers and your best-performing posts."
Step by step — connecting the page:
- Click Connect Facebook. Beforehand, the screen warns: "In the Facebook window, tick your business Page. We only read numbers — nothing is posted or changed."
- In the Facebook window, check your company's page and confirm.
- You go back to the tab with the notice "Facebook connected".
The possible states:
| What the screen says | What it means | What to do |
|---|---|---|
| "Page “your page name” connected" | All good. "Your Facebook page's numbers show up right below." | Nothing. |
| "No Facebook page connected" | You haven't connected yet — or, in the Facebook window, you didn't check any page. | Click Connect Facebook and check the company's page. |
| "This Page comes from the Facebook connection you made in Integrations. To turn it off, use that screen." | The tab reused the page you had already connected on the Integrations screen. | Nothing. To turn it off, use the Integrations screen: this tab's Disconnect only exists for the connection made here. |
If you checked more than one page, choose which one to see under Show Page:.
To disconnect, click Disconnect. The window explains: "We'll delete the read credentials stored here and the page's numbers disappear from this tab until you connect again. Nothing is deleted on your Facebook page." If the connection drops (password changed or access removed), use Reconnect.
Block 5 — Facebook Page numbers.
It only shows up with the page connected. At the top, the same three period buttons as Instagram: 7 days, 30 days and 90 days (it starts at 7 days).
- Six numbers: Reach, Views, Page visits, Post interactions, Followers and New followers — explained in the How to read the numbers section, further down.
- Posts that reached the most people: up to five posts from the period, each with the photo, the start of the text and the line "N people reached · N reactions · N comments". The little arrow beside it opens the post on Facebook.
- Average by post type: one row per format (Video, Photo, Link, Text only and Other), with how many Posts you made and the average Reach, Reactions, Comments and Shares.
- At the bottom: "Page “your page name” · numbers provided by Facebook."
While Meta hasn't enabled reading for your account. Reading the page's numbers depends on a permission that Meta needs to enable for AutoAgency. Until that happens, the connection works, but instead of the numbers this shows: "Facebook reading is being enabled by Meta. As soon as it approves, your page's numbers show up here on their own — you don't need to do anything. Meanwhile: your page has N followers." It's not a defect in your account, and the follower count is already valid.
Connection
/app/modulos/social-media/conexao
It's the tab where you connect your accounts. Without it, nothing publishes.
- What you see here: the Social media header with a status tag, the cards for each network to connect, and the Connected list.
- What you can do: connect networks, mark which accounts belong to your company, reconnect the ones that expired and refresh the list.
Step by step — connecting a network:
- On the Connection tab, click the network's card. The screen explains: "Click a network below — it will open its official login window. You can connect several."
- A new window opens, from the social network itself. Sign in with your login and authorize.
- Close the window and come back. The account shows up under Connected.
- If it doesn't show up, click Refresh account list.
Step by step — choosing which accounts belong to your company:
This step is important and many people skip it. The screen warns: "Check only the accounts that belong to this company. Unchecked ones don't receive posts (e.g.: clients' pages that show up because you manage them)."
- In the Connected list, click each account to turn it on (it turns green) or off (it turns gray and crossed out).
- Click Save accounts for this company.
If you don't have Instagram yet, the tab shows, before the buttons, a guided walkthrough that takes you by the hand, one step at a time:
- "Does your company already have Instagram?" — answer Yes, we do or No — create mine.
- "Create your company's account" — "Open the Instagram app on your phone and create a new account with the company's email. Use the company name on the profile."
- "Turn it into a business account".
- "Link it to a Facebook page".
- "Authorize AutoAgency to post" — "Last step: click the connect button down here and authorize."
At each stage you click I did this step and the walkthrough moves on. When it's done, the walkthrough disappears on its own.
The header's status tag:
| Color | What it means |
|---|---|
| Disconnected | You don't have a posting account on the platform. |
| Pending | The account exists but no network has been connected yet. |
| Connected | At least one network connected and valid. |
| Red (error) | A connection expired. Fix it now — see the next section. |
How to use
/app/modulos/social-media/como-usar
Every module has this tab at the end. It's the module's manual inside the system itself.
When the social network account disconnects
This will happen to you sooner or later, and it's normal. Social networks (Meta in particular) give the platform an authorization with an expiry date — on Instagram, 60 days. When the time is up, the authorization dies and needs to be renewed.
Why this is serious: while the connection is expired, what you send to that network may not go out. You still see the post on the Posts tab, but it doesn't appear on the profile. The platform warns you, but if you don't look, you spend weeks posting into the void.
How you get warned:
- On the Connection tab, the network shows up in yellow, with the mark "· connection expired" or "· expiring soon" (the latter shows up when 3 days or fewer are left), and gets a Reconnect button beside it.
- At the top of the list the notice appears: "The networks marked in amber lost their authorization. Click “Reconnect” on the network — anything sent to it until then may not go out."
- The module header's tag turns red.
- You get an alert on the platform with the text: "The connection to <network> has EXPIRED — what you send there may not go out. Reconnect the network."
- On the Posts tab, the posts that went out in that period show up as Unconfirmed, with the explanation: "The post left here, but the network didn't confirm it's live. Check the profile and, if the connection is expired, reconnect on the Connection tab."
- On the Analytics tab, if it's the metrics connection, this shows: "Your connection expired — Meta access lasts 60 days. The weekly report is paused until you reconnect; it's one click and nothing is lost."
Step by step — reconnecting:
- On Home, under Your apps, click Social → Connection tab.
- In the Connected list, find the network marked in yellow.
- Click Reconnect, beside it.
- The network's login window opens. Sign in and authorize again.
- Check that the yellow mark is gone. If it isn't, click Refresh account list.
- If the Instagram metrics connection also expired, go to the Analytics tab and click Reconnect Instagram — they are separate authorizations.
What you don't lose when you reconnect: nothing. The history stays, the editorial calendar stays on, your settings stay. Reconnecting is one click.
What to do with the posts that stayed "Unconfirmed": open your profile on the network and see if they're there. If they aren't, publish again — now with a valid connection.
And the Editorial Calendar, with an expired network? It keeps working — on purpose. This is the question that confuses people the most, so here's the whole rule:
- The calendar does NOT skip the expired network. Every week it writes the captions, generates the artwork and sends the posts to all the networks you chose on the Editorial Calendar tab, including the one that's in yellow. This is a design decision, not an oversight: many networks renew the authorization on their own in the following hours, and refusing up front would take from you a post that probably was going to go out.
- But you get warned BEFORE the post goes out, not after. The moment the system sees an expired connection, it opens a notice for you with this sentence: "Reconnect the network in Social Media › Connection. Meanwhile, what you send to that network may not go out — and I won't mark it as published without its confirmation." The notice comes with a button that opens the module directly on the right screen.
- Nothing is marked as published until the network confirms. The post stays Unconfirmed on the Posts tab, not "Published". You'll never look at the panel and think it went out when it didn't.
- ⚠️ The week's credits are spent anyway. Each post's artwork is generated (and charged) before the post is sent. If you chose four networks and only one is expired, the post went out on the other three and the credit paid off. But if all your networks are expired, the whole week is produced and charged with no one seeing it. That's why it's worth reconnecting the same day as the notice.
- If the platform's link to the publishing service goes down entirely (not just one network, but the parent connection), then the calendar for that week does not run — nothing is generated and nothing is charged.
One specific message deserves attention: if the notice says the connection "used to renew itself and STOPPED", it means that network was renewing automatically and stopped renewing. Reconnect by hand following the path above and tell support if it happens again.
How to read the numbers
On the Analytics tab, in the Account metrics block (all of them are Instagram's, for the period you chose at the top):
| Number | What it is |
|---|---|
| Reach | How many different people saw something of yours. It's the size of the audience. |
| Views | How many times your content was seen. It's always larger than reach, because the same person sees it several times. |
| Profile visits | How many people clicked your name and went to see your profile. It's a sign of real interest: the person wanted to know who you are. |
| Website clicks | How many clicked the link in your bio. It's the number closest to money on this screen. |
| Followers | How many you have today. |
| New followers | How many you gained in the period. |
Below several numbers a comparison shows up, like "+12% vs. previous period". It compares with the period of the same length right before. If "no baseline to compare" shows up, it's because there's no earlier period to compare with — and the system prefers to say so rather than make up a number.
If a dash (—) shows up instead of the number, with the notice "Instagram doesn't report this for this account": it's not zero, it's missing information. Instagram doesn't provide every metric for every account — small accounts, for example, don't get the follower count per period.
In the Average by content type table: each row is a format (Reels, Carousel, Image). The columns show each format's average: how many Posts you made, and the average Reach, Saved, Likes, Comments and Shares. The practical reading: the row with the highest average reach is the format that works for your audience — do more of that. Saved is the most valuable of the five: someone who saves a post plans to come back to it.
On the Analytics tab, in the Facebook Page numbers block (same periods, the numbers are your page's):
| Number | What it is |
|---|---|
| Reach | How many different people saw any content from your page. |
| Views | How many times your page's content was seen. |
| Page visits | How many times your page was opened. |
| Post interactions | How many times people interacted with your posts: reactions, comments, shares and other clicks. |
| Followers | How many the page has today. |
| New followers | How many it gained in the period. |
The comparison with the previous period works the same as Instagram's. The dash (—) too: on Facebook, the notice is "Facebook doesn't report this for this page" — missing information, not zero. In the Average by post type table, the row with the highest average reach is the format that works best on your page.
On each page's card in the Connection tab header: the step "3+ networks for maximum reach" is a recommendation, not an obligation. The screen's own suggestion is "Instagram, Facebook, LinkedIn".
If a line about sales attributed to Meta/Instagram shows up, read the notice with it: "It's the same period, not a cause-and-effect relationship." That is: they happened in the same window of time, which doesn't prove that one caused the other.
Frequently asked questions
Do I need to post on every network? No. Start with the two or three where your customers really are. Posting badly on nine networks is worse than posting well on two.
What's the difference between "Sent" and "Published" on the Posts tab? Sent means the post left here and was delivered to the network. Published means the network confirmed it's live. They're different on purpose: posts have been counted as published without ever going out. If a post stays "Sent" for a long time or becomes "Unconfirmed", check the profile.
Can I cancel a post after it went out? Not here. The Cancel button only exists while it's Scheduled. Once it has gone out, you need to delete it directly in the network's app.
I turned on the Editorial Calendar. Does it publish without my seeing it? Yes, that's what it's for. But everything shows up on the Posts tab with the Editorial origin, and while it's Scheduled you can cancel it. If you want to check everything first, leave the calendar off and publish by hand.
Why is the network I want grayed out on the Publish tab? Because there's no account for that network connected and marked as belonging to this company. Hover over it and the notice appears: "No account for this company on this network". Fix it on the Connection tab.
I connected Instagram but the Analytics tab says there's no account connected. Is it broken? No. They're two different authorizations: one to publish (Connection tab) and another to read numbers (Analytics tab). Connect on the Analytics tab too.
I connected the Facebook page and, instead of the numbers, "Facebook reading is being enabled by Meta" shows up. Is it broken? No. Reading the page's numbers depends on a permission that Meta enables for AutoAgency, and until it enables it for your account the screen says so and already shows how many followers your page has. It's not a defect in your account.
How long does the connection last? On Meta (Instagram and Facebook), 60 days. The platform warns you when 3 days are left. Reconnecting is one click and nothing is lost.
How many photos can I put in a post? Up to 10. When you send more than one, it becomes a carousel.
When something goes wrong
| Symptom | What to check | What to do |
|---|---|---|
| The publish button is off | Did you choose a network? Did you write the caption? Is there a connected account? Is any image address invalid? | Fill in what's missing. The four blockers are listed in the Publish tab section. |
| The networks show up grayed out under Platforms | No account for that network is connected and marked as belonging to this company. | Connection tab → connect the network → check the account → Save accounts for this company. |
| "Failed to publish" | It's almost always an expired connection or a file the network refused. | Check the Connection tab. If there's a yellow mark, click Reconnect. |
| "Sent for head-office approval" | Your company is a unit of a franchise network with the approval rule turned on. | It's not an error. The post is in the head office's queue. Follow it on the Campaigns tab. |
| The post stayed Unconfirmed | The network never confirmed the publication. | Open your profile and check. If the connection is expired, reconnect and publish again. |
| The post stayed Removed from network | It did go live and was taken down afterward. | Nothing to do here. The text stays saved as history. |
| "A maximum of 10 files fit per post." | You tried to attach more than 10. | Remove some. |
| "'file' is not a format social networks publish." | The file isn't png, jpg, jpeg, webp, gif, mp4 or mov. | Convert the file or choose another. |
| "'file' is empty or over 50 MB." | The file is too big (or corrupted). | Reduce the video or image size. |
| "Could not upload the file. Please try again." | Upload failure. | Try again in a moment. |
| "Not a public address: …" | You pasted a path on your computer instead of an internet address. The notice explains: "The social network must download the file — a file on your computer won't work." | Use the Choose a file from your computer button instead of pasting the path. |
| "We couldn't connect <network>." | "Either the login window was closed before authorizing, or the network refused the authorization." | Click Try again. If it keeps happening, talk to support. |
| I connected but the account didn't show up in the list | The list may be out of date. | Click Refresh account list. |
| Network marked in yellow with "· connection expired" | The authorization expired. | Click Reconnect on that network. See the When the social network account disconnects section. |
| The Analytics tab says "Your account is personal" | Instagram only gives numbers for a professional account. | In the Instagram app, Switch to professional account (it's free) and then Connect Instagram. |
| The Analytics tab says the account is connected but shows no numbers | "The account is connected, but Instagram hasn't returned numbers for this period yet." | Choose a longer period (30 or 90 days), or post something and come back. |
| "The metrics read permission is still under review at Meta." | It's not a problem with you or your account. | Wait. |
| "I couldn't read the metrics right now." | Momentary failure. | Try again in a few minutes. |
| "Facebook reading is being enabled by Meta." | Meta hasn't enabled reading of the page's numbers for your account yet. It's not your problem. | Nothing. The follower count already shows; the other numbers come once Meta enables it. |
| "The Facebook connection dropped (password changed or access removed)." | The page's authorization stopped being valid. | Click Reconnect, in the Facebook metrics block. |
| "I couldn't read the Facebook numbers right now." | Momentary failure. | Try again in a few minutes. |
| The Facebook page is connected but shows no numbers | "The Page is connected, but Facebook hasn't returned numbers for this period yet." | Choose a longer period (30 or 90 days), or post something and come back. |
| "Could not cancel." | The post already went out, or wasn't found. | Refresh the page. If it's already live, delete it directly in the network's app. |
| "No posts recorded" | Nothing has been published or scheduled yet. | Use the Publish tab, or ask Sofia for a post in the chat. |