

Sites & Landing Pages
Where it is: Home → Your apps → Sites (at the top of the screen the module shows as Sites & Landing Pages)
Address: /app/modulos/sites
What it's for
Today, when someone hears about your service, the first thing they do is look up your name on the internet. If they find nothing, they call your competitor. A website is your company's address on the internet — the place you send anyone who asks "do you have a website?".
This module is where your sites and your pages are kept. The one who builds them is Téo, the module's specialist: you chat with him, tell him what your company does, and he puts the site together. After that, you change the texts, the phone number and the prices yourself, right on the screen, without depending on anyone.
There are two kinds of page here, and the difference matters:
- Site — several pages (home, services, about, contact). It's the company's complete business card. It lives in the My Sites tab.
- Landing page (also called a "capture page") — a single page with a single goal: getting the person to leave their phone number. It's what you use when you run an ad or send a link on WhatsApp. It lives in the Landing Pages tab.
An everyday example: you're a locksmith. You ask Téo for a site with your four service cities and your WhatsApp. Then you create a separate landing page just for "24h door opening", put its link in an ad, and everyone who fills in the form lands on a list of yours. You open the list and call each one.
Before you start
- The Sites module needs to be active on your account. If it isn't, the screen shows the subscription card with the Activate in catalog button.
- The first time you open the module, an invitation appears at the top of the screen to set it up by chatting with Téo. It's optional: the tabs below already work, and each reply from the specialist uses AI credits. Click Chat with Téo so Téo gets to know your company (when you're done, click Complete setup) or Dismiss to remove the invitation without chatting.
- To publish a site (put it online for real) you need hosting. If you don't have it, the Hosting required window shows up when you publish and you subscribe right there. Creating, editing and viewing the preview costs nothing.
- Nothing else is required. You don't need your own domain to get started: every site is born with a free platform address.
First steps
- On Home, under Your apps, click Sites. You land on the My Sites tab.
- If the invitation to the setup conversation shows up, chat with Téo and click Complete setup, or click Dismiss. The tabs work either way.
- The screen will be empty, with the notice "You don't have any sites yet". Click Build a site with Téo — it takes you to the chat.
- In the chat, tell Téo what your company does, your phone number and the cities where you work. The more concrete you are, the better the site. Ask for the site.
- Go back to the My Sites tab. The site shows up as a card with the Draft tag — it means it exists, but it isn't on the internet yet.
- Click Edit. The site screen opens, with the preview beside it. Change the texts you want and click Save changes.
- When it's the way you like it, click Publish website. If it asks for hosting, choose Monthly or Annual and confirm.
- Done. The card's tag becomes Live and the site's address appears.
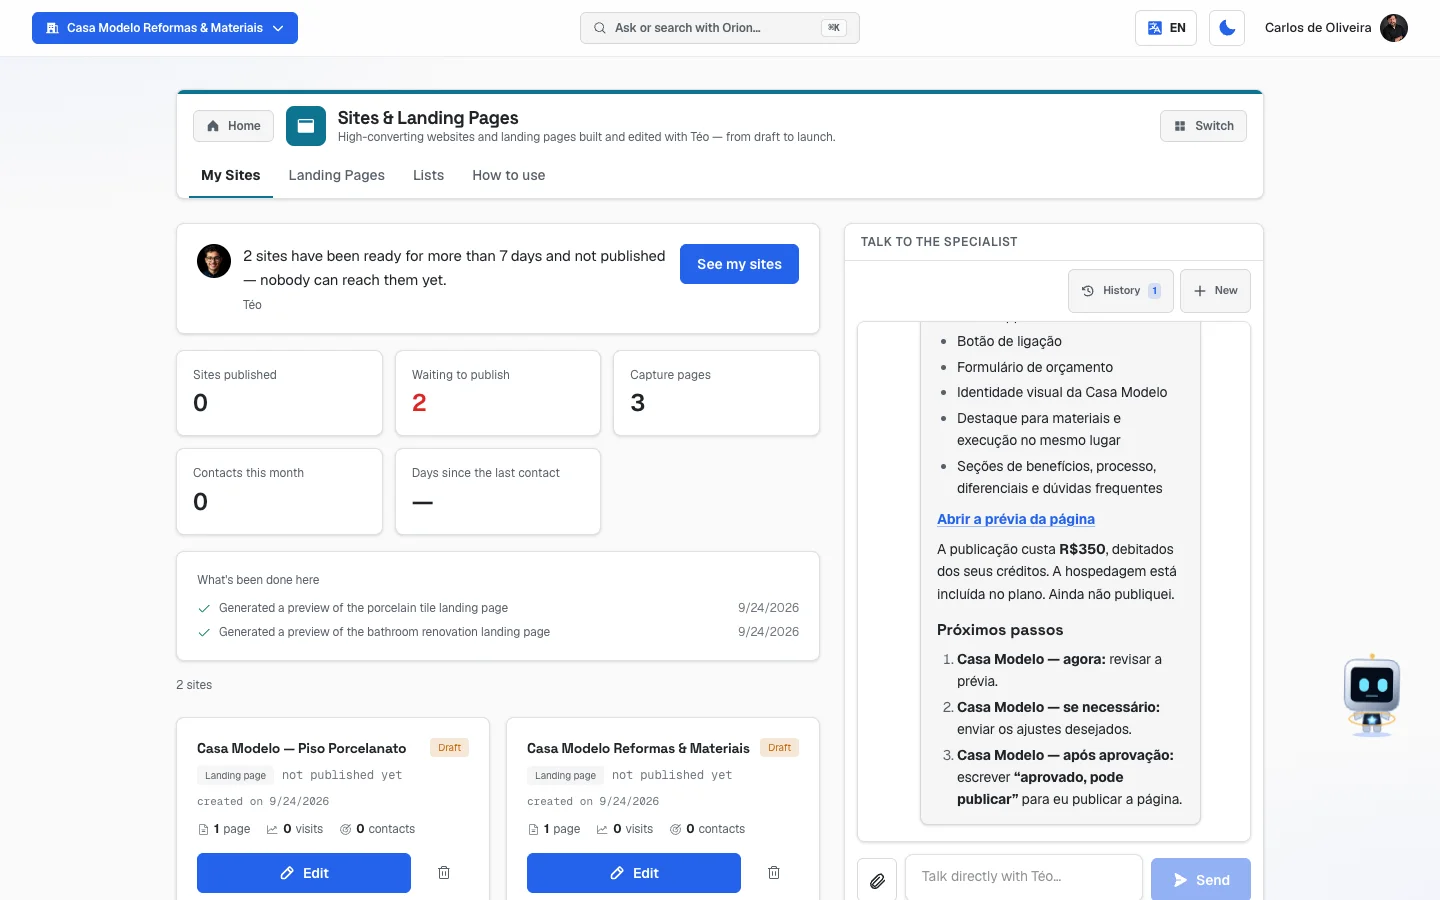 My Sites tab with two pages created by Téo, still with the "Draft" tag (preview ready, waiting for publication)
Understanding the tags (read this first)
Every site and every page has a status, shown in a colored tag in the corner of the card:
| Tag | What it means |
|---|---|
| Draft | It exists only in here. No one on the internet can open it. You can tinker as much as you like. |
| Live | It's published. Anyone with the address opens it and sees it. |
| Archived | It was taken out of circulation. It can't be edited or published. |
On landing pages the same statuses show up in lowercase: draft, published and archived.
Two words that show up all the time and cause confusion:
- Preview is how the site looks for you to check, before it's on the internet. Viewing the preview doesn't put anything online.
- Publish is what puts the site on the internet for real. Until you click publish, no one sees it.
And, if you edited a site that was already live: what you save doesn't show up on its own on the published site. You need to click Republish for the changes to go up.
The tabs, one by one
My Sites
/app/modulos/sites/meus-sites
- What you see here:
- At the top, the module panel: a note from Téo about how your presence on the internet is doing and what he delivered last.
- The count — "3 sites" or "1 site".
- A card for each site. On it: the name, the status tag, whether it's a Landing page or an Institutional site, the internet address (or "not published yet"), and three numbers: how many pages, how many visits and how many contacts that site has brought in.
- Beside it, the chat: you talk to Téo without leaving the screen.
- What you can do: open the site to edit it, see how it looks live and delete drafts.
Notices that can appear on the card:
- "Published, but no page is live: anyone who opens the address sees 'page not found'. Ask Téo to create the first page." — the site was published but it's hollow. Talk to Téo in the chat.
- "created on <date>" — shows up on drafts, so you can tell which is which.
- "most recent with this name" — shows up in orange when you have two drafts with the same name. It's the newer of the two.
The buttons on each card:
| Button | What it does |
|---|---|
| Edit | Opens the site's edit screen. It doesn't show up on an archived site. |
| View live | Opens the published site in a new browser tab. It only shows up when it's Live. |
| 🗑️ (Delete this preview) | Deletes the draft. It only shows up on what is not live. |
Step by step — deleting a draft:
- On the My Sites tab, find the draft's card.
- Click the trash can icon.
- Read the question: "Delete the preview 'site name'? It will not come back." If you have two drafts with the same name, the question also shows the date, so you don't delete the wrong one.
- Click Delete this preview. "Preview deleted." appears.
You can't delete a published site. If you try, the screen answers "This page is live. Take it down before deleting."
The site's edit screen (opens when you click Edit):
This screen sits outside the module, and the card is the door. Its address is
/app/sites/<código do site>and there is no menu item that leads there — not in the side menu, not in the module's tabs. To get there, it's always through the Edit button on the card, in the My Sites tab. (There are two other ways, but both are specific situations: right after importing a ready-made page from outside, the import window itself offers to open the site; and, when you come back from paying for hosting, the system brings you back to this same screen.) If you use a site's screen a lot, save the address in your browser's bookmarks — it doesn't change.
At the top there are two tabs: Edit and Leads received.
On the Edit tab:
- The text fields on the left and the Preview on the right. If the site has more than one page, the list of them also shows up so you can choose which one to edit (a one-page site goes straight to it). The preview has two buttons, Desktop and Mobile, so you can see how it looks on each screen.
- Edit the text — change headings, texts and phone numbers right in the fields. The notice explains: "It's free and instant — click Save to see it in the preview." Then click Save changes.
- Ask Téo for a bigger change — to swap images, rearrange sections or create new content. Write the request in the field (for example: "make the top more eye-catching and add a testimonials section") and click Ask Téo. The first 2 changes on each page are free; from the third one on, the system asks if you confirm before charging.
- Publish website (or Republish, if it's already live). The notice reminds you: "Republish so the changes show up on the live website."
On the Leads received tab: the people who filled in that site's form, with name, phone and message. It has the Download spreadsheet button to take the list to Excel. If no one has arrived yet, "No contacts yet" shows up with the explanation that the contact appears the moment someone fills it in.
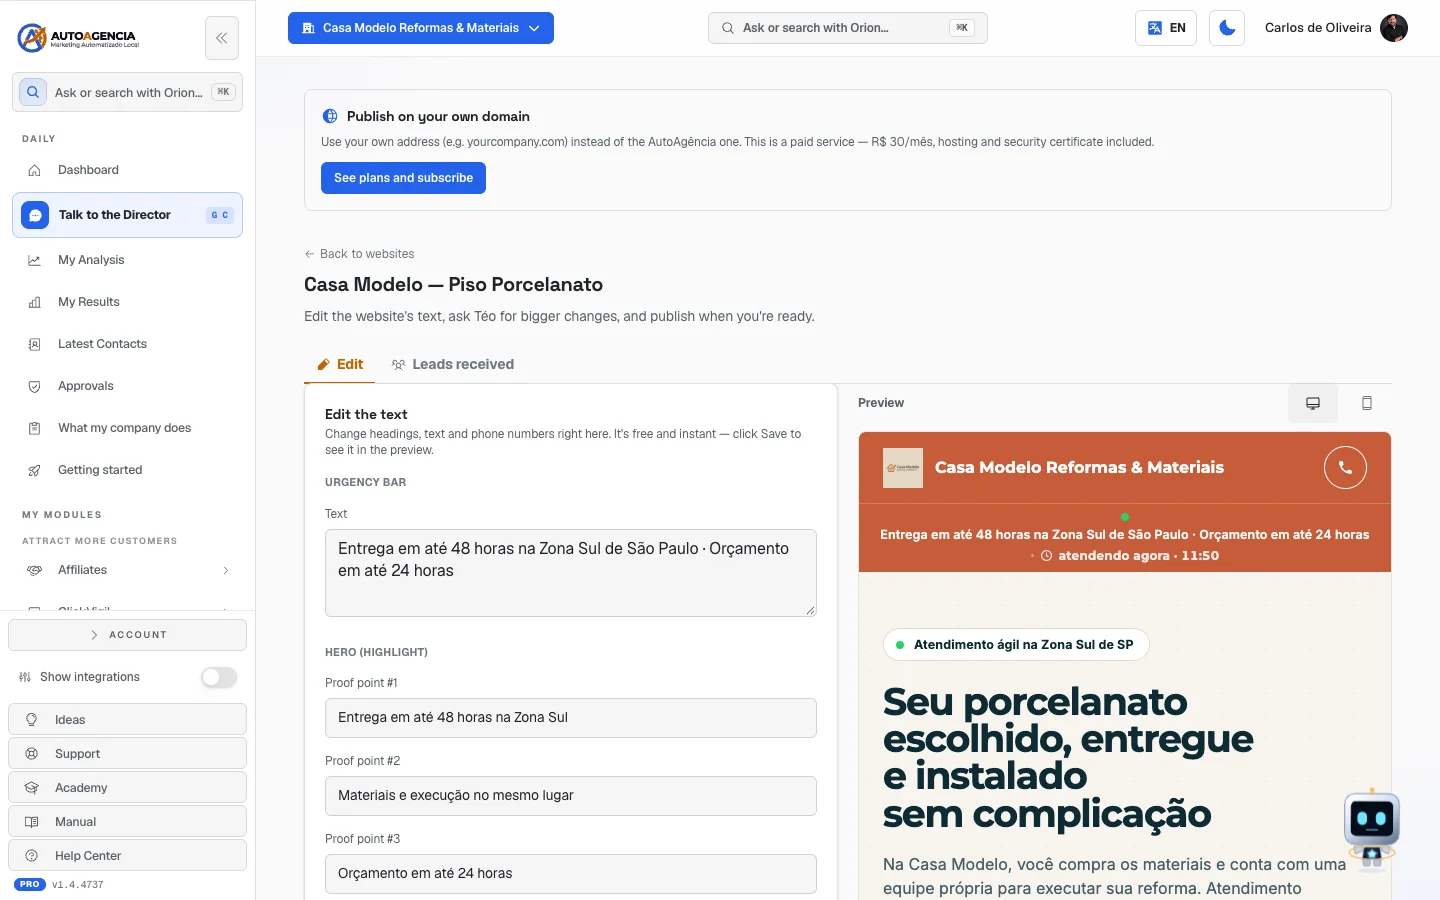 Edit screen of a one-page site: "Edit the text" on the left and the Preview on the right, with the desktop and mobile buttons
Landing Pages
/app/modulos/sites/paginas-captacao
- What you see here: the count of pages and a card for each one. Each card shows the title, the status tag, the page's address, how many visits, how many contacts and the conversion — the count of how many, out of every 100 who opened it, left their phone number. Below it shows which template the page uses.
- What you can do: create a new page, import a ready-made page from outside, edit, publish, take offline and delete.
- Empty state: "No pages yet", with the explanation "Create your first landing page from ready-made templates." and the Create first page button.
Step by step — creating a landing page:
- On the Landing Pages tab, click New page.
- Fill in the Title (e.g.: "Black Friday Offer — Marketing Course"). It's the name you see in here.
- Fill in the URL slug (e.g.:
oferta-bf-curso). It's the end of the link you'll send to people. It only accepts lowercase letters, numbers and hyphens — the system fixes what you type on its own. - Choose the Template (the ready-made model). See the table right below.
- Click Create page. It's born as a draft and opens straight in the editor.
The available templates:
| Template | Use it when |
|---|---|
| Simple offer | You want to sell just one thing, with a price, a list of benefits and a guarantee. |
| Lead capture | You only want the person's phone/email, in exchange for something (a quote, an e-book, a discount). |
| Thank-you page | It's the page the person sees after filling in the form. It's for saying what happens now. |
| Local service | You serve a region. It has a service area field, WhatsApp, hours and a list of services. |
| Info-product / course | You sell a course or digital material, with a promise, modules, price and guarantee. |
| Custom (blank canvas) | You build the page from scratch, putting blocks together. For people who already have some practice. |
The page editor (opens when you click Edit):
It has a Back button at the top and three blocks:
- Page content — the LP title and the fields of the template you chose. See the table of fields below.
- Lead capture — what happens when the person fills in the form.
- SEO — how the page shows up in Google searches.
At the top there are also two buttons: Generate with AI and Save changes.
Each field explained (Content block, depending on the template):
| Field | What to write |
|---|---|
| LP title | The page's name here inside the system. |
| Headline (H1) | The most prominent sentence, the first one the person reads. E.g.: "Drain unclogging in 40 minutes, without breaking anything". |
| Subheadline | The supporting sentence, right below the headline. |
| CTA button text | What's written on the button. E.g.: "I want a quote". |
| Price / Previous price (optional) | How much it costs and, if you like, the crossed-out earlier amount. |
| Benefits (one per line) | One per line. E.g.: "✓ 24h service". |
| Guarantee | E.g.: "90-day guarantee". |
| Form fields (comma-separated) | Which data you ask for. Use: name, email, phone, company, city. |
| What do you give in exchange for the contact? | E.g.: "Free quote on the spot". |
| Next steps | Only on the Thank-you page. What the person does now, one per line. |
| Service area | E.g.: "São Paulo - South Zone". |
| WhatsApp number | Numbers only, with the country code. E.g.: 5511999999999. |
| Hours | E.g.: "Mon-Fri 8am-6pm, Sat 8am-12pm". |
| Services (one per line) | One service per line. |
| Main promise / Modules (one per line) | Only on the course template. |
Each field explained (Lead capture block):
| Field | What to write |
|---|---|
| Add captured leads to this list | The list where the contacts will land. Choose one of your lists from the Lists tab. If you leave it on "— none —", the contacts don't go into any list. |
| Thank-you message (after conversion) | What shows on the screen after the person submits. E.g.: "Thanks! We'll get in touch on WhatsApp shortly." |
| Or redirect to URL (optional) | Instead of the message, sends the person to another address. Many people use a WhatsApp link here, so the conversation starts right away. |
Each field explained (SEO block):
| Field | What to write |
|---|---|
| Title on Google | What shows as the blue title in the Google search and on the browser tab. Up to 70 letters. |
| Description on Google | The two lines of text that show below the title in the search. Up to 160 letters. |
Step by step — letting the AI write the page for you:
- In the page editor, click Generate with AI.
- Describe your offer in the field, in as much detail as possible. The screen's own example is: "Online photography course for beginners. 12 video lessons. Price: $297 or 12x $29.90. 7-day guarantee."
- Click Generate. The AI fills in the fields on its own.
- Read everything before publishing. The screen itself warns: "⚠️ AI fills in the fields. Review before publishing — you are responsible for the final content."
- Click Save changes.
Step by step — publishing and taking offline:
- In the list of pages, find the card.
- If it's a draft, click Publish. The notice "Published" appears.
- To see how it looks, click Open — the page opens in a new tab.
- To take it offline without deleting it, click Unpublish. "Unpublished" appears and it goes back to being a draft.
- To delete it for good, click the red trash can and confirm the question "Delete 'page name'?".
Step by step — importing a ready-made page (HTML):
Use this when you already have a page made by someone else and just want to put it online here.
- On the Landing Pages tab, click Import ready-made HTML.
- Drag the .zip file onto the dotted area, or click Choose file. The zip needs to have the page and the images together, and can be up to 20MB.
- If the zip has more than one page, the system asks: "This zip has more than one page. Which one is the landing page?" Pick one and click Confirm and import.
- When it finishes, "Landing page imported!" appears, along with a preview of the page.
- Click Open the site and publish. It's still a draft — the address only responds once it's published.
- If you picked the wrong file, click Replace the file: the new one replaces the same site, without creating a duplicate address.
An imported page can't be edited field by field in here. If you ask Téo for a change, he answers: "This page came from a ready-made HTML you imported, so it can't be edited from here."
Lists
/app/modulos/sites/listas
This is your contact book by topic. Each list is a group of people — for example, "people who asked for a quote in October" or "2023 customers". They serve two uses: automatically receiving the contacts from your landing pages, and feeding the WhatsApp, email and prospecting sends.
- What you see here: the count of lists and a card for each one, with the name, the description, how many contacts it has and where they came from.
- What you can do: create a list, open it, import a spreadsheet of contacts and delete.
- Empty state: "No lists yet", with the explanation "Create your first list and upload contacts via CSV." and the tip "E.g. “2023 customers” to win back people who already bought from you."
Step by step — creating a list:
- On the Lists tab, click New list.
- Fill in the name. The screen's example is "Hot leads — October".
- If you like, fill in the Description (optional).
- Click Create list.
Step by step — importing contacts from a spreadsheet:
- Click Open list on the list's card.
- Click Import CSV. (CSV is the simple spreadsheet format — in Excel or Google Sheets you save it that way under "Save as" / "Download".)
- Choose the file on your computer.
- The Column mapping panel appears, with the notice "Confirm which field each CSV column maps to. Columns set to '—' will be ignored."
- For each column in your spreadsheet, choose the matching field: Name, Email, Phone, Company, Position, City, State or Notes. What you don't want to use, leave on "— ignore —".
- Check the preview — the screen shows how many rows it found and the first three.
- Click Import N contacts. At the end it shows how many went in and how many were ignored.
The other two buttons on the open list:
| Button | What it does |
|---|---|
| Sync Kommo | Sends the pending contacts of this list to Kommo, another company's CRM. It only shows up for a company that already had Kommo connected — Kommo is no longer offered as a CRM. |
| Add to email list | Moves the contacts that have an email into the company's email marketing list (which one, right below). |
Which email list the contacts land in. It isn't your choice and the screen doesn't ask: they go to the oldest email marketing list that isn't archived yet — the same one the newsletter and the campaigns use. To find out which one it is, open the Email Marketing module, Contacts tab: the lists show up there, from newest to oldest, and the ones that are no longer in use carry the Archived tag. The one that receives the contacts is the oldest without that tag — that is, the last one in the line that isn't archived yet. If your company doesn't have any list yet, the button does nothing and warns: "Email marketing has no provisioned list for this tenant yet." (tenant = your company's account) — create the first list in the Email Marketing module and click here again. The button shows up even for people who didn't subscribe to Email Marketing — in that case it will always give that same message, because there's no list to send to.
Two details that avoid scares: only the contacts that have an email and haven't been sent yet go — anyone who already went is skipped, so clicking twice doesn't duplicate anyone; and each click takes at most 200 contacts, so on a big list you click more than once until the message says "No contacts with pending email."
Empty state inside a list: "No contacts yet", with the tip "Import a CSV with columns like name, email, phone, company, city."
To delete a list: click the trash can icon on the card and confirm the question "Delete 'name' and all its contacts?". Careful: it deletes the contacts too.
How to use
/app/modulos/sites/como-usar
Every module has this tab at the end. It's the module's manual inside the system itself.
How to read the numbers
On each site's card (My Sites tab):
- pages — how many pages that site has (home, services, contact…).
- visits — how many times the site was opened.
- contacts — how many people filled in the site's form. It's the number that's worth money: each contact is someone who wanted to talk to you.
On each landing page's card:
- visits — how many times the page was opened. It's the same number the site card calls visits, in the My Sites tab.
- contacts — how many left their details.
- conversion — the percentage between the two. If 100 people opened it and 8 left their phone number, the conversion is 8%. This is the number that says whether the page is working: if you have lots of visits and low conversion, the problem is in the page (the title doesn't convince, the form asks for too much). If you have few visits, the problem is in the promotion.
On a list's card (Lists tab): the number of contacts and where they came from.
Frequently asked questions
What's the difference between a site and a landing page? The site tells your company's story and has several pages. The landing page has one page and one goal: getting the contact details of whoever arrived. If you're going to run ads, use a landing page. If someone asked "do you have a website?", send the site.
I created the site but no one finds it on the internet. Why? Check the tag on the card. If it says Draft, it only exists in here — click Edit and then Publish website.
I edited the texts and the live site is still the same. What did I do wrong? Nothing. Saving keeps the change in the draft; for it to reach the site that's on the internet, you need to click Republish.
Do I need my own domain (like mycompany.com) to publish? No. Every site is born with a free platform address. If you later want an address that's only yours, that's done in the Digital Presence module, in the Domain tab.
Where do the people who fill in the form end up? From a site: in that site's Leads received tab (click Edit on the card). From a landing page: in the list you chose in the Add captured leads to this list field. And, if the source is connected to the CRM, they also become a card in your pipeline.
The AI wrote the page. Can I publish it right away? You can, but read it first. You're responsible for what's written — the screen itself says so. Check the price, the phone number and the promises above all.
When something goes wrong
| Symptom | What to check | What to do |
|---|---|---|
| "We couldn't load your sites right now" | It's a connection failure of this screen, not of your sites. The message itself says: "Your sites are still live." | Click Try again. |
| "We couldn't load your pages right now" | Same thing, on the landing pages tab. | Click Try again. |
| The card says "Published, but no page is live" | The site was published without any page inside. Anyone who opens the address sees "page not found". | Ask Téo, in the chat, to create the first page. |
| Clicking Publish website opens "Hosting required" | That site needs hosting to go live. | Choose Monthly or Annual (2 months free) and click Subscribe & publish. Or click Not now and come back later. |
| "Insufficient balance" when publishing | The account is short on balance for that publication. | Top up the balance and publish again. |
| "This page is live. Take it down before deleting." | You tried to delete a published site. | On landing pages, use Unpublish first. On a site, talk to Téo. |
| "Could not delete right now. Please try again." | Momentary failure. | Try again in a moment. |
| Two drafts with the same name and I don't know which is the new one | The card shows "created on <date>", and the most recent one has the orange mark "most recent with this name". | Use the date to decide. The delete question also shows the date. |
| "The zip needs one .html file at its root." | The file you sent doesn't have the page loose inside the zip (it's in a folder, or has no .html). | Redo the zip with the .html file next to the images, with no folder around it. |
| "The zip is over 20MB." | File too big, almost always because of heavy photos. | Reduce the size of the images and build the zip again. |
| "Couldn't open that file as a zip." | The file isn't a real .zip. | Compress the folder again (right-click → Compress) and try once more. |
| "The zip has a file that can't be published: …" | Inside the zip there's a type of file that the platform doesn't put online for security reasons. | Take that file out of the zip and import again. |
| "This page came from a ready-made HTML you imported, so it can't be edited from here." | Imported pages can't be edited field by field. | Ask Téo to build the page on the platform and publish it in its place. |
| The landing page is published but the contacts don't show up in any list | The Add captured leads to this list field is on "— none —". | Open the page in Edit, choose a list and click Save changes. |
| "Empty or invalid CSV" when importing contacts | The file isn't a CSV spreadsheet, or has no rows. | Open the spreadsheet and save it again as CSV. |
| "No contacts yet" inside a list | The list really is empty. | Import a CSV, or connect that list to a landing page. |