

Franchise Marketing
Where it is: Home → Your apps → Franchises (at the top of the screen the module shows as Franchise Marketing)
Address: /app/modulos/marketing-franquias
What it's for
You have a brand and other people sell it for you. A store in each city, each with a different owner. The usual problem: everyone makes their ads their own way. One makes a nice design, another rushes it out on their phone. One spends well, another throws money away. And you, the brand owner, only find out when a customer complains.
This module solves two things. The first is seeing: each unit becomes its own account inside the platform, and you see them all side by side on a single scoreboard — how many leads each one received, how much it's spending on ads, how much it pays per lead and how many Google reviews it has. The second is standardizing: you build the artwork and the text once, send it to the whole network with one click, and each unit receives it with its own name, city and WhatsApp already filled in.
A day-to-day example: you own a pizzeria chain with nine units. There's a month until Valentine's Day. You build the campaign once — the artwork, the text, the guidance ("don't promise delivery in under 40 minutes") — and click Distribute. All nine units receive the material ready to go, each with its own phone number in the text. The Goiânia unit wants to write "2-for-1 draft beer" on the artwork; it does that itself, without calling you. And if you turned on the approval switch, nothing the units come up with on their own goes live without your OK.
The module also has a place to write the network's plan (brand, calendar, budget, governance) and an assistant, Viviane, who chats with you and writes the first version of that plan on her own.
Before you start: who is NETWORK and who is UNIT
Read this part before anything else. It's the point that confuses people the most.
This module is a single screen that behaves in two different ways, depending on who is looking at it. You don't choose it with a button: the system figures it out on its own, from the type of account you're in.
| Role | Who it is | How the account was born |
|---|---|---|
| Network (the system also calls it headquarters) | You, the brand owner / franchisor | It's your main account. It isn't anyone's child. |
| Unit (the system also calls it franchisee) | The owner of one store in your network | The account was created inside your network, on the Network tab |
What each one can do:
| Action | Network | Unit |
|---|---|---|
| See the scoreboard with all units | Yes | No |
| Create a unit and invite a franchisee | Yes | No |
| Write the national plan | Yes | Sees only its own, blank |
| Build and distribute a campaign | Yes | No |
| Receive the ready-made material | No | Yes |
| Personalize the artwork with the store's details | No | Yes |
| Set the network's rules and approve posts | Yes | No (just follows along) |
Important: if you're a franchisee, this module has to be subscribed on your own account for you to open the tabs. It doesn't come along with the franchisor's. Without it the screen warns you: "The Franchise Marketing module is not active on this tenant. Activate it in the Modules tab to use it." (tenant = your company's account).
Before you start
- The Franchise Marketing module has to be active on the account.
- The first time you open a newly subscribed module, an invitation from Viviane appears at the top of the screen: "Want to set up … by chatting with Viviane?". It's optional — the tabs already work — and each reply from her uses AI credits. Chatting helps Viviane get to know your company. To make the invitation go away, click Dismiss or, after chatting, Complete setup.
- You have to be the owner or manager of the account. Someone who joins as a read-only guest can't load the network scoreboard.
- For the network: have each franchisee's name and email at hand. If there are many, a spreadsheet (.csv or .xlsx) with one row per franchisee.
- For the network: creating a unit uses up your plan's company quota. If the quota runs out, the system warns you before creating.
- For the network: to build a campaign you need artwork ready — in the Studio library or the Brand library. The module doesn't draw the artwork from scratch in here.
- For the unit: to use the Personalize with my details button you need the Media Studio active on the unit's account. Without it you can still download and publish the network's material normally.
- For the unit: for the text to come out complete (with city, WhatsApp, address), your company's profile has to be filled in.
Getting started (for the NETWORK)
The first time, when the module has just been subscribed, the invitation Want to set up … by chatting with Viviane? appears at the top of the screen. It's optional and the tabs already work beneath it. If you want, click Chat with Viviane, answer, and click Complete setup; if you'd rather go straight on, click Dismiss.
- On Home, under Your apps, click Franchises. You land on the Network tab.
- The first time, the screen says "The network has no units yet". Click Create the first unit.
- Fill in Unit / franchisee name. Also fill in City/State (optional) — it's what makes the territory notice work and it goes into the campaign text.
- If you already have the franchisee's email, write it in Franchisee email (optional): the unit is created and the invitation goes out in the same click.
- Click Create unit. The message "Unit created" appears.
- Repeat for the others. If there are many, use Import franchisees and send the spreadsheet (see the step by step further below).
- Go to the Home tab and write the National plan — or ask Viviane in the chat beside it. Click Save plan.
- Go to the Campaigns tab. Decide whether the units' own posts go through your approval and write the network guidelines. Click Save.
- Still on Campaigns, build the first campaign and click Distribute.
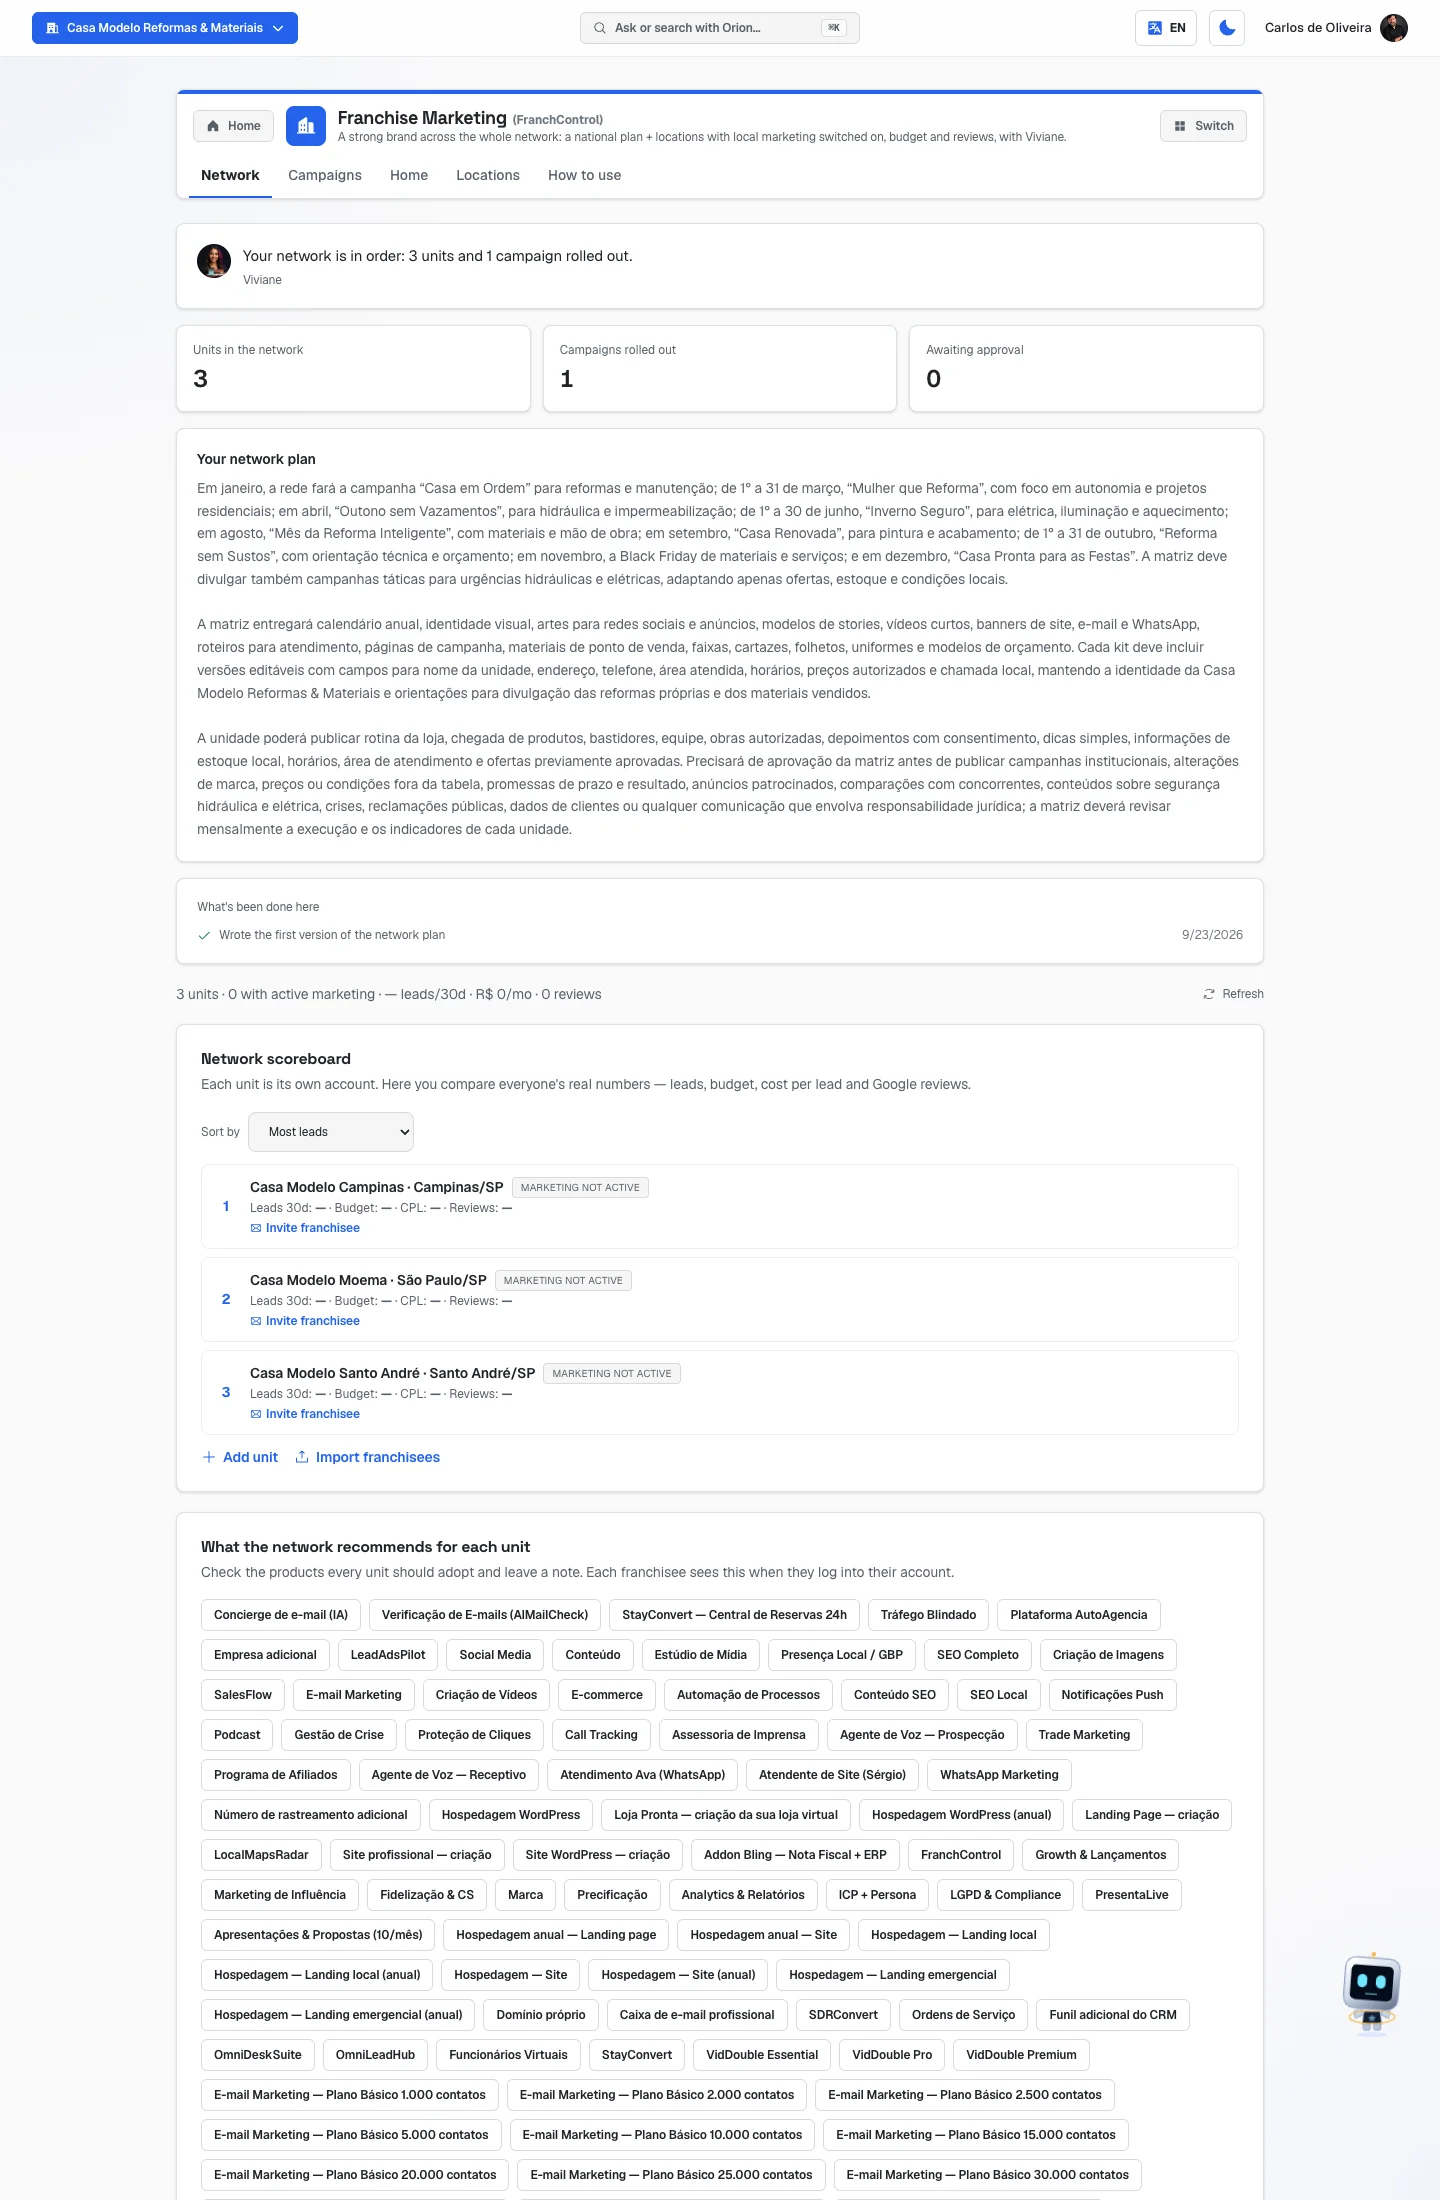 Network tab with the scoreboard, three or four units listed and the "Sort by" box
Getting started (for the UNIT / franchisee)
- You get an email invitation from your franchisor. Click the link and create your password.
- When you sign in, a welcome window appears: "You're part of the <name> network". It brings a list of three connections to make: Ads (Google/Meta/Microsoft), Google Business Profile and WhatsApp.
- Click each one and connect it. That's what makes your numbers show up on the network scoreboard. If you'd rather leave it for later, click See later — the window goes away, but a "Finish connecting your unit" box stays on your home screen until you're done.
- When you finish, click Done. Then the window no longer appears.
- Complete your company's profile (name, city, WhatsApp, address, website). That's where the system takes your details from to fill in the campaign text.
- On Home, go to Your apps → Franchises → Campaigns tab. That's where the material sent by headquarters appears.
Without a subscribed plan you can set up and connect your accounts. To generate content and use the assistants, you need to subscribe to a plan — regular pricing, the same as any customer.
The tabs, one by one
Network
/app/modulos/marketing-franquias/rede
This tab is for the network. It's where you create units, invite franchisees and compare everyone.
If you're a franchisee: this tab doesn't show your franchisor's network. It would show your network — and you don't have one. That's why it appears with the message "This tab is the scoreboard for whoever has units below them", explaining that your account is a unit and not headquarters, and reminding you that the material your franchisor sends arrives in the Campaigns tab. There's no create-unit button for you — creating a unit is for the network's account, and the screen no longer offers a button the system would refuse. You can ignore this whole tab.
- What you see here (from top to bottom):
- Viviane's panel: a note from her about the state of the network, with a shortcut button, and three numbers: Units in the network, Campaigns rolled out and Awaiting approval. If you've already written the plan, it shows below. And there's a list called "What's been done here" with Viviane's deliveries.
- The scoreboard sentence, one line summing it all up: how many units, how many with active marketing, leads in the last 30 days, budget per month, average CPL and reviews. On the right side, the Refresh button.
- A Territory notice (orange box), when there is one. It says, for example, "Goiânia has 2 units: Downtown, South" or 'Campaign "Summer" from unit Downtown is advertising in the city of South'. Right below the title comes the sentence: "Nothing was blocked — this is just a heads-up for you to decide if it makes sense."
- Network scoreboard: the list of units, one below the other, numbered by position.
- What the network recommends for each unit: the products you mark as recommended for the whole network.
- What you can do: create a unit, import franchisees in bulk, invite and re-invite a franchisee, reorder the scoreboard and save the network's recommendation.
What appears on each unit's row:
- The position (1, 2, 3…), the name · city and, when applicable, the gray marketing not active label.
- Leads 30d, Budget, CPL and Reviews.
- Below, the invitation status:
- Invite franchisee — nobody has been invited yet.
- Invite sent on <date> · pending, with the Resend and Copy link buttons.
- Franchisee active since <date> — they've already joined.
Step by step — creating a unit:
- On the Network tab, click Add unit (or Create the first unit, if the list is empty).
- Fill in Unit / franchisee name. It has to have at least 2 letters; otherwise "Enter the unit name" appears.
- Fill in City/State (optional).
- Fill in Franchisee email (optional).
- Click Create unit.
Each field explained (New unit window):
| Field | What to write |
|---|---|
| Unit / franchisee name | What you call that store. "Joe's Pizzeria — Downtown," "Aparecida Unit." That's the name shown on the scoreboard. |
| City/State (optional) | The city where the store is. It serves two notices: two units in the same city, and one unit's ad showing up in another unit's city. It also goes into the campaign text. |
| Franchisee email (optional) | The email of whoever will run the store. If you fill it in, the invitation goes out along with the creation. If you leave it blank, you can invite later with the Invite franchisee button. |
The window warns: "The unit is created as its own account in your network, with no plan — the franchisee subscribes to their own when they join." That is: it's a real account, separate from yours, with its own login. It doesn't inherit your plan.
Step by step — inviting a franchisee (a unit that already exists):
- On the unit's row, click Invite franchisee.
- The window says who the invitation goes to: "We'll send an email invite to the owner of '<unit name>'."
- Write the Franchisee email. Without a valid email, "Enter a valid email" appears.
- Click Send invite. "Invite sent" appears and, along with it, the Copy invite link option — useful for sending the link over WhatsApp too.
Resend and copy link — the important difference:
- Copy link only copies the link that already exists. It doesn't send any email.
- Resend cancels the previous invitation and creates a new one. The franchisee receives another email. Use it only when they say they didn't receive it.
- If the person already accepted, the system warns "This franchisee already accepted the invite".
Step by step — importing many franchisees at once:
- On the Network tab, click Import franchisees.
- Click Download spreadsheet template. You get a file with the right columns, whose names come in Portuguese:
nome, email, whatsapp, cidade, estado, unidade. When importing, the system also understands the English names (name, email, whatsapp, city, state, unit), so you can leave them as they are or translate them. - Fill in one row per franchisee and save as .csv or .xlsx.
- Go back and choose the file under Click to choose the file.
- The screen shows the review before doing anything: each row with Name, Email, Unit (you can correct the name right there) and Status — which can be Create & invite, Already exists or Invalid.
- Read the sentence below: "We'll create N unit(s) and send N invite(s)". It also warns how many rows will be ignored.
- Check the quota notice: "Your quota allows creating N more unit(s)". If the file asks for more than that, the box turns red and the confirm button doesn't turn on.
- Click Confirm import. The progress bar shows "X of Y processed".
- At the end comes the report: Created, Invited and Failed. If there were failures, use Download rejected (CSV) to see the reason row by row.
You can close that window and even reload the page: the import keeps running, and the Network tab shows a bar "Importing franchisees: X of Y processed" in the meantime.
Why a row becomes "Invalid": missing name, missing email, invalid email or duplicated in the file. Rows with an email you've already invited, or with the name of a unit that already exists, become Already exists and are skipped (they don't duplicate anything).
Step by step — recommending products to the units:
- On the Network tab, scroll down to What the network recommends for each unit.
- Click the names of the products every unit should subscribe to. Clicked = checked.
- Write a Note to the units (optional) — up to 500 letters.
- Click Save recommendation.
- Each franchisee now sees this when they enter their account, with the Recommended by the network label.
Campaigns
/app/modulos/marketing-franquias/campanhas
This is the tab that confuses people the most, because it's two different screens with the same name. The network sees one thing; the unit sees another. Read only the half that's yours.
If your account is neither a network nor a unit, the tab shows just a message: "Campaigns are available to a network's head office and its units" and "Create your first unit in the Network tab to start distributing material."
If you're the NETWORK (headquarters)
- What you see here:
- Network rules — the approval switch and the guidelines.
- Approvals — the queue of posts the units created on their own. When there's a request waiting, the title gets the number in parentheses: Approvals (N).
- Upcoming dates — buttons with the commercial dates in the next 90 days.
- Your campaigns — the list of what you've already built.
- What you can do: set the rules, approve or reject the units' posts, build a campaign, attach artwork, distribute it to the network and close the campaign.
Network rules:
The screen sums up the box like this: "Set what units can post on their own, and whether those posts need your approval before going live."
- The checkbox Units' own posts go through your approval. When it's on, everything a unit comes up with on its own lands in your queue before going live.
- Right below, the screen reminds you: "Material the head office distributes to the network publishes directly, without going through here." That is: what you sent doesn't need your own approval.
- The big guidelines field, with an example on the screen: "upbeat tone, always mention the unit's WhatsApp, never promise a discount above 10%…". The units read this on their screen.
- Click Save. "Network rules saved" appears.
Right below is the Approvals box. While no unit has sent you anything to look at, it shows "No approval requests", and the sentence below follows the rule that is saved: with approval on, "When a unit publishes something it created itself, the request lands here for your OK before going live."; with it off, "Approval is off: units publish directly today, without asking. Tick the option above and save if you want to approve first." Ticking the checkbox without clicking Save doesn't change that sentence — the rule only takes effect once saved.
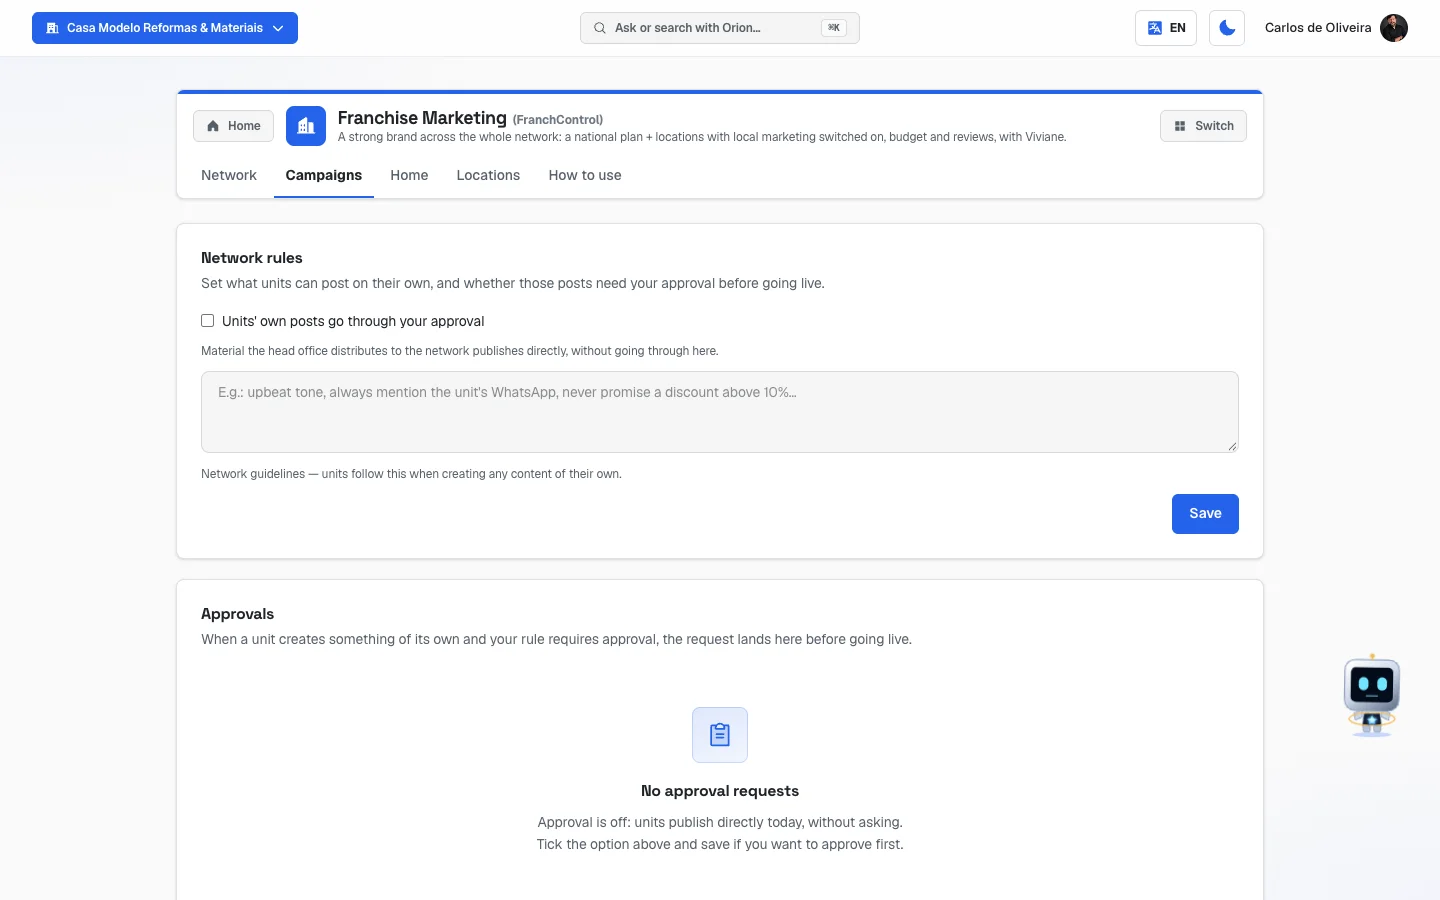 Campaigns tab seen by headquarters, with Network rules and Approvals, still with no requests
Step by step — approving or rejecting a unit's post:
- On the Campaigns tab, go to Approvals. The number in parentheses is how many are waiting (with no request waiting, no number appears).
- Each card shows the unit's name, which networks it'll go out on, the scheduled date, the images and the text.
- To release it, click Approve. The system publishes (or schedules) on the unit's account and confirms with "Published to the unit's account" or "Scheduled on the unit's account".
- To block it, click Reject, write the reason in the Explain what needs adjusting (required) field and click Confirm rejection. Without a reason the button doesn't turn on. The unit sees the reason on their screen.
- The cards already decided stay below, with the approved or rejected label.
If the post fails when it's time to go out, the card shows "The post didn't go out: <reason>. You can approve again."
Step by step — building and distributing a campaign:
- Under Upcoming dates, click a commercial date (it already fills in the campaign's name and date). Or click Campaign without a date.
- Fill in the Campaign name (at least 2 letters).
- Write the Guidance for the units (optional) — the note that appears on each unit's screen. E.g.: "only use in the two weeks before the holiday".
- Write the Caption — the text that goes along with the artwork. Don't type any unit's name or phone number. Use the field buttons right above: insert unit name, insert city, insert WhatsApp, insert phone, insert address, insert website. Each unit gets the text with its own details in their place.
- If the network is going to pay for the units' personalization, check The network covers personalization and write the Cap per unit. The screen explains: "Each unit can personalize up to this many pieces on the network's tab. Beyond that, the unit pays."
- Click Save. The campaign is born as a Draft — no unit sees it yet.
- On the campaign's card, click Add piece. Choose between Studio library and Brand library and click the image. Repeat for each piece.
- Click Distribute. (With no piece, that button is grayed out.)
- Choose All units or Choose units (and check which ones).
- If you want the post to go out on its own, check Schedule the post on the units' networks, choose the date and time and check the networks (Instagram, Facebook, TikTok, LinkedIn). The screen explains: "The post goes out on its own at the set time, on each unit's account that already has a network connected."
- Click Send. The system confirms how many units received it, how many had the post scheduled and which are "without a connected network".
Each field explained (New campaign window):
| Field | What to write |
|---|---|
| Campaign name | The internal name. "Valentine's Day 2026". |
| Guidance for the units (optional) | The brand owner's note to the franchisee. It appears above the material on the unit's screen. |
| Caption | The post's text. Use the field buttons for whatever changes from store to store. |
| The network covers personalization | When checked, the network pays for the units' personalized artwork up to the cap. |
| Cap per unit | How many artworks per unit the network pays for, in that campaign. From 0 to 50. |
What each campaign status means:
| Status | Means |
|---|---|
| Draft | You're building it. No unit sees it. |
| Sent | It was distributed. The chosen units already see the material. |
| Closed | You closed the campaign. It disappears from the units' screens and stays grayed out in your list, with no buttons. |
Each campaign's buttons: Add piece, Distribute and Close. Clicking the campaign's name opens editing. On each piece there are two icons: replace the artwork and remove the piece.
Replace the artwork, don't delete and add another. When you replace it, the units that had already personalized that piece get the notice "The head office updated this artwork after you personalized yours". If you delete and add another one, that notice doesn't happen.
Closing doesn't delete. That's on purpose: deleting would take with it the record of what each unit has already used.
If you're a UNIT (franchisee)
- What you see here:
- A bar at the top: Network material — sent by <network name>.
- Network rules, when your franchisor wrote guidelines or turned on approval.
- A section for each campaign headquarters sent to you.
- Your posts awaiting the network, when there are any.
- What you can do: copy the caption, download the artwork, publish and personalize the artwork with your store's details.
- You don't build campaigns here. Headquarters builds them. You receive them ready.
What appears in each campaign:
- The name and the date.
- Headquarters' guidance, when it wrote some.
- The caption already filled in with your details, with the Copy caption button.
- If some detail of yours was missing, a yellow notice: "Your caption came out without: city, WhatsApp. Complete your unit's profile." with the Complete your unit's details shortcut. The text doesn't break — the missing field simply stays out.
- A line saying how many more personalizations the network covers in that campaign, or that they've run out.
- The pieces, one by one, with the Download, Publish and Personalize with my details buttons.
Step by step — using the network's material:
- On the Campaigns tab, find the campaign.
- Click Copy caption.
- On the piece you want to use, click Download (saves the image to your device) or Publish (takes you straight to the Social Media module's publish screen, with the artwork and text already filled in).
Step by step — personalizing the artwork with your details:
- On the piece (it only works on images, not on video), click Personalize with my details.
- Write what you want written on the artwork, in the Text on the artwork field — up to 200 letters. The screen gives the example: "2-for-1 draft beer at the Goiânia location".
- Click Generate.
- Your version appears next to the original, with the Your version label. The original stays there.
Who pays for the personalization:
- If headquarters checked "the network covers it", the first personalizations come out of its pocket, up to the cap it chose.
- Past the cap, they come out of your credits. The screen warns you beforehand: "This campaign's network-covered personalizations are used up — the next ones come from your own credits."
- If the network covers it but headquarters' balance ran out right then, a Confirm who pays window opens saying: "The network covers this personalization, but headquarters' balance has run out. If you continue, the credits come out of YOUR unit's balance." You decide: Cancel or Continue (comes out of my balance).
- Nothing gets stuck silently. The system always asks before spending yours.
Network rules — what changes for you:
If your franchisor turned on approval, this notice appears: "This unit's own posts go through approval from <name> before going live. Material sent by the network publishes directly."
In plain English:
- Material that came from the network (the campaign's artwork, or your personalized version of it): publishes right away, without asking anyone.
- Something you created yourself (a photo of yours, a post of yours): goes to headquarters' queue. When you try to publish, the system answers: "Sent for headquarters approval — the network checks before publishing. You can follow its progress in the Campaigns tab."
- Under Your posts awaiting the network you follow each one: pending, approved (with the date) or rejected (with the Reason headquarters wrote).
Home
/app/modulos/marketing-franquias/inicio
- What you see here:
- At the top, the same network scoreboard sentence that appears on the Network tab, and the Refresh button.
- The National plan section, with five text fields.
- Beside it (or below, on a phone), the Talk to the specialist chat — that's Viviane.
- What you can do: write the network's plan and chat with Viviane.
If you're a franchisee: this plan is yours, not the franchisor's. Each account has its own, and yours starts empty. The plan your franchisor wrote doesn't appear here. What reaches you is the campaign material and the Network rules, in the Campaigns tab.
Each field explained (National plan):
| Field | What to write |
|---|---|
| Brand / national campaign | The brand's positioning and the year's umbrella campaign. Example on the screen: "Positioning and master campaign". |
| Seasonal calendar | The dates of the year the whole network follows together. Example on the screen: "Campaigns the whole network runs together". |
| Material kit | Which pieces headquarters delivers ready-made. Example on the screen: "Standardized pieces adaptable per unit". |
| Budget structure | How the money is split. Example on the screen: "Royalty %, national ad %, local marketing %". |
| Governance | The network's rules of coexistence. Example on the screen: "Ad fund, territory, anti-cannibalization rules". |
Step by step:
- On Home, under Your apps, click Franchises → Home tab.
- Write in the fields, or ask Viviane in the chat ("build the year's calendar for a pizzeria chain") and she writes it.
- Click Save plan. "Saved" appears.
The first time, Viviane writes a first version of the calendar, the material kit and the governance on her own. While she's writing, the panel says: "I'm preparing the first version of this for you — check back in a few minutes." If it doesn't work out, it says: "I couldn't prepare the first version. You can ask me to try again." — and you just ask in the chat.
Locations
/app/modulos/marketing-franquias/unidades
Careful with this tab. It looks like the Network tab, but it isn't. Here it's a notepad about your units. Nothing you write here creates an account, sends an invitation or enters the scoreboard.
| Network tab | Locations tab | |
|---|---|---|
| What it is | The units' real accounts | A table of your own notes |
| Creates an account for the franchisee? | Yes | No |
| Sends an invitation? | Yes | No |
| Where do the numbers come from? | From what each unit really did (ads, leads, Google) | From what you typed by hand |
That's why the two counters can disagree: the Network tab may say "1 unit" and the Locations tab say "0 units" in the same minute. It's not an error — they're two different lists. For anything that matters, use the Network tab.
- What you see here: at the top, a summary of what you typed ("N units · X active · Y audited · budget $Z/mo · W reviews"). Below, one row per noted unit.
- What you can do: write down, change and delete rows, and save.
- Empty state: "No units yet", with the hint to ask Viviane in the chat ("register the Downtown unit") or add a row to the table.
Step by step:
- On the Locations tab, click Add unit. A blank row appears.
- Fill in Unit name and City/State.
- Choose the status in the dropdown: to activate, onboarding, active or audited.
- Fill in Franchisee, Budget/mo and Google reviews.
- To delete a row, click the trash can on the right.
- Click Save. "Units saved" appears.
Each field explained:
| Field | What to write |
|---|---|
| Unit name | The store's name. |
| City/State | Where it is. |
| Franchisee | The name of that store's owner. |
| to activate / onboarding / active / audited | Where that unit's local marketing rollout stands. You decide what each stage means in your network. |
| Budget/mo | How much that unit invests per month, according to your note. |
| Google reviews | How many reviews it has, according to your note. |
How to use
/app/modulos/marketing-franquias/como-usar
Every module has this tab at the end. It's the module's short manual inside the system itself.
How to read the numbers
In Viviane's panel (Network tab):
- Units in the network — how many unit accounts really exist in your network. (It's not what you noted on the Locations tab.)
- Campaigns rolled out — how many campaigns you've already built.
- Awaiting approval — how many unit posts are stuck waiting for your click. When it's more than zero, the number stands out as an alert. Each one of those is reach the unit is losing today.
In the scoreboard sentence (Network and Home tabs):
It's a single line, more or less like this: "9 units · 6 with active marketing · 412 leads/30d · $18,400/mo · avg. CPL $45 · 1,203 reviews".
- units — how many accounts exist in the network.
- with active marketing — how many are really advertising already.
- leads/30d — how many leads the whole network received in the last 30 days.
- $.../mo — the sum of all units' ad budgets.
- avg. CPL — how much the network pays, on average, for each lead that arrives. It's the total budget divided by the leads. The lower, the better.
- reviews — the sum of all units' Google reviews.
On each unit's row:
- Leads 30d — how many people contacted that store in the last 30 days. Sometimes it comes with the note (ad conv.): it means that unit has no call/WhatsApp tracking, so the number came from its ad accounts' conversions.
- Budget — how much that unit is spending on ads per month.
- CPL — how much it pays for each lead. Budget divided by the leads.
- Reviews — how many reviews it has on Google.
The dash "—" is not zero. It means "that unit didn't connect that source, so the system doesn't know". A unit that hasn't connected ads shows "—" under budget, not "$0". That's on purpose: saying "0 leads" about someone who simply didn't connect anything would be a lie, and would send you to chase the wrong person.
Sort by (the box above the list):
| Option | Puts first |
|---|---|
| Most leads | Whoever brought the most people. |
| Lowest cost per lead | Whoever spends the least to bring in each lead. That's where the best operation is. |
| Highest budget | Whoever invests the most. |
| Most reviews | Whoever has the most reputation on Google. |
Units with no number for that criterion always go to the end of the list, whatever the sorting.
In the Locations tab summary: these are the numbers you typed. They serve as internal control, not as a scoreboard.
Frequently asked questions
Does creating a unit really create a separate account? Yes. The unit is born as its own account inside your network, with the franchisee's login, with no plan subscribed. They subscribe to their own plan when they join. You don't see their password and they don't see your account.
The Network tab and the Locations tab show different numbers. Which one is right? The Network. It counts the real accounts and pulls the numbers from what each unit really did. The Locations tab is just a table of your own notes, which nobody else fills in.
Two units in the same city — does the system block it? No. An orange Territory notice appears and nothing else. The screen itself says: "Nothing was blocked — this is just a heads-up for you to decide if it makes sense". Sometimes two units in the same city is exactly what you want.
If I turn on approval, do my own campaigns also go to the queue? No. The material you distribute to the network publishes directly. The queue is only for what a unit creates on its own.
I'm a franchisee. Why don't I see anything on the Network tab? Because that tab shows your network of units, and you don't have units below you. The screen itself explains it — "This tab is the scoreboard for whoever has units below them" — and doesn't offer a create-unit button, which belongs to the network's account. What your franchisor sends arrives in the Campaigns tab.
I'm a franchisee and the "Personalize with my details" button gives an error. Why? Personalizing the artwork is part of the Media Studio, and it has to be active on your account. The message is this: "Personalizing the artwork with your details is part of the Media Studio. You can download and publish the network's material normally, or subscribe to the Studio in the Modules tab." Downloading and publishing keep working.
How does my store's name get into the campaign caption? Headquarters writes the caption with "tags" in place of the details that change from store to store. When the material reaches you, the system swaps each tag for the detail in your profile. If one is missing, it drops out of the text and the sentence still makes sense — and you get a notice of what was missing.
I deleted a campaign's piece. Do the units lose the personalization they made? The artwork leaves the campaign, but the record that the unit already used a personalization keeps counting. That's on purpose, so the cap's tally isn't lost.
When something goes wrong
| Symptom | What to check | What to do |
|---|---|---|
| The invitation "Want to set up … by chatting with Viviane?" appears at the top of the screen | The module was just subscribed: it's the first-time invitation. It's optional and doesn't lock the tabs. | Click Chat with Viviane to set up by chatting, or Dismiss to remove the invitation. After chatting, Complete setup also removes it. |
| The screen says "The Franchise Marketing module is not active on this tenant." | Is the module subscribed on this account? If you're a franchisee, it doesn't come along with the franchisor's. | Activate the module in Modules. |
| In place of the scoreboard, "I couldn't read the network scoreboard right now." appears and, right below, the "I couldn't read the network scoreboard" box with the Try again button | Are you the owner or manager of this account? Is the module active? | The box explains: this does not mean the network is empty — the scoreboard only opens for the account's owner or manager. Ask the owner for that permission, or sign in with the right account. If you are the owner, click Try again: it may have been a network failure. (On the Home tab the same sentence appears, in full, in place of the scoreboard.) |
| I'm a franchisee and the Network tab has no units | It's not an error. That tab shows the units below your account, and you have none. The screen says so: "This tab is the scoreboard for whoever has units below them". | Ignore the Network tab. Your material is on the Campaigns tab. |
| I clicked Create unit and got "Couldn't create the unit" | Did your company quota run out? | Increase the quota in the Catalog and create it again. (From a unit's account the button doesn't even appear — it belongs to the network's account only.) |
| The invitation didn't arrive in the franchisee's email | Is the email right? Did they check spam? | Click Resend on the unit's row — that cancels the old invitation and sends another. Or use Copy link and send it over WhatsApp. |
| The franchisee clicked the old link and it doesn't work | You clicked Resend after sending the first one. | The valid link is always the one from the last invitation. Use Copy link and send that one. |
| A unit shows "—" on everything | Did it connect ads, Google and WhatsApp? Does it have the "marketing not active" label? | Talk to the franchisee: they need to finish the "Finish connecting your unit" checklist on their account. Without connecting, there's no number to show. |
| On import: "Your unit quota isn't enough for this import." | How many units would the file create? What's your quota? | Trim the file's rows or increase the quota in the Catalog, and import again. |
| On import: "Couldn't read that file. Check the format and try again." | Is the file .csv or .xlsx? Does it have a header row? | Download the spreadsheet template and copy your data into it. |
| On import: several Invalid rows | The reason appears on the row: missing name, missing email, invalid email or duplicated in the file. | Fix it in the spreadsheet and send it again. |
| The Distribute button is grayed out | Does the campaign have any piece? | Click Add piece and choose at least one artwork. With no piece, the system warns "Add at least one piece before sending to the units". |
| On distributing, "N without a connected network: …" appeared | Those units don't have Instagram/Facebook connected. | The material reached them all the same — only the automatic scheduling didn't happen. Ask the franchisee to connect their networks. |
| On scheduling: "Pick a date and time in the future to schedule the post" | The chosen date has passed. | Choose a date and time ahead of now. |
| The campaign disappeared from the unit's screen | Was it Closed? Was it distributed only to some units? | A unit only sees Sent campaigns addressed to it. Check under Distribute which units you checked. |
| The unit is warned: "The head office updated this artwork after you personalized yours." | Headquarters replaced the artwork. | The unit should personalize again from the new artwork, or use the original as it is. |
| On saving the campaign: "The caption uses a field I don't know how to fill in: …" | You typed a tag that doesn't exist. | Delete what you typed and use the insert unit name, insert city, etc. buttons. |
| I'm a franchisee and my post doesn't publish, it goes to approval | Your franchisor turned on the approval switch. | That's how it works. Follow it under Your posts awaiting the network. The material sent by the network keeps publishing directly. |
| In the approvals queue: "The post didn't go out: …" | The unit's social network disconnected, or there was an error at that moment. | Click Approve again. If it persists, ask the franchisee to reconnect their social network. |
| "This request is no longer pending" when approving | Someone (or you, in another tab) already decided that post. | Refresh the page. |
| One of the "Only the network's headquarters can…" notices | You're on a unit's account trying to do something that belongs to the network. | Switch to the network's account in the company selector at the top of the screen. |
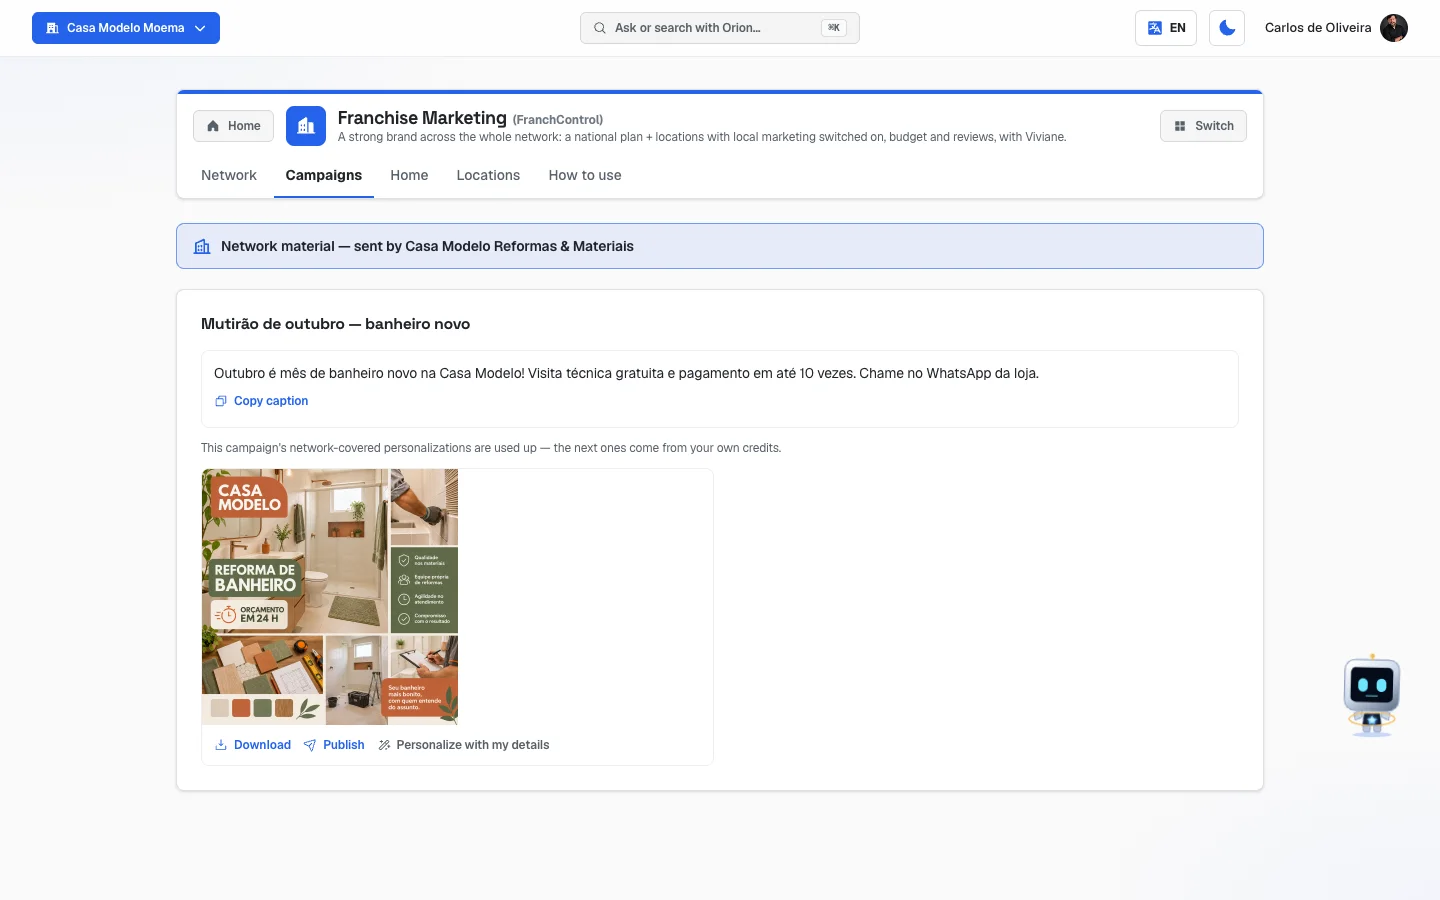 Campaigns tab seen by the unit, with the "Network material" bar and a campaign with its pieces