
Brand
Where it is: Home → Your apps → Brand
Address: /app/modulos/marca
First of all: what "visual identity" is
Identity is the set of things that make someone recognize your business without having to read its name. It has two parts:
- The part you see: your colors, your lettering (the font), your logo and the style of your photos. That's the visual identity.
- The part you hear: the way you talk. Whether you address the customer casually or formally, whether you joke around or stay serious, whether you explain everything or get straight to the point.
Think of the pizzeria on the corner that has a green sign, green napkins, a green motorbike and a drawing of a smiling pizza on everything. You recognize it from far away. Now think of its competitor, which changes color with every post and uses a different font on every flyer. That second one always looks smaller and more amateur than it is — and looking smaller costs money when it's time to charge.
What it's for
Every piece of artwork you publish is a decision: which color to use, which font to use, where to put the logo, which tone of voice to write in. If those decisions are made fresh on every post, every piece comes out a different way. Five posts, five faces. Nobody puts the five together in their head and thinks "that's so-and-so".
This module is the place where you make those decisions once and keep them saved. From then on, everything the platform creates for you — post images, videos, website pages, PDF proposals, presentations — already comes out with your colors, your font, your logo and your way of speaking. You stop explaining the same thing every time.
The one who chats with you here is Bruno, the assistant for this module. He's in the chat in the right-hand column of the Home tab and can write your entire identity for you from a conversation — including generating logo options.
Everyday example. You're a locksmith. Today, every piece of artwork you ask for comes out a different way: one with a blue background, another with a yellow one, one with a thin font nobody can read on a phone. You come in here once, register the two colors of your van, pick a bold font, write that your way of speaking is "direct, no fluff, talking about urgency" and save. The next time you ask for artwork, it already comes with your colors, your font and your tone. And your website page changes along with it, on its own.
Where your identity is used afterward
| Where | What changes |
|---|---|
| Images and videos created by the platform | The colors, the font, the photo style and the logo go into the creation instructions for each piece. |
| Texts written by the content agents | When you save the identity, the system records the "brand voice" (your How to speak, What to avoid, the 3 words and the personality) and the agents that write your texts start using that voice. |
| Your site and your lead-capture pages | The colors and fonts are copied to your company's profile, and the site reads that profile every time someone opens the page — so it changes right away. |
| PDF proposals, presentations and portals | They go out with your logo. |
| Brand manual in PDF | Generated from those same fields, at the moment you ask for it. |
Before you start
- The Brand module has to be active on your account. Without it, the screen shows the offer with the Activate in catalog button, and any attempt to save returns the notice "Brand identity is part of the Brand module. Activate it in the Modules tab to use it."
- The first time you open the module, an invitation from Bruno appears at the top of the screen: "Want to set up … by chatting with Bruno?". It's optional — the tabs already work — and each reply from him uses AI credits. Chatting helps Bruno get to know your company. To make the invitation go away, click Dismiss or, after chatting, Complete setup.
- Recommended beforehand: having your audience already defined in the Audience module (Ideal Customer Profile). Bruno himself warns you in the panel: "Audience comes before brand: without knowing who you speak to, any identity is a guess." It isn't mandatory, but the result comes out much better.
- Helps a lot: having photos of your own, an old logo, a flyer, a photo of the storefront, a photo of the fleet — anything that already shows your business's face. You upload it in the Library tab and Bruno uses it as a starting point.
- No connection, password or third-party account is needed.
- If you're a franchise location: the brand belongs to the network. You see everything in read-only mode, with the notice "Network brand — set by <name>", and you edit only your location's details (name, city, phone, WhatsApp, email and address).
First steps
- On Home, under Your apps, click Brand. You land on the Home tab.
- If the invitation to set up by chatting with Bruno appears, you can click Chat with Bruno, answer, and then click Complete setup — or click Dismiss and go straight on, because it's optional.
- Go to the Library tab and upload what you already have: a photo of the storefront, the product, the team, the old logo. Choose the type under Upload as: before clicking Upload files.
- Go back to the Home tab and chat with Bruno in the chat on the right. Tell him what you do, for whom, and what sets you apart. He fills in the fields.
- Check the filled-in fields and adjust whatever looks off. Nobody knows your business better than you.
- Register the Brand colors (explained further down) and the fonts.
- Click Save identity.
- Ask Bruno, in the chat: "generate a few logo options for me". The options show up in the Logos tab.
- Click Download manual (PDF) and keep that file. It's what you send to the print shop, the supplier or whoever is going to make anything for you.
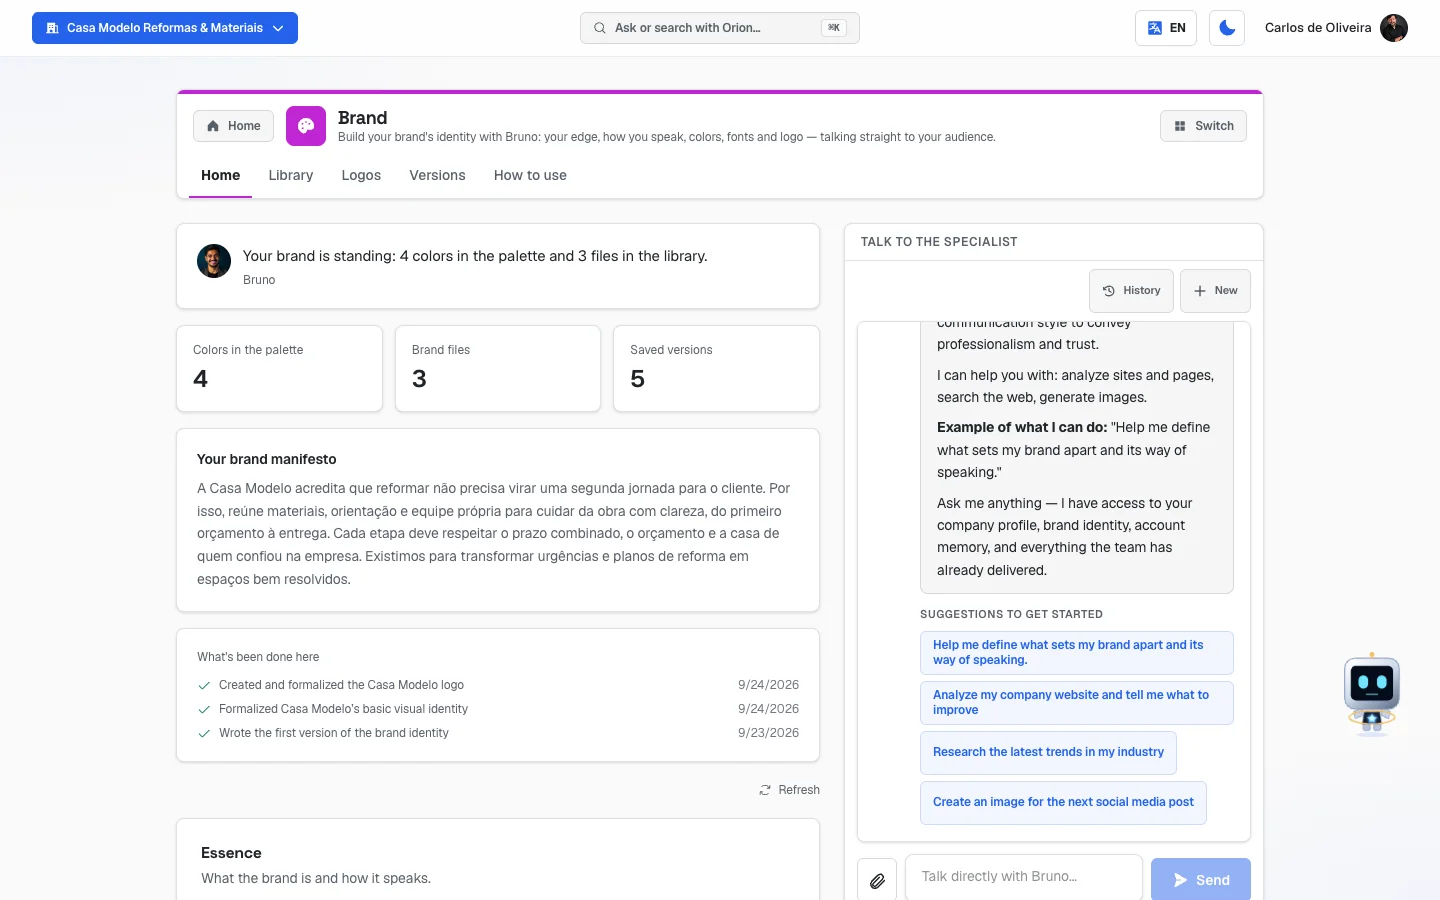 Home tab of Brand, showing the form on the left and the chat with Bruno in the right-hand column
The tabs, one by one
The tabs are in the app bar, at the top of the screen, in this order: Home, Library, Logos, Versions and How to use. The chat with Bruno only appears on the Home tab.
Home
/app/modulos/marca/inicio
This is the main screen: the identity form, the chat with Bruno and the button for the manual in PDF.
- What you see here:
- At the top, Bruno's panel: a note from him with a button for the next step (for example, Upload references), three numbers — Colors in the palette, Brand files and Saved versions — and, when it exists, a "Your brand manifesto" panel with the text you wrote.
- The Essence section — "What the brand is and how it speaks."
- The section The brand's look — "Colors, fonts and image style."
- The Brand manual section, with the Download manual (PDF) button.
- A Refresh link in the right corner.
- What you can do: write the identity (or let Bruno write it), register colors and fonts, save and download the manual.
Each field explained (Essence section):
| Field | What to write |
|---|---|
| Your edge | Why buy from you and not from a competitor. One sentence, the way you'd say it to a customer. "Quality and good service" doesn't count — everybody says that. "I get there within 40 minutes, 24 hours, and the quote is fixed before I start" does. |
| 3 words that define the brand | Exactly that: three words. E.g.: "Artisanal, Welcoming, Modern". Those words guide the tone of everything written for you. |
| What the brand believes | 3 to 5 sentences about why your business exists. Write as if you were explaining it to a new employee on their first day. This text appears in the panel and in the PDF manual. |
| Main personality | A type of person. E.g.: "Creator", "Caregiver", "Hero", "Sage". It's a shortcut: saying the brand is a "Caregiver" already explains a lot about how it speaks. Both fields are free text — write whatever you want. But see the list of twelve just below. |
| Secondary personality | A second trait, which tempers the first. There are only two fields: one main and one secondary, and that's on purpose. |
| How to speak | What to always do in the texts. E.g.: "short sentences, human warmth, speak casually". |
| What to avoid | What to never do. E.g.: "jargon, excessive formality, promising results". |
The twelve personalities Bruno works with. The screen doesn't show this list — the field is a blank text box, with just one example beside it ("e.g.: Creator."). But the guidance Bruno receives is to pick a main one and a secondary one from these twelve, so that's what he'll propose when you ask for the personality in the chat:
Hero · Sage · Creator · Caregiver · Rebel · Explorer · Lover · Jester · Innocent · Ruler · Magician · Everyman
You don't have to use one of them — the field accepts any word. The advantage of using them is that Bruno already knows what each one means, so everything he writes afterward comes out consistent. If none fits, write it in your own words ("firm and direct, no frills").
Each field explained (The brand's look section):
| Field | What to write |
|---|---|
| Brand colors | Up to 6 colors. Each has a Name and a code. See the step by step below. |
| Headings font | The name of the font used in headings. E.g.: "Poppins Bold". |
| Body font | The name of the font used in paragraphs. E.g.: "Inter Regular". |
| Photo style | Three visual adjectives. E.g.: "warm, natural, close". It's what tells the platform whether your photos should look cozy or cold and technical. There's no list to choose from: it's free text, and the screen itself only suggests "3 visual adjectives". What you write here goes in, word for word, into the request for every piece of artwork the platform generates for you — along with the main personality, what the brand doesn't do and your colors. That's why it's worth taking care: "warm, natural, close" and "cold, technical, minimalist" produce very different images. |
Step by step — register a color:
- In the section The brand's look, click Add color.
- In the first field, write the name: Primary, Secondary or Accent.
- In the second field, write the color code — the code that starts with
#and has 6 letters/numbers, like#1D4ED8. The little square on the left fills with the color as soon as the code is right; if it's wrong, the field's border turns red. - Repeat for the other colors (6 at most).
- Click Save identity.
Where do I find that code? Whoever made your logo has it. If you have nobody to ask, ask Bruno in the chat: send a photo of your logo or your storefront and ask for the color codes. To remove a color, click the trash can icon next to it.
🟥 The color's name really matters. The system looks for the words primary, secondary and accent in the name you wrote to decide which color becomes your site's main color. If you write "Van blue" and "Yellow", it uses the order in which you registered them. Writing Primary, Secondary and Accent is the way to not leave this to chance.
🟥 A color with a wrong code is simply discarded on save — it disappears from the list with no notice at all. If a color vanished after saving, that's why.
Step by step — save the identity:
- Fill in whatever you want.
- Click Save identity.
- If something changed, "Identity saved — new version in history" appears. If nothing changed, "Identity saved — the content team now uses this voice" appears.
🟥 On this screen, saving replaces everything. If you erase a field and click save, the field stays erased for real. It's on purpose: here you're looking at the fields, so clearing one is your choice. (In the chat it's different: when Bruno records only part, the rest is preserved.)
Step by step — download the brand manual in PDF:
- In the Brand manual section, click Download manual (PDF). The button turns into "Generating…".
- The file opens in a new browser tab. Download it and keep it.
The manual comes out with your company's name and contains, in this order: What the brand believes, Your edge, 3 words that define the brand, Brand personality, Way of speaking (with How to speak and What to avoid), Brand colors (in a table with name and code), Fonts and Photo style. A section you didn't fill in doesn't appear — the manual never makes up content. If the identity is entirely empty, the PDF comes out with a note telling you to fill in the Home tab.
The manual comes out in the language the panel is in at the moment you click.
If you're a franchise location: all the fields above show up in grey, impossible to edit, and an extra section appears called Your location details, with Location name, City, Phone, WhatsApp, Contact email and Address — those are yours and you edit them normally, saving with Save location details. They're what appears in your ads and materials.
Library
/app/modulos/marca/biblioteca
- What you see here: the Brand library section — "Your own photos, illustrations, patterns and videos. The creative team uses these files as reference and starting material for creatives." — with an upload bar on top and the thumbnails of the files below.
- What you can do: upload your own files, name them, change the type and delete them.
- Empty state: "No files yet" appears with the hint to upload the first ones.
Step by step — upload files:
- In the Library tab, choose the type in the Upload as: box. The options are Photo, Illustration, Pattern, Video, Logo variant and Background.
- Click Upload files. The button turns into "Uploading…".
- Choose one or several files from your computer or phone at once.
- When it finishes, you'll see, for example, "3 files uploaded".
What each type means:
| Type | What to put here |
|---|---|
| Photo | Real photos: storefront, team, product, service being done, a happy customer. |
| Illustration | Drawings, icons, mascot. |
| Pattern | Prints and textures that repeat (that checkered background, your brand's stripe). |
| Video | Short videos of your own. |
| Logo variant | Alternate versions of your logo: just the symbol, the white version for dark backgrounds, the horizontal version. |
| Background | Images to use behind text. |
Accepted formats: PNG, JPG, WebP, SVG, GIF, MP4, WebM and MOV.
Maximum size per file: 15 MB for images and 60 MB for videos (video has a higher limit because half a minute recorded on a phone easily goes past 15 MB). These numbers aren't written on the screen: anyone who goes over the limit gets the notice right away, with the file's name — "<file name>: too large (>15MB)" or "(>60MB)". A file outside the accepted formats gets "<file name>: unsupported format".
When you upload several at once, each one is judged on its own. If three pass and one is too big, the screen shows "3 files uploaded" and, right after, the notice about what was left out. You don't need to resend the ones that went through. The screen only shows the notice for the first rejected file — if you sent several big ones at once, check the grid to see which actually made it in. And when none passes, the green message still shows up, saying "0 files uploaded".
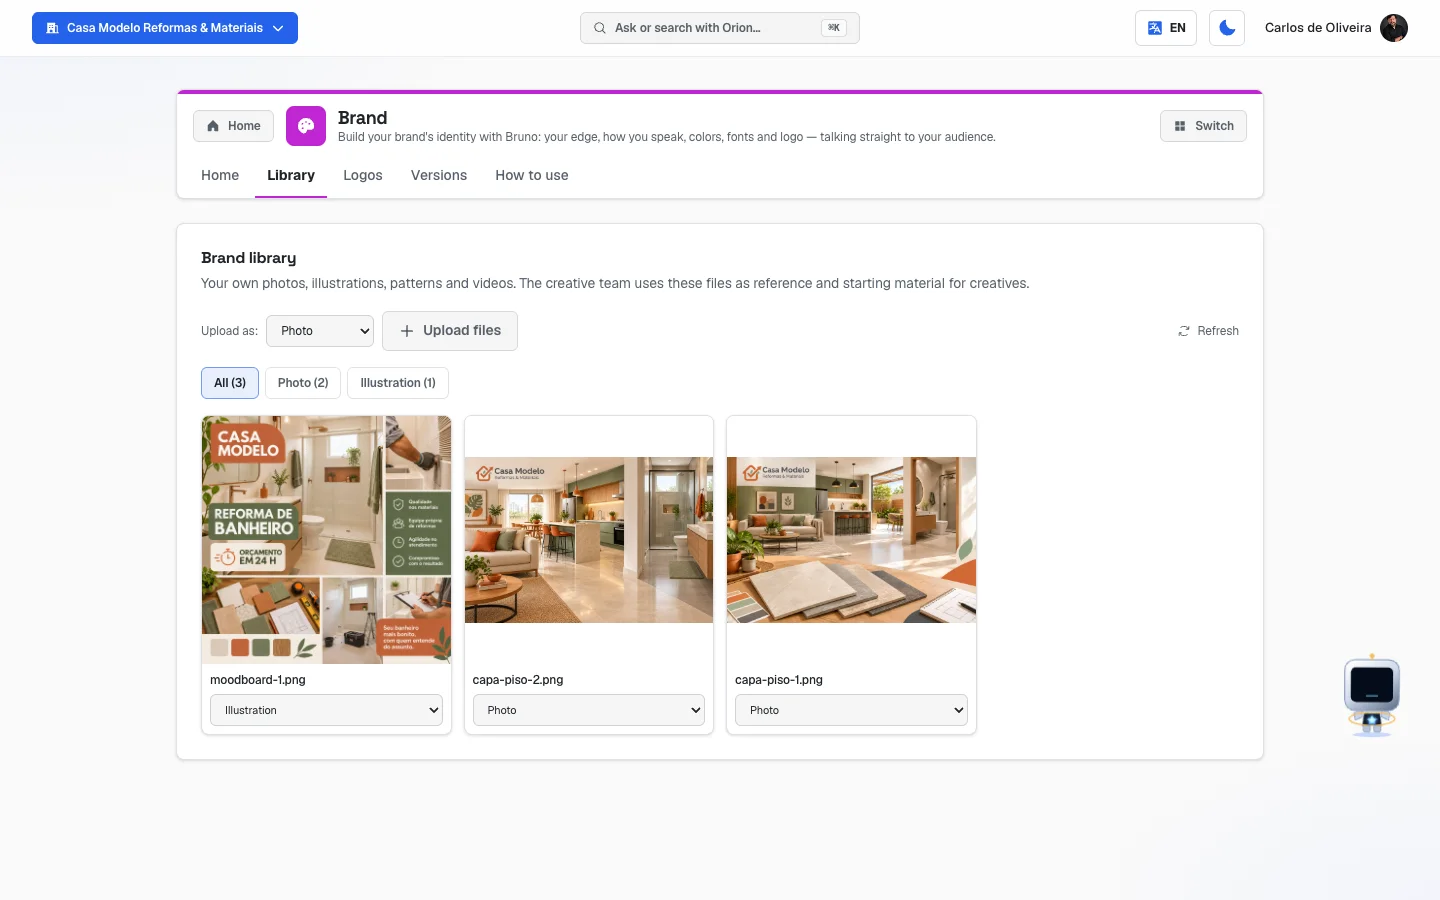 Library tab with the "Upload as:" bar at the top, the filters by type and the grid of thumbnails
On each file's card you can:
- Hover over it and click the download icon to download it.
- Click the file's name (or the pencil icon) to rename it. Press Enter to save, or Esc to give up.
- Change the type in the little selection box under the thumbnail.
- Click the trash can to delete. The question "Delete this library item?" appears — confirm.
The filters: when there are files, buttons appear at the top — All (N) and one button per type, each with the count. Click to see only that type.
Why this matters: the library is where the platform gets real material from your business. Without it, all your artwork comes out with a generic stock photo — the same photo your competitor is also using.
Logos
/app/modulos/marca/logos
- What you see here: the Generated options section — "The one marked Main is the one used on your site and artwork. Download the one you prefer; fine artwork can be refined in the Images module." — with the logo options in squares. The first one in the row carries the Main tag in the top corner.
- What you can do: choose which one is the main, download and delete. There's no upload button on this tab.
- Empty state: "No logos yet", with the hint "Finish the identity in the Home tab and ask Bruno to generate options".
How logos get here: you ask Bruno in the chat on the Home tab (for example: "generate 4 logo options for me"). He draws them and saves them here. Up to 24 options fit.
Step by step — download a logo:
- In the Logos tab, hover over the option you want (on a phone, tap it).
- Click Download. It opens in a new tab.
Step by step — choose which logo is the main one:
- In the Logos tab, hover over the option you want (on a phone, tap it).
- Click Use as main. "Main logo changed" appears.
- It jumps to the first place in the row and gets the Main tag. No other option is deleted — the order changes, that's all.
That choice is the one that applies to the rest of the platform. The logo marked as Main is the one that goes into your company profile's Main logo (horizontal) and, from there, to your site, to the artwork, to the PDFs and to the presentations. The button does not appear on the option that's already the main one, and does not appear for a franchise location (in a network, the head office defines the logo).
One exception, and it's in your favor: the profile's Square logo / icon is only replaced if it's empty. If you uploaded your square one by hand in My company → Brand Kit, it stays — changing the main one here doesn't override it.
To delete an option: hover and click the trash can icon. "Logo removed" appears. There's no confirmation — it vanishes right away.
Versions
/app/modulos/marca/versoes
- What you see here: the Brand history section — "Each time the identity changes, a version is saved here. Restoring a version makes it the current identity — nothing is lost, it's just a new point in history." — and the list of versions, from newest to oldest.
- What you can do: see the history and go back to an earlier version.
- Empty state: "No versions yet", with the hint to save the identity in the Home tab to start the history.
What each row shows:
- The version number, in the circle on the left.
- The version name, put together automatically from what was filled in at that moment (for example: "UVP, pillars, manifesto, tone of voice, palette (3), typography"). Two terms in that name are shorthand: UVP is the Your edge field and mood is the Photo style field, both on the Home tab.
- A tag saying where the change came from:
| Tag | Means |
|---|---|
| Edited | You saved from the Home tab's screen. |
| Bruno | The assistant recorded the change from a conversation. |
| Restored | The version was born from a Restore button. |
- The Current tag, on the first one in the list — it's the identity in effect right now.
- The date and time (in Brasília time).
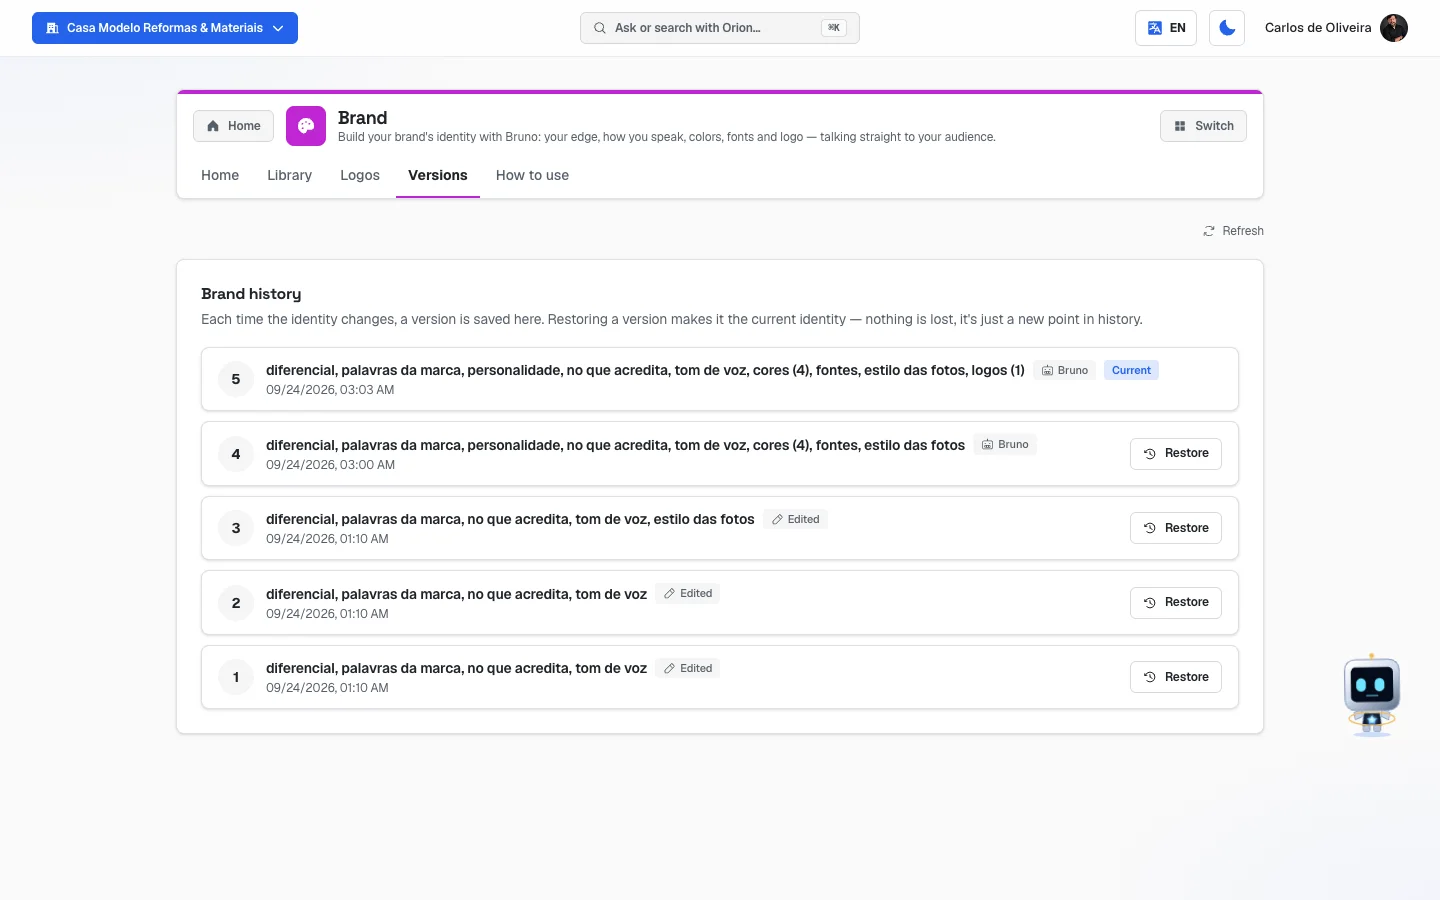 Versions tab with the Brand history and three versions in the list, from newest (3) to oldest (1), all with the Edited tag; the first marked "Current" and the "Restore" button on the other two
Step by step — go back to an earlier version:
- In the Versions tab, find the version you want.
- Click Restore, in the right corner of the row. The button turns into "Restoring…".
- "Version #N restored — it's now the current identity" appears.
Restoring doesn't delete anything. It copies that version's content over the current identity and creates one more version at the end of the list, marked as Restored. You can go back as many times as you like.
A new version only goes in when something actually changed. Clicking Save identity without touching anything doesn't fill up the list.
If you're a franchise location: this tab shows only the notice "The brand history is managed by <name>."
How to use
/app/modulos/marca/como-usar
Every module has this tab at the end. It's the module's manual inside the system itself.
And when I change the logo? What happens to what's already been created?
This is the question everybody asks, and the answer has two parts.
First: where the logo is changed.
| Situation | Where it happens |
|---|---|
| You have a finished logo, made by a designer, and want to upload it | Not here. Go in the full menu to Account → My company (/app/profile), in the Brand Kit section, and use Upload / Replace on Main logo (horizontal) and Square logo / icon. It accepts PNG, SVG, WebP and JPG up to 5 MB. |
| You want Bruno to draw options for you | Ask in the chat on the Home tab. The options show up in the Logos tab. |
| You just want to keep alternate versions of your logo as a reference | Library tab, choosing the Logo variant type. That's reference material and does not become the official logo. |
Second: what changes after the swap.
- What's already been created does NOT change. Artwork, a video, a PDF proposal or a presentation that the platform already generated are finished files, kept as they are. The old logo stays in them forever. If you want the piece with the new logo, you have to generate the piece again.
- What's still to be created already comes out with the new logo. Every image, video, PDF and presentation from now on uses the logo that's in effect at the moment it's made.
- Your site and your lead-capture pages change right away. They don't keep a copy of the logo: they read the profile every time someone opens the page. Changed here, changed there.
- Heads up: when Bruno generates logos and they're saved in the Logos tab, the one marked as Main (by default, the first in the row) takes effect as your logo, replacing what was in My company → Brand Kit. If you had already uploaded your real logo there, and don't want to lose track of it, download a copy first before asking Bruno for logos. If Bruno got it right with another option, use Use as main on the right option — there's no need to delete the others.
- Heads up 2: if you delete all the options in the Logos tab, the site does not end up with no logo — it keeps showing the last one that was in effect. To truly replace it, upload the new one in My company → Brand Kit.
The same reasoning applies to colors and fonts: a finished piece isn't redone on its own; the site and pages change right away; a new piece comes out in the new standard.
How to read the numbers
In Bruno's panel (top of the Home tab):
- Colors in the palette — how many colors you've registered (from 0 to 6). Two or three already do the job: a main one, a supporting one and an accent one.
- Brand files — how many files you have in the Library tab. The more there are, the fewer generic photos in your artwork.
- Saved versions — how many times the identity has already changed. It's just so you know there's somewhere to go back to.
Bruno's note changes according to your state, always with the most urgent thing first:
| If… | He says | And the button leads to |
|---|---|---|
| you have no audience defined | "Audience comes before brand: without knowing who you speak to, any identity is a guess." | Find the audience → Audience module |
| the identity is blank | "I haven't written your brand identity yet — send me your logo, photos and references in the library and I'll build from them." | Upload references → Library tab |
| the identity is written but the library is empty | "Your identity is written, but there's no file in the library to use in your materials." | Upload references → Library tab |
| everything is in order | "Your brand is standing: N colors in the palette and M files in the library." | — |
In the "Your brand manifesto" panel the text of the What the brand believes field appears. If that field is empty, the panel shows Your edge instead. If both are empty, the panel doesn't appear.
Frequently asked questions
I don't have any logo. Can I use the module? Yes, and that's exactly what it's for. Start with the words (the edge, the 3 words, the way of speaking), then register two colors and ask Bruno to generate logo options in the chat.
Can I go back to an earlier version of the brand? Yes, in the Versions tab. Restoring doesn't delete anything: it creates a new point in the history with the content of the chosen version.
If I change my way of speaking here, do the old texts change? No. A text that's already written is written. The change applies to what gets written from now on.
What's the difference between the Logos tab and the Library tab? The Logos tab holds the logo options Bruno drew for you — the one marked Main becomes your official logo. The Library tab holds your reference material: photos, videos, prints and alternate versions of the logo, used as raw material in the artwork. You upload files in the Library; in the Logos tab there's no upload button.
Do I have to fill in everything? No. The PDF manual omits the empty sections and the platform uses whatever there is. But two things make the biggest difference and are worth the effort: at least one color and one logo — without those two, your pieces come out with the system's default look, with no company look at all.
What language does the brand manual come out in? In the language the panel is in at the moment you click Download manual (PDF).
Can my franchise location change the network's identity? No. The location sees everything in read-only mode and can download the logos, but not edit them. The details that belong only to the location — name, city, phone, WhatsApp, email and address — stay editable in the Home tab itself.
When something goes wrong
| Symptom | What to check | What to do |
|---|---|---|
| The screen shows the module's offer instead of the tabs | The Brand module isn't active on your account. | Click Activate in catalog. |
| "Brand identity is part of the Brand module. Activate it in the Modules tab to use it." appears | Same thing: the module isn't subscribed. | Activate the Brand module. |
| The screen says "We couldn't verify your access right now." | It was a connection failure, not a lack of subscription. | Click Try again. |
| The invitation "Want to set up … by chatting with Bruno?" shows up at the top | It's the first-time invitation: it's optional and doesn't lock the tabs. | Click Chat with Bruno to set up by chatting, or Dismiss to remove the invitation. After chatting, Complete setup also removes it. |
| The panel says "I'm preparing the first version of this for you — check back in a few minutes." | Bruno is writing the first version of the identity on his own. | Wait a few minutes and reload the page. |
| The panel says "I couldn't prepare the first version. You can ask me to try again." | The automatic writing failed. | Ask him in the chat to try again, or fill it in by hand. |
| I registered a color, saved and it vanished | The color code was wrong. It has to start with # and have 3 or 6 characters (#1D4ED8, #fff). | Register it again with the right code. The field's border turns red when the code is invalid. |
| "Couldn't save" | Momentary failure when saving. | Click Save identity again. Don't reload the page before — what you typed is only on the screen. |
| "Couldn't generate the manual" | Failure when building the PDF. | Try again in a few minutes. |
| The PDF manual came out almost empty | The fields on the Home tab are blank. | Fill in the fields and generate it again. An empty section doesn't appear in the manual, on purpose. |
| "Upload failed" in the Library | It was a connection or server failure, not the file's — when the problem is the file, the notice gives its name and the reason. | Try again. |
| "<file>: too large (>15MB)" or "(>60MB)" appears in the Library | It went over the limit: 15 MB per image, 60 MB per video. | Shrink the file (on a phone, choose a lower quality when exporting) and upload again. The other files in the same upload already went in. |
| "<file>: unsupported format" appears in the Library | The file's type isn't on the accepted list. | Use PNG, JPG, WebP, SVG, GIF, MP4, WebM or MOV. |
| "Session expired — reload the page" in the Library | You left the screen open for too long. | Reload the page (F5) and upload again. |
| I uploaded several files and only some went in | One of the files was rejected. A yellow notice appears with the reason for the first one. | Resend only what's missing, checking format and size. |
| The Logos tab is empty | Nobody has generated logos yet. There's no upload button on that tab. | Ask Bruno in the chat on the Home tab, or upload your logo in My company → Brand Kit. |
| "Couldn't restore" in the Versions tab | Momentary failure. | Click Restore again. |
| I saved and no new version appeared in the history | Nothing really changed since the last save. | That's expected — the history only keeps real changes. |
| I changed the colors and the artwork I already had is still in the old color | A piece that's already created is a finished file and isn't redone on its own. | Generate the piece again. The site and the lead-capture pages, those do already show the new color. |
| Everything shows in grey with the notice "Network brand — set by …" | Your account is a franchise location. | That's expected. Edit only the Your location details section. |