

Traffic Management
Where it is: Home → Your apps → Traffic (at the top of the screen the module shows up as Traffic Management)
Address: /app/modulos/gestao-trafego
In Your apps the module appears under the short name Traffic. The one who looks after it is Ricardo, the traffic manager on the AI team — he's the name you see signing the notes on the screen, and he's who you talk to in the chat.
If you type just /app/modulos/gestao-trafego, the system takes you straight to the first tab,
Overview.
What it's for
This module is your ad manager. It looks after the advertising you pay for on Google (someone searches "drain cleaning near me" and sees your ad at the top), on Meta (the ads that show up on Facebook and Instagram) and on Microsoft (the ads on the Bing search engine). All in one place: how much you invested, how many people got in touch and how much each contact cost.
The problem it solves is the costliest one for anyone who advertises: money going out the door without turning into a customer. An ad showing up for someone searching for a service you don't offer. An expensive keyword that brings in curious people and no actual jobs. A campaign that burns the whole day's budget by ten in the morning. A city you don't even serve. Ricardo looks for these things every day, fixes on his own what can be fixed, and brings you — in plain human language — only what's your decision.
And the line is this, nice and clear: you decide three things — how much to invest, on which days and at what times to advertise, and where (in which cities) to show up. The rest of the day-to-day management (keywords, ad texts, bids) Ricardo decides and applies on his own, without bombarding you with questions. If he changes anything, it's recorded in the Decisions tab, with the before and the after, and in most cases you can undo it in two clicks.
An everyday example: you're a gas fitter and you have a campaign on Google. On Monday Ricardo notices that the search "refrigerator repair" is making your ad show up and wasting money. He blocks that search on his own (it's maintenance, he doesn't need you) and logs it in Decisions. On Tuesday he notices that the day's budget runs out at 11 a.m. and that you're missing calls in the afternoon — that's budget, it's your decision, so it becomes a card in Approvals waiting for you to click "Approve & apply" or "Dismiss".
Before you start
For the module to really work, these things need to be ready:
- A Google account (that
@gmail.comemail or the company email you use on Google) connected to the system, with permission for ads. - An existing Google Ads ad account that this Google account has access to. If your agency already looks after this, the account may already come chosen — and then you don't need to do anything in that step.
- Balance or a payment method set up inside Google Ads. The system doesn't pay Google for you (unless your agency has taken over that bill — in that case the "Media credit" card appears, explained further on). Without balance, the ad simply doesn't show.
- Optional: a Meta (Facebook/Instagram) ad account and a Microsoft Advertising (Bing) account. Each has its own tab and can be connected when it makes sense. None of this is required to get started.
- Optional, but highly recommended: tracking installed on your website, so the system knows how many contacts really came in. Without measuring contacts, the most important number on the screen — the cost per contact — doesn't exist.
This module is hired separately. If you open the address and land on a sales page instead of the dashboard, it's because it isn't active in your company yet.
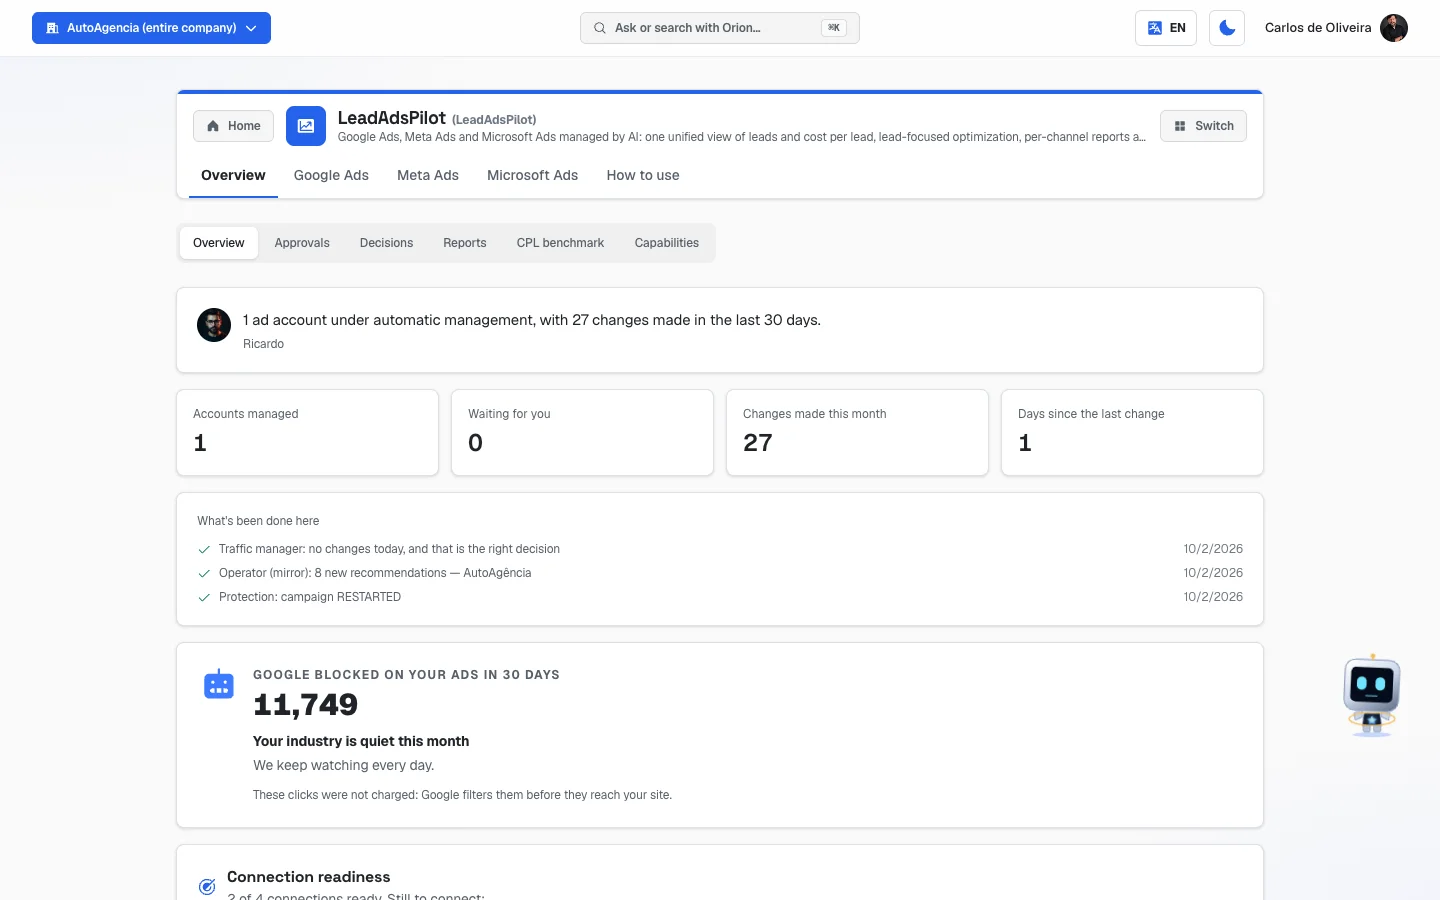 The Overview tab open on the Overview pill, showing Ricardo's note at the top and the four big numbers below
Getting started
The first time, follow this order. It takes about 15 minutes.
-
On Home, in Your apps, click Traffic. The very first time, an invitation appears at the top of the page to set up the module by chatting with Ricardo: "It's optional — the tabs below already work. Each reply from the specialist uses AI credits." If you want, click Chat with Ricardo — he asks you the basics about your business — and, at the end, Complete setup. If you'd rather go straight in, click Dismiss: the dashboard already works either way.
-
Go to the Google Ads tab → Settings pill. This is where the connection lives. The screen has numbered steps.
-
Step 1 — Your Google account. Click Manage Google connection. You'll land on the Advanced pill, where the Connect with Google button is. Sign in with your Google account and accept the permissions. You never type your Google password inside our system — the sign-in happens on Google's own screen.
-
Go back to the Connection pill and look at step 3 — Accessible accounts. There you'll see the list of ad accounts your Google account can see. Find yours and click Activate. It then shows up in step 2 with a green ✓.
- If you use a manager account (that "umbrella" account that administers several ad accounts, also called an MCC), type its number in the "Manager account (optional)" field on the row before clicking Activate.
- If your agency has already set the account for you, the list may come up empty with a notice explaining that. That's normal.
-
Check the account status card, right at the top of that same screen. It answers the question "why aren't my ads running?" — for example, if an owner with administrator access is missing or billing isn't set up. If a step-by-step shows up there, follow it.
-
Go back to Overview → Overview pill and fill in "Your goals". Two fields: how much you want to invest per day and how many contacts you want per month. Click Save. (Read carefully the explanation of the "Actually apply to Google" switch, further on — it changes your campaign for real.)
-
Fill in "What your business does and doesn't do", on the same screen. It's the list of services you provide and the list of what you don't. This sheet is what stops the system from pausing a keyword for a service you do offer — and what makes it block searches for what you don't. It's well worth the time you spend here.
-
Choose the operation mode, in Google Ads → Settings (the "Operation mode" card, at the top). Automatic, With Approval or Advisor mode. If you're unsure, leave it on Automatic: budget and schedule are still your decision either way.
-
Check the spending brake, on the card right below. It comes on with a default limit. Only touch it if you want to tighten or loosen it.
-
Done. From then on, come into the module once or twice a week and look at two things: whether something is waiting for you in Approvals and what happened in Decisions.
The tabs, one by one
The module has four tabs: Overview, Google Ads, Meta Ads and Microsoft Ads — plus the How to use tab, which every module in the system has. They sit in the app bar, at the top of the screen.
Inside Overview and Google Ads there are pills (little buttons side by side, right below the module title). They switch the content of the screen without leaving the tab. The address changes along with them — you can bookmark the pill you use most.
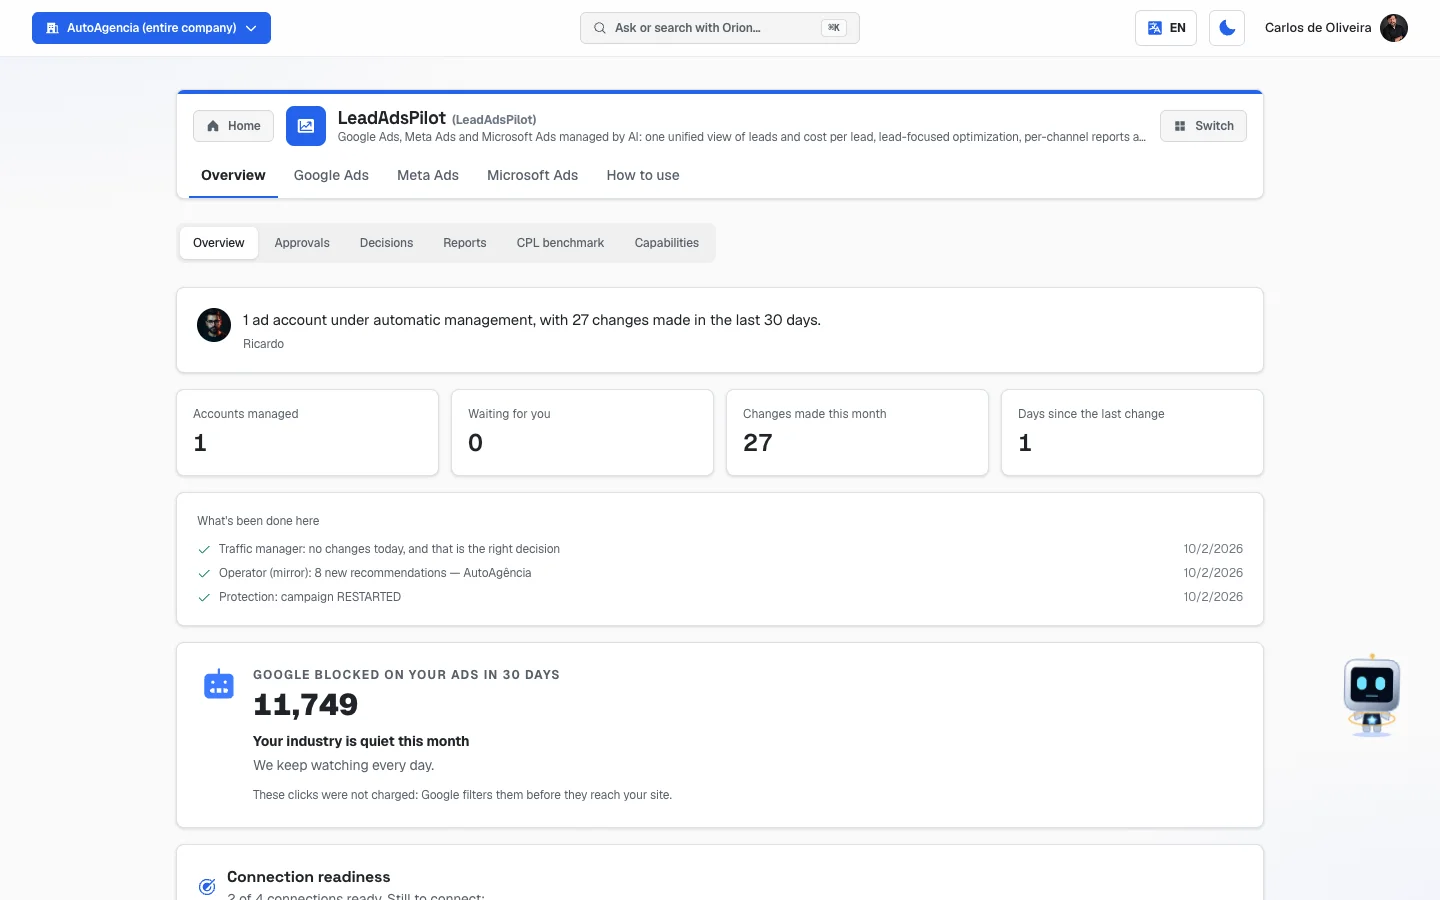 The row of pills in Overview, right below the module title: Overview · Approvals · Decisions · Reports · CPL benchmark · Capabilities
Overview
/app/modulos/gestao-trafego/visao-geral
This is the entrance to the module and the only screen that brings the three platforms (Google, Meta and Microsoft) together in one place. It has six pills: Overview, Approvals, Decisions, Reports, CPL benchmark and Capabilities.
Overview (pill "Overview")
/app/modulos/gestao-trafego/visao-geral
This is the pill that opens by default — that's why its address has nothing after the tab name.
-
What you see here:
1) Ricardo's note. At the top, with his photo, a short sentence saying the most important thing right now, and a button that takes you straight to fix it. The possible sentences are:
- "No ad account connected yet — connect Google Ads so Ricardo can start looking after your budget."
- "Your ad account balance ran out: your ads stopped showing."
- "Your ad account balance is running low — worth topping up before the ads stop."
- "X suggestions are waiting for your approval."
- "X accounts are switched off from automatic management — nothing is optimized on them."
- "X ad accounts under automatic management, with Y changes made in the last 30 days." (this is the "everything's in order" sentence)
- "I couldn't read your account data right now…" — read this calmly: it does not mean everything is fine or that everything is wrong. It means the reading failed. Nothing changed in your ads.
2) Four big numbers:
- Accounts managed — how many ad accounts are connected and being looked after.
- Waiting on you — how many suggestions are in the Approvals queue. The number turns red when it's greater than zero.
- Changes made this month — how many changes the system applied in the last 30 days.
- Days since the last change — how many days ago the last change was. It turns to an alert tone when it goes past 30 days.
If the reading fails, the four numbers show as —. A dash is not zero: a dash means "I couldn't check".
3) "What's been done here" — a short list of Ricardo's latest deliveries, with the date.
4) The click shield — a card with the title "Google blocked on your ads in 30 days" and a big number. It's the number of bot clicks that Google filtered out before they reached you. Below it comes a reading:
- "Your industry is quiet this month"
- "Activity above normal"
- "Your industry is under heavy attack" — and, along with it, how many bot attempts there were for each real click of yours. The card says that these clicks were not charged (Google filters them beforehand). If you don't have the click protection product hired, the See click protection button appears.
5) The tracking block, which is the rest of the screen and is detailed below.
-
Connection readiness. A strip that counts how many of the four connections are ready: "Google account (ads)", "Phone number", "Click protection" and "WhatsApp". When all four are on, the title becomes "Everything connected", with a green background. When one is missing, clickable tags appear that lead to the place to switch each one on. While the system is still checking, gray blocks blink and the word "Checking…" shows — on purpose: the screen doesn't claim something is off before being sure.
-
Ad platforms. Three little cards: Google Ads, Meta Ads and Microsoft Ads, each with the tag Connected or Not connected, and a Manage link (if it's already connected) or Connect (if it isn't). At the right end of the row, the counter "X of 3 connected". The Meta Ads card is different: if it's disconnected, the Connect button goes straight to Facebook's authorization, in one click, without you having to copy any number.
-
Your connections. Three more cards, now for the structure that makes the contact arrive:
- Phone number & mask — Active / Inactive, with the Configure link.
- Click protection — Active / Inactive, with Configure.
- WhatsApp — Connected / Not connected. The link is Configure; if you don't have the call tracking product yet, it becomes Get CallTrack. If any of these readings fails, this appears below: "I couldn't check one or more of these connections right now — what you see above may be out of date. Nothing was switched off…".
-
Your goals. This is the most important form on this screen.
Step by step:
- In the "How much to invest per day (R$)" field, type the amount.
- In the "How many contacts per month" field, type how many contacts you want to receive.
- Decide whether or not to tick the "Actually apply to Google" checkbox (read the explanation below first).
- Click Save.
- If the checkbox is ticked, a confirmation window opens: "Change the budget in Google Ads?", warning that this changes the REAL budget of your campaign, effective right now. Click Change budget to go ahead or Cancel to go back.
- Next to the button the result appears. It can be:
- "Your goals were saved." (when the checkbox was unticked)
- "Budget for campaign [name] changed from [amount] to [amount]."
- "Your goals were saved, but we couldn't change Google right now: …" — note this: your goal was saved; it's only the change over on Google that didn't go through.
Each field explained:
- How much to invest per day (R$) — the amount per day, not per month. Leaving it empty means "no budget goal".
- How many contacts per month — how many contacts (call, WhatsApp, form) you'd like to receive per month. It lets the system know whether it's delivering what was agreed. Leaving it empty means "no contact goal".
- Actually apply to Google — the most serious switch on the screen. The screen itself explains: "On: saving changes the real budget of your campaign in Google. Off: it becomes your goal (the team follows it)." When it's on, the system picks the campaign that spent the most and swaps its daily budget for the amount you typed. If there's a tie, it takes the one with the highest current budget. If you have several campaigns and want to change a specific one, it's better to ask in the chat.
-
Connect Facebook (ads). A card with the Connect Facebook button (or Reconnect Facebook, if it's already connected). It's the one-click connection: you authorize through Facebook itself, without copying any number. If your account has more than one business, page or ad account, the question "I found more than one. Which should I use?" appears and you choose by clicking. There's also Disconnect Facebook, with a confirmation explaining that nothing is deleted on your Facebook.
-
What your business does and doesn't do. The "service sheet" — the card is called Service profile. The screen sums up the reason: "The team uses this to NEVER pause a keyword for a service you offer, and to block searches for what you don't do (so you don't waste budget)."
Step by step:
- In "Your niche", write your line of business (the screen suggests examples: pest control, drain cleaning, gas fitter).
- Click Suggest with AI. The system fills in both lists with suggestions. They're added, not substituted for what you already wrote. The message warns: "Suggestions added. Review and remove what doesn't fit before saving."
- Review the "Services you DO (one per line)" list — delete what isn't yours.
- Review the "Services you DON'T do (one per line)" list.
- (Optional) Click Find similar brands & products. It looks for brands and products similar to what you listed under "don't do", to block them too. The answer is "We found N similar brands/products to block." or "Nothing new found."
- Fill in "Of the services you DO, which are the CHEAPER ones?".
- Click Save profile. The answer is "Profile saved."
Each field explained:
- Your niche — your line of business, in one or two words.
- Services you DO — one per line. Everything you really serve.
- Services you DON'T do — one per line. It lets the system block those searches so you stop paying for them.
- Of the services you DO, which are the CHEAPER ones? — the screen explains: a cheaper service attracts a cheaper contact; by marking them here, the system keeps those services in separate campaigns and doesn't mix one's keywords into the other's ad.
If reading the sheet fails, the Save profile button is disabled on purpose — so nobody saves a blank sheet over the one that already exists.
-
How to set up your campaigns. Three options, you click the one you want (it saves right away):
- Automatic (recommended) — "The team sets up the campaign on its own and leaves it ready — you just hit play."
- Propose first — "The team builds it and shows you the proposal; it publishes only when you say 'go ahead'."
- With questions — "The team asks 2-3 quick questions and completes the campaign with your answers." And, for all three: "In any option, the campaign starts PAUSED — it never spends anything until you activate it."
-
Meta tracking (pixel). The pixel is explained on the screen itself: "The pixel is Meta's meter: it counts how many people reached your site from the ad and who became a contact. Without it, Meta advertises blind."
Step by step:
- Type your website address in "Your website address" (e.g.:
minhaempresa.com.br). - Click Install / Verify.
- If it works: "Done! The pixel was set up and tracking is being installed."
- If the automatic installation can't reach your site: "I couldn't install it automatically — see below how to paste it on your site." A box "Paste on your site" appears with a code and the Copy button. Take that code to whoever looks after your website.
When a pixel already exists, the card shows four lines: Pixel (with the number hidden, only the last digits), Source (found in your account / created for you / entered manually), Installed (on your site (automatic) / on your WordPress / via Tag Manager / you paste it on the site / not yet) and Measuring (yes / no).
- Type your website address in "Your website address" (e.g.:
Approvals
/app/modulos/gestao-trafego/visao-geral?aba=aprovacoes
The title of the screen is "Pending approvals", with the number in parentheses when something is waiting.
-
What you see here: the queue of decisions that are yours. The screen explains it in one sentence: "The decisions that are yours: how much to invest, which days and times to advertise, and where to appear. Everything else — keywords, ads and bids — your traffic manager decides and applies, without needing to ask."
How often this is updated. The system sweeps your ad accounts once a day, in the early morning (around 6 a.m., Brasília time) — Google, Meta and Microsoft, each on its own pass. The new cards come out of that sweep. In other words: if you clear the queue now, what shows up here again will generally only be the next day — the exception is the backed-up queue, when the screen says "Showing the X most recent of Y pending. Clear these and the next ones appear." and the next ones come in as soon as you free up space. The screen doesn't write this frequency anywhere; it's the system's rhythm.
Each item is a card with:
- Title — what the change does, in plain language (e.g.: "Adjust budget", "Adjust ad schedule", "Target the service area", "Exclude location").
- A smaller line saying the target — the name of the campaign, the group or the keyword.
- Platform tag — Meta Ads (blue) or Microsoft Ads (teal). When there's no tag at all, it's from Google (it's the most common case, so it carries no badge).
- Risk tag — Low (green), Medium (amber), High (orange) or Critical (red). The most critical ones appear at the top of the list.
- The why, next to an information icon: the explanation the system wrote.
-
What you can do: approve (and the change goes to the ad platform right away), dismiss (it disappears from the queue) or, after approving, undo.
-
Step by step — approving a suggestion:
- Read the card's title, target and explanation.
- Click Approve & apply.
- The button becomes Confirm apply (with Cancel next to it). This is on purpose: the first click only asks.
- Click Confirm apply. While it works, the button shows "Applying…".
- The card then shows the result:
- "Applied to Google Ads ✓" (or Meta Ads / Microsoft Ads) — it worked.
- A sentence in yellow or red explaining why it wasn't applied. They are always in clear language, never code. Real examples: "This account already received this week's changes. Daily tinkering disrupts Google's learning and raises click costs…"; "Automation is paused (kill switch off)."; "The account is in observe-only mode: the agent proposes but doesn't apply yet."; "Protected: this exclusion would mute searches for a service you provide."; "This change was made recently — the agent waits a while before touching it again."
-
Step by step — dismissing a suggestion:
- Click Dismiss.
- The button becomes Confirm dismiss (with Cancel next to it).
- Confirm. The card then shows "Dismissed ✓". Dismissing doesn't touch your ad account: it only takes the card off the queue. The system stops proposing that for 30 days.
-
Step by step — undoing something you just approved:
- On the card that shows "Applied ✓", click Undo.
- The question "Undo it?" appears, with Confirm and Cancel.
- Click Confirm. The card then shows "Undone ✓". The Undo button only appears when the system knows how to reverse that change. A button that promises and fails is worse than no button — that's why it disappears in cases with no way back.
-
Sections that appear below the queue, in this order:
-
Needs you (open by default, when it appears). This is the list of what depends on a decision or some text from you — things the system does not apply on its own. The screen explains: "What depends on a decision or some copy from you. These are not changes the manager applies on its own — it set each one aside and explained it."
The most common card here is the service one: the system found a search that tends to work for businesses in your line, but it doesn't match your service sheet. The question isn't about the keyword, it's about your business — that's why the buttons are We do offer this and We don't. The notice below clarifies: "Your answer updates the account's service profile — nothing changes in the ads right now. If you do offer it, the manager starts covering that search; if not, it stops proposing and starts blocking it." The other cards have only the Dismiss button; when it's a request for new ad text, the line "Needs new copy — ask in chat and the team will write and apply it." appears. If something has been stuck for a long time, a yellow notice appears saying how many tasks have been waiting for more than 7 days.
This section only appears for people with full power over the account — the company's owner or administrator, or someone at the agency that looks after it. If you sign in with a login the agency created just to follow along, it disappears from your screen on purpose.
-
Account health (closed by default, click the little arrow to open). Here there's no button: it's reading only. The screen warns: "What the manager observes in the account, by subject. There is no button here: it is reading. It disappears on its own once the issue is gone, and comes back if it returns." The observations come grouped by subject, in this order: Contact measurement, Coverage and demand, Fraud and invalid traffic, Ad and landing page, Auction competition, Account structure, Settings and status and Other findings. When everything's fine: "Nothing to flag right now".
-
Recently dismissed (also closed by default). Lists what you took off the queue, with the date. Each item has the Restore to queue button, which brings the suggestion back right away.
-
-
Empty and error states:
- Nothing in the queue: "Nothing waiting on you" — "When there's something about budget, days and times or where to advertise for you to decide, it shows up here."
- No account connected: "No ad account linked", with the hint "Go to the Settings tab and connect your first account".
- Big queue: "Showing the X most recent of Y pending. Clear these and the next ones appear." (the screen shows up to 50 per platform).
- Reading failed: a notice with the title Approvals saying "I couldn't load this information right now. That does not mean there is nothing here — it means I couldn't check."
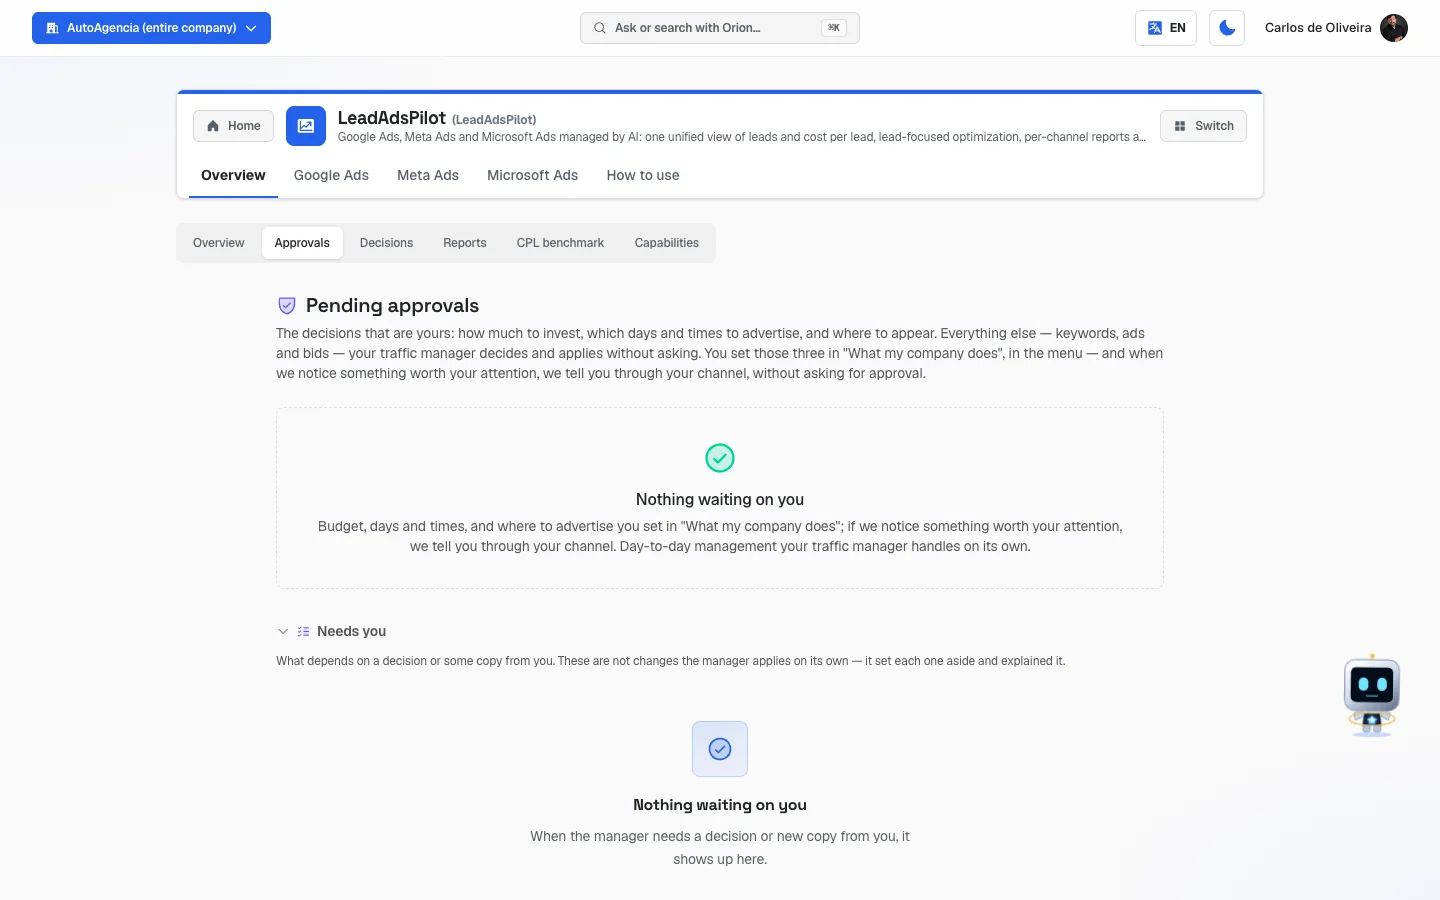 A card from the Approvals queue, with title, explanation, risk tag and the "Approve & apply" and "Dismiss" buttons
Decisions
/app/modulos/gestao-trafego/visao-geral?aba=decisoes
The title on the screen is "What we did for you".
-
What you see here: the history, day by day, of everything the system changed in your campaigns — whether on its own or after your "yes". The screen explains: "Every change the system made to your campaigns — on its own or reviewed by the team — with the reason in plain language. Seven days later we measure the effect: what worked gets a green badge."
The list is grouped by day (with the weekday written out in full). Each line brings:
- What was done and, next to it, the target (campaign name, keyword, etc.).
- The platform icon (Google, Meta or Microsoft).
- The reason, in two parts: the category and a written detail.
- Before → after, when it can be shown: the old value in a little gray box, the little arrow, and the new value in a little green box.
- The time (in Brasília time).
- A badge for who decided: Automatic (robot icon, purple) or Reviewed by the team (person icon, blue).
- A badge for the outcome: Applied (green) or "Protection chose not to apply" (amber) — meaning some safety brake stopped the change before it reached your account.
- "It worked" (green, with an up arrow) — appears when, seven days later, the measurement showed improvement.
- Undo, when that action has a known way back.
-
The maintenance line. Above the list a dotted strip may appear: "N more routine adjustments protecting your budget — blocking searches that aren't customers and fine-tuning keywords. It's behind-the-scenes work: it doesn't need your attention." This exists because most of the work is repetitive (blocking hundreds of useless searches); listing it item by item would bury what matters. The number stays visible so you know work was done.
-
Step by step — undoing an adjustment:
- Find the line in the list and click Undo.
- Confirm with Confirm when the question "Undo it?" appears.
- The line then shows "Undone ✓", and the adjustment leaves the list on the next load. Unlike the Approvals queue, here the button survives reloading the page: the list is the saved record, not a screen state.
-
What the list covers: the last 90 days, up to 100 records, newest to oldest.
-
Is there a deadline to undo? There's no clock running. The button doesn't expire in hours or days: it holds as long as that adjustment is in this list — that is, within the last 90 days and the 100 most recent records. What decides whether it appears is something else: the system needs to know how to reverse that specific change. If it knows, the button is there on day 1 and on day 89 just the same. If it doesn't, it doesn't show up even a minute later — a button that promises and fails is worse than no button. On very old adjustments it can happen that the button appears and the reversal doesn't go through, because the system didn't keep everything it would need to go back to the previous state; when that's the case, it says so right away, in yellow, right there on the line — and nothing is changed in your account.
-
Empty and error states:
- "No decisions logged yet" — if the account is already connected: "As soon as the system makes its first change to your campaigns, it shows up here."; if it isn't: "Traffic management is not active on this account yet."
- Reading failed: the standard notice with the title Decisions.
Reports
/app/modulos/gestao-trafego/visao-geral?aba=relatorios
-
What you see here: how much came in from each channel (Google, Meta, WhatsApp, organic, offline, etc.) and how much that earned, within a period you choose.
At the top, two selectors:
- Attribution model — how the credit for a sale is split among the channels the customer went through. The options are Last click, First touch, Linear, Time decay and Position-based. If you have no idea, leave it on Last click (it's the default). Your choice is saved for your next visit.
- Period — Last 7 days, Last 30 days or Last 90 days.
Three big cards:
- Spend — total spent on ads in the period.
- Revenue — what the sales earned. If the system doesn't know the value of the sales, — (a dash) appears, not zero. Hovering over the information dot: "We don't know yet how much each contact was worth: WhatsApp, call and site contacts carry no service value. Cost per contact, alongside, is a real measurement."
- ROAS — revenue divided by spend. "Above 1x it pays off."
A table "Results by channel" with the columns Channel, Spend, Revenue, ROAS, CPA and Conversions.
Two more cards below:
- LTV per customer — how much each customer is worth, on average, in the period. Below it comes a dated fact: "Last tracked sale: today", "N days ago" or "No tracked sale so far" — so the dash above isn't left unexplained.
- Period — repeats the chosen period, for clarity.
And, at the bottom, a note saying which model is in use and how many sales had a journey across more than one channel.
-
What you can do: switch the model, switch the period and, when the reading fails, click Try again (the button is inside the error notice; here it exists, and reloading the whole page isn't necessary).
-
Empty state: "No data yet" — "Connect Google Ads or Meta Ads and track conversions to see results by channel here."
CPL benchmark
/app/modulos/gestao-trafego/visao-geral?aba=regua-cpl
The title on the screen is "Your niche's cost-per-lead ruler". CPL stands for cost per lead — in plain words, how much you pay for each contact that comes in.
-
What you see here: the anonymous comparison between your cost per contact and that of other businesses in the same line that use the system. The screen explains: "Compares your cost per real contact (never per click) with other accounts in the same niche. Others appear anonymous — you only see where yours stands and the niche's best to aim for."
Three little boxes at the top:
- Niche best — the lowest cost per contact in your line (the amount, with no one's name).
- Niche median — the middle value; half the businesses pay more, half pay less.
- Your account — your value. Below it appears your position: "+X% vs best", or "you're the best 🏆", or "insufficient measurement", or "not in the ruler".
And a Niche ranking (lowest cost per contact first): a numbered list where your line is highlighted and written as "Your account", and all the others appear as "Niche account" — no name, no identification. Each line has a band tag:
- on target (green) — you're on target.
- acceptable (yellow) — it can be improved.
- critical (orange) — it's expensive.
- churn risk (red) — it's so expensive that the ad doesn't pay for itself.
- no data (gray) — the line didn't get a band. This happens for two different reasons, and the tag is the same in both: either that account didn't have enough measurement in the period, or its line of business doesn't have a ruler built yet. The screen doesn't tell the two cases apart, so don't conclude from the gray that your measurement has a problem.
The bands aren't the same for everyone: they change by line of business. The value that separates "on target" from "acceptable" for a drain-cleaning company isn't the same as for a dentist or a plaster shop, because what each customer is worth is different in each business. That's why there's no universal number here: the system uses the ruler for your line. Today few lines have their own ruler; for the rest, all the lines appear as "no data" (gray) — the comparison with the other accounts in the niche (best, median, your place in the ranking) keeps working normally, and that's the one that counts in this case.
At the bottom: "CPL = cost per real contact (WhatsApp, calls and forms — never clicks). Only accounts that measure contacts reliably enter the ruler."
-
What you can do: just read. There's no button on this screen.
-
Empty states:
- "Ruler not built yet" — "The niche ruler is built weekly (on Sundays) from accounts in the same segment." Come back after the next Sunday.
- "This account has no niche set yet — no cost-per-lead ruler to compare against."
- "No Google Ads account connected yet. Connect yours under Settings."
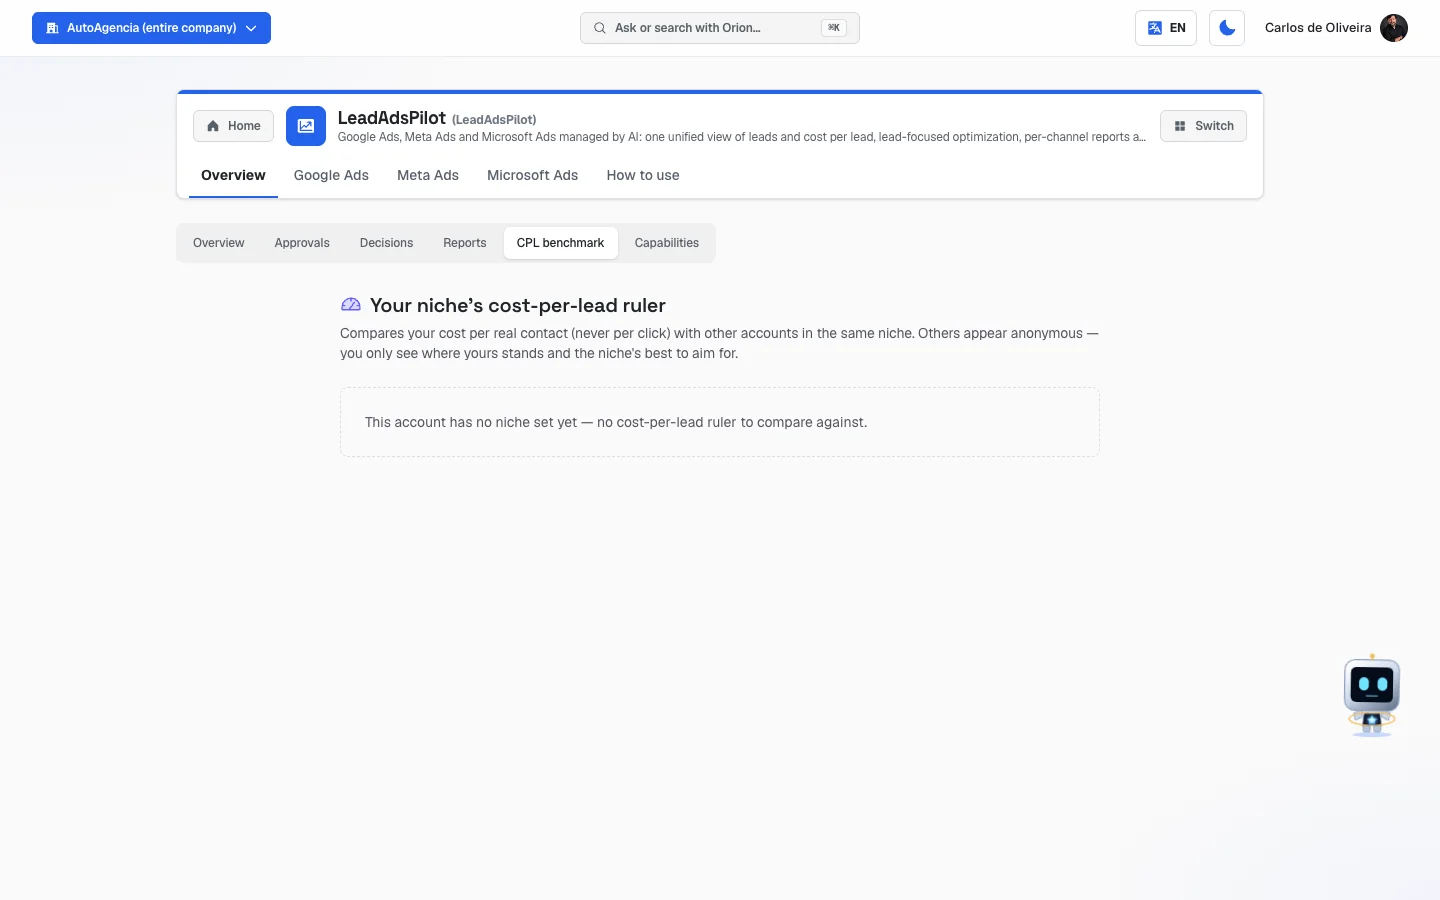 The CPL benchmark pill on an account with no niche set yet: the title, the explanation and the notice "This account has no niche set yet — no cost-per-lead ruler to compare against."
Capabilities
/app/modulos/gestao-trafego/visao-geral?aba=capacidades
The title on the screen is "Everything traffic management does".
-
What you see here: the full menu — everything the system knows how to do on your ads, grouped by subject, and next to each one a tag saying who's in charge of that decision:
- Automatic (green, robot icon) — the system does it on its own.
- With approval (purple) — goes through the Approvals queue first.
- Only with your approval (red, padlock) — it's your decision, always. These are the budget and schedule ones.
- Suggestion only (amber) — appears when you chose Advisor mode: the system recommends and doesn't apply. And a gray tag reminding you that everything can be triggered via chat.
The groups are: Budget — client's decision, Schedule — client's decision, Keywords & search terms, Ads & creatives, Ad extensions, Where the ad shows (geography), Networks, placements & devices, Bidding & strategy, Campaigns & structure, Measurement & conversions, A/B tests, Google's native recommendations, Meta Ads (Facebook & Instagram), Microsoft Ads (Bing), Fraud protection, Audiences and Diagnostics & watchdogs.
Above the groups, a dotted box "Your operation mode" lists the current mode of each connected platform (Google Ads, Meta Ads, Microsoft Ads) and reminds you: "You change the mode in each platform's Settings. Budget and schedule are always your call."
At the bottom: "Every automatic action goes through a dry-run, protected terms, per-account limits and an audit trail with rollback — and there is an emergency switch that pauses everything." In plain words: before really changing anything, the system does a rehearsal; there are words it never touches; there's a limit on how many changes per account; and everything is recorded and can be reversed.
-
What you can do: read and check. The tags change on their own when you change the operation mode in each platform's Settings.
-
If reading the mode fails, the menu stays on the screen, but with a notice saying the operation mode couldn't be checked — no tag is made up.
Google Ads
/app/modulos/gestao-trafego/google-ads
This is the Google sub-module — where most of the work happens, because Google is the main platform. It has five pills: Panel, Competitors, Experiments, Negatives and Settings.
Panel (pill "Panel")
/app/modulos/gestao-trafego/google-ads
-
What you see here: two blocks.
1) Account balance. The card that answers "are my ads running?". It shows:
- available now — how much balance there is in the ad account.
- cost of one day — how much the account spends on a normal day.
- days of delivery — how many more days the balance covers. And a sentence that changes color depending on the situation:
- "The balance covers the day's spend." (all good)
- "The balance won't cover a full day. Worth topping up before campaigns open." (attention, yellow)
- "The account is out of funds — campaigns won't run until money comes in." (red) Also shown, when they exist: Last top-up (amount and date) and a history of recent days with four columns — Day, Campaigns open at, Funds available at and Delay. This history exists for a very specific conversation: if the money only reaches the account at noon, your ad was off the air the whole morning, and the delay shows up there in minutes or hours. In the top corner it says "Read at" with the date and time of the reading.
2) Google Ads — by campaign. "Impressions, clicks, cost and conversions aggregated over the period." A period selector (7 days, 14 days, 30 days) and a Refresh button. Four little boxes with the totals — Impressions, Clicks, Cost and Conversions — and, below, a table with one row per campaign: Campaign, Impr., Clicks, CTR, Cost and Conv., sorted from the one that spent the most to the one that spent the least.
-
What you can do: switch the period and refresh the numbers. Nothing here changes your campaigns.
-
Empty and error states:
- "Connect and activate a Google Ads account above to see metrics."
- "No campaigns in the period."
- "The selected account is a manager account (MCC), and Google does not report numbers for that account type. Pick your business's own ads account under Settings." — this happens when you activated the "umbrella" account instead of the ad account itself.
- "No Google Ads account connected yet. Connect yours under Settings."
- "We couldn't read the Google Ads numbers right now. We're already looking into it — try again in a few minutes."
- From the balance card: "I couldn't read your ad account balance right now. That does NOT mean the balance is fine — it means I couldn't check." and, the first time: "We're still taking the first reading of this account's balance. The numbers show up here within 15 minutes."
Competitors
/app/modulos/gestao-trafego/google-ads?aba=concorrentes
-
What you see here: your position in the "auction" — because a search ad works like an auction: several businesses compete for the same space when someone searches.
Three cards at the top:
- Market share — as a percentage. The explanation from the information dot: "Of every 100 searches you could appear in, how many you appeared in. The higher, the more you dominate over competitors."
- Leads slipping away — an approximate number (it comes with the ≈ sign). "Estimate of leads that went to competitors because you appeared less. It's an estimate based on your searches and your conversion rate."
- Cost per lead — "How much each lead (call, WhatsApp or form) cost in ads, on average."
A section "Why you lose ground", with a colored bar and three numbers:
- You won — of searches.
- Lost by rank — ad below competitor.
- Lost by budget — budget ran out. And, above the bar, the sentence that says what to do:
- If the problem is rank: "Most of what you lose is because your ad shows below competitors. Improving ad and landing-page quality — or adjusting the bid — usually recovers ground."
- If the problem is budget: "Most of what you lose is because your budget runs out before the day ends. Raising the daily budget captures the searches that are slipping away today."
- If everything's fine: "You're dominating the auction well — there's little ground lost to competitors."
A table "Your campaigns in the auction", with Campaign, Presence, Where it loses (tag Shows below, Budget runs out or Dominating), Leads, Cost/lead and Slipping.
And a table "Competitors in your searches" — searches for a competitor's name where your ad appeared, with Search, Competitor, Clicks, Spend and Status. The status is ✓ Protected (you already blocked that search, you no longer pay for it) or Paying (you're still paying).
At the bottom, an honest note: Google does not disclose the names of every advertiser competing for the same spots as you; what shows up here is your real position with the numbers Google releases, plus the competitors that show up directly in your searches.
-
What you can do: read, and click Try again if the reading fails. To act from here (blocking a competitor search, for example), talk to Ricardo in the chat.
-
Empty states:
- "Connect Google Ads" with the Connect Google Ads button.
- "Management account" — "This company is a management account that administers other accounts. Competition analysis appears on the client accounts, not on the management account."
- "No search data yet" — "Your search campaigns haven't gathered enough data yet to measure your presence in the auction. Check back in a few days."
- "Couldn't load right now", with the Try again button.
Experiments
/app/modulos/gestao-trafego/google-ads?aba=experimentos
The title on the screen is "Experiments (A/B by cost per lead)".
-
What you see here: the tests running on your campaigns. An A/B test, here, means: the system makes a copy of your campaign, changes just one thing in that copy, splits the traffic between the two and compares which one brings a cheaper contact. The screen explains: "Each experiment splits traffic between the current campaign (control) and a copy with a change (treatment). The verdict compares the cost per lead of both — and only sticks when the difference is proven."
Each experiment is a card with:
- The name and a status tag: Running, Being set up, Becoming a campaign, Became a campaign, Ended or Removed.
- Two little boxes side by side: Control (current) and Treatment, each with the cost per lead.
- A comparison line: "Treatment X% cheaper" (in green) or "Treatment X% pricier" (in red).
- A box with the verdict and the reason, written out. The icon changes: trophy (promote), X (end) or clock (still measuring).
- When there's a pending decision, a yellow strip saying what will happen. If your mode lets the system decide on its own: "✅ Verdict: PROMOTE — the traffic manager will promote it automatically on the next evaluation." If it doesn't: "✅ Recommendation: PROMOTE — ask the traffic agent in chat to promote this experiment."
-
What you can do: read the result and, when appropriate, ask in the chat to promote or end it. There's no promote button on this screen.
-
Empty state: "No experiments running" — "The system proposes tests as your campaigns build up data — each with a hypothesis and a measurement.", with the hint "Suggestions that need your OK land in the Approvals tab".
-
Other notices: "No Google Ads account connected yet. Connect yours under Settings." and "We couldn't load the experiments right now. Try again in a few minutes."
Negatives
/app/modulos/gestao-trafego/google-ads?aba=negativas
You can bookmark this address. The little
?aba=negativasbit at the end isn't a passing technical detail: it's the official way to open straight onto this tab, the same as its neighbors (?aba=concorrentes,?aba=experimentos,?aba=configuracao). It works in a bookmark, in the browser's Back button and in a link pasted into a conversation. Just one caution: some older tabs also answer to a short address, from when they were separate items in the menu —/app/modulos/gestao-trafego/concorrentes, for example, opens the Competitors tab. The Negatives one was born as a tab already and has no short address: if you try/app/modulos/gestao-trafego/negativas, the system doesn't give an error — it simply opens the module's Overview. Save the full address above, or go through the menu: Your apps → Traffic → Google Ads → Negatives.
The title on the screen is "Account negatives". A "negative" is a blocked word: a search you do not want your ad to show up for.
-
What you see here: the list of all the words blocked in your Google account, and — what really matters — why each one was blocked. The screen explains: "Negative keywords in Google Ads and the intent behind each one. Negated a term on purpose because of cost? Declare it here — without the record, the platform may propose removing the protection."
The table has five columns:
- Term — the blocked word.
- Match — the match type (how similar the search has to be to the word).
- Where — whether the block applies to a Campaign, an Ad group or a List, and the name.
- Intent — the reason tag:
- Anti-fraud (ClickVigil) (green, with a shield) — blocked by the bot protection.
- Cost (declared) (light blue, with a dollar sign) — you (or the team) declared that you blocked it because of cost. Hovering shows the reason that was written.
- — (dash) — nobody said why. That's where the button comes in.
- A button column, only on the rows with no declared intent.
Above the table there's a "Filter by term or campaign…" field and the counter of how many negatives exist. The screen shows up to 200 rows at a time.
-
Step by step — declaring that you blocked on purpose:
- Find the row in the table (use the filter if you need to).
- Click Declared for cost.
- A "Reason (e.g. $8 CPC)" field appears — write in a few words why you blocked it. It's optional, but it helps a lot whoever reads it later.
- Click Confirm (or Cancel to back out).
- The answer is: "Intent recorded — detectors will no longer propose removing this negative."
-
The "Waiting on your decision" box. It may appear at the top, with a yellow background. It lists terms that were blocked and then unblocked — and that's why the system stopped touching them. The explanation: "These terms were negated and later removed. Until someone says which side wins, the platform won't recreate the negative — to avoid putting the account back in a loop." Each row shows the term, the type, when it was removed and by whom.
Step by step:
- Click Block on purpose on the row.
- Write the reason in the "Why block it?" field.
- Click Confirm.
- The answer is: "Decision recorded — I'll recreate that negative on my own, next cycle."
One case has no button: when the term is your own company's name. In that case the explanation appears, with no button: "This one can't be blocked: '[name]' is your company's own name — negating it would hide you from people searching for you."
-
Empty and error states:
- "Connect Google Ads".
- "No negatives in the account" — "When there are negative keywords, they appear here with the intent behind each one."
- "Couldn't load right now", with Try again.
📷 This screen has no photo — each row of the Negatives table shows where the block came from — for example, the tag "Anti-fraud (ClickVigil)" — and, when applicable, the "Declared for cost" button.
Settings
/app/modulos/gestao-trafego/google-ads?aba=configuracao
This pill has two cards at the top and, below them, three more inner pills: Connection, Conversions API and Advanced.
The two cards at the top
The Operation mode card only appears after your Google Ads account is connected and has gone through the system's first reading. Before that, the top shows only the Spend brake — that's normal.
Operation mode. "You decide how much the system acts on its own on this platform." Three buttons, click one to choose:
- Automatic — "The system applies improvements on its own. Budget & schedule always with you."
- With Approval — "Each improvement waits for your OK in the Approvals queue before applying."
- Advisor mode — "The system only recommends — nothing is applied on its own. You apply whenever you want." When you switch, the notice "Mode updated." appears. If you're not the account's owner or administrator, the buttons are turned off and this appears: "Only the account owner or admin can change the mode."
Spend brake. It's the safety limit that pauses the campaign when it spends too much in a day. The explanation on the screen: "Pause threshold (% of the daily budget). Default is 120% — the 20% headroom tracks Google's normal delivery (pacing); 100% is a hard cap."
In simpler words: Google can spend a bit more than your budget on a good day and even it out over the month. The brake watches that spending and, if it goes past the limit you chose, it pauses the campaign until the day turns over.
Step by step — changing the brake:
- Next to Google: (followed by the current value — 120%, if you've never touched it), click adjust.
- Type the percentage in the field (the minimum is 50 and the maximum is 300).
- Read the notice that appears, if one does:
- With 100%: "100% is a hard cap: it pauses good campaigns often (Google delivers above the daily on good days and evens out over the month). Extreme-fraud protection still applies."
- Below 100%: a notice explaining that it's a preventive anticipation — the brake checks every 5 minutes and pauses before the day's budget runs out, which pauses good campaigns even more often.
- Click Save.
- The answer is: "Spend brake updated — effective next cycle (~30 min)."
On the same card there's a checkbox: "Notify me when a campaign is paused for protection (spend brake or fraud)". When you tick it, you choose where you want the alert: Email and/or WhatsApp. The answer is "Alerts updated."
Pill "Connection"
...?aba=configuracao&gcfg=conexao
This is the screen for connecting Google Ads, with numbered steps. At the top of it two cards may appear:
-
Google Ads account status — answers "is the account fit to run ads?". When everything's fine, it's a green line with a ✓. When something is missing, it becomes a card with a title, summary, a numbered step-by-step and a button that opens the right screen inside Google (for example Open billing in Google Ads or View access in Google Ads). In one specific case — when there's nobody with owner access on the account — a field appears to type the responsible person's Google email and the Send invite button.
-
Media credit — only appears if your agency has taken over the Google bill for you. It shows how much is available for ads and how much was spent this cycle, with an amount field and the Top up credit button (which opens the payment screen). The minimum amount per top-up is 10.00 and the maximum is 100,000.00.
How do I know if I'm on this arrangement? The one who puts you on it is your agency, and that's agreed with them, outside the system — there's no notice anywhere else in the panel saying "from today on, your agency pays Google". Inside the product, the proof is this screen: if the Media credit card appears here, you're on this arrangement; if it doesn't, you pay Google yourself, directly, and your balance is the one on the Account balance card. If in doubt, ask whoever looks after your ads. And don't be left without knowing: if the credit runs out, campaigns are paused until the top-up, and that pause goes into the "What's been done here" list, in the module's Overview.
Then come the steps:
1. Your Google account. "You need to be connected with Google. If this is your first time or you connected before the update, reconnect to unlock access to your ads." Button: Manage Google connection (takes you to the Advanced pill).
2. Active Google Ads account. It shows which account is being managed, with a green ✓, the account number and — if there is one — the manager account number. Disconnect button. Three other possible states:
- "No active account. Choose one from the list below."
- "Account disconnected, but still on record" (with an orange triangle) — the link has already been undone but the record is still getting in the way. The button here is Remove from management, and this is the only place in the system where you can do that.
- The notice for a failed reading, with a Try again link.
3. Accessible accounts. The list of ad accounts your Google account can see. Each row has:
- Ad account — the number.
- Manager account (optional) — a field to type the number of the "umbrella" account, in the
format
123-456-7890. Only fill it in if you use one. - Action — the Activate button (or the word Active, if it's already the chosen one).
There's a Reload button in the corner to fetch the list again, and a link to
ads.google.com/aw/accountaccess, where you find the manager account number.
Possible messages in this section:
- "Your ad account is set by your agency. For security, you only see your own account — not other clients'."
- "Your agency hasn't linked an ad account to you yet. Get in touch with them to have it enabled."
- "No accounts found. Check that your Google account has access to some Google Ads ad account."
- "The Google connection lost its ads permission. Reconnect your Google account in step 1, above."
- "Your session with Google expired. Reconnect your Google account in step 1, above."
- "This Google connection has no access to ad accounts. Check that you connected the right Google account."
- "Google has temporarily rate-limited queries. It's nothing on your side — your accounts show up again as soon as the limit resets."
4. Ready-made reports. "Pick a ready-made report and run it on the active account."
The available templates are: Account overview, Performance by campaign (the one that comes already chosen), Performance by ad group, Performance by ad, Top keywords, Search terms (the real searches people typed), Bidding strategies, Performance by device and Daily trend.
Step by step:
- Choose in Report type.
- Choose the Period (Last 7 days, Last 14 days, Last 30 days, Last 90 days, This month or Last month).
- If you want, turn on Additional metrics by clicking the tags (they get a ✓).
- Click Run report.
- The table appears below, with how many rows came back and the period. There's a View technical details link for anyone who wants to see the query behind it — you can ignore it.
If no account is active: "Activate a Google Ads account before running reports." If there's no data: "No data for the period."
Invite by number. Right below the steps is the Google Ads account section, for the
alternative path: instead of choosing from the list, you paste the account number (in the format
123-456-7890, which appears in the top right corner of Google Ads) and click Connect. The
system sends the official invite and you accept it in Google's panel. The responses are
"Invite sent to Google Ads." or "All set — your account is already under our management."
Pill "Conversions API"
...?aba=configuracao&gcfg=conversoes
-
What you see here: the way to tell the system when a sale closes over in your CRM (the program where you keep track of your customers and deals). The screen explains: "Tell AutoAgencia when a sale closes in your CRM. This trains click protection and improves campaign performance."
This is a technical screen. It exists for people who have a programmer or a system that knows how to send data. If you don't, you can skip it with no problem at all — nothing else on the screen depends on it.
Step 1 — Your API key. "Use this key in your CRM to confirm sales. Treat it like a password." If there's no key yet, there's the Generate key button. If one already exists, the key comes hidden, with an eye button to show it, a button to copy it and the Rotate key button.
Careful with Rotate key: before swapping it, the system shows the notice "Generating a new key invalidates the current one. Any CRM using the old key stops working until you update it.", with the Confirm rotation and Cancel buttons.
Step 2 — How to connect your CRM. It shows the address to send to (Endpoint), the Company ID and an Example (cURL) ready to copy. It also explains the fields that must be sent:
tenantIdandapiKey(required),status(always "sale"),gclidorclickId(the identifier of the contact's click — send at least one so the sale is credited to the right campaign) andvalueCents(the value of the sale in cents, optional). -
If the reading fails, the screen shows the notice with the title Your API key and a Try again button — on purpose it does not offer to generate a new key, because that would take down the key that's already working.
Pill "Advanced"
...?aba=configuracao&gcfg=avancado
-
What you see here: two blocks.
1) Google Connections. This is the login with Google itself — the one that unlocks not just ads, but also Google Analytics, Search Console, Google Business Profile, YouTube and Tag Manager. It has the Connect with Google button (or Disconnect), shows which email you're connected with and brings the ID fields per product, for anyone who wants to point to exactly which property to use. If you're not the account owner: "Only the account owner can connect/disconnect."
2) Tracking in your Google Tag Manager. The card explains: "I install all the tracking you're entitled to (conversions, smart number, pixel, protection) straight into your GTM — without touching your site or DNS. Reversible at any time." The main button changes depending on your operation mode: in Automatic it installs; in the mode that asks for approval it shows what would be installed and asks for your Approve & apply. States that tend to appear:
- "Some tracking you already pay for is missing" — the tracking exists, but it's incomplete.
- A persistent notice when the tracking was created in Tag Manager but your site doesn't load its code yet — with the Open the step link.
- "Set your business website in your profile so I can install the tracking."
- Remove tracking, to undo everything. If you're not an owner or admin: "Only the account owner or admin can install the tracking."
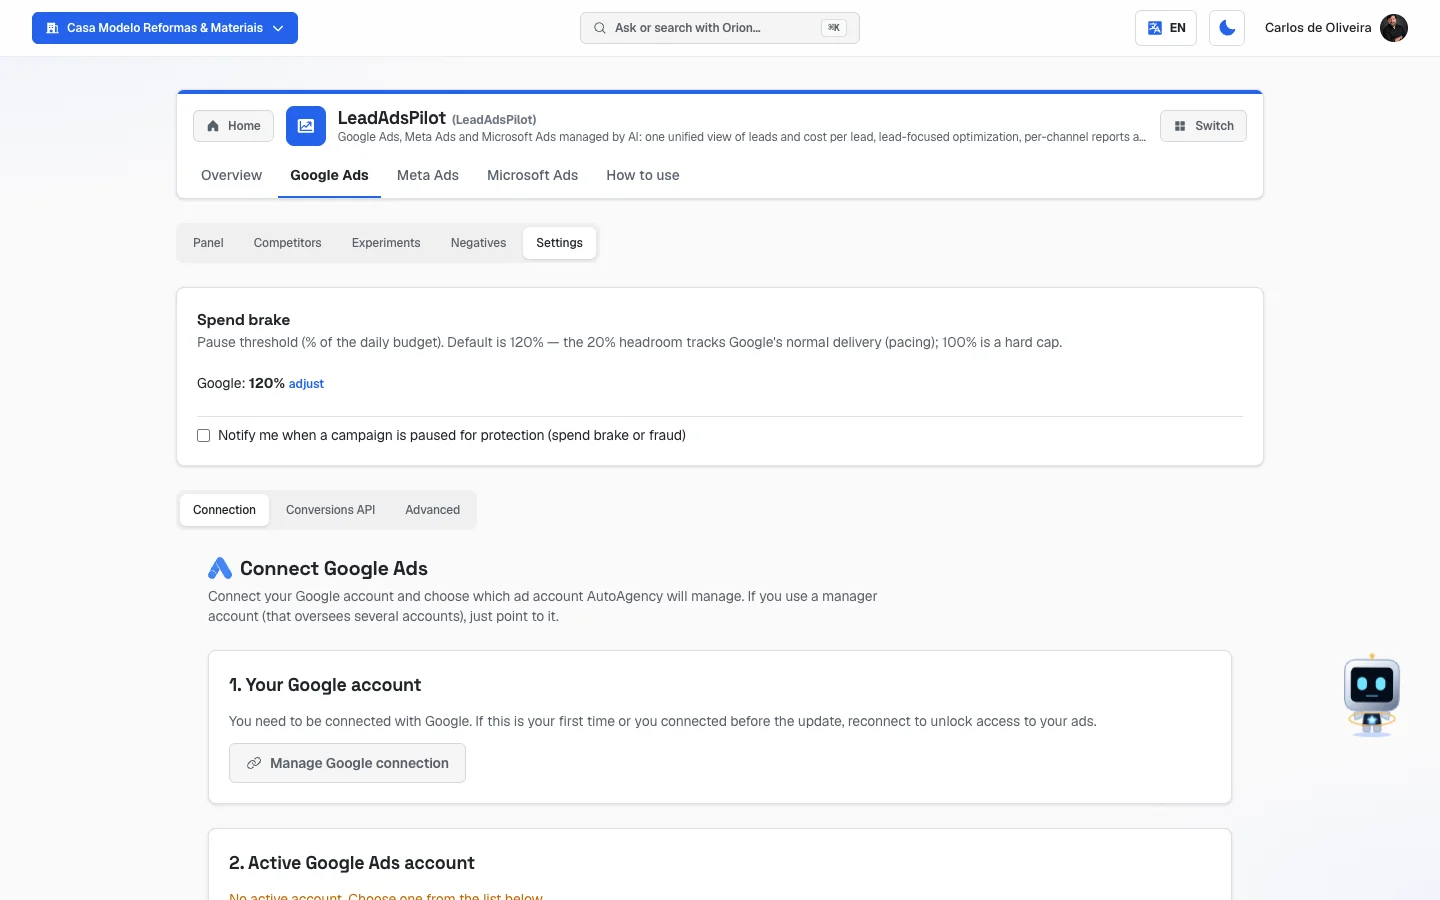 The Google Ads Settings pill on an account with no Google Ads connected yet: at the top only the "Spend brake" card, below the Connection · Conversions API · Advanced pills and the steps "1. Your Google account" and "2. Active Google Ads account"
Meta Ads
/app/modulos/gestao-trafego/meta-ads
This is the Facebook and Instagram sub-module. It has two pills: Panel and Settings.
Panel (pill "Panel")
/app/modulos/gestao-trafego/meta-ads
-
What you see here: the Meta Ads Insights card — "Impressions, clicks, spend and CTR for your linked account." A period selector with the options Today, Yesterday, 7 days, 14 days, 30 days, This month and Last month, and a Refresh button.
Six little boxes:
- Impressions — "How many times your ad showed up on people's screens."
- Clicks — "How many times people clicked your ad."
- Reach — "How many distinct people saw the ad (no repeats)."
- Spend — "How much you spent on ads in the period."
- CTR — "Click-through rate: of every 100 people who saw it, how many clicked. Higher means more appealing."
- CPC — "Cost per click: how much you paid, on average, per click."
-
What you can do: switch the period and refresh. Nothing here changes your campaigns.
-
Empty and error states:
- "Connect and activate a Meta ad account above to see insights."
- "No data in the period."
- "No Meta ad account connected yet. Connect yours under Settings."
- "Meta hasn't granted us access to this ad account yet. Open Business Manager, accept the AutoAgencia invite, then come back — your numbers show up right after." — this is the most common one: the account shows up as connected here, but the invite hasn't been accepted yet over inside Facebook.
- "We couldn't read the Meta numbers right now. We're already looking into it — try again in a few minutes."
Settings
/app/modulos/gestao-trafego/meta-ads?aba=configuracao
-
What you see here: the same two cards from Google at the top — Operation mode and Spend brake —, now applying to Meta, and the connection below. As with Google, the mode card only appears after the Meta ad account is connected and has already been read by the system.
The connection block is called Meta Ads (Facebook & Instagram) and works like this: "Connect your Facebook Page and your Meta ad account. You paste the ID, AutoAgencia sends the official invite and you accept it in Meta." There are two sections:
Facebook Page — "Paste the numeric ID or page URL. E.g. 123456789012345 or https://facebook.com/yourcompany".
Meta ad account — "Ad Account ID (with or without act_ prefix). Find it in Ads Manager."
-
Step by step — connecting (the paste-the-number path):
- Paste the ID into the section's field.
- Click Connect. The response is "Invite sent."
- Click Open invite ↗ — it opens Meta's panel in a new tab.
- Accept the invite there, in Business Manager.
- Come back and click I've accepted. The system checks with Meta right away and responds "Done — [name] is connected."
-
An easier path: in Overview → Overview, the Connect Facebook (ads) card does everything in a single click, without you having to find any number. Use that path if you're not used to Business Manager.
-
Notices that may appear:
- "Meta hasn't granted us access to this account yet. Open the invite, accept it in Business Manager and click 'I've accepted' again. Nothing was changed here."
- "Our app is still under Meta review for access to this account. Once it's approved, just click 'I've accepted' again."
- "Meta refused the invite for this account. Check that the ID is right and that you're an administrator of it in Business Manager."
- "We connected [name], but Meta reports that this ad account is CLOSED." (or DISABLED) — in that case there's no data or delivery until you sort it out over there.
-
Disconnecting: the Disconnect button exists in each section, with a confirmation that explains exactly what's going to happen. In the case of the ad account: "We'll take this ad account off this company: we stop reading the data and looking after its campaigns from here. The partnership in your Business Manager stays…". Only the company's owner or an administrator can disconnect.
Microsoft Ads
/app/modulos/gestao-trafego/microsoft-ads
This is the Bing (Microsoft's search engine) sub-module. It has two pills: Panel and Settings.
Panel (pill "Panel")
/app/modulos/gestao-trafego/microsoft-ads
-
What you see here: the Microsoft Ads card — "Your Microsoft Advertising (Bing) account performance — last 30 days." The period is fixed at 30 days; there's a Refresh button.
Four little boxes: Impressions, Clicks, Investment and Conversions. Below, a simple list of campaigns, each with its number of clicks and spend.
-
Empty and error states:
- "No Microsoft account connected yet."
- "Account connected — collecting performance (up to 24h)." — normal right after connecting.
- "No campaigns with delivery in the period."
- The notice for a failed reading, with the title Microsoft Ads.
Settings
/app/modulos/gestao-trafego/microsoft-ads?aba=configuracao
-
What you see here: the Operation mode card (the same as Google's and Meta's) and, right below, the Microsoft Advertising connection block. As with Google, the mode card only appears after the Microsoft account is linked and has already been read by the system — before that, the screen shows only the connection.
The connection has two steps, and the screen shows one at a time:
Step 1 — authorize. "Authorize AutoAgencia to manage the Microsoft Advertising account.", with the Connect Microsoft button. It takes you to Microsoft's login screen. When you return, the notice "Microsoft connected!" appears. If you're not the account owner, instead of the button this appears: "The Microsoft connection is done by the account owner."
Step 2 — link the account. "Enter the client's Microsoft ad account number.", with a field and the Link button. The response is "Account linked."
Once it's done, the screen shows "Linked account:" with the name in bold and the number next to it, plus the Unlink button (the response is "Account unlinked.").
-
If the reading fails, the screen shows the Microsoft Advertising connection notice instead of offering the connect button — on purpose, so you don't redo a connection that already exists.
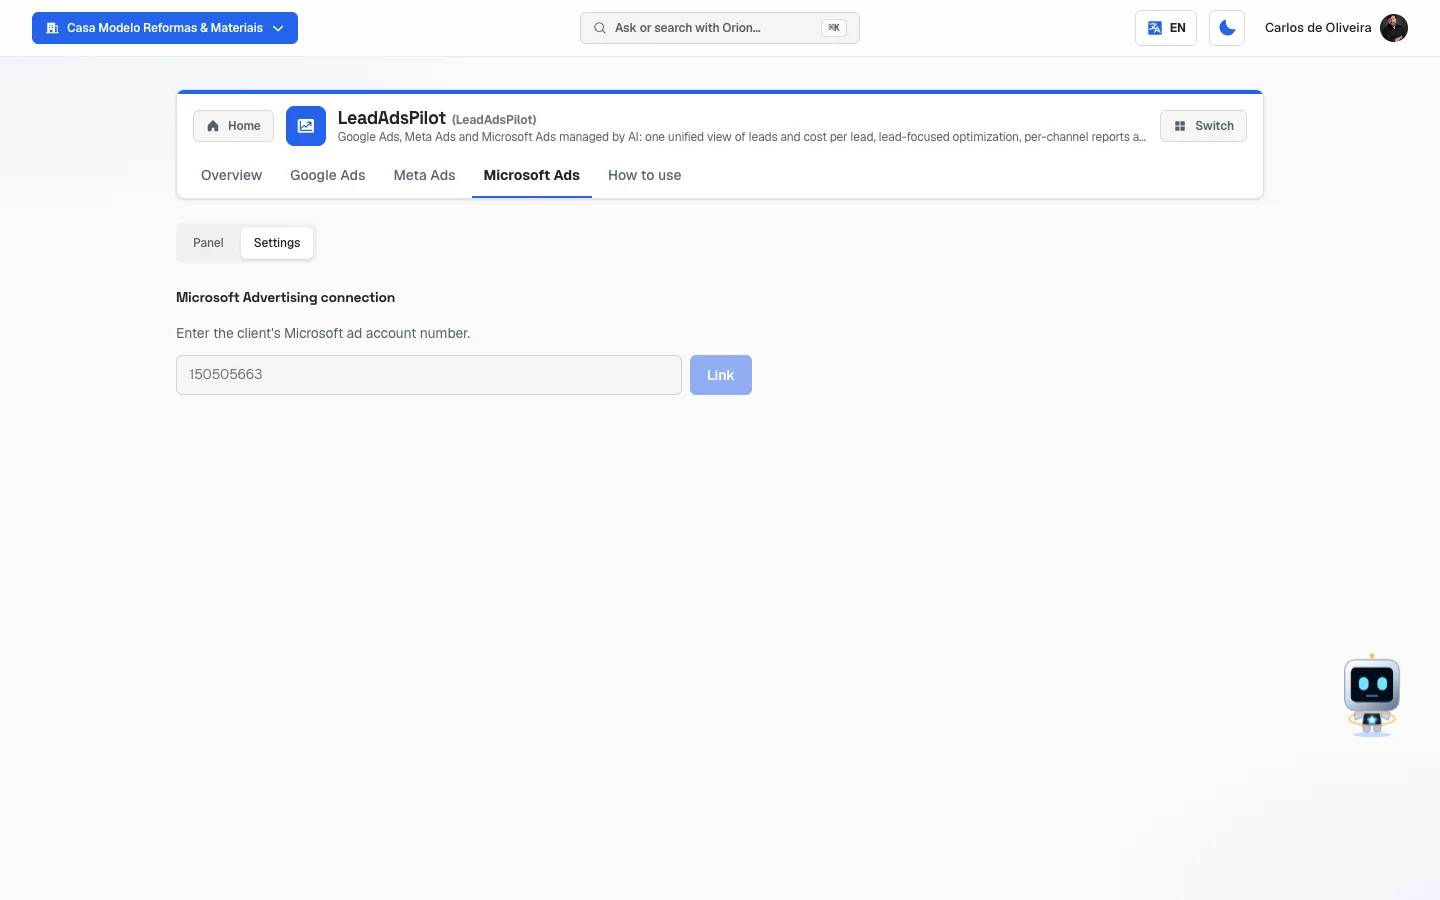 The Microsoft Ads Settings pill at the step "Enter the client's Microsoft ad account number", with the field and the Link button
How to use
/app/modulos/gestao-trafego/como-usar
This is the last tab in the app bar and it exists in every module in the system. It shows, in a short version, what the module is for, the setup steps, how to read the results and a few frequently asked questions — all written in plain language. It works as a quick reference; this manual is the full version.
How to read the numbers
This is the part that confuses people the most when they're starting out. Take it slowly — every number below shows up somewhere in the module.
Contact (or "lead") Someone who got in touch with you because of the ad: called, sent a WhatsApp or filled out a form on your website. It is not someone who only clicked. A click is a curious person; a contact is a person talking to you.
Cost per contact (CPL) How much you paid in ads, on average, for each contact that came in. It's the most important number in the whole module. If you spent $1,000 and received 20 contacts, the cost per contact is $50. It shows up as "Cost per lead", "Cost/lead", "CPL" and "CPA" depending on the screen.
CPC (cost per click) How much you paid, on average, for each click. It helps you understand the auction, but it does not tell you whether the ad worked — ten cheap clicks that don't turn into a contact cost more than one expensive click that turns into a job.
Impressions How many times your ad showed up on someone's screen. Showing up doesn't cost: you pay for the click.
Clicks How many times people clicked your ad. It's what you pay for.
Reach (Meta only) How many different people saw the ad. If the same person saw it five times, it counts once in reach and five times in impressions.
CTR (click-through rate) Of every 100 people who saw the ad, how many clicked. The higher, the more appealing the ad is.
Conversions The results that matter coming from the ads (contacts, sign-ups, purchases). It's Google/Meta doing the counting; for this to work, tracking has to be installed.
Spend / Cost How much came out of your pocket on ads in the chosen period.
Revenue How much the sales earned. It only shows up with a number if the system knows the value of each sale — and it only knows if your CRM tells it (that's the Conversions API). When it doesn't know, it shows —, and that's better than showing $0.00, which you'd read as "I spent and nothing came in".
ROAS Revenue divided by spend. "3.50x" means that every $1 invested turned into $3.50 in revenue. Above 1x, the ad already pays for itself.
LTV per customer How much each customer is worth, on average, in the period — the total of tracked sales divided by how many different customers bought.
Market share (Competitors tab) Of every 100 searches you could appear in, how many you appeared in. The higher, the more you dominate.
Lost by rank / Lost by budget (Competitors tab) The two reasons you didn't show up: either your ad ended up below the competitor (rank), or your budget for the day ran out (budget). They're different problems and have different solutions.
Leads slipping away (Competitors tab) How many contacts, roughly, went to competitors because you appeared less. It comes with the ≈ sign because it's an estimate made from your own numbers — it's neither an exact number nor a made-up one.
CPL benchmark bands on target (green, you're on target) · acceptable (yellow, it can be improved) · critical (orange, it's expensive) · churn risk (red, it's too expensive to pay for itself) · no data (gray).
Risk tags in Approvals Low, Medium, High and Critical. The higher it is, the more the change touches something important — and the more it's worth reading it calmly before approving.
The dash (—) Whenever you see a dash in place of a number, read it as "couldn't find out", never as "zero". The system is built never to claim zero without having checked.
"Days since the last change" How many days ago the system last touched your campaigns. Not touching is also management — but many days with no adjustment at all, with the number in alert, is the time to ask Ricardo in the chat.
Frequently asked questions
Can the AI spend more than I authorized? No. Budget and schedule are always your decision — no automation changes that on its own. On top of that there's the spend brake, which keeps an eye on the day's spending and pauses the campaign when it goes past the limit you chose (the default is 120% of the daily budget). You can tick the option to get an alert by email or WhatsApp every time that happens.
Do I have to approve every little thing? No. The Approvals queue only brings what's your decision: budget, days and times and where to appear. The rest — blocking useless searches, adjusting keywords, touching bids — the system does on its own and records in Decisions. If you want to approve everything anyway, change the Operation mode to With Approval in the platform's Settings.
I approved something and regret it. Now what? Go to Overview → Decisions, find the adjustment's line and click Undo. The first click only asks; you confirm right after. The button only appears on adjustments the system knows how to reverse — if it isn't there, talk to Ricardo in the chat.
Do I need to have an account on Google, Facebook and Bing? No. Google Ads is the main connection. Meta Ads and Microsoft Ads are optional and each has its own tab — connect them when it makes sense for your business.
Why does the screen say the account is connected and yet no number shows up at all? Two common causes. On Meta, it's the invite that hasn't been accepted yet inside Business Manager — the screen says so in plain words. On Google, you may have activated the "umbrella" account (the manager/MCC) instead of your business's ad account; Google doesn't report numbers for the umbrella account.
My ad stopped showing out of nowhere. What happened? Start with the balance: go to Google Ads → Panel and look at the card at the top. If it says "The account is out of funds", that's it. The second common cause is the spend brake having paused the campaign for hitting the day's limit — it comes back on its own when the day turns over.
Why wasn't a suggestion I approved applied? The card always says the reason, in plain language. The most common ones: the account already received this week's changes (daily tinkering disrupts Google's learning and raises click costs); the change was made recently and the system waits a while; or a protection stopped it — for example, the change would mute searches for a service you provide.
Is that "what the business does and doesn't do" sheet really important? It's the most important thing you fill in by hand in this module. It's what stops the system from turning off a keyword for a service you do offer, and it's what makes the system block searches for what you don't do. Half an hour there saves money every month.
When something goes wrong
The screen says "I couldn't load this information right now"
What it means: the reading failed. That doesn't mean there's nothing there — it means it couldn't be checked. The full sentence the system uses is: "I couldn't load this information right now. That does not mean there is nothing here — it means I couldn't check." What to do: if there's a Try again button in the notice itself, click it. If there isn't, reload the page after a few moments. Nothing was changed in your ads.
The dashboard numbers show up as "—"
What to check: it's the same case as above, applied to the four numbers. A dash is never zero. What to do: reload the page. If it persists for hours, talk in the chat.
The screen shows "Checking…" and blinking gray blocks
What it means: the system is still checking your connections and, on purpose, doesn't claim anything before it knows. Wait a few seconds.
"No active account. Choose one from the list below."
What to do: go to Google Ads → Settings → Connection, step 3, find your account and click Activate.
"Account disconnected, but still on record"
What it means: the link with that account has already been undone, but the record was left behind and is getting in the way. What to do: click Remove from management, on that same card. It's the only place where that's possible.
"No accounts found" in the list of accessible accounts
What to check: whether the Google account you connected is really the one that has access to Google Ads. Many people have two Google emails and connect the wrong one. What to do: in Settings → Advanced, disconnect and connect again with the right account.
"The Google connection lost its ads permission"
What to do: go back to step 1 (Manage Google connection) and reconnect your Google account, accepting all the permissions asked for.
"Your session with Google expired"
What to do: the same — reconnect in step 1.
"Google has temporarily rate-limited queries"
What it means: Google put a temporary limit on our queries. It's nothing on your side and no timeframe is promised. What to do: nothing. The accounts show up again when the limit resets. There's no point in reloading dozens of times.
"The selected account is a manager account (MCC)"
What it means: you activated the "umbrella" account instead of the business's ad account. Google doesn't report numbers for accounts like that. What to do: in Google Ads → Settings → Connection, activate your business's ad account (and, if needed, put the manager account's number in the field next to it).
On Meta: "Meta hasn't granted us access to this ad account yet"
What to do: open Facebook's Business Manager, accept the AutoAgencia invite and go back to the screen. If you already accepted, click I've accepted again — the system checks right away.
On Meta: "Our app is still under Meta review"
What to do: wait for the approval and click I've accepted again. In the meantime, use the one-click path in Overview → Overview → Connect Facebook (ads), which gives direct access, with no invite.
On Meta: the account shows up as CLOSED or DISABLED
What it means: the problem is on Facebook's side, not here. While it stays that way, there's no data or delivery. What to do: sort out the issue in Business Manager, or use another ad account.
On Microsoft: the screen offers "Connect Microsoft" and I already connected
What to check: if instead of the button the notice "Microsoft Advertising connection" shows up with the failed-reading sentence, it's just the reading that didn't come back — do not click connect again. What to do: reload the page in a few moments.
"Account balance: the account is out of funds"
What it means: the money in the ad account ran out and the ads stopped. What to do: top up the balance inside Google Ads. If your agency took over the bill, use the Top up credit button on the Media credit card, in Google Ads → Settings → Connection.
The balance history shows a "Delay" of several hours
What it means: the money entered the account after the campaign had already started the day — that is, the ad was off the air during that time. What to do: top up before the time your campaigns open, not after.
A campaign was paused on its own
What to check: it was probably the spend brake (it hit the day's limit). The campaign comes back on its own when the day turns over. What to do: if this keeps happening, either raise the daily budget, or loosen the brake's limit in Settings → Spend brake. And tick the email/WhatsApp alert so you're not caught by surprise.
The button to save the service profile is disabled
What it means: reading the sheet failed, and the system disables the button on purpose — so nobody saves a blank sheet over the one that already exists. What to do: reload the page and try again.
"Your goals were saved, but we couldn't change Google right now"
What it means: your goal was recorded. What failed was only the part of changing the budget over inside Google. What to do: try again later, or ask Ricardo in the chat.
"No active campaign to apply the budget"
What it means: you ticked "Actually apply to Google" but there's no running campaign to receive the new budget. What to do: activate a campaign first, or leave the switch unticked (the goal still counts as guidance for the team).
"Your access to this module is read-only. Ask the agency to enable settings."
What it means: you're signing in with a login the agency created just to follow along. You see everything, but you can't approve, dismiss, save goals or change settings. What to do: ask the agency to enable the edit permission in the traffic area.
"Only the account owner or admin can change the mode" / "…change the brake" / "…install the tracking"
What it means: those three actions are restricted to the company's owner or administrator inside the system. What to do: ask whoever has that role, or ask for your user to be promoted.
The Approvals queue says "Showing the X most recent of Y pending"
What it means: there are more items than fit on the screen. What to do: resolve the ones in sight — "Clear these and the next ones appear."
I clicked "Undo" and a yellow notice appeared
What it means: the system couldn't reverse it. The notice explains the reason in plain language. What to do: talk to Ricardo in the chat describing what you wanted to undo.
I can't find the "Needs you" section in the Approvals tab
What it means: it only appears for the company's owner/administrator or for the agency. If your login is a follow-along one, it disappears on purpose.
A suggestion I dismissed disappeared and I regret it
What to do: in Approvals, open the Recently dismissed section (click the little arrow) and click Restore to queue on the item. It comes back right away. Without restoring, the system stops proposing that for 30 days.