

E-commerce
Where it is: Home → Your apps → E-commerce
Address: /app/modulos/ecommerce
What it's for
Selling online has two parts: getting the store live and looking after it every day. The first part trips up a lot of people — you have to choose a platform, set up payments, set up shipping, write the required pages. The second wears you out: writing product descriptions, inventing promotions, chasing people who put something in the cart and vanished.
This module takes care of both. If you don't have a store yet, it creates one for you — already with catalog, payments, shipping and the required pages set up. You just add the products. If you already have a store on Shopify, you connect yours and keep going with it.
With the store linked to the panel, you get a team of three assistants: Eduardo (organizes the storefront, categories and navigation), Marina (writes product descriptions that sell and builds discount campaigns) and Thiago (handles the abandoned cart and the checkout). They can look at your real catalog and your real orders — it's not advice in a vacuum.
An everyday example: you make sweets to order and never had a store. You type the name "Doces da Lu", choose Brazil, pay for the setup and within a few minutes the store is live. Then you open the chat, ask Marina to write the description for the gourmet chocolate truffles, and ask for a discount campaign for Mother's Day. The following week, you ask Thiago how many carts were abandoned.
What this module does — and what it does NOT do
This is the most important part to understand before subscribing. Read it calmly.
What it DOES:
- Creates a new online store for you, hosted at the address
nome-da-sua-loja.lojas.autoagencia.io. On the screen that store shows up with the platform AutoAgency store. It's born with catalog, payment method, shipping and the required (legal) pages ready, in the language and currency of the country you choose. - Connects a Shopify store you already have, so the team can start looking after it.
- Lets the assistants look up your catalog (products, prices and stock) and your recent orders.
- Lets the assistants create discount coupons in your store (with a code, value, usage limit and expiry date).
- Helps with text and strategy: product descriptions, storefront organization, promotion campaigns, ideas for recovering abandoned carts.
- Offers the Bling add-on, for invoicing (Brazil's nota fiscal), stock control and syncing with marketplaces (Mercado Livre, Shopee, Amazon).
What it does NOT do:
- It isn't a store by itself. Without creating or connecting a store, the module has nothing to show. It's a control panel, not the storefront.
- It doesn't connect just any platform. The connect button is for Shopify only. If your current store is on another platform, there's no button today to link it here.
- It doesn't add or edit your products on its own. The assistants read the catalog and write the texts for you; you're the one who adds the product, changes the price and adjusts the stock, inside the store's own panel. The only thing they create on their own in the store is a discount coupon.
- It doesn't issue invoices and doesn't control stock on its own. That's the Bling add-on, subscribed separately — and Bling only works with the store created here, not with a connected Shopify.
- It doesn't pack, ship or serve your end customer.
- Creating the store is a one-time charge, separate from the monthly fee. Hosting and the team's management are subscribed separately — the screen itself says so.
Before you start
- The E-commerce module has to be active on your account. Without it the screen shows the module's description and the Activate in catalog button.
- The first time you open a newly purchased module, an invitation appears at the top of the page to set it up by chatting with the module's specialist: "It's optional — the tabs below already work. Each reply from the specialist uses AI credits." Chat with … lets the specialist get to know your company; Dismiss removes the invitation without chatting. If you open the chat, the Complete setup button at the end of it also removes the invitation.
- If you're going to create the store here: have decided the store name (it becomes the address on the internet) and which country you sell in (it sets the currency, language, payment and shipping options). You'll also check a box confirming the store is created right away, and pay the one-time setup fee.
- If you already have a Shopify store: have its internal address on hand (the one that ends
in
.myshopify.com) and an access code generated inside Shopify's own panel. The step by step for generating that code is written on the screen and repeated below. - You can only have one store linked to the panel. If there's already one, the screen says "You already have a store connected to the panel."
Getting started
Path A — I don't have a store (I want to create one):
- On Home, under Your apps, click E-commerce. You land on the Home tab.
- If the invitation to set up the module by chatting appears, you can accept or click Dismiss — the tabs already work either way.
- Click the Store tab.
- In the Create my store box, fill in the Store name (e.g.:
Corner Coffee). As you type, the screen shows below: "Your store address will be: …". - Under Where you sell, choose the country. The options are Brazil, Chile, Mexico, Argentina, Colombia, Peru, Spain, United States and Portugal.
- Check the acceptance box: "Create my store now. I understand the service starts immediately after payment and the store is delivered within minutes." Without checking that, the payment button doesn't turn on.
- Click the button to create the store. Its text carries the setup price — the price shown in the catalog, in your country's currency, after Create my store for — and, right above it, the screen reminds you that it's a one-time charge and that hosting and the team's management are subscribed separately. You're taken to the payment screen.
- After paying, you go back to the Store tab and see the "We're building your store" box. You can close the page — when the store is ready, it shows up there.
- With the store live, the Open my store and Open the store dashboard buttons appear. It's in the store dashboard that you add products.
Path B — I already have a Shopify store (I want to connect it):
- On the Store tab, find the I already have a store box and click Connect my Shopify store.
- Two fields open, along with the step by step "How to get the access code (takes 2 minutes)".
- In another browser tab, open your Shopify panel and follow the five steps (they're repeated below, in "The Store tab").
- Come back here, fill in the Your store's internal address and the Store access code.
- Click Connect my store. You see "Store connected: …".
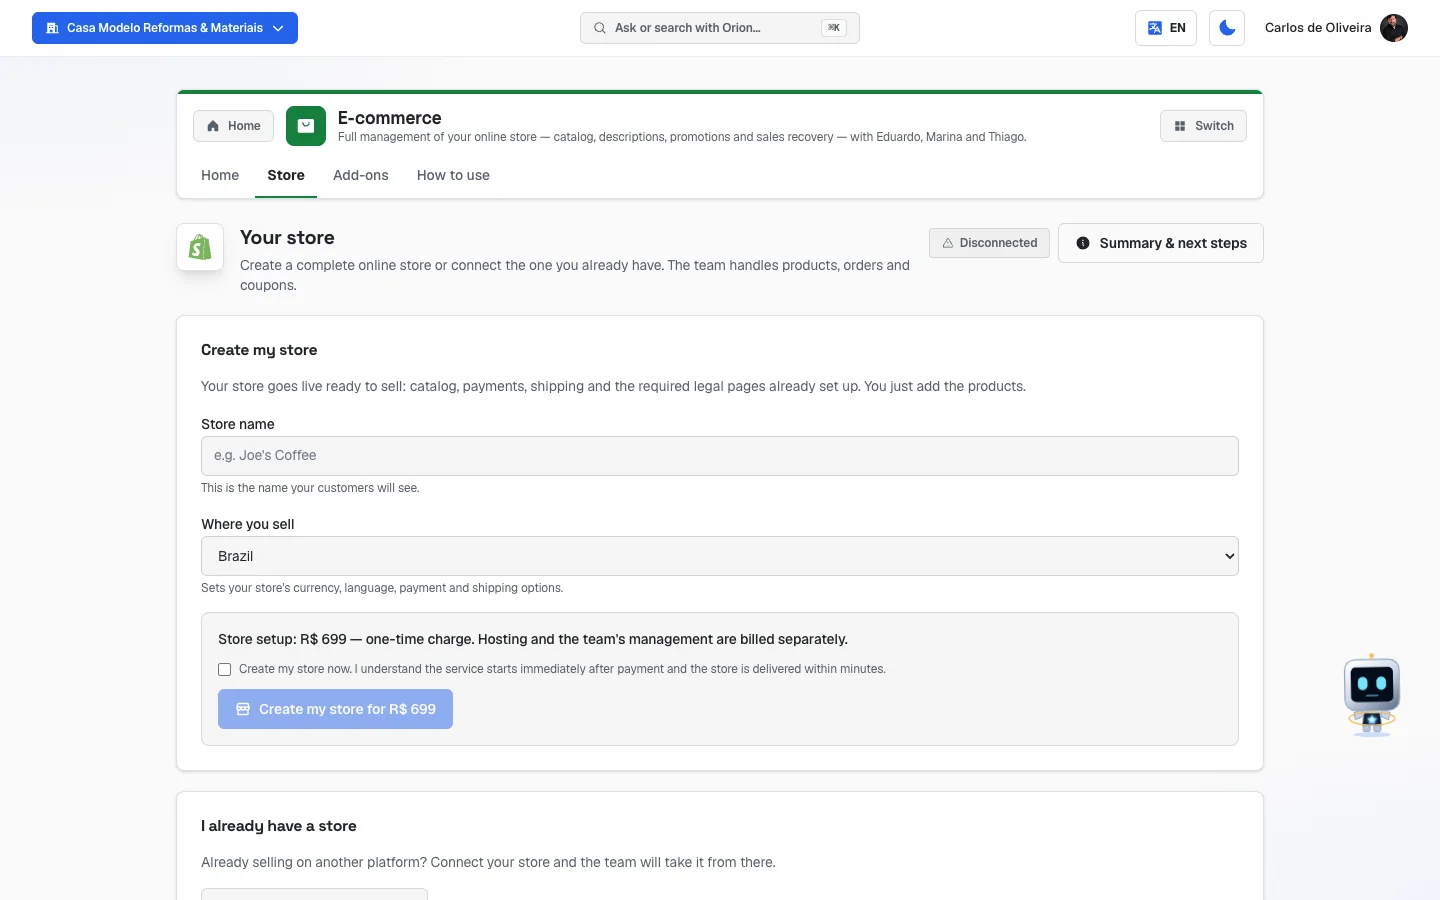 Store tab with no store: the Your store header with the Disconnected tag and the Summary & next steps button, the "Create my store" box with the payment button still dimmed (the acceptance box needs to be checked) and, below it, the start of the "I already have a store" box
The tabs, one by one
Home
/app/modulos/ecommerce/inicio
- What you see here:
- At the top, Marina's note about your store's situation. It can be "You don't have a store connected yet — without it I can't see your catalog or your orders.", "Your store is being created — this takes a few minutes.", "Your store setup failed — it isn't live and nobody can buy.", "Your store is live, but with no integration on — invoicing and stock are still manual." or "Your store is live with X integrations on.". Next to the note comes a button that takes you straight to where you fix it.
- Two numbers: Integrations on and Integrations failing.
- Four shortcuts and, below them, the chat with the team.
- What you can do: chat with the assistants. The four shortcuts already leave the question started — you complete it and send it:
| Shortcut | Who answers | What it's for |
|---|---|---|
| Organize the store | Eduardo | Tidying up the storefront, categories and navigation. |
| Product description | Marina | Writing a product's text, with the attributes and with Google in mind. |
| Discount campaign | Marina | Planning promotions and coupons to sell more. |
| Recover carts | Thiago | Reducing cart abandonment and improving checkout (the screen for finishing a purchase). |
If the store isn't linked yet and you ask for something that needs the catalog, the assistant answers: "You need to create or connect the store first."
A note you may see here: "Your store is live and selling without anyone checking each product's margin." It appears when your store is up and running but you haven't yet added products with cost and price in the Pricing module. The button next to it takes you there.
Store
/app/modulos/ecommerce/loja
This is the tab that decides everything: without a store here, the rest of the module has nothing to do.
- What you see here: a header Your store with a tag saying whether it's Connected or Disconnected, and the Summary & next steps button, which opens the Store status window — it shows two steps: Store (the address, or "You don't have a store yet") and Team operating ("The team can now run your store" or "Create or connect your store to get started").
- What you can do: create the store, connect a Shopify, open the store, open the store dashboard and disconnect.
When you don't have a store yet, the two boxes appear:
"Create my store" box. The screen explains: "Your store goes live ready to sell: catalog, payments, shipping and the required legal pages already set up. You just add the products."
| Field | What to fill in |
|---|---|
| Store name | The name your customer will see. Up to 60 characters. It's what becomes the address: Corner Coffee becomes corner-coffee.lojas.autoagencia.io. Accents and spaces disappear, and only letters, numbers and hyphens are left. |
| Where you sell | The country. It sets the store's currency, language, and payment and shipping options. |
| Acceptance box | Required. It states that you understood the store is created right away, right after payment. |
Choose the name with care: it becomes the address on the internet. And if you see "That store address is taken. Please pick another name.", it's because another customer already took that name — change it to a variation.
"I already have a store" box. The screen explains: "Already selling on another platform? Connect your store and the team will take it from there." When you click Connect my Shopify store, two fields open:
| Field | What to fill in |
|---|---|
| Your store's internal address | The address that ends in .myshopify.com. The screen warns: "not your website domain". |
| Store access code | A code that starts with shpat_, generated inside your Shopify panel. |
How to get the access code (the step by step the screen shows):
- In your store's admin, open Settings → Apps and sales channels.
- Click "Develop apps", then "Create an app". You can name it AutoAgency.
- Under "Configure Admin API scopes", check: read products, read orders and create discounts.
- Click "Install app", then "Reveal token once" — copy the code that
starts with
shpat_. - Paste the code above, along with your store address. Done.
The Connect my store button only turns on when both fields are filled in. The code is stored encrypted — neither the team nor you can see it again afterward.
While the store is being built, the tab shows the "We're building your store" box with the sentence "This takes a few minutes. You can close this page — your store will show up here as soon as it's ready." The screen refreshes on its own.
If the build goes wrong, the tab shows the Your store setup failed box, with the explanation "The setup you already paid for did not finish. Click to try again — no new charge. If it fails again, contact support." and the Try again button. When you click it, the system restarts the build with the same name and country you paid for — you fill in nothing new and pay nothing new. The screen goes back to "We're building your store" and refreshes on its own.
When the store is live, four buttons and a box appear:
| Button | What it does |
|---|---|
| Open my store | Opens your storefront in a new tab — it's what your customer sees. |
| Open the store dashboard | Opens the admin side, where you add products and see orders. |
| Refresh | Re-reads the store's status. |
| Disconnect | Unplugs the store from the panel. |
The Store details box shows four lines: Name, Address, Platform (AutoAgency store, if it was created here, or Shopify, if you connected yours) and Status (Active).
About disconnecting: when you click Disconnect, the screen asks "Disconnect the store?" and explains: "Disconnect the store from the panel? Your store stays online — the team simply stops running it. You can reconnect it here whenever you want, at no extra charge." In other words: your storefront doesn't go offline and nobody loses products; what ends is the assistants' access to the catalog and the orders.
And how do you reconnect afterward? It depends on which store it is:
- The store created here (AutoAgency store): it stays saved in the panel. The Store tab starts showing the Reconnect my store to the panel box, with its address and the Reconnect my store button. One click and everything comes back — catalog, orders and the Bling add-on, if you have it. There's no new charge. While it's disconnected, the Create my store box doesn't even appear on the screen: the reconnect one is there instead, so you don't pay twice for the same store.
- The Shopify you connected: the link is undone. To come back, use the I already have a
store box again with the
.myshopify.comaddress and an access code. That doesn't cost anything either.
This applies to those who disconnected the store while the account is active. Closing the account in AutoAgency is something else: then the store goes offline for real and the access passwords to it are deleted on purpose. Anyone who comes back after closing builds the store again, through the Create my store box — the screen doesn't offer reconnecting in that case, because there would be nothing to reconnect.
🟥 Before paying again, talk to us. When a customer re-subscribes, our reconnection routine may put the store back online at the same address without the screen knowing — and then you'd see the "Create my store" box charging again for a store that's already back. If you're re-subscribing and had a store before, open a ticket before buying: we check whether yours is already live and give you back access through the panel. (If you try to create with the same address, the screen now recognizes that the store is yours and says so, instead of sending you off to pick another name.)
Add-ons
/app/modulos/ecommerce/addons
An add-on is something extra you plug into the store. Today there's one:
Bling — Invoicing + ERP. The screen explains: "Issue invoices, control stock and sync with marketplaces (Mercado Livre, Shopee, Amazon) from your store." Bling is a system from another company, a Brazilian one, that handles the tax side and the stock.
Note the requirement: Bling can only be activated on top of the store created here. If you have no store, or if your store is a connected Shopify, the screen shows: "Bling connects to your store. Create your store in the Store tab first."
What you see, depending on the situation:
| Situation | What shows on the screen |
|---|---|
| No store created here | The sentence "Bling connects to your store. Create your store in the Store tab first." |
| Store ready, Bling not subscribed | The Activate Bling button (the button's text carries the price, one-time charge). |
| Subscribed, being set up | "Setting up the Bling connection… this takes a moment." The screen refreshes on its own. |
| Failed | The Try again button. |
| Active | The numbered connection guide and, below it, the Your Bling orders box. |
Step by step — linking your store to Bling (after activating the add-on):
The screen builds a guide with your details already filled in, under the title "Connect your store to Bling":
- Create your Bling account with the button that appears below the guide (Create a Bling account) — it takes 2 minutes.
- Inside Bling, go to Preferences → Integrations → WooCommerce. The guide itself explains, in that step: "That's the right one: your AutoAgency store shows up in Bling under the name WooCommerce, because that's the technology it runs on."
- Paste your store's address (the screen already shows what it is).
- Paste the Key (Consumer Key) and the Secret (Consumer Secret) — the screen shows both. Pick the default authentication method.
- Turn on product and order sync. Done — Bling starts issuing your invoices and controlling stock.
Why "WooCommerce" only shows up here. On every screen and in every AutoAgency message the store created here is called AutoAgency store — on the Store tab, on the card on the Integrations screen and in the assistant's messages. Bling is the only place where it appears under another name, WooCommerce, because that's what Bling calls the technology that runs underneath it. If you look for "AutoAgency" in Bling's integrations list, you won't find it: choose WooCommerce, which is your store.
Step by step — seeing the orders without leaving the panel:
- On the Add-ons tab, scroll down to Your Bling orders.
- Click Connect my Bling. The screen explains: "Connect your Bling account to see your orders and invoice status right here — without leaving the panel."
- Authorize in the window that opens.
- When you come back, your last 10 orders appear, each with the number, the customer's name, the amount and the invoice status: Invoice issued, Invoice pending, No invoice or Status unavailable.
- If there are no orders yet, you see "Account connected. You have no orders in Bling yet.".
How to use
/app/modulos/ecommerce/como-usar
Every module has this tab at the end. It's the module's manual inside the system itself.
How to read the numbers
The two numbers on the Home tab:
| Number | What it means |
|---|---|
| Integrations on | How many add-ons are working on your store. Today Bling is the only add-on that exists — it's the only one the Add-ons tab offers and the only one the system knows how to connect —, so this number can only be 0 or 1. The plural in the title is the shape of the box, not a promise that there are several. |
| Integrations failing | How many add-ons failed. If it's greater than zero, the number turns an alert color and Marina warns you in the note at the top. |
Marina's sentences, in order of urgency (she shows the most serious one that applies):
- The store failed to be created — nobody can buy. This is the most urgent.
- The store is being created — just wait.
- You don't have a store connected.
- Some integration is failing.
- The store is live, but with no integration on — invoicing and stock are still manual.
- The store is live and selling without anyone checking each product's margin (it goes to the Pricing module).
- All in order: the store live, with X integrations on.
In the Your Bling orders box: the amount on each row is that order's total. The tag on the right side is the invoice status, not the order's — Invoice pending means the sale exists but the invoice hasn't gone out yet.
Frequently asked questions
Do I need to know about computers to have the store? Not to create it: you type the name, choose the country, pay and it goes up ready. After that you'll need to add your products in the store dashboard — and that's where the assistants help, writing the texts for you.
I already sell through Instagram/WhatsApp. Do I need a store? You don't need one, but the store handles payment and shipping on its own, without you having to send a PIX key (Pix is Brazil's instant payment) and sort out delivery in private messages.
I have a store on a platform that isn't Shopify. Can I connect it? Today the connect button is for Shopify only. If yours is on another platform, the alternative is to create a store here with the Create my store box.
Does the team add my products? No. They read your catalog, write the descriptions, organize the categories and create coupons. Adding the product and changing the price is something you do in your store's dashboard.
What happens if I disconnect the store? Your store stays online and selling as normal. What changes is that the assistants stop seeing the catalog and the orders.
Can I have two stores connected to the panel? No. If there's already one, the screen says "You already have a store connected to the panel."
Do I need Bling? If you sell physical products and need to issue invoices and control stock, it solves that. If you sell services, or already have a system that issues your invoices, you can ignore the Add-ons tab. Remember that Bling only works with the store created here.
When something goes wrong
| Symptom | What to check | What to do |
|---|---|---|
| The screen shows the module description and the Activate in catalog button | The module isn't active on your account. | Click Activate in catalog. |
| "We couldn't verify your access right now." | It was a connection failure, not a lack of subscription. | Click Try again. |
| The button to create the store is dimmed | The name is missing (minimum 2 letters) or the acceptance box isn't checked. | Fill in the name and check the acceptance box. |
| The address doesn't show up below the name field | The name you typed doesn't become an address — it has only symbols or accents. | Use letters or numbers in the name. |
| "That store address is taken. Please pick another name." | Another customer already has that address. | Change it to a variation (Corner Coffee Downtown, for example). |
| "You already have a store connected to the panel." | There's already a store on this account. | Use the one that's there. If it was created here and you disconnected it, the way is Reconnect my store — buying another would mean paying twice. If it's a connected Shopify, disconnect it before creating. |
| "I couldn't open the checkout. Please try again." | It was a failure opening the payment screen. | Click the button again. If it persists, refresh the page (F5). |
| "I couldn't connect the store." | The address or the access code is wrong, or the code doesn't have the requested permissions. | Check that the address ends in .myshopify.com and redo the step by step for the code, checking the three scopes (read products, read orders, create discounts). |
| The store got stuck on "We're building your store" | The build takes a few minutes and the screen refreshes on its own. | Wait. If a long time goes by, go back to the Store tab: if the Your store setup failed box appears, click Try again. |
| Marina says "Your store setup failed — it isn't live and nobody can buy." | The build went wrong. You already paid for it. | Go to the Store tab and click Try again — no new charge. If it fails again, contact support; don't buy another store. |
| I disconnected the store by mistake | The store created here is still saved in the panel. | On the Store tab, click Reconnect my store. Nothing is charged. |
| After disconnecting, the Create my store box disappeared | It's on purpose: you already have a store created here, and buying another would mean paying twice. In its place the screen shows Reconnect my store to the panel. | Click Reconnect my store. |
| The Add-ons tab says my store is disconnected | You disconnected the store from the panel, and Bling connects to it. | Reconnect the store on the Store tab. Bling shows up again, without paying anything new. |
| The assistant answers "You need to create or connect the store first." | You asked for something that depends on the catalog and there's no store linked. | Go to the Store tab and create or connect yours. |
| The assistant says "No products found in the store." | The store is linked, but has no products added. | Add the products in the store dashboard (Open the store dashboard). |
| "Bling connects to your store. Create your store in the Store tab first." | You have no store created here — or your store is a connected Shopify. | Create the store with the Create my store box. Bling doesn't work with a connected Shopify. |
| "Bling is already active on your store." | The add-on has already been subscribed. | No need to buy it again. Follow the connection guide on the screen. |
| "Couldn't start right now. Please try again." on the Add-ons tab | A failure opening the add-on's payment. | Click again. If it persists, refresh the page (F5). |
| Bling got stuck on "Setting up the Bling connection…" | The setup is in progress and the screen refreshes on its own. | Wait. If Try again appears, click it. |
| The orders don't show up in Your Bling orders | The Bling account hasn't been authorized yet. | Click Connect my Bling and authorize. If you see "Account connected. You have no orders in Bling yet.", the connection is fine — there just aren't any orders on the other side yet. |
| Marina says "Your store is live and selling without anyone checking each product's margin." | You have no products with cost and price in the Pricing module. | Click the button next to the note and add your items there. |
| I looked for "AutoAgency" in Bling's integrations list and didn't find it | In Bling, your store shows up under the technical name WooCommerce. | Choose WooCommerce — it's your AutoAgency store. |
Your store's name
The store created here is called AutoAgency store everywhere in AutoAgency — it's the same name on the Platform line of the Store tab, on the store card on the Integrations screen and in the messages where the assistant reminds you what's left to connect. When you call support, that's the name they'll find it by.
The only exception is inside Bling: there it shows up as WooCommerce, because that's what Bling calls the technology that runs underneath your store. The connection guide says so at the step where you choose the integration.
If the store linked to the panel is a Shopify you already had, it keeps Shopify's name — the AutoAgency store is only the one we created for you.