

SalesFlow (CRM)
Where to find it: Home → Your apps → SalesFlow (it's the platform's CRM — the notebook for customers and sales)
Address: /app/modulos/crm
What it's for
Imagine a notebook where you jot down every person who asked for a quote. Whoever called, whoever messaged you on WhatsApp, whoever filled out the form on your website, whoever came from the ad. Today those people are scattered: one in the little notebook, another in the notes app on your phone, another you only remember from memory. And then one slips away — and the money they were going to bring slips away with them.
SalesFlow is that notebook, except it fills itself in. Every person who gets in touch becomes a card on a single screen. You look and see where they came from, how much the job is worth and where the conversation stands. When the customer closes, you drag the card to "Won". When they back out, you drag it to "Lost" and write down the reason.
Everyday example: you're a plumber who clears clogged drains. On Monday morning six requests come in — three on WhatsApp, two through the website form and one by phone. All six are already in your pipeline when you open the screen, each with a phone number and a source. You open the first one, tap "Call", close the quote, create the proposal right there, send the link on WhatsApp and get a notice when the customer opens it. Accepted? One button generates the agreement for them to sign on their phone. All without leaving the screen.
The module also stores your proposals, your signed agreements and — if you get the Job Orders add-on — the orders you send to your field technicians.
Before you start
- The SalesFlow module has to be active on your account. Without it the screens warn that "the CRM module is not active in this tenant" (tenant = your company's account).
- The first time you open a newly purchased module, an invitation appears at the top of the page to set it up by chatting with Klara, the module's assistant: "It's optional — the tabs below already work. Each reply from the specialist uses AI credits." Chat with Klara lets her get to know your company; Dismiss removes the invitation without chatting. If you open the chat, the Complete setup button at the end of it also removes the invitation.
- Nothing else is required. The pipeline is born ready, with five stages, the first time you go in.
- Optional: for leads to come in on their own you need to have the modules that bring in those contacts (website, WhatsApp, ads). You turn on each source in the Sources tab.
- Optional: the Services tab only works with the "Job Orders" add-on turned on.
- No connection is needed. The CRM is this one, from the platform itself (SalesFlow) — it doesn't depend on connecting any outside system.
- Optional: the Import from Kommo tab is only for people who used Kommo (another company's CRM) and want to bring the contacts and leads from there over here. If you don't use it, you can ignore it.
Getting started
- On Home, under Your apps, click SalesFlow. You land on the Home tab. The module's tabs are in the app bar, at the top of the screen.
- If Klara's invitation shows up, you can accept (Chat with Klara) or click Dismiss — the tabs already work either way.
- Click the Pipeline tab. Your pipeline is already there, with the stages New, In contact, Negotiation, Won and Lost. While there's nobody in it, the screen shows an example with fake contacts, clearly marked "(example)", just so you can see the format.
- Click + Lead and enter your first customer by hand, just to get a feel for how it works. Fill in the Title, the Person's name and at least the Phone/WhatsApp or the E-mail. Click Create lead.
- Click the card that appeared. The lead record opens, with Call and WhatsApp buttons and room to take notes.
- Go to the Sources tab and turn on the sources your contacts really come from (WhatsApp, website form, ads). Each switch you turn on makes contacts come into the pipeline on their own.
- Done. From here on the pipeline fills itself and your job is to drag the cards to the right stage.
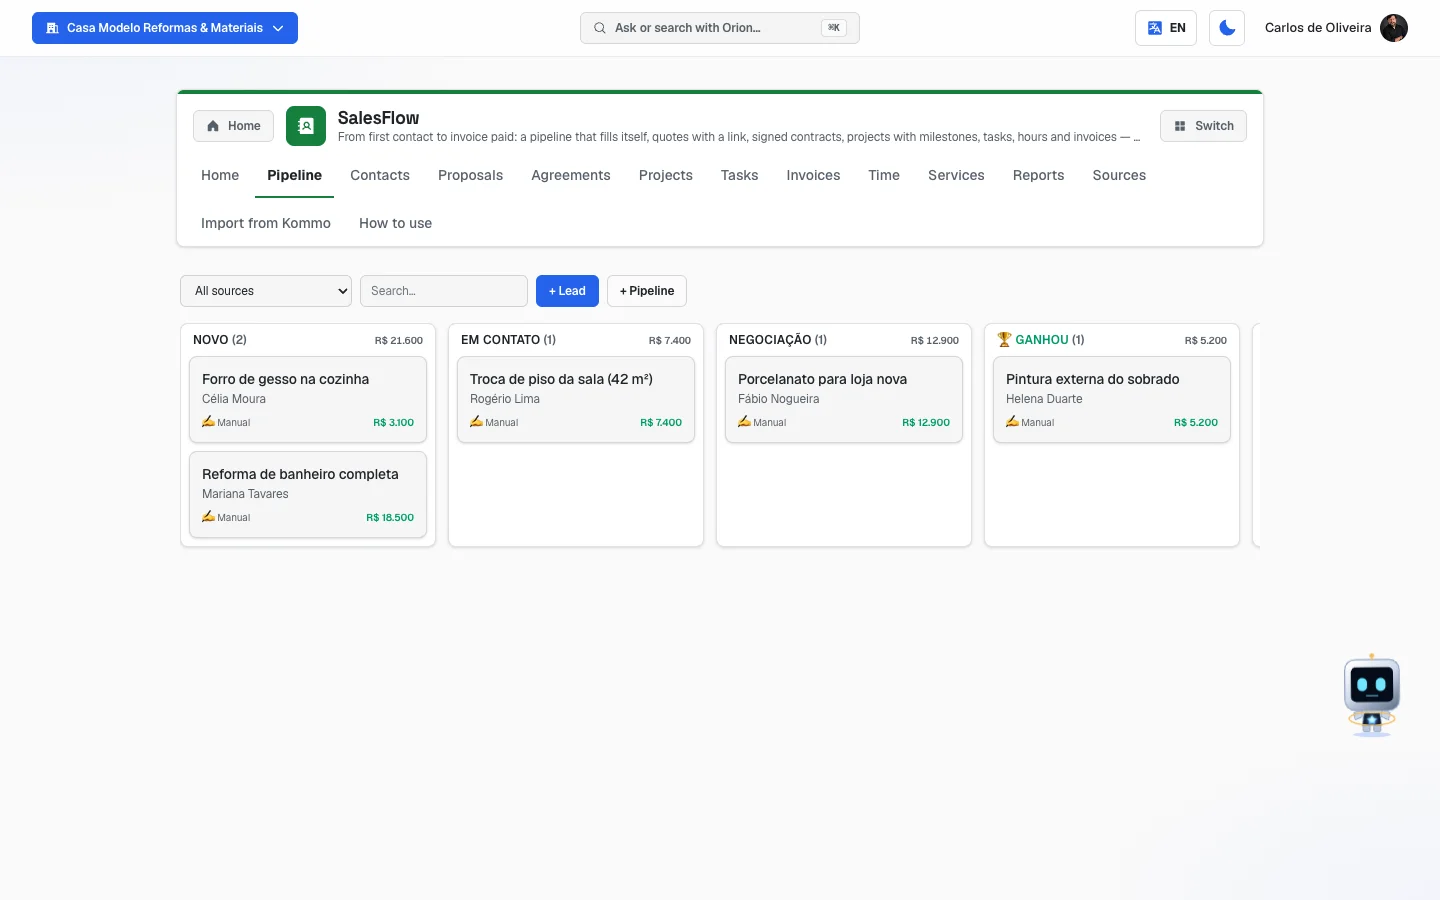 Pipeline tab with five leads entered by hand (Manual label) in the New, In contact, Negotiation and Won columns, each column with the count and the total in reais at the top; the fifth column, Lost, sits just to the right (the row scrolls sideways)
Understanding the pipeline (read this first)
Pipeline is just a fancy name for "the line of your sales". It's divided into columns. Each column is a stage — a moment in the conversation with the customer.
The pipeline that comes ready has five stages:
| Stage | What it means |
|---|---|
| New | The person just arrived. You haven't talked to them yet. |
| In contact | You've talked. You're figuring out what they need. |
| Negotiation | You've given a price and you're talking about value and timing. |
| Won | It closed. It's a sale. |
| Lost | It didn't close. This is where you write down why. |
You can adjust the stages to the way you sell. In Pipeline, the Stages button opens the list of stages of the open pipeline: change a name and click Save, move a stage up or down with the arrows, delete one you don't use or create a new one with + Stage. Won and Lost can only be renamed — they don't move and can't be deleted —, and a stage with deals in it can't be deleted: move the deals first. A new pipeline (+ Pipeline button) starts with the five stages above. Note: the second pipeline is a paid add-on ("Additional CRM pipeline", in the Catalog); the first one is included.
Each person becomes a card (the system also calls it a lead). The card shows the job title, the person's name or phone, where they came from and how much the lead is worth.
How the card moves: on a computer you drag the card with the mouse from one column to the other. On a phone, the card has a Move button — you tap it and pick the stage you want to take it to. You can also change the stage inside the lead record, in the selection box at the top.
When you move a card to Won, the system records the date of the sale. When you move it to Lost, a red box appears asking "Why was it lost?" — write it (for example, "went with competitor") and click Confirm lost. That reason is saved and it's what later shows you why you're losing leads.
At the top of each column, the system adds up how many cards are there and how much money that represents.
You can have more than one pipeline (for example, one for services and another for product sales), but additional pipelines are a paid add-on, sold separately.
The tabs, one by one
Home
/app/modulos/crm/inicio
- What you see here:
- At the top, Klara's panel: a note from her saying how your operation is doing (how many open leads, what's stuck) and what's worth looking at first.
- Three numbers for the period: Leads in the last 24h, Leads this week and Won this week. While the system is fetching, three little dots (…) show up instead of the number — that means "still counting", not "zero".
- An ⏰ Upcoming tasks box with up to three of your tasks that haven't been completed yet, with date and time. If you have no scheduled tasks, the box doesn't appear.
- Below, the chat with Klara, with four ready-made shortcuts.
- What you can do: talk to Klara. The shortcuts are:
- Pipeline summary — she tells you how the last 30 days went.
- What's stuck? — she lists who you should contact today.
- Write a follow-up — she writes the follow-up message for a customer (you complete it by saying which one).
- Qualify a lead — she helps you work out whether it's worth investing in that contact (you complete it by saying which one).
Pipeline
/app/modulos/crm/funil
- What you see here: the pipeline columns with the cards for your leads. On a computer it's a board that scrolls sideways; on a phone it's a list grouped by stage. If you have more than one pipeline, a selection box appears at the top to choose which.
- What you can do:
- Filter by source in the All sources box.
- Search by name, phone, e-mail or title in the Search… field.
- Create a lead by hand with the + Lead button.
- Create a new pipeline with the + Pipeline button.
- Drag cards between stages (or use the Move button, on a phone).
- Click a card to open the full record.
Step by step — entering a lead by hand:
- On the Pipeline tab, click + Lead.
- Fill in the Title (it's the name of the job, for example "Flooring replacement quote").
- Fill in the Person's name.
- Fill in the Phone/WhatsApp or the E-mail — at least one of the two is required. The notice "Provide at least a phone or an email." is written below the form, and the create button only turns on once you fill one in.
- If you want, fill in Company (optional) and Value (R$).
- Click Create lead. While it saves, the button turns into "Creating…".
Each field explained (New lead form):
| Field | What to write |
|---|---|
| Title | The name of the job, the way you say it. "Kitchen drain clearing", "Flooring replacement quote". It's what will appear large on the card. |
| Person's name | Who reached out to you. |
| Phone/WhatsApp | Their number. It's what makes the call and WhatsApp buttons work. |
| Their e-mail. It's what lets you send an e-mail from inside the record. | |
| Company (optional) | Only fill it in if the customer is a company. |
| Value (R$) | How much you think that job is worth. It lets the pipeline add up how much money is in each stage. You can leave it blank and fill it in later. |
Step by step — creating a new pipeline:
- On the Pipeline tab, click + Pipeline.
- Write the name in the New pipeline name field.
- Click Create. The new pipeline is born with the same five stages.
If you don't have the additional pipeline add-on, an orange notice appears saying that additional pipelines are an add-on and that you need to turn on "Additional CRM pipeline" in the Catalog.
The lead record (opens when you click a card):
- At the top: the title, the source and the company.
- A box with the contact and the buttons 📞 Call, 💬 WhatsApp, ✉️ Email and 🔧 Create job order. The WhatsApp and call buttons only appear if there's a phone; the email one only if there's an email; the job order one only if you have the Job Orders add-on.
- A selection box to change the stage and a Value (R$) field that saves on its own when you click away.
- A Write a note… field with the Add button — to record what was agreed.
- A Task (e.g.: call tomorrow) field with date/time and the ⏰ Schedule button — the task shows up later on the Home tab.
- The Timeline: everything that happened with that lead, from newest to oldest — stage changes, notes, tasks, emails sent, proposals, agreements and job orders. If there's nothing yet, "Nothing yet" appears.
- A task that hasn't been done shows the due date in orange and a ✓ Done button.
When your virtual assistant is already talking to the person (for those who have OmniLeadHub):
- The record shows the Conversation block, with everything Rebeca talked about with that person — on WhatsApp, on the website chat, on Instagram, on Messenger, by email, on Telegram or on TikTok. Each message shows who spoke and when, and the record refreshes itself every 3 seconds while it's open. The Open in the Hub link opens OmniLeadHub — the same conversation is there, in the list of conversations.
- Right below the title, a sentence says where the conversation stands — for example, "Rebeca is talking · Fulano replied 4 h ago" or "Rebeca wrote · Fulano has not replied yet".
- While Rebeca is leading, the 📞 Call, 💬 WhatsApp and ✉️ Email buttons disappear, with the sentence "Rebeca is talking to this person — continue through the conversation below.". It's on purpose: that way the person doesn't get two approaches at once, one from Rebeca and one from you.
- If you have Íris on the phone, her calls with that person show up in the Calls block, each with the date, the length, the summary and the See the call conversation button. The 3 most recent show; Show the N earlier calls brings the others.
Step by step — talking yourself to the person Rebeca is handling:
- Open the lead record and scroll to the end of the conversation.
- Click ✋ Take over the conversation. The sentence changes to "You have the conversation — Rebeca stays quiet meanwhile", and the 📞 Call and ✉️ Email buttons come back. The 💬 WhatsApp on your phone stays hidden when the conversation is on WhatsApp: it would go out from another number, and the person would end up with two conversations.
- Write in the "Write to Fulano…" box and click Send via WhatsApp (the name changes according to the conversation's channel). The message goes out from the same number Rebeca was using.
- When you're done, click Hand back to Rebeca. If the person wrote while the conversation was with you, Rebeca replies to that message right away, and the notice says what happened — for example, "Rebeca is back on the conversation and has already replied to the person's last message.".
Note: after you take over, Rebeca stays quiet in that conversation until you hand it back. If you forget, the person is left without a reply.
Official WhatsApp only accepts a free-form message up to 24 hours after the person's last message. After that, the record warns "24 h without a reply: official WhatsApp only takes a Meta-approved message, and this conversation has none. Call the person." — in that case, the way forward is to call.
Step by step — sending an e-mail from inside the record:
- Open the lead record and click ✉️ Email.
- The system shows who it's going to, which address it goes out from and where replies arrive.
- Fill in the Subject and the message.
- Click Send email.
Contacts
/app/modulos/crm/contatos
- What you see here: your address book. A list of everyone who has ever gotten in touch with you, from most recent to oldest, with phone, e-mail, company and the source they first came in through.
- What you can do:
- Search in the field at the top: the search looks at name, phone, e-mail and company.
- Click a person to open their record.
- On the contact record you see since when they've been your customer, the 📞 Call, 💬 WhatsApp and ✉️ Email buttons, and the This contact's leads list — all of that person's leads, with the stage each one is in.
- Empty state: if you've never received anyone, "Your address book starts empty" appears, along with an explanation that you don't need to enter anyone by hand. If the search finds nobody, "Nobody matches that term" appears.
You don't add contacts here. A contact is born on its own when someone gets in touch, or when you create a lead on the Pipeline tab.
Proposals
/app/modulos/crm/propostas
- What you see here: the list of your proposals, from newest to oldest. Each one shows the number (#1, #2…), the title, the customer, the total amount and a status label. At the top there are buttons to filter: All, Draft, Sent, Accepted, Declined, Expired.
- What you can do: write a proposal, send the link to the customer on WhatsApp, follow whether they opened it, mark whether they accepted or declined and create the agreement from it.
What each status means:
| Status | Means |
|---|---|
| Draft | You're writing it. The customer hasn't seen it yet. |
| Sent | It's in the customer's hands, waiting for an answer. |
| Accepted | The customer approved. |
| Declined | The customer said no. |
| Expired | It went past the Valid until date with no answer. The system changes it on its own when you open the list. |
When the customer opens the link, a 👀 customer opened it appears on the proposal's line.
Step by step — creating and sending a proposal:
- On the Proposals tab, click New proposal.
- In Deal (optional), choose which pipeline customer this proposal belongs to. If it's a standalone one, leave it on "Not linked to the funnel".
- Write the Title (for example, "Gas heater installation"). Without a title the save button stays disabled.
- If you want, write the Intro (optional) — two lines of greeting, the way you'd say it.
- In Items, write one line per service or material: Description, quantity and Price. To add more lines, click + Add item. To remove a line, click the trash can icon.
- If you give a discount, write it in Discount (R$).
- In Valid until, choose the deadline. After that date the proposal becomes "Expired" on its own.
- In Terms (optional), write the rules: payment term, warranty, what's included.
- Check the Total — the system adds it up on its own as you type.
- Click Save. The proposal is born as a Draft.
- In the list, click Send to customer. You need to have at least one item.
- The system tries to send the link on WhatsApp automatically. If it works, it shows "Proposal sent on WhatsApp." If it doesn't, a message and an Open WhatsApp link appear — you click it and send it yourself.
Each field explained:
| Field | What to write |
|---|---|
| Deal (optional) | The pipeline customer. That way the proposal shows up on their timeline. |
| Title | The name of the job, as the customer will read it. |
| Intro (optional) | A short greeting at the start of the document. |
| Description / quantity / Price | Each item of the quote. Quantity is entered with a comma (1,5) and the price in reais. |
| Discount (R$) | How much you took off the total. |
| Valid until | The date the proposal expires. |
| Terms (optional) | Payment, deadline, warranty. E.g.: "50% upfront, 50% on delivery. 90-day warranty." |
The buttons on each proposal, depending on its status:
- Draft: Edit, Send to customer, Delete. (You can only delete a draft proposal.)
- Sent: Copy link, Resend, Customer accepted, Customer declined, Back to draft.
- Accepted: shows "✅ Closed on <date>" and the Create agreement button.
- Declined or Expired: a Redo button, which sends the proposal back to draft.
When you click Create agreement, the system creates a new agreement already with the items, the amount and the customer from that proposal, as a draft, in the Agreements tab.
What the customer sees on the link: they open the proposal on their phone, read the items and the total, and have two buttons: ✅ Accept proposal and Decline. Before deciding they can write a note in the Anything to add? (optional) field — for example "you can start on Monday". Their answer lands in your list right away. You can also mark the answer by hand with the Customer accepted / Customer declined buttons, when they answer you through another channel.
Agreements
/app/modulos/crm/contratos
- What you see here: the list of your agreements, with number, title, customer, start date, amount and status. Filters at the top: All, Draft, Awaiting signature, Signed, Not signed, Canceled.
- What you can do: write the agreement, send the link to the customer to sign on their phone and keep the signature.
A fixed notice on the screen reminds you: "The short path is from the Proposals tab: every accepted proposal has a “Create agreement” button that copies items, value and customer."
What each status means:
| Status | Means |
|---|---|
| Draft | You're writing it. |
| Awaiting signature | It's with the customer to sign. |
| Signed | The customer signed. This status is final — you can't go back. |
| Not signed | The customer declined. |
| Canceled | You canceled it. |
When the customer opens the link, 👀 customer opened it appears. After it's signed, ✍️ appears with the name of the person who signed.
Step by step — creating and sending an agreement to be signed:
- On the Agreements tab, click New agreement (or use Create agreement on an accepted proposal, which comes already filled in).
- Choose the Deal (optional).
- Write the Title (e.g.: "Traffic management agreement").
- In What's contracted, list the items with description, quantity and price.
- Fill in Discount (R$) and Starts on, if applicable.
- In Terms, write the rules: term, payment method, what's included, how to end it.
- Click Save.
- In the list, click Send to sign. The system tries to send it on WhatsApp; if that doesn't work, it offers the Open WhatsApp link for you to send it by hand.
- When the customer signs, the status turns to Signed and the ✍️ View signature button appears.
Buttons depending on the status:
- Draft: Edit, Send to sign, Delete.
- Awaiting signature: Copy link, Resend, Back to draft, Cancel.
- Signed: ✍️ View signature — shows the drawing of the signature, the name of whoever signed, the date and information about the device used.
- Not signed: Redo, which sends it back to draft.
The customer doesn't need an account or an app. They open the link, read, write their full name and draw the signature with their finger on the screen.
Services
/app/modulos/crm/servicos
This tab belongs to the Job Orders add-on. If you don't have it, the screen shows a padlock, explains what the add-on does and offers the Activate Job Orders button.
- What you see here: the list of your job orders (OS). Each one shows the title, the customer, the address, the scheduled date and a status label: Pending, In progress, Completed or Canceled. At the top there are filters by status, the 👷 Technicians button (with the number of active technicians) and the + OS button.
- What you can do: add technicians, create orders, choose who does each one, notify the technician on WhatsApp and mark it as completed or canceled.
Step by step — adding a technician:
- On the Services tab, click 👷 Technicians.
- Fill in Name and WhatsApp.
- Click Add.
- To take someone off the list without deleting them, click Deactivate on their row (it gets struck through). To bring them back, Reactivate.
Step by step — creating a job order:
- Click + OS.
- Fill in the Title.
- If you want, write the Description (optional) and the Address.
- Choose a date and time, and choose the technician in the Technician (later) box — you can leave it without a technician and assign one later.
- Click Create order.
- The technician receives everything on WhatsApp. If there's no WhatsApp connected on the account, the system opens the WhatsApp window for you to send it by hand and shows the notice "No WhatsApp connected — opened wa.me for manual sending."
On each order's card you can:
- Choose or change the technician in the selection box (they're notified right away).
- 💬 Resend WhatsApp — sends the message to the technician again.
- ✓ Complete — marks it as completed.
- Cancel — marks it as canceled.
The technician doesn't need an account or a password. They receive a link on WhatsApp, open it on their phone, see the job and mark "in progress" or "completed" right there, and can leave a note. That note shows up on the job order's card with the 📝 icon.
You can also create a job order straight from a lead's record, with the 🔧 Create job order button.
Reports
/app/modulos/crm/relatorios
- What you see here: your pipeline's numbers for the chosen period. At the top there are three buttons: 7 days, 30 days and 90 days (it starts at 30).
- What you can do: just look. It's a read-only screen.
- Blocks on the screen:
- Four numbers: New leads, Won (with the amount in reais underneath, in green), Lost and Avg. time to win.
- Leads by stage — bars showing how many leads are in each stage.
- Leads by source — bars showing where they came from.
- 🔧 Job orders by technician — only appears with the Job Orders add-on. It's a table with the columns Technician, Pending, In progress, Completed and Canceled.
- Empty state: if no lead came in during the period, "No leads in this period" appears along with a tip to try a longer period.
Sources
/app/modulos/crm/fontes
- What you see here: the list of sources leads can come in from on their own to your pipeline, each with an on/off switch. Under each name there's a sentence explaining what that source is, and the time of the Last sync ("now", "20 min ago", "3h ago").
- What you can do: turn each source on and off. At the top the screen notes: "Choose where leads flow into your pipeline from. Collection runs every 5 minutes."
Step by step:
- On the Sources tab, find the source you want.
- Click the switch on the right side. Green/colored = on. Gray = off.
- Done, it saves instantly. Within 5 minutes the contacts from that source start coming in.
The labels that may appear:
- coming soon — the source isn't ready yet and the switch stays locked (today that's the case for email marketing).
- module not active — you haven't subscribed to the module that brings in those contacts. The switch stays locked until you do.
Some sources and what they mean:
| Source | Where it comes from |
|---|---|
| WhatsApp conversations the system classified as a sales opportunity. | |
| 📞 Phone call | Incoming calls classified as an opportunity. |
| 📝 Website form | Forms filled out on the websites built on the platform. |
| 📝 Landing page | Forms from your capture pages. |
| 🤖 Website agent | Visitors who left their contact while chatting with your website's assistant. |
| 🔎 Google Ads / 📣 Meta Ads | People who became a contact through your ads. |
| 📤 WhatsApp campaign | People who replied to your bulk messages. |
| 📸 Instagram DM, 👤 Facebook DM, ✈️ Telegram, 🎵 TikTok DM | Conversations from social networks. |
| 📧 Inbound email | People who wrote to the company's email. |
| 📍 LocalMapsRadar | Businesses prospected on the local radar. |
| 🎯 SDRConvert | Companies qualified by active prospecting. |
| 🧮 Calculator | People who asked for a price on the public calculator and left their contact. |
Import from Kommo
/app/modulos/crm/conexao
The CRM is this one right here. This tab exists only for people who used Kommo (another company's CRM) and want to bring what they had there into their pipeline — just once. After that you work here; nothing syncs with Kommo, and nothing changes in your account over there.
If you don't use Kommo you don't need to do anything on this tab: your pipeline already works on its own. AutoAgency doesn't create a Kommo account or connect Kommo as a CRM.
- What you see here: at the top, the title Import from Kommo (with the Connected label after you authorize reading). Below, two numbered steps.
- Step 1 — Authorize reading your Kommo account. The Authorize reading Kommo button opens a window from Kommo itself: you sign in to your account and authorize. AutoAgency only reads the data — it changes nothing there, and your password doesn't go through us. Once authorized, the screen shows "Reading authorized on the yourname.kommo.com account." and the Remove authorization button.
- Step 2 — Bring over your contacts and leads. The Import now button only turns on after step 1 (before that the screen warns "First authorize reading, in step 1."). While it's working, it shows "Importing… this can take a few minutes".
How the leads reach your pipeline:
- Won in Kommo go into the Won stage; lost ones go into Lost, with the loss reason they had there, when there was one.
- Open ones go into the equivalent stage by position: those that were at the start of Kommo's pipeline land in New, those at the end land in Negotiation, and the middle ones in In contact.
- Everything goes into your main pipeline, with the value and the creation date from over there — an old lead doesn't show up in Reports as if it were new this week.
- The first line of each lead's Timeline keeps where it came from, for example: "Brought over from Kommo. There it was in the "Sales" pipeline, at the "Proposal" stage."
- On the card's source, 📥 Kommo (imported) appears.
How the contacts arrive:
- Anyone already in your CRM (same phone or same e-mail) is not duplicated: the lead comes linked to the person who already exists.
- The same person entered twice in Kommo becomes one contact here.
- A contact with no phone and no e-mail only comes over when it's linked to some lead (it comes in with the name). On its own, without a lead, it stays out.
Step by step — bringing everything over from Kommo:
- On Home, under Your apps, click the CRM (in the menu it appears as SalesFlow) → Import from Kommo tab.
- Click Authorize reading Kommo. In the little window that opens, sign in to your Kommo account and authorize.
- Close the little window and come back to this tab: "Reading authorized on the … account" appears.
- Click Import now and wait for the done message.
- The screen shows the result — for example "Done! 42 leads and 57 new contacts brought in.", how many contacts were already here and were reused, and how many leads had already come over before. Click See in the Pipeline to check.
Importing again is safe: only what's new in Kommo comes in. A lead that already came over isn't touched — it's already yours here, and you may have changed it. The next time you open the tab, it remembers the total: "Already brought over from Kommo: 42 leads and 57 contacts."
Removing the authorization: the Remove authorization button asks for confirmation and explains that nothing that already came over is deleted — we just can no longer read your Kommo account. To import again, you just authorize once more.
Old links: anyone who opens the address of the old Kommo leads tab (
/app/modulos/crm/leads) lands here, in the importer — the leads it used to only show can now come into your pipeline.
How to use
/app/modulos/crm/como-usar
Every module has this tab at the end. It's the module's manual inside the system itself.
How to read the numbers
On the Home tab:
- Leads in the last 24h — how many new people entered your pipeline since yesterday at this hour.
- Leads this week — how many came in over the last 7 days.
- Won this week — how many of those 7 days you closed. It's the green number.
- … (three dots) in place of the number means the system is still counting. It isn't zero.
In Klara's panel (the box at the top) the numbers speak of the state right now — how much is open, what's stuck. The three numbers below speak of a period (24h, 7 days). They're different things on purpose.
At the top of each Pipeline column:
- The number next to the stage name = how many leads are in it.
- The amount in reais = the sum of those leads' values. If you don't fill in the Value (R$) field on the cards, that sum stays empty.
On the Reports tab:
- New leads — how many new people came in during the period.
- Won — how many closed. The green amount underneath is how much that came to in money (sum of the Value field on the won leads).
- Lost — how many you lost.
- Avg. time to win — how many days, on average, pass between the person arriving and you closing with them. It appears as "12.4d". If you haven't won any yet, it shows "—".
- Leads by stage — the biggest bar is the stage with the most people. If the biggest bar is a middle stage, that's where your leads are getting stuck.
- Leads by source — the biggest bar is the source that brings you the most people. That's how you decide where to invest.
On the Services / Reports tab (table by technician): how many orders each technician has pending, in progress, completed and canceled.
Frequently asked questions
Do I have to enter a customer by hand every time? No. Whoever calls, messages on WhatsApp or fills out the website form becomes a lead on their own, as long as the source is turned on in the Sources tab. You only enter by hand what came in from outside: a referral, a visit, a trade fair.
A customer of mine is in the pipeline twice. What do I do? Move one of the two to Lost or keep only the one that's further along. The system avoids duplicating on its own: when a new contact arrives from someone who already has an open lead, it adds the event to the lead that already exists instead of creating another one.
I lost a lead. Should I delete the card? No. Drag it to Lost and write the reason. That way, three months from now, the Reports tell you why you're losing — and that's worth money.
Does the customer need to install an app to see the proposal or sign the agreement? No. They get a link, open it in their phone's browser, read and respond right there. To sign, they write their full name and draw the signature with their finger.
Do I need Kommo (or another CRM) to use this one? No. The CRM is this one, from the platform itself — the Pipeline tab is where you work, and it doesn't depend on connecting anything outside. AutoAgency doesn't create a Kommo account or connect it as a CRM.
I used Kommo. Do I lose what I had there? No. On the Import from Kommo tab you authorize reading your account and bring the contacts and leads into your pipeline, each lead in the equivalent stage. It's a one-time copy: nothing changes in your Kommo account, and from then on you work here.
Does my technician need a login to receive the job order? No. They receive a link on WhatsApp and respond through it, with no account and no password.
Can I rename the pipeline columns, or add an extra column? Yes. In Pipeline, click Stages: you can rename, reorder, delete and create stages in each pipeline. Won and Lost can only be renamed.
When something goes wrong
| Symptom | What to check | What to do |
|---|---|---|
| The screen says "The CRM module is not active for this company." | Is the CRM module subscribed on your account? | Turn on the SalesFlow module in the Catalog. |
| The pipeline is empty and shows cards with "(example)" | It's just a demonstration. None of those contacts exist. | It disappears on its own when your first real lead arrives. To speed it up, create one with + Lead. |
| "Nothing with these filters" on the Pipeline | You left a source filter or a search turned on. | Set the sources box back to All sources and clear the Search… field. |
| "Nobody matches that term" in Contacts | What you typed doesn't match any name, phone, e-mail or company. | Try a shorter piece (just the first name, just the last 4 digits of the phone). |
| Contacts aren't coming into the pipeline on their own | Is the source turned on in the Sources tab? Does it have the "module not active" or "coming soon" label? | Turn on the switch. If it has a label, subscribe to the matching module — or wait, in the case of "coming soon". Collection runs every 5 minutes, so give it a few minutes. |
| When creating a new pipeline an orange notice about an add-on appears | You've already used the pipeline that comes included. | Turn on "Additional CRM pipeline" in the Catalog. |
| "Add at least one item before sending the proposal." | The proposal has no line in Items. | Go back to Edit, write at least one item with a description and click Save. |
| When sending the proposal/agreement "Automatic sending isn't available — open WhatsApp and send it yourself" appears | There's no WhatsApp connected on the account, or the send failed. | Click the Open WhatsApp link and send the message by hand. To fix it for good, connect the company's WhatsApp. |
| A message appears saying the proposal has no customer phone | The contact has no number saved. | Use Copy link and send it however you prefer; or add the contact's phone. |
| I can't delete a proposal | You can only delete a proposal in Draft. | If it has already been sent, use Back to draft first. |
| The customer says that "This proposal has expired. Contact the company for a new one." appeared on the link | The Valid until date has already passed. | Click Redo on the expired proposal, change the date and send it again. |
| The customer says that "This proposal was already answered." appeared on the link | Someone has already accepted or declined it. | Check the status in the list. If you need a new version, use Redo. |
| I can't change a Signed agreement | It's on purpose: deleting a signature would be deleting the proof that it existed. | If the agreement is no longer valid, end it outside the system (a termination agreement) and register a new agreement. |
| The Services tab shows a padlock | The Job Orders add-on isn't active. | Click Activate Job Orders. |
| "No leads in this period" in Reports | No new contact came in during the chosen window. | Click 90 days to look further back. |
| "Authorize reading your Kommo account before importing." | Kommo reading isn't authorized (or the authorization was removed). | On the Import from Kommo tab, do step 1: Authorize reading Kommo. |
| I clicked Authorize reading Kommo and no window opened | The browser blocked the window (pop-up blocker). | Allow pop-ups from this site in the browser and click again. |
| I authorized on Kommo, but the tab still doesn't say "Reading authorized" | The screen didn't notice that the window closed. | Close the little Kommo window and refresh the page (F5). |
| "The Kommo reading authorization has expired." | The authorization expired on Kommo's side. | Authorize again in step 1 and click Import now — what already came over isn't repeated. |
| After the import, a notice appears that your Kommo has more records than one import brings at once | The import brings up to 20 thousand records of each kind; anything beyond that didn't come over. | Talk to us to bring the rest. |
| "Lead not found." or "Invalid stage for this pipeline." | The lead or the stage was deleted while the screen was open. | Refresh the page (F5) and try again. |
| The technician says they didn't receive the order | Is their WhatsApp correct on their entry? | Open 👷 Technicians and check the number. Then click 💬 Resend WhatsApp on the job order's card. |
| The customer's signature isn't accepted | They need to write their full name (at least 3 letters) and draw the signature. | Ask them to redo both steps on the agreement screen. |