

Content & SEO with AI
Where to find it: Home → Your apps → Content SEO (at the top of the screen the module shows as Content & SEO)
Address: /app/modulos/conteudo-seo
What it's for
Every day people type things into Google like "how much does it cost to replace a gas valve", "24-hour drain cleaner in Setor Bueno" or "is a plasterboard ceiling or PVC better". Whoever shows up in the answer to those searches gets visits to their website without paying for a single click. That's the idea of SEO (short for "search engine optimization", that is: getting your website ready so Google understands it and shows it).
The difference from an ad is simple: an ad stops bringing people the day you stop paying. The article stays there. You write it once, and it stays up answering that question for whoever searches for it, for free, month after month.
This module writes those articles with you. Mariana (this module's agent) writes the text, sets up the title, the summary, the description that shows up on Google and the structure the search robot expects to find. You take the part that's yours: reading, fixing whatever is wrong about your service and approving. Nothing is published without your approval — it's written at the top of the Panel.
Everyday example: you're a gas fitter. Mariana writes "Gas smell at home: what to do in the first 5 minutes". The article goes into the queue. You open it, change a sentence that isn't quite how it works in practice, check the checklist, click publish. From then on, whoever searches for that in your city may land on your website — and next to the article is your phone number.
Before you start
- The Content & SEO with AI module has to be active on your account.
- The first time you open a newly purchased module, an invitation appears at the top of the page to set it up by chatting with the module's specialist: "It's optional — the tabs below already work. Each reply from the specialist uses AI credits." Chat with … lets the specialist get to know your company; Dismiss removes the invitation without chatting. If you open the chat, the Complete setup button at the end of it also removes the invitation.
- To publish straight to your website: you need to connect your WordPress on the Settings tab. Without that, the article is written and reviewed normally, but stays only in here — the screen warns: "No site connected — this content is ready to apply; connect a WordPress in Settings to publish with 1 click."
- For the site to connect, you'll need three things from your WordPress: the website's address, your username and an application password (an extra password that WordPress creates just for this — your own password stays yours alone). The step by step is on the screen itself.
- Optional: turn on the Auto-blog, so Mariana writes on her own, once a week. For that, enter the topics and the audience in Settings.
Getting started
- On Home, under Your apps, click Content SEO. If the invitation to set up the module by chatting shows up, you can accept or click Dismiss — the tabs already work either way.
- Go to the Settings tab. In the Connect site card, fill in the website address, the WordPress username and the Application password (the one WordPress generated) and click Connect WordPress. If you don't know how to generate the password, click I don't know where to find this — the screen teaches you, step by step, where to click inside WordPress.
- Still in Settings, in the Auto-blog card, write the subjects in Topics (1 per line) and who you want to reach in Target audience. If you want Mariana to write on her own every week, turn the switch on. Click Save settings.
- Go back to the Panel tab and click New article to write the first one.
- Write the Title (the subject of the article), choose the Language and click Create and write. You land straight on the Review tab.
- Review the text, look at the SEO Checklist and fix whatever is marked in red.
- Click Approve & publish ▶. Done: the article is live on your website.
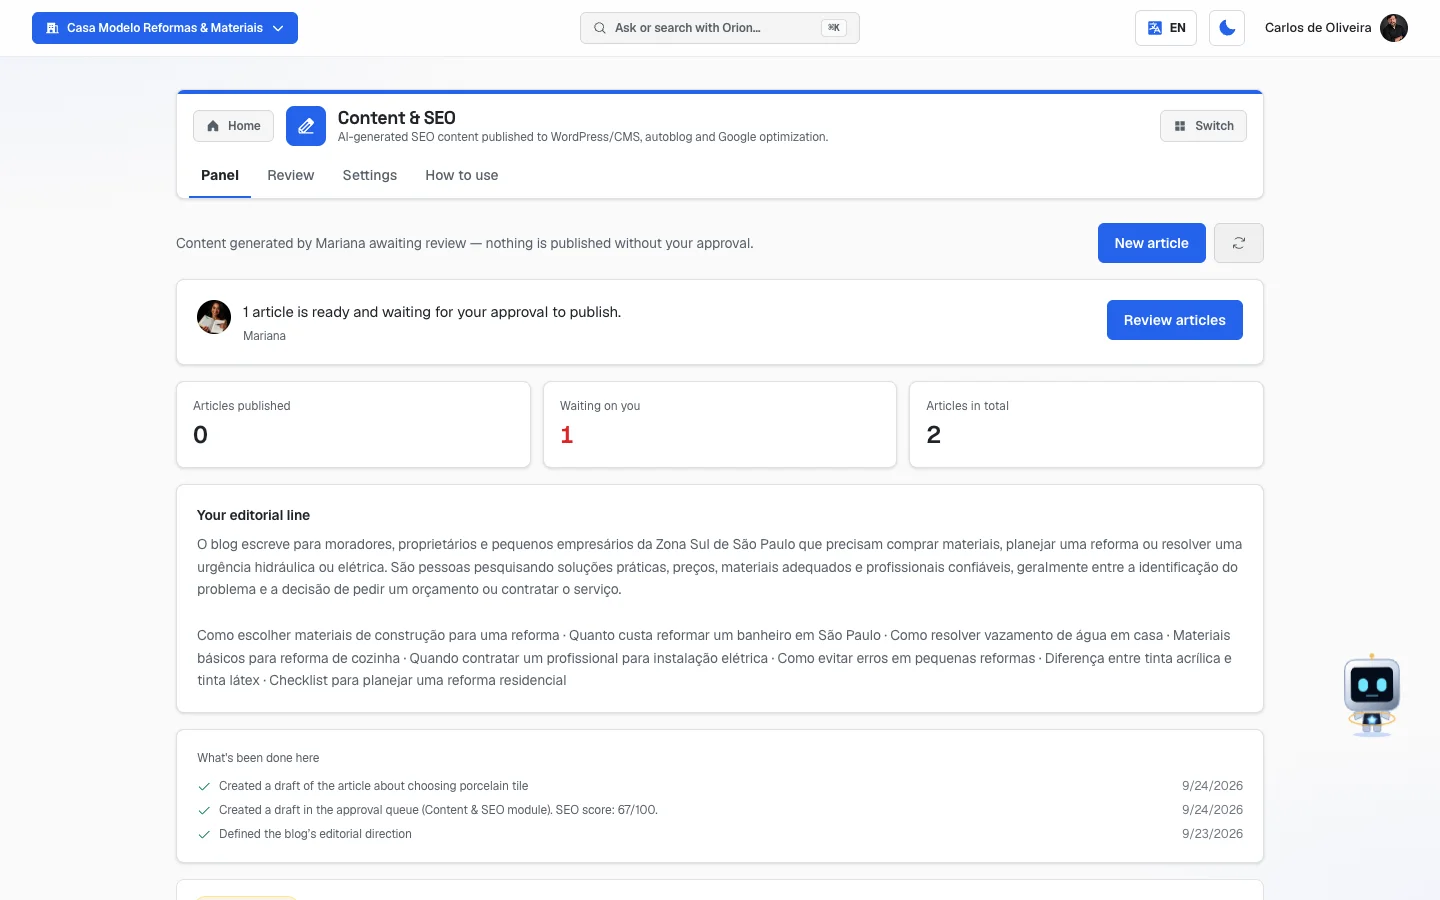 Panel tab with Mariana's note asking for the editorial line (Set editorial line button) and the three numbers at zero; the article list is still empty in this sample company, with the three tips to get started
The tabs, one by one
Panel
/app/modulos/conteudo-seo/painel
- What you see here:
- At the top, the sentence "Content generated by Mariana awaiting review — nothing is published without your approval.", the New article button and, next to it, a button with two circular arrows, which refreshes the list.
- Mariana's note, with a shortcut button (Review articles or Set editorial line, depending on the case) and three numbers: Articles published, Waiting on you and Articles in total.
- The Your editorial line card — the audience and topics you registered in Settings. It only shows up after that registration; before that, Mariana's note is "I still don't know who to write for or what to write about on your blog.", and the Set editorial line button takes you straight to the Settings tab.
- The list of articles, from newest to oldest.
- What you can do: create an article, open an article to review it, take it offline or delete it.
Each row of the list shows:
- A tag with the language spelled out (Português, English, Español).
- A status tag (the table below explains each one).
- The article's title and the date of the last change.
- The View on site link (it only shows up when the page really exists).
- Take offline (when it's published) or Delete (when it was never published).
- On the right, a big number with the word SEO underneath: the article's score, from 0 to 100.
What each status means:
| Status | Means |
|---|---|
| Draft | It's being written. Nobody has seen it. |
| Pending review | Mariana is done and is waiting for you to read it. |
| Ready to publish | It has already been through review and can go live. |
| Publishing… | It's being sent to the website right now. The screen updates on its own. |
| Live | It's published. A public page with that text exists. |
| Applied | It's not an article: it's an SEO adjustment on a page that already existed (the status shows on the Page SEO and Schema items). |
| Failed | It was approved but couldn't reach your website. |
| Discarded | You discarded it. It leaves the list. |
Step by step — creating an article:
- On the Panel tab, click New article.
- Under Title, answer "what is the article about?". The screen reminds you: "You can change it later."
- Under Language, choose Portuguese, English or Spanish.
- Click Create and write. The article is born and the Review tab opens on it.
You don't choose where the article goes. The system decides, by checking whether your account has a WordPress connected.
Step by step — taking an article offline (or deleting it):
- On the article's row, click Take offline (if it's published) or Delete (if it never was).
- A window opens that names what goes away: how many languages, which ones, and the addresses of the pages that disappear.
- Choose one of the two paths:
- Take offline — "The pages go offline and the text returns to the Panel, ready to publish again."
- Delete everything — the topic leaves the list for good.
- If the window shows a red notice saying the topic could not go back online without editing, read it before deciding: it means the text no longer passes the quality check the blog requires today, and that, if you take it offline now, it only goes back after being fixed.
- Empty state: "No content yet", with three tips: write your own by clicking New article, ask Mariana for an article in the chat, or turn on auto-blog in Settings.
If a group with the "3 languages" tag shows up: it's the same topic written in Portuguese, English and Spanish, and they travel together — the screen warns that editing one without its siblings breaks the link between the versions.
Review
/app/modulos/conteudo-seo/editor
It's the article's workbench. You get here by clicking an article on the Panel.
If you click Review in the menu without having chosen any article, the screen explains this and offers the Go to the Panel button.
The screen is split into two columns. On the left, the fields you edit. On the right, the Preview: how the article is going to look and, further down, the Google snippet — the little box that shows up in the search result, with the address, the title and the description.
What Mariana already did on her own and what you need to look at:
| She does it on her own | You need to review |
|---|---|
| Writes the article text, with the subheadings. | Whether what's written is true about YOUR service: price, deadline, warranty, what you do and what you don't. |
| Writes the Title, the Excerpt, the Meta Title and the Meta Description. | Whether the title is what you'd say to a customer. |
| Chooses the Focus keyword. | Whether it's really what people type in your region. |
| Builds the data Google reads behind the scenes (the "schema"). | Nothing — that's automatic and has no field on the screen. |
| Generates the score and the SEO Checklist every time you save. | Fixing the items marked in red. |
| Generates the cover and the figures when you ask. | Checking that the image matches the text before saving. |
The fields of the "Content" card:
| Field | What it is |
|---|---|
| Title | The name of the article, as the reader sees it. |
| Author | Who signs it. It's required: an article without an author won't publish. |
| Slug | The last part of the page's address (e.g.: gas-smell-what-to-do). Only lowercase letters, numbers and hyphens. Once published it locks, and the screen explains why: the link has already been shared and changing it would turn the current page into an error. |
| Excerpt | Two lines about the article, used in the listings. |
| Cover image URL | The address of the image that opens the article. It's required. |
| Article body | The text itself, with the formatting bar on top. |
The fields of the "SEO" card:
| Field | What it is |
|---|---|
| Meta Title | The title that shows up on Google (it doesn't have to be the same as the article's). Above 60 characters, Google cuts it off. |
| Meta Description | The one- or two-sentence description under the title, on Google. The comfortable length is between 70 and 160 characters. |
| Focus keyword | The search you want to win with this article. |
The body's formatting bar has, in this order: Section heading, Subheading, Bold, Italic, Bullet list, Numbered list, Quote, Link, Table with caption and Figure with caption. Below the editor, the screen reminds you of the house rule: "The blog requires a visual aid in the body: use the table or the figure button — both come with a caption, which is what Google reads."
Step by step — generating the cover with your brand:
- In the Content card, click Generate branded cover.
- The screen warns that it takes 2 to 4 minutes, because the artwork goes through a check. You can keep editing the rest — the cover shows up on its own in the field.
- When it arrives, check it in the preview next to it and save for real.
Clicking again while a cover is on its way does not generate another one, and doesn't charge twice. If you close the tab and come back later, the screen fetches the cover that finished while you were away.
Step by step — putting a figure in the middle of the text:
- In the article body, click the Figure with caption button.
- Choose one of the four tabs: Upload from computer, Ask Diego, My images or Paste URL.
- If you choose Ask Diego (the agent who draws), choose the Section to illustrate and click Ask Diego for a figure. He reads that section and draws it in your brand. It takes a few minutes and you can close the window — the figure comes back on its own. Save the article before asking, because he reads the text that's already saved.
- If you choose My images, the window shows the 60 most recent images of your company. To find an older one, click Show more images below the grid — each click brings 60 more. (The same images are all in the Gallery tab of the Image Creation module.)
- Fill in the Image description (for people who can't see the image — the blog requires it) and the Caption (it shows below the figure; it's what Google reads to understand what it shows).
- Click Insert.
Step by step — asking for Mariana's opinion on the text:
- In the Mariana's review card, click Ask for a review.
- She reads the article and sends back suggestions separated by subject: Hook, Promise, Scannability, Call to action, Repetition and Jargon.
- Read and apply whatever makes sense, writing it yourself. There's no "apply" button — she suggests, you do the writing.
- If she finds nothing, the screen says: "Mariana read the article and found nothing to improve in the copy."
The footer buttons (they stay stuck to the bottom of the screen):
| Button | When it shows | What it does |
|---|---|---|
| Save | Article not yet published. | Saves what you wrote and recalculates the SEO score. Doesn't touch any website. |
| Approve & publish ▶ | Article with a connected site. | Puts it live. Stays disabled while there's a red item on the checklist. |
| Mark as ready ▶ | When there's no connected site. | Marks it as ready, to publish when the site is connected. |
| Publish all 3 languages ▶ | Only on AutoAgency blog topics. | Publishes the three versions together. |
| Save and update live ▶ | Article already published. | Saves and changes the public page right away. |
| Discard / Take offline | Always. | Discards the draft, or opens the take-offline window. |
The notices that can show up at the top:
- Green bar: "This article is live. Whatever you save here changes the public page immediately." — with the View on site link.
- Orange bar (WordPress): "This content is already published on WordPress. Saving here only updates the panel copy — to change the text on the client's site, use the button below." The button is Send this version to the site, and it's a separate click, on purpose: saving here never touches your website on its own. If you still have an unsaved change, the screen says "Save your changes before sending."
- Orange bar (no site): "No site connected — this content is ready to apply; connect a WordPress in Settings to publish with 1 click."
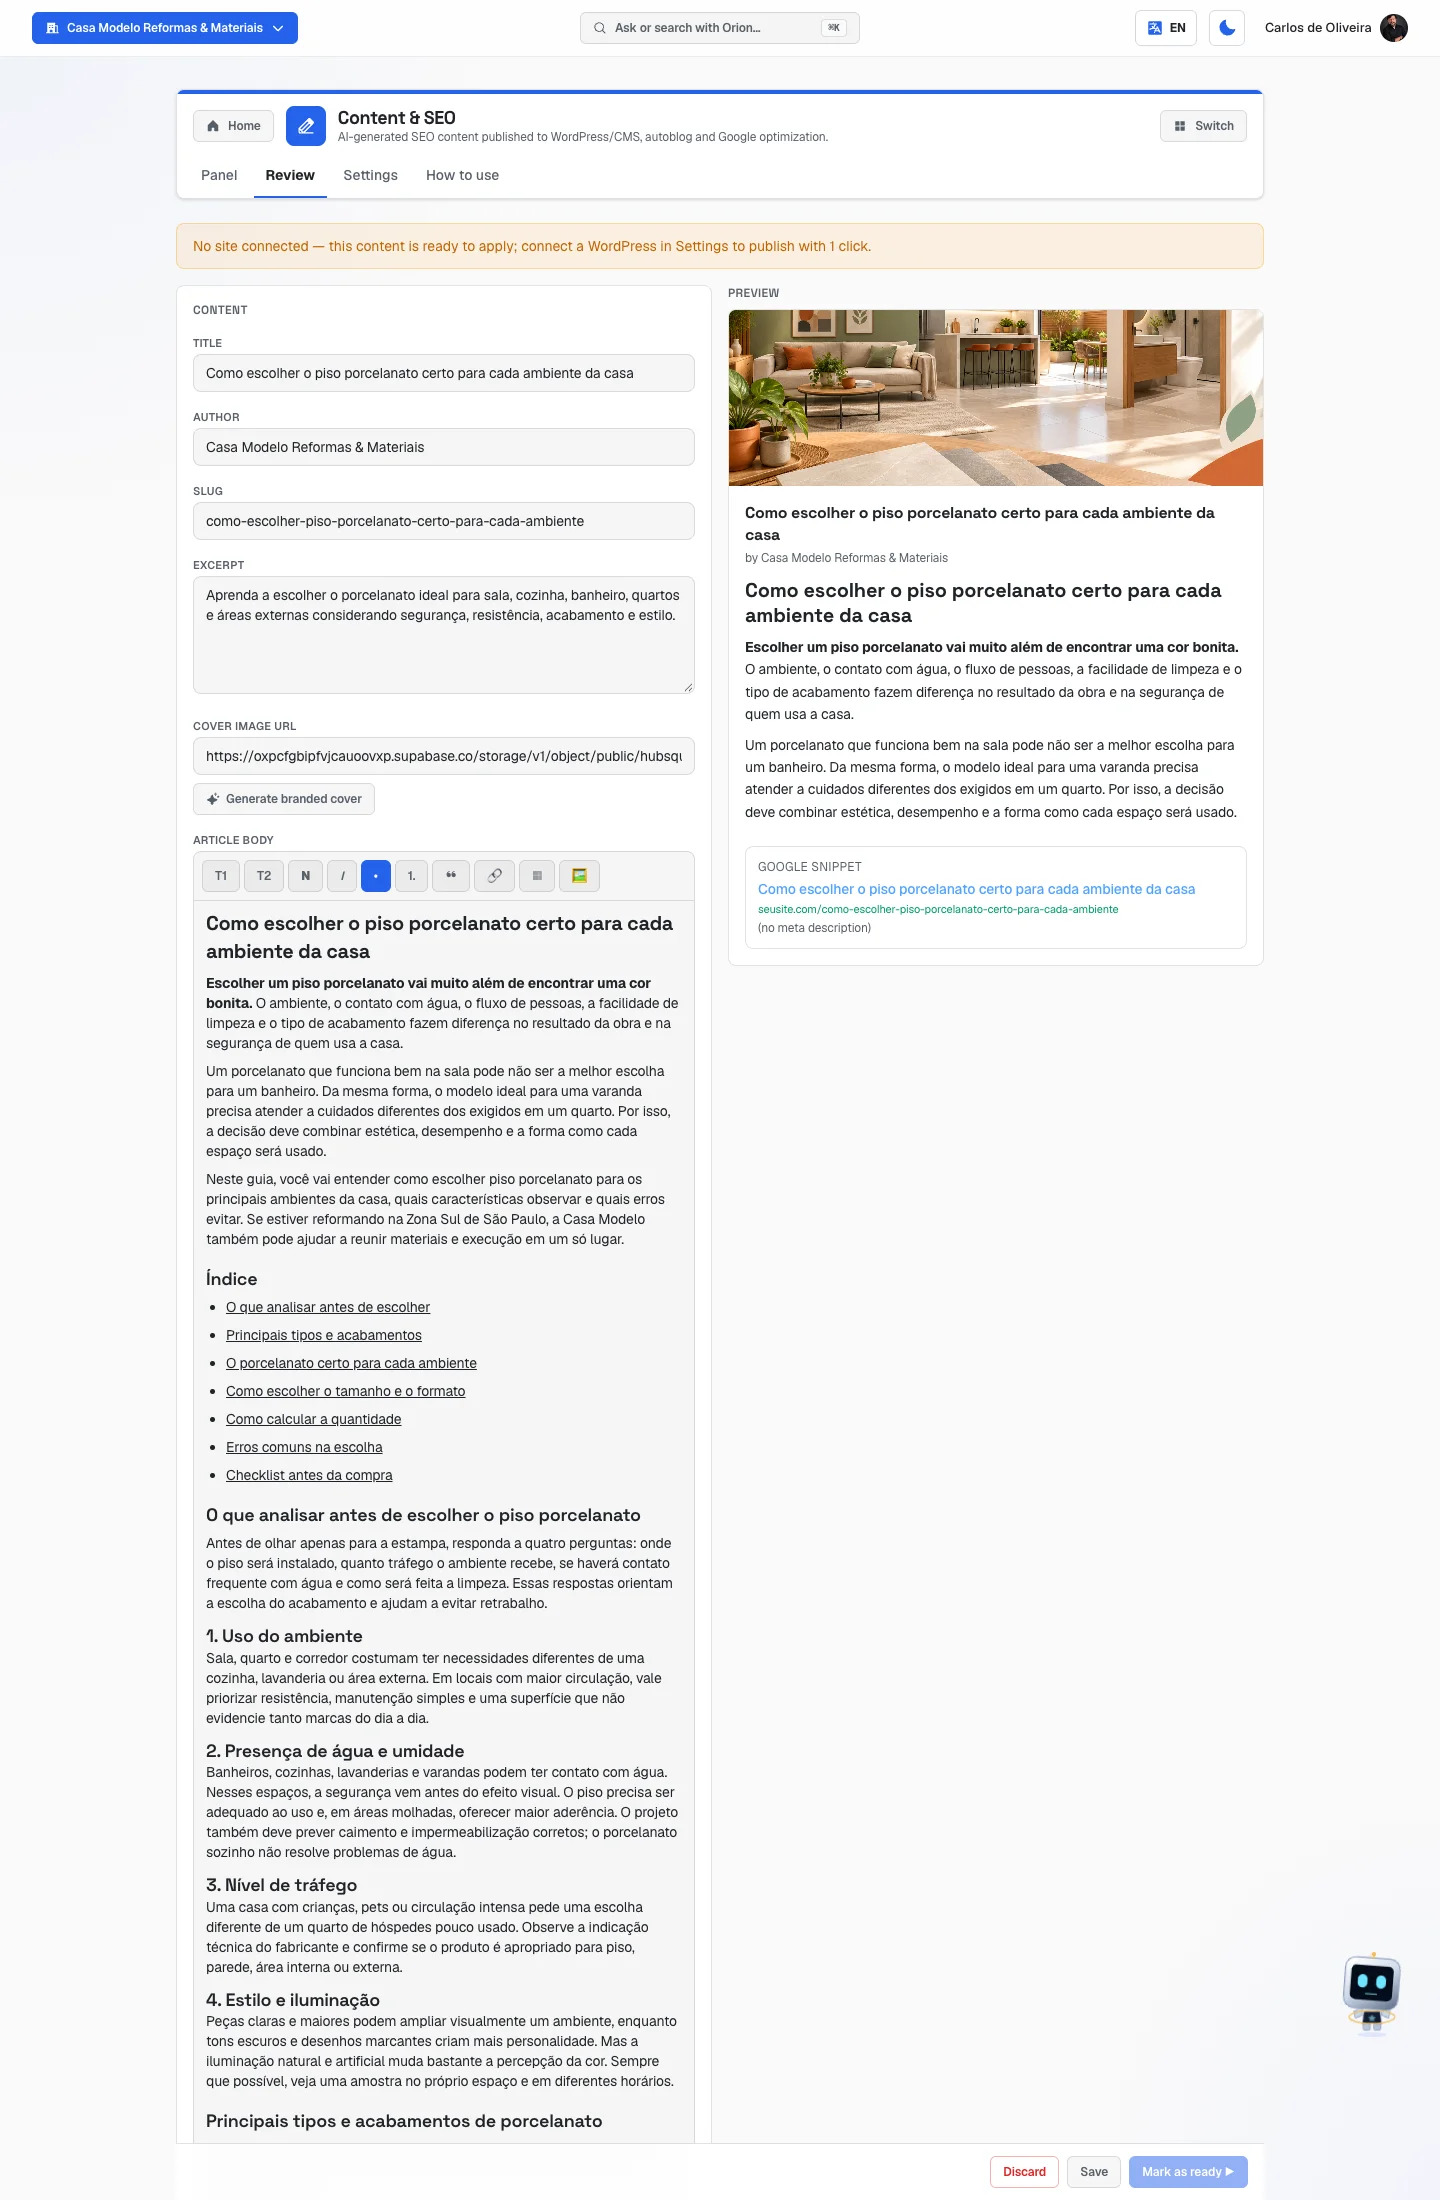 Review tab with an article written by Mariana: the fields (title, author, excerpt, cover and the article body) on the left, the preview with the cover and the Google snippet on the right
Settings
/app/modulos/conteudo-seo/config
There are two cards.
1. Connect site
Step by step — connecting your WordPress:
- In the address field, write your website's address (e.g.:
https://seusite.com). - Under WordPress username, write your username from there.
- Now generate the extra password. In another browser tab:
- Go into your website's panel (the address ends in
/wp-admin) with your usual user. - In the left menu, click Users and then your own name.
- Scroll the page all the way down, until you find the Application Passwords card.
- Write any name so you remember it later (e.g.: "AutoAgency") and click add. The password shows up only once.
- Copy the password.
- Go into your website's panel (the address ends in
- Paste it into the Application password (the one WordPress generated) field.
- Click Connect WordPress. "WordPress connected!" shows up and, on the screen, the Connected to line with your website's name.
If you close the WordPress page without copying the password, no problem: delete that one and create another. And you can cancel that extra password whenever you want, without losing your access. Once connected, the buttons become Reconnect and Disconnect.
2. Auto-blog
"When enabled, Mariana writes 1 article per week and it enters this queue for your approval — nothing is published without your approval."
Step by step:
- Click the switch. It changes to say Auto-blog enabled.
- Under Topics (1 per line), write one subject per line. E.g.: "How to increase sales with SEO".
- Under Target audience, write who it's for. E.g.: "SMB managers looking to grow on Google".
- Under Who signs the articles, leave it blank to use AutoAgency's default signature, or write the name of a person at your company.
- If you write a name, two more fields appear: how that person introduces themselves (e.g.: "Lead gas technician") and the page on your site that talks about them. If you leave both blank, the article comes out signed with the name only.
- Click Save settings. "Configuration saved." shows up.
Why the signature matters: the screen explains that Google uses that signature to know that there's a real person behind the text — an article without an identifiable author performs worse.
How to use
/app/modulos/conteudo-seo/como-usar
Every module has this tab at the end. It's the module's manual inside the system itself.
How to read the numbers
The three numbers on the Panel:
- Articles published — how many are already live.
- Waiting on you — how many Mariana finished and are sitting in the queue. This one turns an alert color when it's greater than zero: it's the number that turns into money if you work on it.
- Articles in total — everything that exists, minus what you discarded.
The SEO score (the big number on the right side of each article, and at the top of the Checklist):
It's a score from 0 to 100. It's simply the percentage of checklist items the article already meets. It's not the score Google gives your article — it's the platform's own check before publishing.
The SEO Checklist has two kinds of items:
- Blocker (❌ red) — prevents publishing. The publish button stays disabled until you fix it. These are things without which the page is born broken: having a title, having a description, having a cover, having an author, having exactly one main heading in the body, every image with a description, and a well-written address (slug).
- Warning (⚠️ orange) — doesn't prevent anything, but you end up with a worse article. These are market references: a title of up to 60 characters, a description between 70 and 160, at least one subheading, at least 600 words, at least 2 internal links and a visual aid in the body.
When an item is already met, it shows up with a green ✓ and the name of the rule.
Frequently asked questions
Why does writing articles bring in customers for free? Because Google takes whoever searched to the answer. If the answer is yours, the visit is yours — and you don't pay for it. It's the opposite of an ad, which only brings people while you're paying. "Free" here means no cost per click: the work of writing and reviewing is still there, and that's why this module writes for you.
How long until I see results?
The effect usually shows up between the second and the third month — that's AutoAgency's
official answer, published on the website's frequently asked questions page (address /faq), in the
question "How long until I see results?". Content and presence on Google are the slow road:
they take longer than ads and, in return, they don't vanish when you stop paying —
because the article stays live and keeps being found.
Two honest caveats, so you don't expect the wrong thing:
- That timeframe is not a promise of ranking. Nobody — not us, not any agency — controls where Google puts your article in the search results. What the platform guarantees is what's on our side: that the article comes out correct, complete and published.
- No screen in this module shows a timeframe counter. If you open the performance tab in the first week and see nothing, it's not a defect — it's early.
Is what Mariana writes published on its own? No. Everything she writes — including from the auto-blog — waits for you in Pending review. Until you click publish, it doesn't exist for the public.
Do I need to have WordPress? To publish with one click, yes. Without a connected site, the module keeps writing and reviewing normally: the article stays Ready to publish and you can copy the text to wherever you like, or connect the site later.
Can I change the text after it's live? Yes. Open the article on the Review tab and use Save and update live ▶ — the green bar reminds you that whatever you save changes the public page immediately. What no longer changes is the Slug (the address), because the link has already been shared and Google has already stored it.
Can I sign the articles with my own name? Yes, in the Who signs the articles card, in Settings. Write the name, and — if you want — the job title and the page on your site that talks about that person.
Can the image be my own? Yes. On the figure button, the Upload from computer tab accepts your photo. The Ask Diego button exists for when you have no image at all.
When something goes wrong
| Symptom | What to check | What to do |
|---|---|---|
| The publish button is disabled and won't click | Is there a red item on the SEO Checklist? | Hover over the button: it says "Resolve SEO issues to publish". Fix the ❌ items and click Save to recalculate. |
| "Resolve before publishing: …" shows up | The list after the colon says exactly what's missing. | Fill in what it mentions and publish again. |
| On the Review screen "Pick an article in the Panel to open it here." shows up | You came in through the menu, without choosing an article. | Click Go to the Panel and open an article. If the list is empty, it's because everything has already been published — create one under New article. |
| The article has the Failed status | It was approved but didn't reach the site. | Open the article and try publishing again. If it repeats, check the WordPress connection in Settings. |
| When saving a live article: "This edit would create an SEO problem that did not exist: …" | Your change broke a rule the article met before (for example, it deleted the cover or the author). | Undo that change, or fix what the message mentions, and save again. |
| I clicked Send this version to the site and nothing changed there | Did the screen show "Save your changes before sending."? | Click Save first. Sending pushes what's saved, not what's on the screen. |
| The cover doesn't arrive | Has it been more than 4 minutes? | The screen says: reload the page in a minute. If it doesn't come, generate it again — you don't pay twice for a cover that didn't arrive. |
| "The cover could not be generated. Try again." | There was a failure drawing the artwork. | Click Generate branded cover again. |
| Under Ask Diego, the button says "Save the article first" | You wrote but haven't saved yet. | Click Save and ask again: he reads the saved text. |
| Under Ask Diego "Write the article text first." shows up | The article has no sections yet. | Write the text with at least one Section heading and ask again. |
| "The server took too long to respond and the connection dropped midway. Nothing was charged." | It was a momentary failure. | Try again in a few moments. |
| "Failed to connect." when connecting WordPress | Are the address, the user or the application password wrong? Was the password copied in full? | Generate a new application password and try again. A regular login password doesn't work here. |
| "The topic needs all 3 languages to go live." | This only happens on AutoAgency blog topics. | Complete the three versions before publishing. |
| "One language of this topic is already live — edit instead of publishing." | The topic is already published. | Open the live version and use Save and update live ▶. |
| In the take-offline window, a red notice: "this topic could not go back online without editing" | The text no longer passes today's quality check. | Decide knowing this: if you take it offline, it only goes back after being fixed. Maybe it's better to fix it first. |
| A Page SEO or Schema item doesn't have the delete button | It's on purpose: those items change a page that already exists, and deleting the draft here wouldn't undo the change there. | Undo the change directly on the site, or ask Mariana in the chat. |