

Automated WhatsApp Campaigns
Where it is: Home → Your apps → WhatsApp Campaigns (at the top of the screen the module shows as Automated WhatsApp Campaigns)
Address: /app/modulos/campanhas-whatsapp
What it's for
You have a list of people who already bought from you, asked for a quote or left their phone number. And you have news to share: a November promotion, annual maintenance, a new service. Sending that on WhatsApp, one by one, is half a day's work — and halfway through you lose track of who already got it.
This module does that work for you. You build the list once, write the message once, and the system sends it to everyone, at the right pace and at the right time. It's not just a "blast": you can build a sequence — the first message today, a second one three days later only for people who didn't reply, and so on. Whoever replies automatically drops out of the follow-up path and enters a real conversation.
The message goes out with the person's name in it. You write "Hi {{nome}}, how are you?" once and each person gets "Hi Maria, how are you?", "Hi John, how are you?". That's called a variable — a blank in the sentence that the system fills in on its own with each contact's data.
An everyday example: you're a locksmith. You have 340 old customers in a spreadsheet. You import the spreadsheet, write "Hi {{nome}}, this is Joe's Locksmith. I did your lock in {{city}} and I have a lock rekeying deal this month. Want me to send you the price?" and send it. The system sends Monday to Friday, 9 a.m. to 8 p.m., slowly, so it doesn't look like a robot — and anyone who replies "PARAR" never gets anything again, automatically.
The agent in charge of this module is Walter.
Before you start
Five things have to be ready. None of them is hard, but without them nothing goes out.
- The module has to be active on your account. Without it, the Settings tab shows the sign-up screen, with the Activate in catalog button, and the screens warn that "The WhatsApp Campaigns addon is not active on this tenant" (tenant = your company's account).
- The invitation to set up by chatting. The first time you open a module, an invitation from the specialist appears: "Want to set up … by chatting with Walter?". It's optional — the tabs already work — and each reply from him uses AI credits. Chatting helps Walter get to know your company. To make the invitation go away, click Dismiss or, after chatting, Complete setup.
- A connected WhatsApp in the Connections tab. There are two paths, and either one is enough (both are explained below).
- A contact list in the Lists tab, with at least one person in it.
- Sending balance. Each message sent uses up one send from your pack or, if you have no pack, your top-up credit. The packs are in the Settings tab. If the balance runs out in the middle of the campaign, sending stops and you get an email telling you — nobody leaves the queue, and as soon as there's balance again sending picks up where it left off.
Only the account owner (owner) or an administrator user (admin) can connect a WhatsApp, import contacts and publish or pause campaigns. Anyone without that role sees the screens, but gets the notice "Only the workspace owner or admin can perform this action." when they try.
Getting started
- On Home, under Your apps, click WhatsApp Campaigns. You land on the Panel tab.
- If the invitation to set up by chatting appears, you can click Chat with Walter, answer whatever he asks, and then click Complete setup — or click Dismiss and go straight on, because it's optional.
- Click the Connections tab and connect your WhatsApp. The fastest way is New instance: you give the number a label, a QR Code appears and you scan that code with your phone (the full step by step is in the Connections tab section).
- Click the Lists tab → New list. Give it a name ("2024 customers", for example) and click Create list.
- Open the list with Open list and click Import CSV. Choose the spreadsheet with your contacts, check the column mapping and click Import N contacts.
- Go to the Campaigns tab and click + New campaign. You land on the Editor.
- Fill in the Name, choose the Audience (the list you just created), choose the Sending channel and write the first message in Step 1.
- Click Preview to see how the message looks with a real customer's name.
- Click Publish ▶. You go back to the Campaigns tab and the campaign shows up as Running.
- Follow it with 📈 View results, on the same line as the campaign.
📷 This screen has no screenshot — after sending, the campaign shows up in the table on the Campaigns tab with the "Running" status; open the row and the results appear right below.
How sending works (read this first)
This is the part that prevents surprises. The system does not fire everything at once.
The queue. When you publish, each person on the list goes into a queue (the system calls this an "enrollment"). The queue is checked every minute. On each pass, the system takes whoever is up next and sends that person's message.
The time window. Every campaign has allowed hours and days — by default, Monday to Friday, 9 a.m. to 8 p.m., in São Paulo's time zone. If the person's turn falls at 2 in the morning or on a Sunday, the system does not send: it reschedules for the next valid time. Nothing is lost, just postponed.
The pace (gradual ramp-up). The volume rises along a controlled curve over the first few days, instead of blowing up on day one. This protects your number: a WhatsApp that blasts a thousand messages in one afternoon usually gets blocked. When the campaign hits the day's limit, the rest of the queue is rescheduled for the next day. The system also adds a few random seconds of difference between one message and the next, so the sending doesn't look like a machine.
The curve's numbers, which no screen shows:
| Message limit | |
|---|---|
| Day 1 | 50 |
| Day 2 | 150 |
| Day 3 | 300 |
| Day 4 | 600 |
| Day 5 onward | 1,500 |
Four details that change the math in practice, worth knowing:
- The limit belongs to the campaign, not to the number. Two campaigns running at the same time each have their own ceiling — the two added together go over the limit of a single one.
- The "day" is counted from the moment each person enters the campaign's queue, not from the date you published. A contact imported today into an old campaign starts on the 50 step — and shares the quota with people who are already on the 1,500 step.
- The count covers the last 24 running hours, not the calendar day: there's no "resets at midnight".
- You can't change these values from a screen, and that's on purpose: whoever blows past the pace loses the number.
The unsubscribe footer. At the end of every text message (and in an image's caption) the
system adds a short sentence that teaches how to opt out — by default Responda PARAR para não receber mais.
(the standard text, which today always goes out in Portuguese, even if your message is in English; it means "Reply STOP to stop receiving messages."). For your contacts to read it in English, you change that text in the Settings tab, in the LGPD Footer box
(LGPD is Brazil's data protection law). If your message already explains how to opt out, the footer isn't repeated. Audio messages and
templates don't get a footer.
Whoever asks to opt out. If the person replies exactly parar, sair, cancelar,
stop, unsubscribe, cancele or cancelar todas (upper or lower case, it makes no
difference; these are the words the system recognizes today, in Portuguese and English, and they are not translated), two things happen right away: their phone goes onto the Opt-outs list in the
Settings tab, and every campaign they were in stops for them. From then on, none of
your campaigns reaches that number — not even a new campaign — until you take the number off the
list by hand.
Whoever replies anything else is marked as "replied". That's used for conditional steps (see the Editor) and counts toward your reply rate. If you have the WhatsApp support module, whoever replies is already answered by the assistant in the same conversation.
When a message fails. The system tries again three times, five minutes apart. If all three fail, that person is marked Failed and the campaign moves on to the others. If five people in a row fail and none succeed, the whole campaign is paused automatically — it's the system protecting you from burning the whole list with a broken message.
The tabs, one by one
Panel
/app/modulos/campanhas-whatsapp/painel
- What you see here:
- At the top, Walter's note: a sentence saying what matters most right now, with a shortcut button. For example: "Your campaigns' number isn't connected — nothing goes out until it is, not even what's already scheduled." with the Connect WhatsApp button; or "There's no audience list for the campaign — build one in Contacts." with the Build list button; or, when everything's fine, "2 campaigns running to 340 people in your lists."
- Next to the note, four numbers for how things stand right now: Campaigns running, In draft, Audience lists and Opt-outs all time.
- Below, six numbers for the month: Messages sent this month, Delivery rate, Read rate, Reply rate, Opt-outs this month and Verified WhatsApp cost this month.
- Last, Active campaigns: each campaign that's running, paused or scheduled, with a little progress bar and the count "how many have finished / how many came in".
- What you can do: just look, and use the shortcut button on Walter's note.
- While it loads you see "Loading metrics...".
- Empty state: if no campaign is running, you see "No active campaign", with the explanation "When a campaign is running, the scoreboard of sends and replies shows up here." and the tip "Create one in the Campaigns tab".
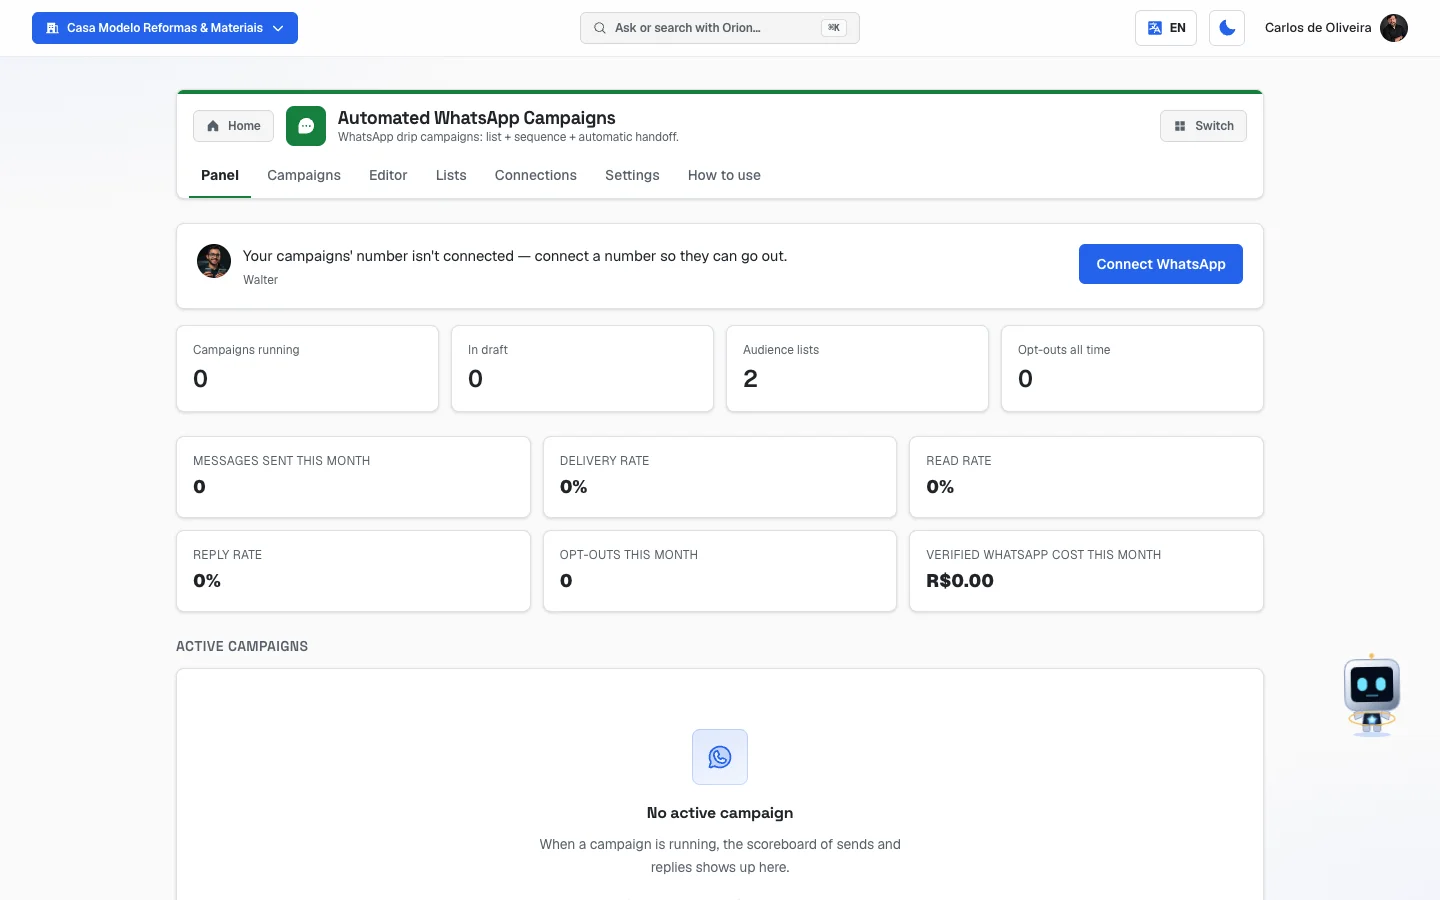 Panel tab with Walter's note at the top, the four status numbers and the six numbers for the month
Campaigns
/app/modulos/campanhas-whatsapp/campanhas
- What you see here: the list of all your campaigns, in a table with the columns Name, Status, Audience, Enr. / Run. / Compl., Last activity and Actions. In the top corner, how many campaigns exist and the + New campaign button.
- What you can do: create, start, pause, resume, duplicate, delete and view the results of each campaign.
What each status means:
| Status | Means |
|---|---|
| Draft | You're building it. Nothing has been sent. |
| Scheduled | It's ready and will start on the date you set. |
| Running | It's sending now (respecting the time window). |
| Paused | You stopped it — or the system stopped it because of a failure or lack of balance. Whoever was in the middle of the sequence stopped receiving. |
| Completed | It's finished. |
| Failed | It went wrong. |
| Archived | It was deleted after it had already run. It's kept, but no longer sends. |
The Audience column shows the list's name and, in parentheses, the type: (Blast) for the list as it is today, (Automatic) to also enroll anyone who joins the list later. If you haven't chosen a list yet, you see "(no list)".
The Enr. / Run. / Compl. column is three numbers side by side: how many people entered the campaign, how many are in the middle of the sequence and how many have already finished.
The buttons in the Actions column:
| Button | What it does |
|---|---|
| 📈 | Opens the campaign's scoreboard below the row. Click again to close. |
| ▶ | Start (if it's a draft) or Resume (if it's paused). |
| ⏸ | Pause. Stops sending right away. |
| 📊 | Details / edit — opens the campaign in the Editor. |
| 📋 | Duplicate — creates a draft copy, with "(copy)" in the name, with the same steps and no schedule. |
| 🗑 | Delete. |
Each campaign's scoreboard (📈 button): Sent, Replied, Reply rate, Completed, Opt-outs (contacts who asked to opt out) and Failed.
Step by step — pausing a campaign that went wrong:
- In the Campaigns tab, find the campaign's row.
- Click the ⏸ button.
- The status changes to Paused right away and no new messages go out.
- To go back, click ▶ (the button turns into "Resume").
Step by step — deleting a campaign:
- Click the 🗑 on the row.
- Read the notice. It changes depending on the situation:
- If it's a draft: "The campaign "X" is a draft and will be permanently removed."
- If it has already run: "The campaign "X" will be archived and will stop running. This action cannot be undone from the interface."
- Click Delete.
- Empty state: "No campaigns yet", with the explanation "A WhatsApp campaign sends your approved message to the chosen list, at a safe pace." and the + New campaign button.
- Error: "Failed to load campaigns."
Editor
/app/modulos/campanhas-whatsapp/editor
This is where you build the campaign. The screen has three parts: the Campaign box on top, the Sequence steps in the middle and the Variables column on the right.
The Campaign box (each field explained)
| Field | What to fill in |
|---|---|
| Name | Just so you can find it later. E.g.: "Black november reactivation". |
| Audience | Two options. Blast (current list): sends to whoever is on the list today. Auto-enroll (new contacts): in addition, anyone who joins the list later also enters the campaign on their own. Below, choose the list in the selection box — it shows the name and, in parentheses, how many contacts it has. |
| Sending channel | Which WhatsApp the message goes out from. While nothing has been chosen, the box says "— select a connected channel —". Each option shows the number's label and whether it's Verified WhatsApp (Meta's official one) or WhatsApp at Scale (from your phone); if it's not up, "disconnected", "connecting" or "with error" appears next to it. |
| Start | Now or Schedule. If you pick Schedule, a date and time field appears. |
| Business hours | Start (h) and End (h) in whole hours — the start goes from 0 to 23 and the end up to 24 (9 and 20 = 9 a.m. to 8 p.m.). On a new campaign, the window already comes filled in with the one you saved in the Settings tab. Then come the Days of the week (click the Mon, Tue, Wed, Thu, Fri, Sat, Sun buttons — when on, it's colored) and the Time zone, chosen from a list by name (leave Brasília time if you're in Brazil). |
If, in place of the audience box, you see the notice "You don't have a contact list yet. Create the first one in this module's Lists tab and come back to pick it.", that's exactly what it says: go to the Lists tab, create a list and come back.
The sequence steps
Each box is a Step — one message. Step 1 says "Send immediately". From Step 2 on you set the wait, and the box's title starts showing it ("Wait 3 days", for example).
In each step you fill in:
- Amount and Unit (Minutes, Hours or Days) — how long to wait after the previous step. It doesn't appear on Step 1.
- Type — what will be sent:
- Text: the Message field. It's the most used.
- Image: Image URL (the address of a photo that's already on the internet) and Caption (optional).
- Audio: Audio URL (mp3/ogg).
- Approved template: only available on Verified WhatsApp. Next to the name you see "(Verified WhatsApp only)" when it can't be used.
- Apply a condition based on the previous step — the checkbox that makes the sequence split (explained below). It doesn't apply to Step 1.
The buttons in each step's corner move the step up (↑), down (↓) or delete it (🗑). At the end of the list, Add step creates one more.
The variables (the person's name filling itself in)
In the right-hand column, the Variables box with the explanation "Click to insert into the
focused field." and three buttons: {{nome}}, {{phone}} and {{city}}.
Step by step — putting the person's name in the message:
- Click inside the Message field, at the spot where the name should go.
- Click the
{{nome}}button in the right-hand column. - The text
{{nome}}appears in the middle of your sentence. Keep writing as usual. - If you click the variable without first clicking in a text field, the screen warns: "Focus a text field before inserting a variable."
What each variable turns into at sending time:
| Variable | Turns into |
|---|---|
{{nome}} | The contact's name. |
{{phone}} | The contact's phone. |
{{city}} | The contact's city. |
{{custom_fields.X}} | An extra field of yours. Type the field's name in the Custom field field and click the +. |
Careful: if the contact doesn't have that data filled in, the variable disappears and becomes an empty space. "Hi {{nome}}, how are you?" on a contact with no name goes out as "Hi , how are you?". That's why it's worth checking the Name column before importing the spreadsheet.
The condition (sending different things to whoever replied and whoever didn't)
Check Apply a condition based on the previous step and choose two things:
- If they did NOT reply to the previous step or If they replied to the previous step.
- What to do when that's true: continue (sends this step as normal), skip next (skips the next step) or stop (ends the sequence for that person).
The most common use: on Step 2, check "If they replied to the previous step" + "stop". That way anyone who already replied to you doesn't get the follow-up again.
The preview
- Click Preview, in the corner of the Sequence steps block.
- The Preview block appears with little green bubbles, one per step, with the variables already filled in.
- The system uses a real contact from the chosen list. If there isn't one, it uses a sample ("Maria Silva", "São Paulo").
- Click Hide preview to close it.
Saving and publishing
At the bottom of the screen, two buttons:
- Save draft — saves without sending anything. To save, you only need a Name and a Sending channel. While it saves, the button turns into "Saving...". Afterward you see "Draft saved.".
- Publish ▶ — puts the campaign live. While it publishes, the button turns into "Publishing..." and, at the end, you go back to the Campaigns tab.
If anything is missing to publish, a red strip appears at the top with what's missing:
| Notice | What to do |
|---|---|
| "Give the campaign a name." | Fill in the Name field. |
| "Select an audience list." | Choose the list in Audience. |
| "Select a sending channel." | Choose the WhatsApp in Sending channel. |
| "The selected channel is not connected." | Go to the Connections tab and reconnect the number. |
| "Step N: empty message." | Write that step's text. |
| "Step N: empty media URL." | Paste the image's or audio's address. |
| "Step N: select a template." | Choose the approved template in that step. |
| "Step N: template "X" is not synced/approved." | Go to Connections → Sync templates, and choose one that's "approved". |
| "Message template "X" is not approved by Meta. Sync your templates and pick an approved one before publishing." | The same case as above, checked at publishing time. |
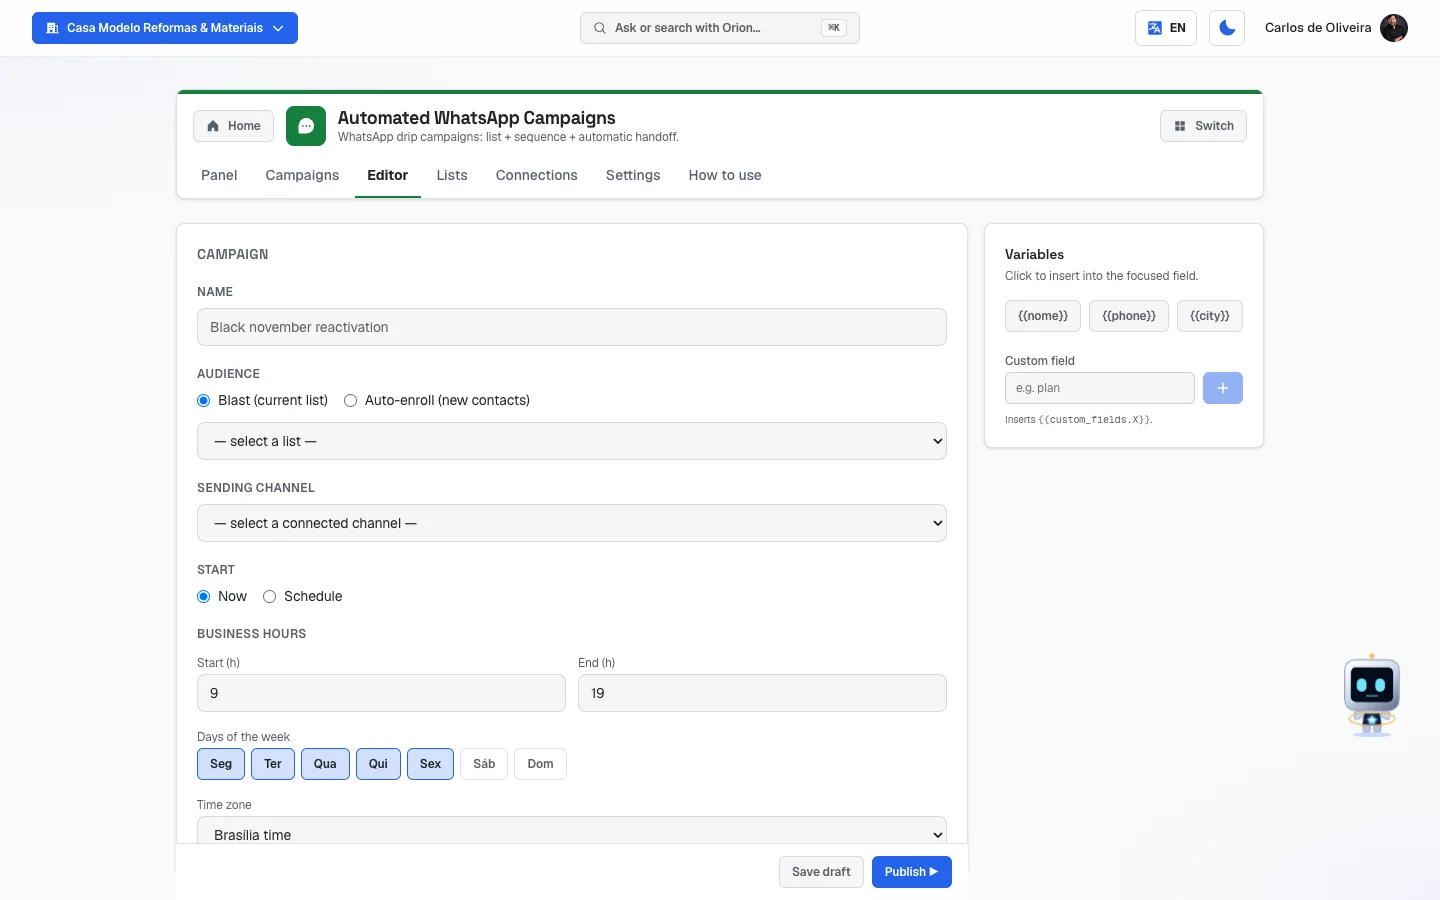 Editor tab showing the Campaign box (Name, Audience — with the notice that there's no contact list yet —, Sending channel, Start and Business hours), the Variables column on the right, the start of the Sequence steps with the Preview button and the Save draft and Publish buttons at the bottom
Lists
/app/modulos/campanhas-whatsapp/listas
This is your sending address book — and it's the same screen that appears inside the AI Outbound Calling module. A list created here works for both.
- What you see here: how many lists you have, the New list button and one card per list, with the name, the description, how many contacts it has and where it came from, and the Open list button. The trash icon in the corner of the card deletes the list.
- What you can do: create lists, import contacts from a spreadsheet, delete contacts, and send the list to email marketing (or to Kommo, only for a company that already had Kommo connected).
Step by step — creating a list:
- On the Lists tab, click New list.
- Under New contact list, type the name. The example on the screen is "Ex: Hot leads — October".
- If you want, write the Description (optional).
- Click Create list. The notice "List created" appears.
Step by step — importing contacts from a spreadsheet (CSV):
- Click Open list on the list's card.
- Click Import CSV and choose the file on your computer.
- The Column mapping box appears, with the explanation "Confirm which field each CSV column maps to. Columns set to "—" will be ignored."
- The system already guesses what it can: a column named "name", "phone", "e-mail", "company", "position", "city" or "state" is recognized on its own. Check each dropdown and fix whatever is wrong. The options are Name, Email, Phone, Company, Position, City, State, Notes and — ignore —.
- Below, the screen says how many rows it found and shows a preview of the first 3.
- Click Import N contacts. At the end a notice appears like "320 contacts imported (20 skipped)".
How to prepare the spreadsheet (this avoids 90% of problems):
- One row per person. The first row is the header, with each column's name.
- The file has to be .csv. In Excel or Google Sheets, use "Save as" or "Download" → CSV.
- A comma, semicolon or tab separating the columns: the system figures out which one you used.
- What really matters is the phone column. Without a phone, the person stays on the list but no WhatsApp campaign reaches them.
- Import at most 5,000 rows at a time. Bigger spreadsheet? Break it into pieces.
Cleanup (the list's automatic cleaning):
When importing, the system fixes and discards what's not usable. That's what the screen calls "skipped":
- Phone: it keeps only the digits, throwing away parentheses, dashes and spaces. If fewer than 8 digits are left, the phone is discarded (left blank).
- Email: it lowercases everything. If it has no "@" or is too short, it's discarded.
- The whole row is only discarded when no name, no phone and no email is left — in other words, an empty or junk row.
- Whoever asked to opt out (the Opt-outs list) isn't deleted from the list, but also never receives: the check is done at sending time, message by message.
🟥 The import does NOT merge repeated contacts — and that has a real consequence. Each row of the spreadsheet becomes a new contact, always. There's no check by phone or by email, neither at import time nor in the database. If you upload the same spreadsheet twice, you end up with two copies of each person on the same list, the list's total contacts doubles, and — what really hurts — each person gets the campaign twice, because to the system they're two different contacts. This also applies to the list that fires on its own when it receives new contacts.
The screen doesn't warn you: it says how many rows were imported and how many were discarded, but "discarded" counts only empty rows, never repeated ones.
How to protect yourself: clean the duplicates out of the spreadsheet before uploading (in Excel or Google Sheets, "Remove Duplicates" on the phone column), and never re-import the whole spreadsheet to add a few contacts — upload only the new rows. If you've already re-imported, open the list and delete the copies before publishing the campaign.
Inside the open list you can also:
- See the contact table with Name, Email, Phone, Company and City. The screen shows the 200 most recent contacts.
- Delete a contact with the trash icon on the row.
- Sync Kommo — sends the contacts not yet sent to Kommo. The button only appears for the company that already had Kommo connected: Kommo is no longer offered as a CRM.
- Add to email list — puts the contacts that have an email into your email marketing list.
- Back to lists — goes back to the previous screen.
Empty states:
- With no list at all: "No lists yet" / "Create your first list and upload contacts via CSV." / "E.g. “2023 customers” to win back people who already bought from you." and the Create first list button.
- Open list that's empty: "No contacts yet" / "Import a CSV with columns like name, email, phone, company, city."
Deleting a list deletes all its contacts. The confirmation question says so in so many words: "Delete "X" and all its contacts?".
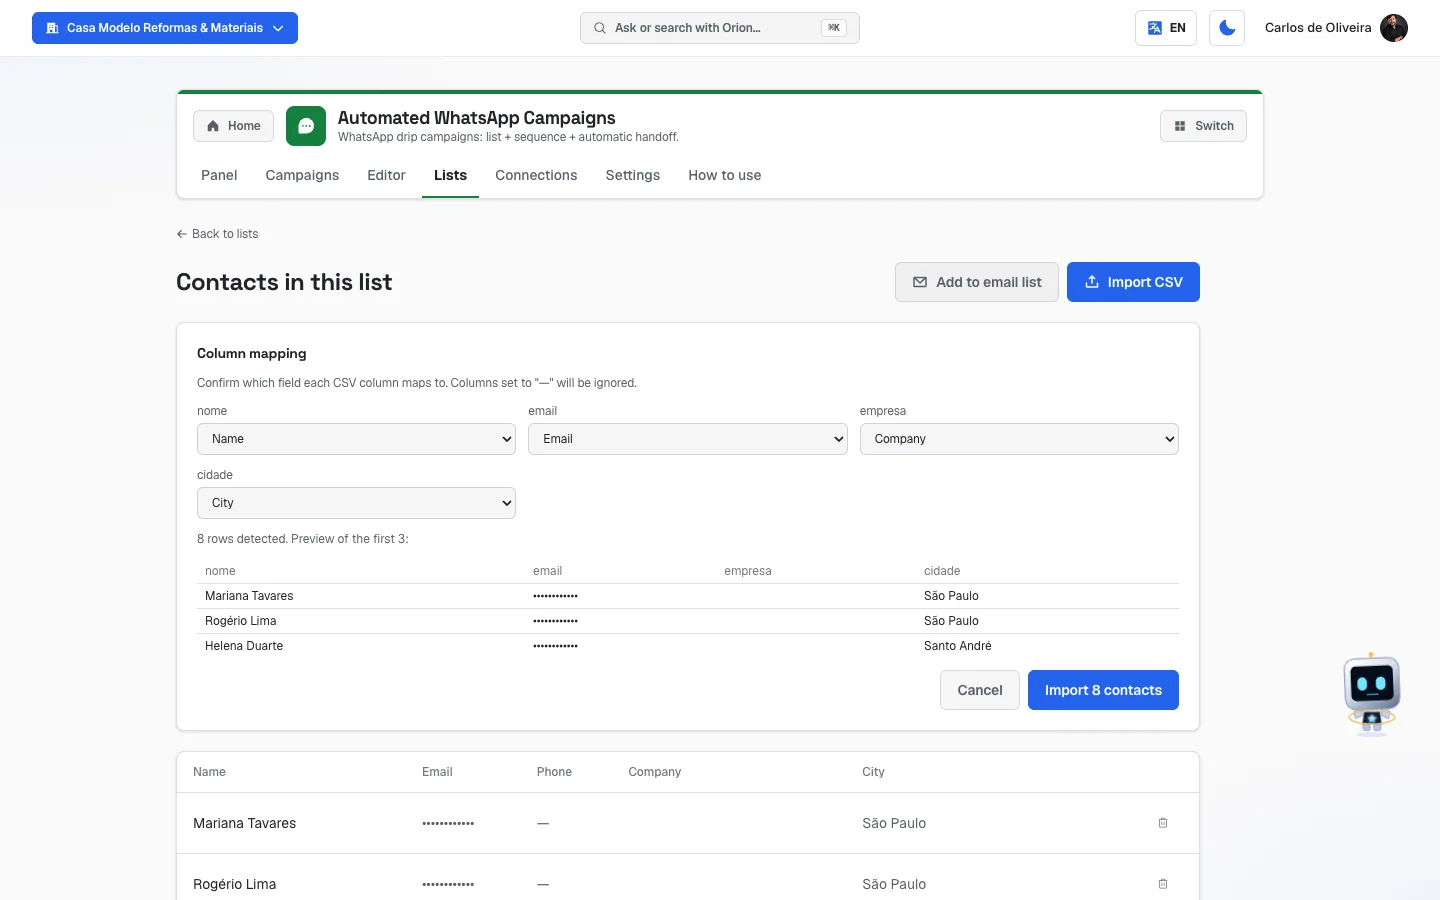 Screen of an open list with the "Column mapping" box filled in and the preview of the first 3 rows
Connections
/app/modulos/campanhas-whatsapp/conexoes
Here you connect the WhatsApp that will do the sending. There are two paths, and the screen shows both, one below the other. You can use one, or both.
Path 1 — your own number (the "WhatsApp at Scale (from your phone)" block). It's the WhatsApp you already use on your phone. It connects by QR Code, just like WhatsApp Web. It needs nobody's approval and the text of each message is free. It's the path for volume.
Path 2 — Meta's official number (the "Verified WhatsApp (official Meta)" block). It's the official connection, with a business badge in the conversation and priority delivery. In exchange, messages to people who haven't talked to you in the last 24 hours have to use templates approved by Meta.
The screen's own recommendation: if you're going to use your number, dedicate a number just to the campaign, separate from your main support WhatsApp.
Step by step — connecting your number by QR Code:
- On the Connections tab, in the WhatsApp at Scale block, click New instance.
- In the Label field, type a label so you can recognize the number later (the example is "Sales SP").
- Click Generate QR Code.
- Take the number's phone, open WhatsApp and go to Linked devices → Link a device.
- Point the camera at the QR Code on the screen. It refreshes on its own every 3 seconds, so if you're slow, no problem: wait for the next one.
- When it connects, you see "WhatsApp connected!" and the window closes on its own.
- If instead of the QR you see a Pairing code (some big numbers), type that code on the phone, on the same linked devices screen.
On each connected number's card you have:
- The label, the connection's technical name and a status tag: Connected, Disconnected, QR pending, Pairing, Pending or Error.
- Refresh — asks WhatsApp again how the connection is doing.
- Disconnect — turns it off (appears only when it's connected).
- Delete — deletes the connection. It asks first: "Delete the instance "X"?".
Step by step — connecting Verified WhatsApp (Meta's official one):
- In the Verified WhatsApp block, click Connect with Meta.
- Here you leave AutoAgency. A Meta window opens: sign in with your Facebook, choose the business and the official number (not your phone's) and follow it to the end. You don't need to create an app at Meta for Developers or copy any codes.
- When the window closes, AutoAgency saves the account, the number and the new-messages notice on its own, and the block shows the verified name and the number. To use another number, the button becomes Change the number through Meta.
- Click Sync templates. The system fetches your account's message templates from Meta. At the end, a notice tells you how many were found, updated and approved.
- The Templates table shows each template with Name, Language, Category, Status (approved, under review, rejected, paused or disabled) and when it was Synced. You can filter by status and by category.
Templates are created in Meta's WhatsApp Manager — not here. If the sync doesn't find any, the screen explains: "The sync found no templates in this WhatsApp Business Account. Create your message templates in Meta's WhatsApp Manager, submit them for approval, then sync again."
The Delete button on the Verified WhatsApp block deletes the connection and the templates already synced. It asks first.
Settings
/app/modulos/campanhas-whatsapp/config
There are four boxes, one below the other.
1. Sending packs. It shows your balance split by channel, because one is no good for the other:
- Verified WhatsApp — Meta's official API.
- WhatsApp at Scale — from your own number.
Click one of the two to see that channel's packs. Each button shows the pack size and what each send costs. When you click, you go to payment. The screen reminds you: "Purchased sends never expire — the larger the pack, the lower the price per send."
2. Default sending window. "Sets the default time and days when new campaigns start sending. Can be overridden per campaign." The fields are Start (hour), End (hour), Time zone and Weekdays (MON to SUN buttons). Click Save window; "Saved." appears. The factory default is 9 a.m. to 7 p.m., Monday to Friday, in Brasília time (the time zone is chosen from a list, by name). This window also applies to other automatic messages that the platform sends to your customers.
What you save here is the starting point for new campaigns: when you open the Editor to create a campaign, the Business hours block already comes filled in with this setting, and you can change it right there if that campaign needs different hours. A campaign that already exists isn't affected — its window is the one you saved when you created it, and changing it here doesn't change a campaign that's already live. That's on purpose: it would be terrible to change, without warning, the schedule of something that's already sending.
If you've been using this module since before September 22, 2026, check your campaigns. Until that date the Editor ignored this setting: every new campaign was born with 9 a.m.–8 p.m., Monday to Friday, no matter what you had saved here — and that was the schedule sending followed. If you set up a different window and created campaigns before that date, open each one in the Editor, check the Business hours block and fix whatever needs it.
3. LGPD Footer. "Short text appended to the end of campaign messages. Ensures explicit opt-out." Write the text (up to 500 characters) and click Save footer. The default
is Responda PARAR para não receber mais. (in Portuguese; it means "Reply STOP to stop receiving messages.").
4. Opt-outs. The list of people who asked to stop receiving messages. It shows the phone, the date and time, and the reason. Each row has the Remove button.
Step by step — taking someone off the opt-out list:
- On the Settings tab, scroll down to the Opt-outs box.
- Find the phone and click Remove.
- The screen asks "Remove opt-out?" and explains that "The contact will receive campaigns again."
- Confirm only if the person really asked to come back. That's a request from someone who wrote "PARAR" — undoing it without their authorization is the kind of thing that turns into a complaint.
- Empty state: "No opt-outs recorded" / "Whoever asks to stop receiving messages shows up here and is respected automatically."
- If the module isn't active, this tab shows only the sign-up screen, with the list of what the module does and the Activate in catalog button.
How to use
/app/modulos/campanhas-whatsapp/como-usar
Every module has this tab at the end. It's the module's manual inside the system itself.
How to read the numbers
On Walter's note (Panel tab):
- Campaigns running — how many are sending or scheduled right now.
- In draft — how many you started building and didn't publish.
- Audience lists — how many lists you have.
- Opt-outs all time — how many people have asked to opt out, ever.
On the six numbers for the month (Panel tab):
- Messages sent this month — how many messages went out since the 1st.
- Delivery rate — out of every 100 messages that went out, how many reached the person's phone. A low rate is a sign of a wrong number on the list or a problem with the connection.
- Read rate — how many were opened. It depends on the person having read receipts turned on, so it's always lower than reality.
- Reply rate — how many people replied to you. It's the number that matters most: it's people raising their hand.
- Opt-outs this month — how many people asked to opt out this month. If that number goes up a lot, your message is bothering people: change the text or space the campaigns out.
- Verified WhatsApp cost this month — an estimate of what messages through Meta's official channel cost during the month.
Mind a detail that's there on purpose: "Opt-outs all time" (on Walter's note) counts since forever; "Opt-outs this month" (in the six numbers) counts only the month. Similar names, different windows.
On each campaign's scoreboard (📈 button):
- Sent — messages that went out in that campaign.
- Replied — people who replied.
- Reply rate — replied divided by sent.
- Completed — people who reached the end of the sequence.
- Opt-outs — people who asked to opt out in the middle of that campaign.
- Failed — people the message didn't reach even after three attempts.
On the progress bar (Active campaigns): the two numbers are "how many people have already finished the sequence / how many entered the campaign".
Frequently asked questions
Do I need to leave my computer on for the campaign to run? No. After you publish, everything happens on the server. You can close the browser and turn off the computer.
Does the message really go out from my number? It goes out from the number you chose in Sending channel. If you connected your WhatsApp by QR Code, the person sees your usual number. If you use Meta's official channel, they see the verified number, with the company's name.
Can I send to a purchased list? Technically the system sends. But messaging someone who never gave you their phone is the fastest way to get your number blocked by WhatsApp and to get complaints. Use people who have already talked to you.
The person replied. Now what? The reply arrives on WhatsApp as usual. The system marks that they replied (that shows up in Replied) and, if you have the WhatsApp support module, the assistant already answers right away. If you set up the step with "If they replied to the previous step" + "stop", they also stop receiving the rest of the sequence.
What happens if the person sends "PARAR"? They go onto the Opt-outs list, leave every campaign they were in and don't receive any more of your campaigns — not even future ones. This is automatic and applies to the number, not to the list: deleting and re-importing the contact doesn't make them receive again.
Can I send the same campaign again to whoever didn't reply? Duplicate the campaign with the 📋 button, adjust the text and publish. Anyone who already asked to opt out stays out.
What's the difference between "Blast" and "Auto-enroll"? Blast takes whoever is on the list at the moment you publish. Auto-enroll does that and keeps taking: every new contact who joins that list afterward is added to the campaign automatically, as long as it's running or scheduled.
Why didn't the campaign send anything overnight? On purpose. Outside the time window the system postpones, it doesn't discard. At the first valid hour it picks back up.
When something goes wrong
| Symptom | What to check | What to do |
|---|---|---|
| The screen says "The WhatsApp Campaigns addon is not active on this tenant." | Is the module subscribed? | Go to the Settings tab and click Activate in catalog. |
| Walter's note says "Your campaigns' number isn't connected" | The number that sends the campaigns isn't connected (phone without internet, WhatsApp logged out of the device). | Connections tab → Refresh button on the number's card. If it stays disconnected, Delete and connect again via QR Code. |
| The Publish ▶ button gives "The selected channel is not connected." | The number's tag in the Connections tab. | Reconnect the number and publish again. |
| "Select an audience list." | You didn't choose the list in the Editor. | Choose it in the Audience box. If none shows up, create the list in the Lists tab first. |
| In the Editor, in place of the audience box you see "You don't have a contact list yet. Create the first one in this module's Lists tab and come back to pick it." | You haven't created any list yet. | Lists tab → New list → import the contacts. Go back to the Editor and the selection box appears. |
| "Step N: template "X" is not synced/approved." | The template was rejected or is still under review at Meta. | Connections tab → Sync templates. Choose a template with "approved" status. If there are none, create one and submit it for approval in Meta's WhatsApp Manager. |
| The campaign paused itself | Five sends in a row failed with no success. The most common cause is the message template having been rejected by Meta after publishing; the second is the sender's connection having dropped. | Check the template and the connection. Once resolved, click ▶ to resume. |
| I got an email saying the campaign paused for lack of credits | The sending balance and the top-up credit ran out. | Buy a pack in the Settings tab or top up credits. Nobody left the queue: sending picks up where it left off. |
| The Panel numbers are all zero | No message went out this month, or the campaign hasn't started yet (it's Scheduled). | Check the status in the Campaigns tab. If it's Scheduled, wait for the date; if it's Draft, publish it. |
| The message arrived as "Hi , how are you?" | The contact has no Name field filled in. | Open the list, check the Name column. On the next import, map the name column correctly. |
| "Empty or invalid CSV" when importing | The file isn't a real CSV, or it has no rows. | Open the spreadsheet and save it again as CSV. Check that the first row is the header. |
| I imported and most of it was "skipped" | The rows came with no name, no phone and no email — or with a phone of fewer than 8 digits. | Open the spreadsheet, check the phone column and re-import only the good rows. |
| I imported a big spreadsheet and got "Failed to import" | The limit is 5,000 rows per import. | Break the spreadsheet into smaller files and import one at a time. |
| "Only the workspace owner or admin can perform this action." | Publishing, pausing, importing contacts, deleting lists and connecting WhatsApp are actions for the account owner (owner) or an administrator (admin). | Ask the account owner to do it, or ask them to promote you to administrator. |
| "Only owner/admin can connect a WhatsApp." | Same case as above, on the Connections tab. | Ask the account owner. |
| A customer complained they keep receiving messages even though they asked to stop | Did they write exactly one of the words the system recognizes? (parar, sair, cancelar, stop, unsubscribe, cancele, cancelar todas) A sentence like "please stop messaging me" is not recognized. | Register the number by hand: there's no button today to add an opt-out from the screen — the way is to remove the person from the list in the Lists tab. |
| The list shows fewer contacts than I imported | The screen shows the list's 200 most recent contacts. | The total number is still right on the list's card, in the Lists tab. |
| "Failed to load campaigns." | A momentary connection drop. | Refresh the page (F5). If it persists, contact support. |
| "Campaign not found." | The campaign was deleted while the screen was open. | Refresh the page (F5). |